Lenovo H330 Power Supply
Related Manual Pages


Similar Questions

Several Days Ago My H330 Wouldn't Power On At All. Dead. No Sound, No Lights.
Several days ago my H330 wouldn't power on at all. Dead. No sound, no lights. Moved her to another s...
Several days ago my H330 wouldn't power on at all. Dead. No sound, no lights. Moved her to another s...
(Posted by lasoniret 7 years ago)

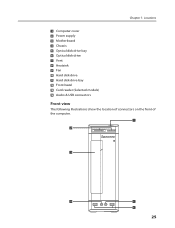
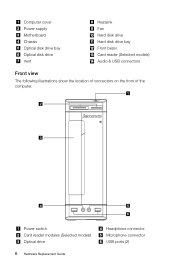
Power Supply Connections To Mother Board
I need to find out where one of the connections to the mother board from power supply go to. I can s...
I need to find out where one of the connections to the mother board from power supply go to. I can s...
(Posted by bobwilk12345 8 years ago)

Power Supply
want to update power supply , wanted to know what to get ?
want to update power supply , wanted to know what to get ?
(Posted by babyleverton 11 years ago)

What Are The Dimensions Of The Power Supply? Are There Upgrades Available?
I would like to upgrade the 280 watt power supply to 500 watt or more, but not sure of best size and...
I would like to upgrade the 280 watt power supply to 500 watt or more, but not sure of best size and...
(Posted by trp1951 11 years ago)
Related Terms
The following terms were also used when searching for Lenovo H330 Power Supply:- lenovo h330 dual monitor
- lenovo h330 memory upgrade
- lenovo h330 memory capacity
- lenovo h330 memory
- lenovo h330 manual
- lenovo h330 i3
- lenovo h330 hdmi
- lenovo h330 graphics card upgrade
- lenovo h330 graphics card
- lenovo h330 graphics
- lenovo h330 factory reset
- lenovo h330 motherboard
- lenovo h330 drivers for windows 7
- lenovo h330 drivers
- lenovo h330 dimensions
- lenovo h330 desktop specification
- lenovo h330 desktop review
- lenovo h330 desktop pc
- lenovo h330 desktop computer
- lenovo h330 desktop
- lenovo h330 cpu upgrade
- lenovo h330 bios update
- lenovo h330 review
- lenovo h330 wireless
- lenovo h330 wifi
- lenovo h330 video card upgrade
- lenovo h330 video card
- lenovo h330 upgrade
- lenovo h330 support
- lenovo h330 specs
- lenovo h330 specifications
- lenovo h330 spec
- lenovo h330 reviews
- lenovo h330 bios
- lenovo h330 rescue and recovery
- lenovo h330 recovery
- lenovo h330 ram upgrade
- lenovo h330 ram
- lenovo h330 price
- lenovo h330 power supply
- lenovo h330 new
- lenovo h330 network driver
- lenovo h330 motherboard specs
- lenovo h330 motherboard manual
- h330 factory reset
- h330 memory capacity
- h330 memory
- h330 manual
- h330 lenovo specs
- h330 lenovo singapore
- h330 lenovo review
- h330 lenovo
- h330 graphics card upgrade
- h330 graphics card
- h330 graphics
- h330 memory upgrade
- h330 dual monitor
- h330 drivers for windows 7
- h330 drivers
- h330 dimensions
- h330 desktop specification
- h330 desktop review
- h330 desktop pc
- h330 desktop computer
- h330 desktop
- h330 cpu upgrade
- h330 review lenovo
- lenovo h330 7780
- lenovo h330
- h330 wireless
- h330 video card upgrade
- h330 video card
- h330 upgrade
- h330 support
- h330 specs
- h330 specifications
- h330 reviews
- h330 bios update
- h330 review
- h330 rescue and recovery
- h330 recovery
- h330 ram upgrade
- h330 price
- h330 power supply
- h330 network driver
- h330 motherboard specs
- h330 motherboard manual
- h330 motherboard