Lenovo G450/G550 User Guide V2.0
Page 5
... 44 Appendix C. Lenovo regulatory notice .... 65 Lenovo regulatory notice 65 Appendix G. Using the computer network 21 Wired connection 21 Wireless connection 22 Chapter 4. Upgrading and replacing devices 30 Replacing the battery 30 Replacing the hard disk drive 31 Replacing memory 33 Removing the ... 40 Caring your hard disk 64 Appendix F. OneKey Rescue System..........23 OneKey Rescue System 23 Chapter 5. Lenovo G450-550 UG V2.0_en.book Page i Wednesday, September 2, 2009 9:29 AM Contents Important safety information ii Important safety information ii Chapter ...
... 44 Appendix C. Lenovo regulatory notice .... 65 Lenovo regulatory notice 65 Appendix G. Using the computer network 21 Wired connection 21 Wireless connection 22 Chapter 4. Upgrading and replacing devices 30 Replacing the battery 30 Replacing the hard disk drive 31 Replacing memory 33 Removing the ... 40 Caring your hard disk 64 Appendix F. OneKey Rescue System..........23 OneKey Rescue System 23 Chapter 5. Lenovo G450-550 UG V2.0_en.book Page i Wednesday, September 2, 2009 9:29 AM Contents Important safety information ii Important safety information ii Chapter ...
Lenovo G450/G550 User Guide V2.0
Page 32
Lenovo G450-550 UG V2.0_en.book Page 24 Wednesday, September 2, 2009 9:29 AM Chapter 5. See http://consumersupport.lenovo.com. Where are the main hardware features of this guide. How can I find the detailed specifications for my computer? What safety precautions should I contact the customer support center? I need to upgrade... a device or I need in your computer, including the warranty period and type of warranty service, see "Appendix C. For an explanation of the following: the hard disk drive, memory, or the keyboard. See "Appendix A. Lenovo limited warranty...
Lenovo G450-550 UG V2.0_en.book Page 24 Wednesday, September 2, 2009 9:29 AM Chapter 5. See http://consumersupport.lenovo.com. Where are the main hardware features of this guide. How can I find the detailed specifications for my computer? What safety precautions should I contact the customer support center? I need to upgrade... a device or I need in your computer, including the warranty period and type of warranty service, see "Appendix C. For an explanation of the following: the hard disk drive, memory, or the keyboard. See "Appendix A. Lenovo limited warranty...
Lenovo G450/G550 User Guide V2.0
Page 41
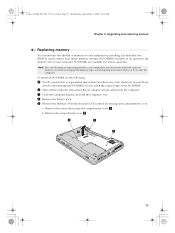
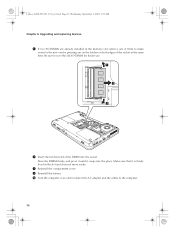
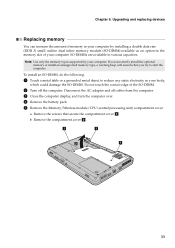
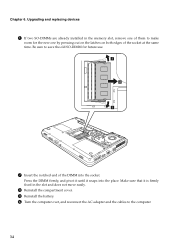
... computer. Note: Use only the memory types supported by installing a double data rate (DDR 3) small outline dual inline memory module (SO-DIMM)-available as an option-in various capacities. Do not touch the contact edge of your computer. a. Lenovo G450-550 UG V2.0_en.book Page 33... Wednesday, September 2, 2009 9:29 AM Chapter 6. Remove the compartment cover b. To install an SO-DIMM, do the following: 1 Touch a metal table or a grounded metal object to start the computer. Upgrading and replacing devices Replacing memory You can...
... computer. Note: Use only the memory types supported by installing a double data rate (DDR 3) small outline dual inline memory module (SO-DIMM)-available as an option-in various capacities. Do not touch the contact edge of your computer. a. Lenovo G450-550 UG V2.0_en.book Page 33... Wednesday, September 2, 2009 9:29 AM Chapter 6. Remove the compartment cover b. To install an SO-DIMM, do the following: 1 Touch a metal table or a grounded metal object to start the computer. Upgrading and replacing devices Replacing memory You can...
Lenovo G450/G550 User Guide V2.0
Page 42
Lenovo G450-550 UG V2.0_en.book Page 34 Wednesday, September 2, 2009 9:29 AM Chapter 6. a b a 7 Insert the notched end of the socket at the same time. Press the DIMM firmly, and pivot it until it is firmly fixed in the memory slot, remove one of them to make room for future use. Be sure... to the computer. 34 Make sure that it snaps into the socket. Upgrading and replacing devices 6 If two SO-DIMMs are already installed in the...
Lenovo G450-550 UG V2.0_en.book Page 34 Wednesday, September 2, 2009 9:29 AM Chapter 6. a b a 7 Insert the notched end of the socket at the same time. Press the DIMM firmly, and pivot it until it is firmly fixed in the memory slot, remove one of them to make room for future use. Be sure... to the computer. 34 Make sure that it snaps into the socket. Upgrading and replacing devices 6 If two SO-DIMMs are already installed in the...
Lenovo G450/G550 User Guide V2.0
Page 43
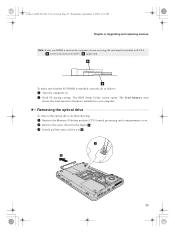
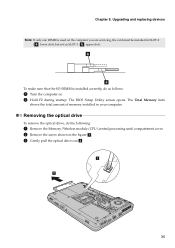
...used on . 2 Hold F2 during startup. a b 35 The BIOS Setup Utility screen opens. Upgrading and replacing devices Note: If only one DIMM is installed correctly, do the following: 1 Remove the Memory/Wireless module/CPU (central processing unit) compartment cover. 2 Remove the screw shown in the figure ...you are servicing, the card must be installed in SLOT-0 ( a : lower slot), but not in your computer. The Total Memory item shows the total amount of memory installed in SLOT-1 ( b : upper slot). Lenovo G450-550 UG V2.0_en.book Page 35 Wednesday, September 2, 2009 9:29 AM Chapter 6.
...used on . 2 Hold F2 during startup. a b 35 The BIOS Setup Utility screen opens. Upgrading and replacing devices Note: If only one DIMM is installed correctly, do the following: 1 Remove the Memory/Wireless module/CPU (central processing unit) compartment cover. 2 Remove the screw shown in the figure ...you are servicing, the card must be installed in SLOT-0 ( a : lower slot), but not in your computer. The Total Memory item shows the total amount of memory installed in SLOT-1 ( b : upper slot). Lenovo G450-550 UG V2.0_en.book Page 35 Wednesday, September 2, 2009 9:29 AM Chapter 6.
Lenovo G450/G550 User Guide V2.0
Page 44
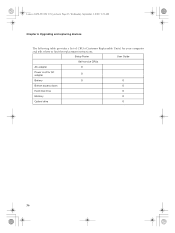
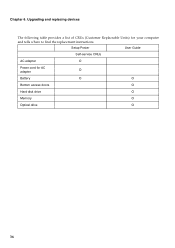
Upgrading and replacing devices The following table provides a list of CRUs (Customer Replaceable Units) for AC adapter O Battery O O Bottom access doors O Hard disk drive O Memory O Optical drive O 36 Setup Poster User Guide Self-service CRUs AC adapter O Power cord for your computer and tells where to find the replacement instructions. Lenovo G450-550 UG V2.0_en.book Page 36 Wednesday, September 2, 2009 9:29 AM Chapter 6.
Upgrading and replacing devices The following table provides a list of CRUs (Customer Replaceable Units) for AC adapter O Battery O O Bottom access doors O Hard disk drive O Memory O Optical drive O 36 Setup Poster User Guide Self-service CRUs AC adapter O Power cord for your computer and tells where to find the replacement instructions. Lenovo G450-550 UG V2.0_en.book Page 36 Wednesday, September 2, 2009 9:29 AM Chapter 6.
Lenovo G450/G550 User Guide V2.0
Page 50
... enables Lenovo to notify you about possible technical information and upgrades. • Only an authorized Lenovo repair technician should disassemble and repair your computer over while the AC adapter is disposed of the following devices, touch a metal table or a grounded metal object. Lenovo G450-550 UG...that were not created by you install any static electricity from a Flash Media Card, such as SD Card, Memory Stick, MultiMediaCard, xD-Picture Card, and Memory Stick Pro card. - otherwise, your computer software might have adequate protection in the form of files or directories ...
... enables Lenovo to notify you about possible technical information and upgrades. • Only an authorized Lenovo repair technician should disassemble and repair your computer over while the AC adapter is disposed of the following devices, touch a metal table or a grounded metal object. Lenovo G450-550 UG...that were not created by you install any static electricity from a Flash Media Card, such as SD Card, Memory Stick, MultiMediaCard, xD-Picture Card, and Memory Stick Pro card. - otherwise, your computer software might have adequate protection in the form of files or directories ...
Lenovo G450/G550 User Guide V2.0
Page 61
...and the integrated keyboard. 53 Customer replaceable units (CRUs) Customer Replaceable Units (CRUs) are concealed by an access panel that can be upgraded or replaced by the customer. There are responsible for removal by the customer. Examples of these types of external CRUs: • ... of CRUs include memory modules and hard disk drives. • Internal CRUs (located within the computer that are computer parts that is visible. Internal CRUs can be removed and installed by customers or by a Lenovo service technician during the warranty period. Lenovo G450-550 UG V2....
...and the integrated keyboard. 53 Customer replaceable units (CRUs) Customer Replaceable Units (CRUs) are concealed by an access panel that can be upgraded or replaced by the customer. There are responsible for removal by the customer. Examples of these types of external CRUs: • ... of CRUs include memory modules and hard disk drives. • Internal CRUs (located within the computer that are computer parts that is visible. Internal CRUs can be removed and installed by customers or by a Lenovo service technician during the warranty period. Lenovo G450-550 UG V2....
Lenovo G450/G550 User Guide V1.0
Page 5
... external devices 18 Chapter 3. Getting to know your computer 40 Accessibility and comfort 43 Maintenance 44 Appendix C. Lenovo regulatory notice .... 65 Lenovo regulatory notice 65 Appendix G. Notices 54 Notices 54 ENERGY STAR model information ......... 56 Wireless related information 57 ... Wireless connection 22 Chapter 4. Contents Important safety information ii Important safety information ii Chapter 1. Upgrading and replacing devices 30 Replacing the battery 30 Replacing the hard disk drive 31 Replacing memory 33 Removing the optical drive 35 Appendix A.
... external devices 18 Chapter 3. Getting to know your computer 40 Accessibility and comfort 43 Maintenance 44 Appendix C. Lenovo regulatory notice .... 65 Lenovo regulatory notice 65 Appendix G. Notices 54 Notices 54 ENERGY STAR model information ......... 56 Wireless related information 57 ... Wireless connection 22 Chapter 4. Contents Important safety information ii Important safety information ii Chapter 1. Upgrading and replacing devices 30 Replacing the battery 30 Replacing the hard disk drive 31 Replacing memory 33 Removing the optical drive 35 Appendix A.
Lenovo G450/G550 User Guide V1.0
Page 32
... need in the package with your computer, see Lenovo G450/G550 Setup Poster. More tips can I follow when... to replace one of the following: the hard disk drive, memory, or the keyboard. See "Appendix B. Use, and care information...Lenovo limited warranty" on page 23. See "Important safety information" on page 53 of this guide. How can I find detailed answers. More information can I install the device drivers? Where can be found in Chapter 1 and 2. Where are the main hardware features of each publication included in your computer is a requirement to upgrade...
... need in the package with your computer, see Lenovo G450/G550 Setup Poster. More tips can I follow when... to replace one of the following: the hard disk drive, memory, or the keyboard. See "Appendix B. Use, and care information...Lenovo limited warranty" on page 23. See "Important safety information" on page 53 of this guide. How can I find detailed answers. More information can I install the device drivers? Where can be found in Chapter 1 and 2. Where are the main hardware features of each publication included in your computer is a requirement to upgrade...
Lenovo G450/G550 User Guide V1.0
Page 41
.... Disconnect the AC adapter and all cables from the computer. 3 Close the computer display, and turn the computer over. 4 Remove the battery pack. 5 Remove the Memory/Wireless module/CPU (central processing unit) compartment cover. a. Chapter 6. SO-DIMMs are available in your computer by your computer. Do not touch the contact edge... your computer. To install an SO-DIMM, do the following: 1 Touch a metal table or a grounded metal object to start the computer. Remove the compartment cover b. Upgrading and replacing devices Replacing memory You can increase the amount of...
.... Disconnect the AC adapter and all cables from the computer. 3 Close the computer display, and turn the computer over. 4 Remove the battery pack. 5 Remove the Memory/Wireless module/CPU (central processing unit) compartment cover. a. Chapter 6. SO-DIMMs are available in your computer by your computer. Do not touch the contact edge... your computer. To install an SO-DIMM, do the following: 1 Touch a metal table or a grounded metal object to start the computer. Remove the compartment cover b. Upgrading and replacing devices Replacing memory You can increase the amount of...
Lenovo G450/G550 User Guide V1.0
Page 42
... the same time. Make sure that it snaps into the socket. Press the DIMM firmly, and pivot it until it is firmly fixed in the memory slot, remove one of them to save the old SO-DIMM for the new one by pressing out on the latches on both edges of... the DIMM into the place. Be sure to make room for future use. Upgrading and replacing devices 6 If two SO-DIMMs are already installed in the slot and does not move easily. 8 Reinstall the compartment cover. 9 Reinstall the battery...
... the same time. Make sure that it snaps into the socket. Press the DIMM firmly, and pivot it until it is firmly fixed in the memory slot, remove one of them to save the old SO-DIMM for the new one by pressing out on the latches on both edges of... the DIMM into the place. Be sure to make room for future use. Upgrading and replacing devices 6 If two SO-DIMMs are already installed in the slot and does not move easily. 8 Reinstall the compartment cover. 9 Reinstall the battery...
Lenovo G450/G550 User Guide V1.0
Page 43
... you are servicing, the card must be installed in SLOT-0 ( a : lower slot), but not in SLOT-1 ( b : upper slot). Chapter 6. Upgrading and replacing devices Note: If only one DIMM is installed correctly, do the following: 1 Remove the Memory/Wireless module/CPU (central processing unit) compartment cover. 2 Remove the screw shown in your computer.
... you are servicing, the card must be installed in SLOT-0 ( a : lower slot), but not in SLOT-1 ( b : upper slot). Chapter 6. Upgrading and replacing devices Note: If only one DIMM is installed correctly, do the following: 1 Remove the Memory/Wireless module/CPU (central processing unit) compartment cover. 2 Remove the screw shown in your computer.
Lenovo G450/G550 User Guide V1.0
Page 44
Upgrading and replacing devices The following table provides a list of CRUs (Customer Replaceable Units) for AC adapter O Battery O O Bottom access doors O Hard disk drive O Memory O Optical drive O 36 Setup Poster User Guide Self-service CRUs AC adapter O Power cord for your computer and tells where to find the replacement instructions. Chapter 6.
Upgrading and replacing devices The following table provides a list of CRUs (Customer Replaceable Units) for AC adapter O Battery O O Bottom access doors O Hard disk drive O Memory O Optical drive O 36 Setup Poster User Guide Self-service CRUs AC adapter O Power cord for your computer and tells where to find the replacement instructions. Chapter 6.
Lenovo G450/G550 User Guide V1.0
Page 50
...a device, or else verify that the device is your computer in sleep or hibernation mode before the data transfer is disposed of in . Memory module • When transferring data to or from your system board or hard disk drive. „ Other important tips • Do not... to computer viruses, hackers, spyware, and other malicious activities that were not created by you about possible technical information and upgrades. • Only an authorized Lenovo repair technician should disassemble and repair your computer. • Do not modify or tape the latches to keep this software ...
...a device, or else verify that the device is your computer in sleep or hibernation mode before the data transfer is disposed of in . Memory module • When transferring data to or from your system board or hard disk drive. „ Other important tips • Do not... to computer viruses, hackers, spyware, and other malicious activities that were not created by you about possible technical information and upgrades. • Only an authorized Lenovo repair technician should disassemble and repair your computer. • Do not modify or tape the latches to keep this software ...
Lenovo G450/G550 User Guide V1.0
Page 61
There are safe for replacing all external CRUs. Examples of these types of CRUs include memory modules and hard disk drives. • Internal CRUs (located within the computer that can be upgraded or replaced by either one or two screws. Once the access panel is removed, only the ... require some technical skills and in some cases might require tools such as a screwdriver. Appendix D. External CRUs are accessible only by a Lenovo service technician during the warranty period. Internal CRUs can be removed and installed by customers or by opening the computer's outer case.
There are safe for replacing all external CRUs. Examples of these types of CRUs include memory modules and hard disk drives. • Internal CRUs (located within the computer that can be upgraded or replaced by either one or two screws. Once the access panel is removed, only the ... require some technical skills and in some cases might require tools such as a screwdriver. Appendix D. External CRUs are accessible only by a Lenovo service technician during the warranty period. Internal CRUs can be removed and installed by customers or by opening the computer's outer case.


