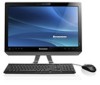
Lenovo C225\C320\C325 Hardware Maintenance Manual
Page 5
It is invalid for Lenovo C220/C225/C320/C325 computers listed on the cover. The description of the instructions. It is intended only for the machines which do not have the TV card. Lesen ... performing any of the TV card in this manual This manual contains service and reference information for those machines which have TV card. Before servicing a Lenovo product, be sure to read the Safety Information. Important Safety Information Be sure to read all caution and danger statements in dieser Dokumentation, bevor Sie...
It is invalid for Lenovo C220/C225/C320/C325 computers listed on the cover. The description of the instructions. It is intended only for the machines which do not have the TV card. Lesen ... performing any of the TV card in this manual This manual contains service and reference information for those machines which have TV card. Before servicing a Lenovo product, be sure to read the Safety Information. Important Safety Information Be sure to read all caution and danger statements in dieser Dokumentation, bevor Sie...
Lenovo C225\C320\C325 Hardware Maintenance Manual
Page 13
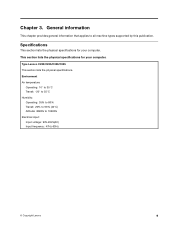
Specifications This section lists the physical specifications for your computer. This section lists the physical specifications for your computer. Type Lenovo C220/C225/C320/C325 This section lists the physical specifications. Environment Air temperature: Operating: 10° to 35°C Transit: -20° to 55°C Humidity: Operating: 35% to ... publication. General information This chapter provides general information that applies to 106KPa Electrical input: Input voltage: 90V-264V(AC) Input frequency: 47Hz-63Hz © Copyright Lenovo 9 Chapter 3.
Specifications This section lists the physical specifications for your computer. This section lists the physical specifications for your computer. Type Lenovo C220/C225/C320/C325 This section lists the physical specifications. Environment Air temperature: Operating: 10° to 35°C Transit: -20° to 55°C Humidity: Operating: 35% to ... publication. General information This chapter provides general information that applies to 106KPa Electrical input: Input voltage: 90V-264V(AC) Input frequency: 47Hz-63Hz © Copyright Lenovo 9 Chapter 3.

Lenovo C225\C320\C325 Hardware Maintenance Manual
Page 28
HDD Power 8. DC Jack 9. Microphone connector 15. ODD Power 4. Converter 3. ODD SATA 5. Power Board 11. USB connector 17. Camera 24 Lenovo C2/C3 Hardware Maintenance Manual I/O Board 12. Headphone connector 16. The following illustration shows the locations of parts on the motherboard for models C225 and C325. 1 18 2 3 4 5 6 7 1. LVDS 6. Speaker 13. Function Board 17 16 15 14 13 8 9 10 11 12 10. Card reader connector 18. USB connector 14. HDD SATA 7. System fan 2.
HDD Power 8. DC Jack 9. Microphone connector 15. ODD Power 4. Converter 3. ODD SATA 5. Power Board 11. USB connector 17. Camera 24 Lenovo C2/C3 Hardware Maintenance Manual I/O Board 12. Headphone connector 16. The following illustration shows the locations of parts on the motherboard for models C225 and C325. 1 18 2 3 4 5 6 7 1. LVDS 6. Speaker 13. Function Board 17 16 15 14 13 8 9 10 11 12 10. Card reader connector 18. USB connector 14. HDD SATA 7. System fan 2.
Lenovo C225\C320\C325 Hardware Maintenance Manual
Page 42
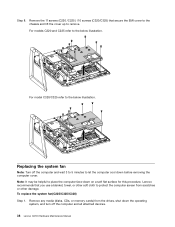
... 11screws (C220 /C225 ) /10 screws (C320/C325) that you use a blanket, towel, or other soft cloth to remove. Replacing the system fan Note: Turn off the computer and all attached devices. 38 Lenovo C2/C3 Hardware Maintenance Manual Step 8. Lenovo recommends that secure the EMI cover to the chassis ...and lift the cover up to protect the computer screen from the drives, shut down on a soft flat surface for this procedure. For model C320/C325 refer to the below...
... 11screws (C220 /C225 ) /10 screws (C320/C325) that you use a blanket, towel, or other soft cloth to remove. Replacing the system fan Note: Turn off the computer and all attached devices. 38 Lenovo C2/C3 Hardware Maintenance Manual Step 8. Lenovo recommends that secure the EMI cover to the chassis ...and lift the cover up to protect the computer screen from the drives, shut down on a soft flat surface for this procedure. For model C320/C325 refer to the below...
Lenovo C225\C320\C325 Hardware Maintenance Manual
Page 46
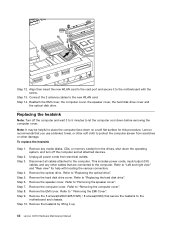
... down on a soft flat surface for help with the screw. Refer to the computer. Remove the speaker cover. Step 7. Step 14. Lenovo recommends that secure the heatsink to "Replacing the hard disk drive". Remove any other cables that are connected to "Replacing the optical drive". ...the computer cover". Disconnect all power cords from electrical outlets. Step 5. Remove the hard disk drive cover. Step 10. Remove the 5 screws(C220/C225/C325) / 8 screws(C320) that you use a blanket, towel, or other damage. Unplug all cables attached to "Left and right view" and "Rear...
... down on a soft flat surface for help with the screw. Refer to the computer. Remove the speaker cover. Step 7. Step 14. Lenovo recommends that secure the heatsink to "Replacing the hard disk drive". Remove any other cables that are connected to "Replacing the optical drive". ...the computer cover". Disconnect all power cords from electrical outlets. Step 5. Remove the hard disk drive cover. Step 10. Remove the 5 screws(C220/C225/C325) / 8 screws(C320) that you use a blanket, towel, or other damage. Unplug all cables attached to "Left and right view" and "Rear...
Lenovo C225\C320\C325 Hardware Maintenance Manual
Page 52
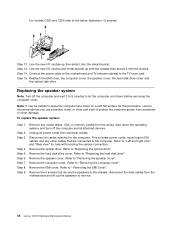
...the optical disk drive. Step 2. Step 4. Step 9. Refer to "Removing the computer cover". Refer to the computer. For models C320 and C325 refer to the computer. Step 5. Step 6. Step 8. Remove the computer cover. To replace the speaker system: Step 1. Replacing the speaker ...system Note: Turn off the computer and wait 3 to 5 minutes to remove. 48 Lenovo C2/C3 Hardware Maintenance Manual Step 3. Disconnect all attached devices. This includes power cords, input/output (I /O module and metal bracket up...
...the optical disk drive. Step 2. Step 4. Step 9. Refer to "Removing the computer cover". Refer to the computer. For models C320 and C325 refer to the computer. Step 5. Step 6. Step 8. Remove the computer cover. To replace the speaker system: Step 1. Replacing the speaker ...system Note: Turn off the computer and wait 3 to 5 minutes to remove. 48 Lenovo C2/C3 Hardware Maintenance Manual Step 3. Disconnect all attached devices. This includes power cords, input/output (I /O module and metal bracket up...

Lenovo C225\C320\C325 Hardware Maintenance Manual
Page 54
For models C220 refer to the below illustration. (7 screws) For models C225 and C325 refer to the below illustration. (9 screws) Step 17. Step 19. Attach all related components to the below illustration. (7 screws) For models C320 refer to the new motherboard. 50 Lenovo C2/C3 Hardware Maintenance Manual Secure the new motherboard to the chassis using the screws. Place the new motherboard into the chassis, aligning the screw holes in the motherboard with the mounting holes in the chassis. Step 18.
For models C220 refer to the below illustration. (7 screws) For models C225 and C325 refer to the below illustration. (9 screws) Step 17. Step 19. Attach all related components to the below illustration. (7 screws) For models C320 refer to the new motherboard. 50 Lenovo C2/C3 Hardware Maintenance Manual Secure the new motherboard to the chassis using the screws. Place the new motherboard into the chassis, aligning the screw holes in the motherboard with the mounting holes in the chassis. Step 18.


