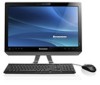
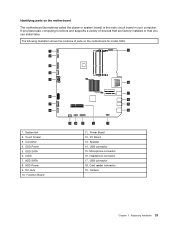
C325 All In One Support - Lenovo
C325 All In One Support
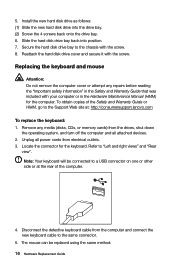
Related Manual Pages


Similar Questions

Does My Lenovo H420 77525hu Support This Graphic Card ?Gainward Geforce Gtx 56
Does my Lenovo h420 77525HU support this graphic card ?Gainward GeForce GTX 560 or can someone recom...
Does my Lenovo h420 77525HU support this graphic card ?Gainward GeForce GTX 560 or can someone recom...
(Posted by justiins 10 years ago)


Does My Lenovo H420 77523hu Support A 2.0x16 Or A 3.0x16 Pci Express?
I would like to purchase a new graphics card for my desktop (Lenovo H420 77523HU) and need to know w...
I would like to purchase a new graphics card for my desktop (Lenovo H420 77523HU) and need to know w...
(Posted by insanestrawberry 11 years ago)
Related Terms
The following terms were also used when searching for C325 All In One Support - Lenovo:- c325 all in one desktop
- c325 all in one desktop pc
- c325 all in one pc
- c325 all in one review
- c325 all in one support
- c325 all-in-one desktop
- c325 all-in-one desktop pc
- c325 all-in-one desktop review
- c325 all-in-one drivers
- c325 best buy
- c325 best price
- c325 bios key
- c325 computer
- c325 computer + purchase
- c325 desktop
- c325 desktop computer
- c325 dimensions
- c325 disassembly
- c325 download
- c325 driver
- c325 drivers
- c325 drivers windows 7
- c325 factory reset
- c325 factory restore
- c325 how to upgrade rams
- c325 lenovo
- c325 lenovo review
- c325 lvt program
- c325 manual
- c325 memory
- c325 memory upgrade
- c325 motherboard
- c325 parts
- c325 pci device
- c325 power adapter
- c325 power adapter lenovo
- c325 price
- c325 price in india
- c325 prices
- c325 processor upgrade
- c325 ram upgrade
- c325 rating
- c325 recovery
- c325 recovery disk
- c325 review
- c325 review cnet
- c325 reviews
- c325 specification
- c325 specifications
- c325 specs
- c325 support
- c325 touch driver
- c325 touch screen
- c325 touch screen setup
- c325 touchscreen
- c325 touchscreen driver
- c325 wall mount
- c325 windows 8
- c325/3 review
- lenovo c325
- lenovo c325 20
- lenovo c325 aio
- lenovo c325 all in one desktop
- lenovo c325 all in one desktop pc
- lenovo c325 all in one pc
- lenovo c325 all in one review
- lenovo c325 all in one support
- lenovo c325 all-in-one desktop pc
- lenovo c325 all-in-one desktop review
- lenovo c325 all-in-one drivers
- lenovo c325 best buy
- lenovo c325 best price
- lenovo c325 bios
- lenovo c325 bios key
- lenovo c325 computer
- lenovo c325 computer + purchase
- lenovo c325 desktop
- lenovo c325 desktop computer
- lenovo c325 dimensions
- lenovo c325 disassembly
- lenovo c325 download
- lenovo c325 driver
- lenovo c325 drivers
- lenovo c325 drivers windows 7
- lenovo c325 factory reset
- lenovo c325 factory restore
- lenovo c325 hmm
- lenovo c325 how to upgrade rams
- lenovo c325 lvt program
- lenovo c325 manual
- lenovo c325 memory
- lenovo c325 memory upgrade
- lenovo c325 motherboard
- lenovo c325 parts
- lenovo c325 pc
- lenovo c325 pci device
- lenovo c325 power adapter
- lenovo c325 price
- lenovo c325 price in india
- lenovo c325 prices
- lenovo c325 processor upgrade
- lenovo c325 ram
- lenovo c325 ram upgrade
- lenovo c325 rating
- lenovo c325 recovery
- lenovo c325 recovery disk
- lenovo c325 review
- lenovo c325 review cnet
- lenovo c325 reviews
- lenovo c325 specification
- lenovo c325 specifications
- lenovo c325 specs
- lenovo c325 support
- lenovo c325 touch driver
- lenovo c325 touch screen
- lenovo c325 touch screen setup
- lenovo c325 touchscreen
- lenovo c325 touchscreen driver
- lenovo c325 wall mount
- lenovo c325 windows 8
- lenovo c325-31
- lenovo c325/3 review
- lenovo essential c325 all in one desktop
- lenovo essential c325 all-in-one desktop