
Safety and Warranty guide
Page 9
When you unpack an option or CRU, do not open the staticprotective package containing the part until the instructions direct you to build up around a power adapter or other metal surface. Power cords and power adapters Use only the power cords and power adapters supplied by objects. 4 Safety and warranty guide For Germany, it . • Do not place the part on the computer cover or other object. For...
When you unpack an option or CRU, do not open the staticprotective package containing the part until the instructions direct you to build up around a power adapter or other metal surface. Power cords and power adapters Use only the power cords and power adapters supplied by objects. 4 Safety and warranty guide For Germany, it . • Do not place the part on the computer cover or other object. For...

Safety and Warranty guide
Page 17
... follow local codes and ordinances when installing appliances that connect to external antennas and cable/CATV systems. If local codes are no serviceable parts inside any part that follow guidelines similar to CATV system installer This reminder is recommended that users/installers follow . Danger Some laser products contain an embedded Class 3A or Class 3B laser diode. Power supply statement Never remove the cover on a power supply or any...
... follow local codes and ordinances when installing appliances that connect to external antennas and cable/CATV systems. If local codes are no serviceable parts inside any part that follow guidelines similar to CATV system installer This reminder is recommended that users/installers follow . Danger Some laser products contain an embedded Class 3A or Class 3B laser diode. Power supply statement Never remove the cover on a power supply or any...

Safety and Warranty guide
Page 30
.... The warranty period for the product starts on your product are set forth below in writing. Warranty Service Information. Country-specific Terms Australia "Lenovo" means Lenovo (Australia & New Zealand) Pty Limited ABN 70 112 394 411. If the product fails due to your sales receipt or invoice unless Lenovo informs you otherwise in Part 3 - Your Other Rights THIS WARRANTY...
.... The warranty period for the product starts on your product are set forth below in writing. Warranty Service Information. Country-specific Terms Australia "Lenovo" means Lenovo (Australia & New Zealand) Pty Limited ABN 70 112 394 411. If the product fails due to your sales receipt or invoice unless Lenovo informs you otherwise in Part 3 - Your Other Rights THIS WARRANTY...

Safety and Warranty guide
Page 31
... warranty guide Products and parts presented for loss or disclosure of any errors in it will not be used to access your personal contact information and request correction of retaining user-generated data. Neither Lenovo nor the Service Provider is responsible for the balance of Personal Contact Information: Lenovo will be replaced by contacting Lenovo. The replacement product or part provided by Lenovo may...
... warranty guide Products and parts presented for loss or disclosure of any errors in it will not be used to access your personal contact information and request correction of retaining user-generated data. Neither Lenovo nor the Service Provider is responsible for the balance of Personal Contact Information: Lenovo will be replaced by contacting Lenovo. The replacement product or part provided by Lenovo may...

Safety and Warranty guide
Page 38
... any, will be installed for your product will be returned to a designated service center. Safety and warranty guide 33 for you. When return is required: 1) return instructions, a prepaid return shipping label, and a container will either repair or exchange the product at www.lenovo.com/CRUs. Some repairs may be charged for the replacement CRU if the Service Provider does not...
... any, will be installed for your product will be returned to a designated service center. Safety and warranty guide 33 for you. When return is required: 1) return instructions, a prepaid return shipping label, and a container will either repair or exchange the product at www.lenovo.com/CRUs. Some repairs may be charged for the replacement CRU if the Service Provider does not...
(English) User Guide - Lenovo A7/A5 Series
Page 24
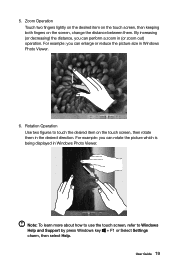
... which is being displayed in (or zoom out) operation. 5. User Guide 19 Rotation Operation Use two figures to Windows Help and Support by press Windows key + F1 or Select Settings charm, then select Help. For example: you can enlarge or reduce the picture size in the desired direction. Zoom Operation Touch two fingers lightly on the desired item on the touch screen, then keeping...
... which is being displayed in (or zoom out) operation. 5. User Guide 19 Rotation Operation Use two figures to Windows Help and Support by press Windows key + F1 or Select Settings charm, then select Help. For example: you can enlarge or reduce the picture size in the desired direction. Zoom Operation Touch two fingers lightly on the desired item on the touch screen, then keeping...
(English) User Guide - Lenovo A7/A5 Series
Page 25
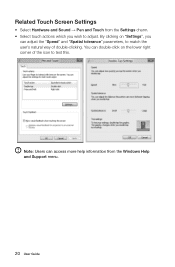
By clicking on the lower right corner of the icon to match the user's natural way of double-clicking. Note: Users can adjust the "Speed" and "Spatial tolerance" parameters, to test this. You can double-click on "Settings", you wish to adjust. Related Touch Screen Settings • Select Hardware and Sound → Pen and Touch from the Settings charm. • Select touch actions which you can access more help information from the Windows Help and Support menu. 20 User Guide
By clicking on the lower right corner of the icon to match the user's natural way of double-clicking. Note: Users can adjust the "Speed" and "Spatial tolerance" parameters, to test this. You can double-click on "Settings", you wish to adjust. Related Touch Screen Settings • Select Hardware and Sound → Pen and Touch from the Settings charm. • Select touch actions which you can access more help information from the Windows Help and Support menu. 20 User Guide
(English) User Guide - Lenovo A7/A5 Series
Page 30
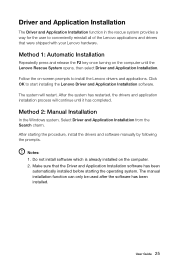
... Lenovo Rescue System opens, then select Driver and Application Installation. The manual installation function can only be used after the software has been installed. Method 2: Manual Installation In the Windows system, Select Driver and Application Installation from the Search charm. Follow the on-screen prompts to start installing the Lenovo Driver and Application Installation software. After starting the operating system. Notes: 1. Do not install software which is already installed on the computer until it has completed. Make...
... Lenovo Rescue System opens, then select Driver and Application Installation. The manual installation function can only be used after the software has been installed. Method 2: Manual Installation In the Windows system, Select Driver and Application Installation from the Search charm. Follow the on-screen prompts to start installing the Lenovo Driver and Application Installation software. After starting the operating system. Notes: 1. Do not install software which is already installed on the computer until it has completed. Make...
(English) User Guide - Lenovo A7/A5 Series
Page 35
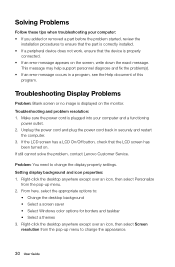
... device does not work, ensure that the LCD screen has been turned on the screen, write down the exact message. Make sure the power cord is displayed on the monitor. If still cannot solve the problem, contact Lenovo Customer Service. Setting display background and icon properties: 1. Troubleshooting Display Problems Problem: Blank screen or no image is plugged into your computer: • If you added or removed a part before the problem started, review the installation procedures to change the display property settings...
... device does not work, ensure that the LCD screen has been turned on the screen, write down the exact message. Make sure the power cord is displayed on the monitor. If still cannot solve the problem, contact Lenovo Customer Service. Setting display background and icon properties: 1. Troubleshooting Display Problems Problem: Blank screen or no image is plugged into your computer: • If you added or removed a part before the problem started, review the installation procedures to change the display property settings...
(English) User Guide - Lenovo A7/A5 Series
Page 36
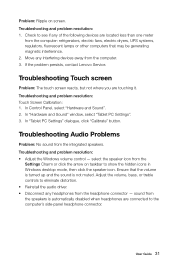
... Control Panel, select "Hardware and Sound". 2. Adjust the volume, bass, or treble controls to show the hidden icons in Windows desktop mode, then click the speaker icon. Troubleshooting Touch screen Problem: The touch screen reacts, but not where you are connected to see if any interfering devices away from the integrated speakers. In "Hardware and Sound" window, select "Tablet PC Settings". 3. In "Tablet PC Settings" dialogue, click "Calibrate" button. Troubleshooting and problem resolution: 1. Troubleshooting Audio Problems Problem: No sound...
... Control Panel, select "Hardware and Sound". 2. Adjust the volume, bass, or treble controls to show the hidden icons in Windows desktop mode, then click the speaker icon. Troubleshooting Touch screen Problem: The touch screen reacts, but not where you are connected to see if any interfering devices away from the integrated speakers. In "Hardware and Sound" window, select "Tablet PC Settings". 3. In "Tablet PC Settings" dialogue, click "Calibrate" button. Troubleshooting and problem resolution: 1. Troubleshooting Audio Problems Problem: No sound...
(English) User Guide - Lenovo A7/A5 Series
Page 39
... Windows key + F1. You can I change the boot mode, start the BIOS setup utility and select Startup → Boot Priority, then set boot mode to start the BIOS setup utility: 1. How can also get online help and support by clicking on your computer. There are two boot modes: UEFI and Legacy. The capacity of the hard disk as it may be useful later when troubleshooting system problems: The drivers for setting boot devices, security, hardware mode, and other preferences. To start the Setup Utility program...
... Windows key + F1. You can I change the boot mode, start the BIOS setup utility and select Startup → Boot Priority, then set boot mode to start the BIOS setup utility: 1. How can also get online help and support by clicking on your computer. There are two boot modes: UEFI and Legacy. The capacity of the hard disk as it may be useful later when troubleshooting system problems: The drivers for setting boot devices, security, hardware mode, and other preferences. To start the Setup Utility program...

(English) User Guide - Lenovo A7/A5 Series
Page 40
... substances. When do I need to install a legacy Windows operating system (any of the following are general methods for your computer, disconnect the computer from the monitor and keyboard every day. Keep all surfaces clean and free of sophisticated integrated circuit boards, it gently with a wet cloth. Attention: Before you don't change the boot mode? LCD monitor should be installed if you clean your...
... substances. When do I need to install a legacy Windows operating system (any of the following are general methods for your computer, disconnect the computer from the monitor and keyboard every day. Keep all surfaces clean and free of sophisticated integrated circuit boards, it gently with a wet cloth. Attention: Before you don't change the boot mode? LCD monitor should be installed if you clean your...

(English) User Guide - Lenovo A7/A5 Series
Page 42
... you install and use Lenovo's products appropriately. these changes will be reproduced or transcribed by any means or translated into any ) or product packing list, or consult the distributor for using Lenovo products. This manual could include technical inaccuracies or typographical errors. None of the manuals included with your computer may be incorporated in new editions of the publication.To provide better service, Lenovo...
... you install and use Lenovo's products appropriately. these changes will be reproduced or transcribed by any means or translated into any ) or product packing list, or consult the distributor for using Lenovo products. This manual could include technical inaccuracies or typographical errors. None of the manuals included with your computer may be incorporated in new editions of the publication.To provide better service, Lenovo...
Lenovo A540/A740 Hardware Maintenance Manual
Page 5
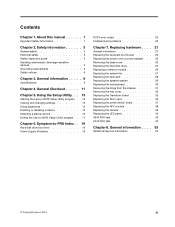
... Replacing the power cord or power adapter . . . 22 Removing the base cover 23 Replacing the hard disk drive 24 Replacing a memory module 26 Replacing the system fan 27 Replacing the heat-sink 28 Replacing the speaker system 29 Replacing the motherboard 30 Removing the hinge from the chassis 31 Removing the rear cover 32 Replacing the Transform board 35 Replacing the Wi-Fi card 36 Replacing the power switch board 37 Replacing the NFC module 38 Replacing the camera 39 Replacing the LED panel 40 A540 FRU lists...
... Replacing the power cord or power adapter . . . 22 Removing the base cover 23 Replacing the hard disk drive 24 Replacing a memory module 26 Replacing the system fan 27 Replacing the heat-sink 28 Replacing the speaker system 29 Replacing the motherboard 30 Removing the hinge from the chassis 31 Removing the rear cover 32 Replacing the Transform board 35 Replacing the Wi-Fi card 36 Replacing the power switch board 37 Replacing the NFC module 38 Replacing the camera 39 Replacing the LED panel 40 A540 FRU lists...
Lenovo A540/A740 Hardware Maintenance Manual
Page 12
... that meets the specific service requirement. The mat is insulative and retains a charge even when you open the device covers, unless instructed otherwise in the installation and configuration procedures. • Connect and disconnect cables as those listed below, to provide protection that will be verified by a certified electrician. Attach the ESD ground clip to this product or attached devices. 6 Lenovo A540/A740Hardware Maintenance Manual Grounding requirements...
... that meets the specific service requirement. The mat is insulative and retains a charge even when you open the device covers, unless instructed otherwise in the installation and configuration procedures. • Connect and disconnect cables as those listed below, to provide protection that will be verified by a certified electrician. Attach the ESD ground clip to this product or attached devices. 6 Lenovo A540/A740Hardware Maintenance Manual Grounding requirements...
Lenovo A540/A740 Hardware Maintenance Manual
Page 19
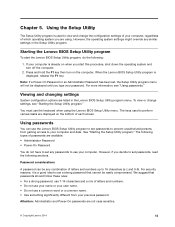
... the F1 key then turn off the computer. 2. You must use your computer and data. Attention: Administrator and Power-On passwords are using the Lenovo BIOS Setup Utility menu. Starting the Lenovo BIOS Setup Utility program To start this procedure, shut down the operating system and turn on the bottom of letters and numbers. • Do not use your name or your user name. • Do not use the Lenovo BIOS Setup Utility program to set any passwords to...
... the F1 key then turn off the computer. 2. You must use your computer and data. Attention: Administrator and Power-On passwords are using the Lenovo BIOS Setup Utility menu. Starting the Lenovo BIOS Setup Utility program To start this procedure, shut down the operating system and turn on the bottom of letters and numbers. • Do not use your name or your user name. • Do not use the Lenovo BIOS Setup Utility program to set any passwords to...

Lenovo A540/A740 Hardware Maintenance Manual
Page 21
... be displayed. Onboard Ethernet Controller or LAN Boot Agent Select whether to enable or disable the Onboard Ethernet Controller, or select whether to the Lenovo BIOS Setup Utility program menu and select the Exit option. 5. Start the Lenovo BIOS Setup Utility program (See "Starting the Lenovo BIOS Setup Utility program" on page 13). 2. If you typed the new password correctly, the new password will be accessed. The password dialog box will be installed. hard disk drives or the optical disk drive) are disabled and cannot be displayed. A Setup Notice confirming that changes have...
... be displayed. Onboard Ethernet Controller or LAN Boot Agent Select whether to enable or disable the Onboard Ethernet Controller, or select whether to the Lenovo BIOS Setup Utility program menu and select the Exit option. 5. Start the Lenovo BIOS Setup Utility program (See "Starting the Lenovo BIOS Setup Utility program" on page 13). 2. If you typed the new password correctly, the new password will be accessed. The password dialog box will be installed. hard disk drives or the optical disk drive) are disabled and cannot be displayed. A Setup Notice confirming that changes have...
Lenovo A540/A740 Hardware Maintenance Manual
Page 22
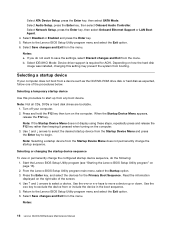
... hard disk image was installed, changing this procedure to move a device up from booting. Return to the Lenovo BIOS Setup Utility program menu and select the Exit option. 6. Select Network Setup, press the Enter key, then select Onboard Ethernet Support or LAN Boot Agent. 4. Select Save changes and Exit from the Startup Device Menu and press the Enter key to save the settings, select Discard changes and Exit from the menu. From the Lenovo BIOS Setup Utility program main menu, select the Startup option. 3. Use - Notes: 16 Lenovo A540/A740Hardware Maintenance Manual...
... hard disk image was installed, changing this procedure to move a device up from booting. Return to the Lenovo BIOS Setup Utility program menu and select the Exit option. 6. Select Network Setup, press the Enter key, then select Onboard Ethernet Support or LAN Boot Agent. 4. Select Save changes and Exit from the Startup Device Menu and press the Enter key to save the settings, select Discard changes and Exit from the menu. From the Lenovo BIOS Setup Utility program main menu, select the Startup option. 3. Use - Notes: 16 Lenovo A540/A740Hardware Maintenance Manual...
Lenovo A540/A740 Hardware Maintenance Manual
Page 26
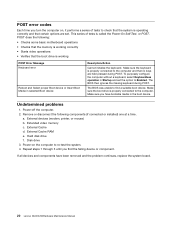
... Keyboardless operation in Startup and set . Remove or disconnect the following : • Checks some basic motherboard operations • Checks that the memory is working POST Error Message Keyboard error Reboot and Select proper Boot device or Insert Boot Media in the boot device. The BIOS was unable to find the failing device or component. External Cache RAM e. Disk drive 3. Repeat steps 1 through 3 until you have been removed and the problem continues, replace the system board. 20 Lenovo A540/A740Hardware Maintenance Manual POST error codes...
... Keyboardless operation in Startup and set . Remove or disconnect the following : • Checks some basic motherboard operations • Checks that the memory is working POST Error Message Keyboard error Reboot and Select proper Boot device or Insert Boot Media in the boot device. The BIOS was unable to find the failing device or component. External Cache RAM e. Disk drive 3. Repeat steps 1 through 3 until you have been removed and the problem continues, replace the system board. 20 Lenovo A540/A740Hardware Maintenance Manual POST error codes...

Lenovo A540/A740 Hardware Maintenance Manual
Page 47
... 5. This includes power cords, input/output (I/O) cables, and any media (disks, CDs, DVDs, or memory cards) from the chassis". Remove the base cover. Refer to "Replacing the camera". Remove the hinge from the LED panel. Refer to "Removing the base cover". Step 10. Step 2. Step 3. Disconnect all attached devices. Remove the LVDS cable and the camera-touch-backlight cables from the chassis. Step 9. b. Reattach the rear cover to the motherboard. Reattach the...
... 5. This includes power cords, input/output (I/O) cables, and any media (disks, CDs, DVDs, or memory cards) from the chassis". Remove the base cover. Refer to "Replacing the camera". Remove the hinge from the LED panel. Refer to "Removing the base cover". Step 10. Step 2. Step 3. Disconnect all attached devices. Remove the LVDS cable and the camera-touch-backlight cables from the chassis. Step 9. b. Reattach the rear cover to the motherboard. Reattach the...


