
Lenovo H4 Series User Guide V1.0
Page 4
... 14 2.2 Driver and Application Installation 14 2.3 System Setup 15 2.4 System Backup 16 2.5 System Recovery 16 2.6 Create Recovery Disc 16 Chapter 3 Using the Computer Software 17 3.1 Lenovo Dynamic Brightness system 18 3.2 Lenovo Eye Distance System 19 Chapter 4 Troubleshooting and Confirming Setup 21 4.1 Troubleshooting Display Problems 22 4.2 Troubleshooting Audio Problems 23 4.3 Troubleshooting Software Problems 23...
... 14 2.2 Driver and Application Installation 14 2.3 System Setup 15 2.4 System Backup 16 2.5 System Recovery 16 2.6 Create Recovery Disc 16 Chapter 3 Using the Computer Software 17 3.1 Lenovo Dynamic Brightness system 18 3.2 Lenovo Eye Distance System 19 Chapter 4 Troubleshooting and Confirming Setup 21 4.1 Troubleshooting Display Problems 22 4.2 Troubleshooting Audio Problems 23 4.3 Troubleshooting Software Problems 23...
Lenovo H4 Series User Guide V1.0
Page 6
User Guide 1 Chapter Using the Computer Hardware This chapter contains the following topics: Computer hardware introduction Information on computer connections Note: The descriptions in this chapter might vary from your computer, depending on computer models and configurations.
User Guide 1 Chapter Using the Computer Hardware This chapter contains the following topics: Computer hardware introduction Information on computer connections Note: The descriptions in this chapter might vary from your computer, depending on computer models and configurations.
Lenovo H4 Series User Guide V1.0
Page 7
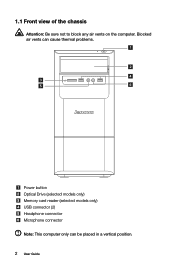
1.1 Front view of the chassis Attention: Be sure not to block any air vents on the computer. Blocked air vents can cause thermal problems. Power button Optical Drive (selected models only) Memory card reader (selected models only) USB connector (2) Headphone connector Microphone connector Note: This computer only can be placed in a vertical position. 2 User Guide
1.1 Front view of the chassis Attention: Be sure not to block any air vents on the computer. Blocked air vents can cause thermal problems. Power button Optical Drive (selected models only) Memory card reader (selected models only) USB connector (2) Headphone connector Microphone connector Note: This computer only can be placed in a vertical position. 2 User Guide
Lenovo H4 Series User Guide V1.0
Page 8
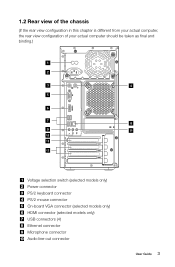
1.2 Rear view of the chassis (If the rear view configuration in this chapter is different from your actual computer, the rear view configuration of your actual computer should be taken as final and binding.) Voltage selection switch (selected models only) Power connector PS/2 keyboard connector PS/2 mouse connector On-board VGA connector (selected models only) HDMI connector (selected models only) USB connectors (4) Ethernet connector Microphone connector Audio line-out connector User Guide 3
1.2 Rear view of the chassis (If the rear view configuration in this chapter is different from your actual computer, the rear view configuration of your actual computer should be taken as final and binding.) Voltage selection switch (selected models only) Power connector PS/2 keyboard connector PS/2 mouse connector On-board VGA connector (selected models only) HDMI connector (selected models only) USB connectors (4) Ethernet connector Microphone connector Audio line-out connector User Guide 3

Lenovo H4 Series User Guide V1.0
Page 10
...coded connectors, match the color of the cable end with WIFI card or TV tuner card.) 1.3 Connecting your computer Use the following information when connecting your computer. User Guide 5 115 230 These computers automatically control the voltage. • If the voltage supply range is 100-127 V ac, set the ...115 V. • If the voltage supply range is 200-240 V ac, set the switch to slide the switch if necessary. Note: Some computers do not have all of the connectors that are described in connector PCI Express x16 graphics adapter connector (Some models are equipped with graphic card...
...coded connectors, match the color of the cable end with WIFI card or TV tuner card.) 1.3 Connecting your computer Use the following information when connecting your computer. User Guide 5 115 230 These computers automatically control the voltage. • If the voltage supply range is 100-127 V ac, set the ...115 V. • If the voltage supply range is 200-240 V ac, set the switch to slide the switch if necessary. Note: Some computers do not have all of the connectors that are described in connector PCI Express x16 graphics adapter connector (Some models are equipped with graphic card...
Lenovo H4 Series User Guide V1.0
Page 11
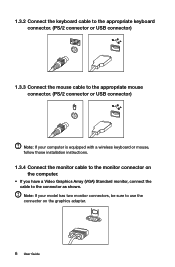
... mouse connector. (PS/2 connector or USB connector) Note: If your model has two monitor connectors, be sure to the connector as shown. Note: If your computer is equipped with a wireless keyboard or mouse, follow those installation instructions. 1.3.4 Connect the monitor cable to the monitor connector on the...
... mouse connector. (PS/2 connector or USB connector) Note: If your model has two monitor connectors, be sure to the connector as shown. Note: If your computer is equipped with a wireless keyboard or mouse, follow those installation instructions. 1.3.4 Connect the monitor cable to the monitor connector on the...
Lenovo H4 Series User Guide V1.0
Page 12
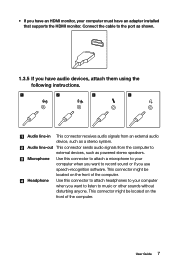
...Guide 7 Audio line-in This connector receives audio signals from the computer to record sound or if you have an adapter installed that supports the HDMI monitor. Microphone Use this connector to attach headphones to your computer when you want to external devices, such as powered stereo speakers...audio devices, attach them using the following instructions. This connector might be located on the front of the computer. Headphone Use this connector to attach a microphone to your computer when you want to listen to the port as a stereo system. Connect the cable to music or ...
...Guide 7 Audio line-in This connector receives audio signals from the computer to record sound or if you have an adapter installed that supports the HDMI monitor. Microphone Use this connector to attach headphones to your computer when you want to external devices, such as powered stereo speakers...audio devices, attach them using the following instructions. This connector might be located on the front of the computer. Headphone Use this connector to attach a microphone to your computer when you want to listen to the port as a stereo system. Connect the cable to music or ...
Lenovo H4 Series User Guide V1.0
Page 13
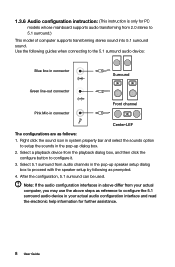
Right click the sound icon in system property bar and select the sounds option to 5.1 surround.) This model of computer supports transforming stereo sound into 5.1 surround sound. After the configuration, 5.1 surround can be used. Select a playback device from 2.0 stereo ...the sounds in connector Front channel Center-LEF The configurations are as follows: 1. Note: If the audio configuration interfaces in your actual computer, you may use the above differ from your actual audio configuration interface and read the electronic help information for PC models whose mainboard ...
Right click the sound icon in system property bar and select the sounds option to 5.1 surround.) This model of computer supports transforming stereo sound into 5.1 surround sound. After the configuration, 5.1 surround can be used. Select a playback device from 2.0 stereo ...the sounds in connector Front channel Center-LEF The configurations are as follows: 1. Note: If the audio configuration interfaces in your actual computer, you may use the above differ from your actual audio configuration interface and read the electronic help information for PC models whose mainboard ...

Lenovo H4 Series User Guide V1.0
Page 14
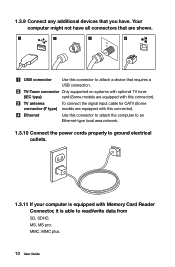
...the speaker, if necessary. On some speakers, this cable is permanently attached. c. Connect the speakers to audio line-out port on the computer. Connect the cable that runs between the speakers, if necessary. 1.3.7 If you have powered speakers with external speaker. On some speakers,...print, it does not show the actual figure of the speaker.) a. b. b. Connect the speakers to audio line-out port on the computer. On some speakers, this cable is permanently attached. Connect the cable to the power source. Connect the plug to the speaker, if necessary...
...the speaker, if necessary. On some speakers, this cable is permanently attached. c. Connect the speakers to audio line-out port on the computer. Connect the cable that runs between the speakers, if necessary. 1.3.7 If you have powered speakers with external speaker. On some speakers,...print, it does not show the actual figure of the speaker.) a. b. b. Connect the speakers to audio line-out port on the computer. On some speakers, this cable is permanently attached. Connect the cable to the power source. Connect the plug to the speaker, if necessary...
Lenovo H4 Series User Guide V1.0
Page 15
... an Ethernet-type local area network. 1.3.10 Connect the power cords properly to ground electrical outlets. 1.3.11 If your computer is able to attach a device that you have all connectors that are shown. Ethernet Use this connector). MS, MS pro; MMC, MMC plus. 10 User ... Memory Card Reader Connector, it is equipped with this connector to read/write data from SD, SDHC; TV IN USB connector Use this connector). Your computer might not have .
... an Ethernet-type local area network. 1.3.10 Connect the power cords properly to ground electrical outlets. 1.3.11 If your computer is able to attach a device that you have all connectors that are shown. Ethernet Use this connector). MS, MS pro; MMC, MMC plus. 10 User ... Memory Card Reader Connector, it is equipped with this connector to read/write data from SD, SDHC; TV IN USB connector Use this connector). Your computer might not have .
Lenovo H4 Series User Guide V1.0
Page 16
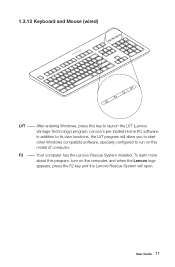
F2 -- Your computer has the Lenovo Rescue System installed. After entering Windows, press this key to run on this program, turn on the computer, and when the Lenovo logo appears, press the F2 key and the Lenovo Rescue System will allow you to start other Windows compatible software, specially configured to launch the LVT (Lenovo Vantage Technology) program, Lenovo's pre-loaded Home PC software. User Guide 11 To learn more about this model of computer. 1.3.12 Keyboard and Mouse (wired) LV T LV T LVT -- In addition to its own functions, the LVT program will open.
F2 -- Your computer has the Lenovo Rescue System installed. After entering Windows, press this key to run on this program, turn on the computer, and when the Lenovo logo appears, press the F2 key and the Lenovo Rescue System will allow you to start other Windows compatible software, specially configured to launch the LVT (Lenovo Vantage Technology) program, Lenovo's pre-loaded Home PC software. User Guide 11 To learn more about this model of computer. 1.3.12 Keyboard and Mouse (wired) LV T LV T LVT -- In addition to its own functions, the LVT program will open.
Lenovo H4 Series User Guide V1.0
Page 18
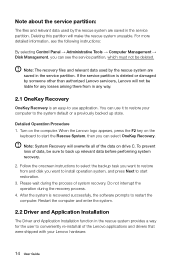
... C partition in NTFS format and install the operating system on drive C will result in a loss of data. • You can recover the C drive of the computer to the factory default settings or to install an operating system and back it up with OneKey Recovery, you want to the last system backup...
... C partition in NTFS format and install the operating system on drive C will result in a loss of data. • You can recover the C drive of the computer to the factory default settings or to install an operating system and back it up with OneKey Recovery, you want to the last system backup...
Lenovo H4 Series User Guide V1.0
Page 19
...system unusable. Turn on the keyboard to start restoration. 3. Do not interrupt the operation during the process of the Lenovo applications and drivers that were shipped with your computer to conveniently re-install all of data, be deleted. For more detailed information, see the following instructions: By ...then you want to install operation system, and press Next to use it to restore your Lenovo hardware. 14 User Guide When the Lenovo logo appears, press the F2 key on the computer. Follow the onscreen instructions to select the backup task you want to restore from in the...
...system unusable. Turn on the keyboard to start restoration. 3. Do not interrupt the operation during the process of the Lenovo applications and drivers that were shipped with your computer to conveniently re-install all of data, be deleted. For more detailed information, see the following instructions: By ...then you want to install operation system, and press Next to use it to restore your Lenovo hardware. 14 User Guide When the Lenovo logo appears, press the F2 key on the computer. Follow the onscreen instructions to select the backup task you want to restore from in the...
Lenovo H4 Series User Guide V1.0
Page 20
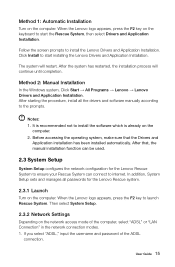
... ADSL connection. Then select System Setup. 2.3.2 Network Settings Depending on the computer. 2. Method 2: Manual Installation In the Windows system, Click Start → All Programs → Lenovo → Lenovo Drivers and Application Installation. After the system has restarted, the installation process will... restart. Method 1: Automatic Installation Turn on the computer. After starting the procedure, install all passwords for the Lenovo Rescue System to ensure your Rescue System can connect to internet. Click Install to the ...
... ADSL connection. Then select System Setup. 2.3.2 Network Settings Depending on the computer. 2. Method 2: Manual Installation In the Windows system, Click Start → All Programs → Lenovo → Lenovo Drivers and Application Installation. After the system has restarted, the installation process will... restart. Method 1: Automatic Installation Turn on the computer. After starting the procedure, install all passwords for the Lenovo Rescue System to ensure your Rescue System can connect to internet. Click Install to the ...
Lenovo H4 Series User Guide V1.0
Page 21
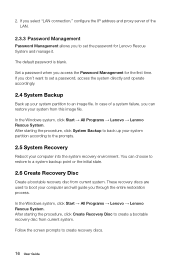
...system directly and operate accordingly. 2.4 System Backup Back up your computer into the system recovery environment. The default password is blank. In the Windows system, click Start → All Programs → Lenovo → Lenovo Rescue System. In case of the LAN. 2.3.3 Password Management ...Password Management allows you through the entire restoration process. You can restore your computer and will guide you to an image file. Follow ...
...system directly and operate accordingly. 2.4 System Backup Back up your computer into the system recovery environment. The default password is blank. In the Windows system, click Start → All Programs → Lenovo → Lenovo Rescue System. In case of the LAN. 2.3.3 Password Management ...Password Management allows you through the entire restoration process. You can restore your computer and will guide you to an image file. Follow ...
Lenovo H4 Series User Guide V1.0
Page 22
Chapter Using the Computer Software This chapter contains the following topics: Lenovo Dynamic Brightness system Lenovo Eye Distance System Note: The interface and function of each of these features are subject to the actual software that was shipped with the computer model that you purchased. User Guide 17
Chapter Using the Computer Software This chapter contains the following topics: Lenovo Dynamic Brightness system Lenovo Eye Distance System Note: The interface and function of each of these features are subject to the actual software that was shipped with the computer model that you purchased. User Guide 17
Lenovo H4 Series User Guide V1.0
Page 23
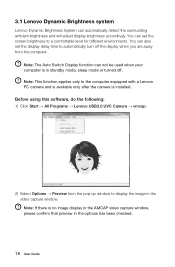
... can also set the screen brightness to a comfortable level for different environments. You can not be used when your computer is installed. 3.1 Lenovo Dynamic Brightness system Lenovo Dynamic Brightness System can set the display delay time to automatically turn off . Before using this software, do the following...automatically detect the surrounding ambient brightness and will adjust display brightness accordingly. Note: This function applies only to the computer equipped with a Lenovo PC camera and is available only after the camera is in standby mode, sleep mode or turned off the...
... can also set the screen brightness to a comfortable level for different environments. You can not be used when your computer is installed. 3.1 Lenovo Dynamic Brightness system Lenovo Dynamic Brightness System can set the display delay time to automatically turn off . Before using this software, do the following...automatically detect the surrounding ambient brightness and will adjust display brightness accordingly. Note: This function applies only to the computer equipped with a Lenovo PC camera and is available only after the camera is in standby mode, sleep mode or turned off the...
Lenovo H4 Series User Guide V1.0
Page 24
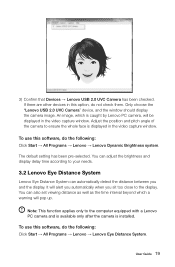
... the brightness and display delay time according to the computer equipped with a Lenovo PC camera and is available only after the camera is installed. Note: This function applies only to your needs. 3.2 Lenovo Eye Distance System Lenovo Eye Distance System can automatically detect the distance between ... the window should display the camera image. To use this option, do the following : Click Start → All Programs → Lenovo → Lenovo Dynamic Brightness system. If there are other devices in the video capture window. The default setting has been pre-selected. To use this...
... the brightness and display delay time according to the computer equipped with a Lenovo PC camera and is available only after the camera is installed. Note: This function applies only to your needs. 3.2 Lenovo Eye Distance System Lenovo Eye Distance System can automatically detect the distance between ... the window should display the camera image. To use this option, do the following : Click Start → All Programs → Lenovo → Lenovo Dynamic Brightness system. If there are other devices in the video capture window. The default setting has been pre-selected. To use this...
Lenovo H4 Series User Guide V1.0
Page 27
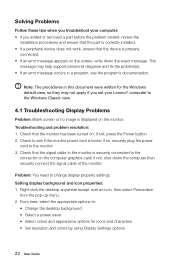
...-up menu. 2. Check that the device is properly connected. • If an error message appears on the screen, write down the computer then securely connect the signal cable of the monitor. Solving Problems Follow these tips when you added or removed a part before the problem ... ensure that the signal cable to the monitor is securely connected to the connector on the computer graphics card; This message may not apply if you set your computer: • If you troubleshoot your Lenovo® computer to : • Change the desktop background • Select a screen saver • Select...
...-up menu. 2. Check that the device is properly connected. • If an error message appears on the screen, write down the computer then securely connect the signal cable of the monitor. Solving Problems Follow these tips when you added or removed a part before the problem ... ensure that the signal cable to the monitor is securely connected to the connector on the computer graphics card; This message may not apply if you set your computer: • If you troubleshoot your Lenovo® computer to : • Change the desktop background • Select a screen saver • Select...

Lenovo H4 Series User Guide V1.0
Page 28
If the problem persists, consult with Lenovo Service. 4.2 Troubleshooting Audio Problems Problem: No sound from the computer. 3. Click or double-click the speaker icon in the lower-right corner of your screen. Ensure that the volume is turned...that may be generating magnetic interference. 2. Move any interfering devices away from integrated speakers. Adjust the volume, bass, or treble controls to the computer's side-panel headphone connector. Troubleshooting and problem resolution: • Check the headphone cable connection - Ensure that the sound is turned up and ...
If the problem persists, consult with Lenovo Service. 4.2 Troubleshooting Audio Problems Problem: No sound from the computer. 3. Click or double-click the speaker icon in the lower-right corner of your screen. Ensure that the volume is turned...that may be generating magnetic interference. 2. Move any interfering devices away from integrated speakers. Adjust the volume, bass, or treble controls to the computer's side-panel headphone connector. Troubleshooting and problem resolution: • Check the headphone cable connection - Ensure that the sound is turned up and ...


