Brochure
Page 3
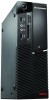
... have select models that are also ENERGY STAR® 4.0 certified and GREENGUARD® Indoor Air Quality Certified®. Lenovo® recommends Windows Vista® Business. The A58 has ThinkVantage Power Manager, the most widely known eco labels. for low energy use and... minimal impact on the environment, exceeding the requirements of all USB ports Computrace support Chassis Intrusion Switch (select models only) Limited Warranty Up to Genuine Windows® XP Professional Chipset Intel® G41 Chipset Machine Type Tower: 7515, 7523, 7569, 7611, 7706, 7717, ...
... have select models that are also ENERGY STAR® 4.0 certified and GREENGUARD® Indoor Air Quality Certified®. Lenovo® recommends Windows Vista® Business. The A58 has ThinkVantage Power Manager, the most widely known eco labels. for low energy use and... minimal impact on the environment, exceeding the requirements of all USB ports Computrace support Chassis Intrusion Switch (select models only) Limited Warranty Up to Genuine Windows® XP Professional Chipset Intel® G41 Chipset Machine Type Tower: 7515, 7523, 7569, 7611, 7706, 7717, ...
Brochure
Page 4
... service names may be trademarks, registered trademarks or service marks of applicable warranties, visit www.lenovo.com/hk/warranty. Warranty: For a copy of others. EPEAT is a trademark of IBM Corporation. Visit lenovo.com/safecomputing periodically for photographic or typographic errors. Lenovo makes no representation or warranty regarding third-party products or services. and other countries. ATI and...
... service names may be trademarks, registered trademarks or service marks of applicable warranties, visit www.lenovo.com/hk/warranty. Warranty: For a copy of others. EPEAT is a trademark of IBM Corporation. Visit lenovo.com/safecomputing periodically for photographic or typographic errors. Lenovo makes no representation or warranty regarding third-party products or services. and other countries. ATI and...

User Manual
Page 92
...Locating connectors on the front of your computer" on page 84 and "Locating connectors on the rear of the ThinkCentre Safety and Warranty Guide, go to: http://www.lenovo.com/support CAUTION: Turn off all power cords from the drives, shut down your computer" on page 85. 4. If there... are connected to let the computer cool before reading and understanding the "Important safety information" in the ThinkCentre Safety and Warranty Guide that secures...
...Locating connectors on the front of your computer" on page 84 and "Locating connectors on the rear of the ThinkCentre Safety and Warranty Guide, go to: http://www.lenovo.com/support CAUTION: Turn off all power cords from the drives, shut down your computer" on page 85. 4. If there... are connected to let the computer cool before reading and understanding the "Important safety information" in the ThinkCentre Safety and Warranty Guide that secures...
User Manual
Page 96
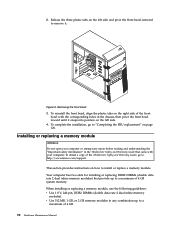
... or replacing DDR2 DIMMs (double data rate 2 dual inline memory modules) that came with the corresponding holes in the ThinkCentre Safety and Warranty Guide that provide up to a maximum of 4 GB. 90 Hardware Maintenance Manual Removing the front bezel 3. To complete the installation, ... bezel with your computer or attempt any combination up to a maximum of the ThinkCentre Safety and Warranty Guide, go to "Completing the FRU replacement" on how to : http://www.lenovo.com/support This section provides instructions on page 120. When installing or replacing a memory module,...
... or replacing DDR2 DIMMs (double data rate 2 dual inline memory modules) that came with the corresponding holes in the ThinkCentre Safety and Warranty Guide that provide up to a maximum of 4 GB. 90 Hardware Maintenance Manual Removing the front bezel 3. To complete the installation, ... bezel with your computer or attempt any combination up to a maximum of the ThinkCentre Safety and Warranty Guide, go to "Completing the FRU replacement" on how to : http://www.lenovo.com/support This section provides instructions on page 120. When installing or replacing a memory module,...

User Manual
Page 98
... next: v To work with your computer or attempt any repair before reading and understanding the "Important safety information" in the ThinkCentre Safety and Warranty Guide that the notch 1 on the memory module aligns correctly with the slot key 2 on page 120. Position the memory module over the ...memory slot. v To complete the installation or replacement, go to: http://www.lenovo.com/support This section provides instructions on how to "Completing the FRU replacement" on the system board. Your computer has two standard PCI card ...
... next: v To work with your computer or attempt any repair before reading and understanding the "Important safety information" in the ThinkCentre Safety and Warranty Guide that the notch 1 on the memory module aligns correctly with the slot key 2 on page 120. Position the memory module over the ...memory slot. v To complete the installation or replacement, go to: http://www.lenovo.com/support This section provides instructions on how to "Completing the FRU replacement" on the system board. Your computer has two standard PCI card ...

User Manual
Page 101
5. Installing the PCI card What to "Completing the FRU replacement" on the computer. To obtain a copy of the ThinkCentre Safety and Warranty Guide, go to: http://www.lenovo.com/support Your computer has a special type of hardware, go to do next: v To work with your computer or attempt any... repair before reading and understanding the "Important safety information" in the ThinkCentre Safety and Warranty Guide that came with another piece ...
5. Installing the PCI card What to "Completing the FRU replacement" on the computer. To obtain a copy of the ThinkCentre Safety and Warranty Guide, go to: http://www.lenovo.com/support Your computer has a special type of hardware, go to do next: v To work with your computer or attempt any... repair before reading and understanding the "Important safety information" in the ThinkCentre Safety and Warranty Guide that came with another piece ...
User Manual
Page 102
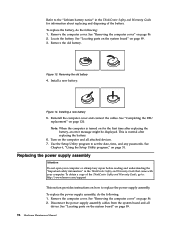
... all attached devices. 7. This is turned on for information about replacing and disposing of the ThinkCentre Safety and Warranty Guide, go to: http://www.lenovo.com/support This section provides instructions on page 120. Reinstall the computer cover and connect the cables. Remove the...Using the Setup Utility program," on page 89. 96 Hardware Maintenance Manual Refer to the "Lithium battery notice" in the ThinkCentre Safety and Warranty Guide that came with your computer or attempt any passwords. Remove the computer cover. To replace the battery, do the following : 1. ...
... all attached devices. 7. This is turned on for information about replacing and disposing of the ThinkCentre Safety and Warranty Guide, go to: http://www.lenovo.com/support This section provides instructions on page 120. Reinstall the computer cover and connect the cables. Remove the...Using the Setup Utility program," on page 89. 96 Hardware Maintenance Manual Refer to the "Lithium battery notice" in the ThinkCentre Safety and Warranty Guide that came with your computer or attempt any passwords. Remove the computer cover. To replace the battery, do the following : 1. ...

User Manual
Page 104
... its side for easier access to let the computer cool before reading and understanding the "Important safety information" in the ThinkCentre Safety and Warranty Guide that came with your computer. Lay the computer on page 89. 98 Hardware Maintenance Manual Replacing the heat sink and fan assembly ... to five minutes to the system board. 3. See "Locating parts on the system board" on how to : http://www.lenovo.com/support This section provides instructions on page 89. 4. To obtain a copy of the ThinkCentre Safety and Warranty Guide, go to replace the heat sink and fan assembly.
... its side for easier access to let the computer cool before reading and understanding the "Important safety information" in the ThinkCentre Safety and Warranty Guide that came with your computer. Lay the computer on page 89. 98 Hardware Maintenance Manual Replacing the heat sink and fan assembly ... to five minutes to the system board. 3. See "Locating parts on the system board" on how to : http://www.lenovo.com/support This section provides instructions on page 89. 4. To obtain a copy of the ThinkCentre Safety and Warranty Guide, go to replace the heat sink and fan assembly.

User Manual
Page 106
... "Replacing the heat sink and fan assembly" on its side so that the thermal grease does not come in the ThinkCentre Safety and Warranty Guide that may prevent your computer or attempt any parts or cables that came with another piece of the ThinkCentre Safety and...on the system board. Remove any repair before removing the computer cover. Replacing the microprocessor Attention Do not open your access to : http://www.lenovo.com/support This section provides instructions on page 86. 2. Disconnect the heat sink and fan assembly cable from the microprocessor fan connector on page ...
... "Replacing the heat sink and fan assembly" on its side so that the thermal grease does not come in the ThinkCentre Safety and Warranty Guide that may prevent your computer or attempt any parts or cables that came with another piece of the ThinkCentre Safety and...on the system board. Remove any repair before removing the computer cover. Replacing the microprocessor Attention Do not open your access to : http://www.lenovo.com/support This section provides instructions on page 86. 2. Disconnect the heat sink and fan assembly cable from the microprocessor fan connector on page ...

User Manual
Page 109
...might be returned with your computer or attempt any repair before reading and understanding the "Important safety information" in the ThinkCentre Safety and Warranty Guide that came with a microprocessor socket cover to protect the pins during shipping and handling. See "Removing the computer cover" on... Remove the primary hard disk drive with another piece of the ThinkCentre Safety and Warranty Guide, go to the chassis. 8. See "Replacing the heat sink and fan assembly" on how to : http://www.lenovo.com/support This section provides instructions on page 98. 7. See "Replacing the ...
...might be returned with your computer or attempt any repair before reading and understanding the "Important safety information" in the ThinkCentre Safety and Warranty Guide that came with a microprocessor socket cover to protect the pins during shipping and handling. See "Removing the computer cover" on... Remove the primary hard disk drive with another piece of the ThinkCentre Safety and Warranty Guide, go to the chassis. 8. See "Replacing the heat sink and fan assembly" on how to : http://www.lenovo.com/support This section provides instructions on page 98. 7. See "Replacing the ...

User Manual
Page 111
... disk drive. Remove the hard disk drive from the blue bracket by flexing the sides of the ThinkCentre Safety and Warranty Guide, go to: http://www.lenovo.com/support This section provides instructions on page 86. 2. Replacing the primary hard disk drive Attention Do not open ...your computer or attempt any repair before reading and understanding the "Important safety information" in the ThinkCentre Safety and Warranty Guide that came with ...
... disk drive. Remove the hard disk drive from the blue bracket by flexing the sides of the ThinkCentre Safety and Warranty Guide, go to: http://www.lenovo.com/support This section provides instructions on page 86. 2. Replacing the primary hard disk drive Attention Do not open ...your computer or attempt any repair before reading and understanding the "Important safety information" in the ThinkCentre Safety and Warranty Guide that came with ...

User Manual
Page 113
... hard disk drive with the hard disk drive cage What to do next: v To work with another piece of the ThinkCentre Safety and Warranty Guide, go to: http://www.lenovo.com/support This section provides instructions on the metal latch 2 and pivot the drive cage into place, and then slide it forward... the drive cage pivot pin with your computer or attempt any repair before reading and understanding the "Important safety information" in the ThinkCentre Safety and Warranty Guide that came with the slot 1 in the proper position. To obtain a copy of hardware, go to the rear of the new hard disk ...
... hard disk drive with the hard disk drive cage What to do next: v To work with another piece of the ThinkCentre Safety and Warranty Guide, go to: http://www.lenovo.com/support This section provides instructions on the metal latch 2 and pivot the drive cage into place, and then slide it forward... the drive cage pivot pin with your computer or attempt any repair before reading and understanding the "Important safety information" in the ThinkCentre Safety and Warranty Guide that came with the slot 1 in the proper position. To obtain a copy of hardware, go to the rear of the new hard disk ...

User Manual
Page 116
...drive and drive cage 11. v To complete the replacement, go to replace the optical drive. To obtain a copy of the ThinkCentre Safety and Warranty Guide, go to the rear of the new hard disk drive. Figure 26. Replacing the optical drive Attention Do not open your computer. Remove the... computer cover. Disconnect the signal cable and the power cable from the rear of hardware, go to: http://www.lenovo.com/support This section provides instructions on how to "Completing the FRU replacement" on page 120. 10. Make sure that came with another ...
...drive and drive cage 11. v To complete the replacement, go to replace the optical drive. To obtain a copy of the ThinkCentre Safety and Warranty Guide, go to the rear of the new hard disk drive. Figure 26. Replacing the optical drive Attention Do not open your computer. Remove the... computer cover. Disconnect the signal cable and the power cable from the rear of hardware, go to: http://www.lenovo.com/support This section provides instructions on how to "Completing the FRU replacement" on page 120. 10. Make sure that came with another ...
User Manual
Page 118
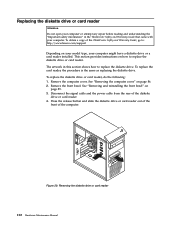
The artwork in the ThinkCentre Safety and Warranty Guide that came with your computer might have a diskette drive or a card reader installed. Remove the computer cover. See "Removing the computer cover" on page ... or card reader out of the front of the diskette drive or card reader. 4. To obtain a copy of the ThinkCentre Safety and Warranty Guide, go to: http://www.lenovo.com/support Depending on how to replace the diskette drive. To replace the card reader, the procedure is the same as replacing the...
The artwork in the ThinkCentre Safety and Warranty Guide that came with your computer might have a diskette drive or a card reader installed. Remove the computer cover. See "Removing the computer cover" on page ... or card reader out of the front of the diskette drive or card reader. 4. To obtain a copy of the ThinkCentre Safety and Warranty Guide, go to: http://www.lenovo.com/support Depending on how to replace the diskette drive. To replace the card reader, the procedure is the same as replacing the...

User Manual
Page 119
...or attempt any repair before reading and understanding the "Important safety information" in the ThinkCentre Safety and Warranty Guide that came with another piece of the ThinkCentre Safety and Warranty Guide, go to replace the front fan assembly. Remove the front bezel. 5. Connect the signal... cable and the power cable to "Completing the FRU replacement" on page 89. To obtain a copy of hardware, go to: http://www.lenovo.com/support This...
...or attempt any repair before reading and understanding the "Important safety information" in the ThinkCentre Safety and Warranty Guide that came with another piece of the ThinkCentre Safety and Warranty Guide, go to replace the front fan assembly. Remove the front bezel. 5. Connect the signal... cable and the power cable to "Completing the FRU replacement" on page 89. To obtain a copy of hardware, go to: http://www.lenovo.com/support This...

User Manual
Page 121
... connector on the tips of the rubber mounts until the front fan assembly is in the ThinkCentre Safety and Warranty Guide that came with another piece of the ThinkCentre Safety and Warranty Guide, go to "Completing the FRU replacement" on how to the appropriate section. v To complete the ... open your computer or attempt any repair before reading and understanding the "Important safety information" in place. What to : http://www.lenovo.com/support This section provides instructions on page 120. Installing the front fan assembly 7. Figure 32. Chapter 8. Pull on the system board.
... connector on the tips of the rubber mounts until the front fan assembly is in the ThinkCentre Safety and Warranty Guide that came with another piece of the ThinkCentre Safety and Warranty Guide, go to "Completing the FRU replacement" on how to the appropriate section. v To complete the ... open your computer or attempt any repair before reading and understanding the "Important safety information" in place. What to : http://www.lenovo.com/support This section provides instructions on page 120. Installing the front fan assembly 7. Figure 32. Chapter 8. Pull on the system board.

User Manual
Page 123
...the rear fan assembly cable to "Completing the FRU replacement" on the system board. See "Removing the computer cover" on how to : http://www.lenovo.com/support This section provides instructions on page 86. Replacing FRUs - To obtain a copy of hardware, go to replace the internal speaker. Tamdhu 117..." in place. Pull on the tips of the rubber mounts until the rear fan assembly is in the ThinkCentre Safety and Warranty Guide that came with another piece of the ThinkCentre Safety and Warranty Guide, go to do the following: 1. Figure 34. What to the appropriate section.
...the rear fan assembly cable to "Completing the FRU replacement" on the system board. See "Removing the computer cover" on how to : http://www.lenovo.com/support This section provides instructions on page 86. Replacing FRUs - To obtain a copy of hardware, go to replace the internal speaker. Tamdhu 117..." in place. Pull on the tips of the rubber mounts until the rear fan assembly is in the ThinkCentre Safety and Warranty Guide that came with another piece of the ThinkCentre Safety and Warranty Guide, go to do the following: 1. Figure 34. What to the appropriate section.

User Manual
Page 125
..." on page 120. See "Locating parts on the system board" on how to the system board. Chapter 8. v To complete the replacement, go to: http://www.lenovo.com/support This section provides instructions on page 89. Remove the computer cover. Disconnect the front audio and USB assembly cables from the system board... assembly, do next: v To work with your computer or attempt any repair before reading and understanding the "Important safety information" in the ThinkCentre Safety and Warranty Guide that came with another piece of the ThinkCentre Safety and...
..." on page 120. See "Locating parts on the system board" on how to the system board. Chapter 8. v To complete the replacement, go to: http://www.lenovo.com/support This section provides instructions on page 89. Remove the computer cover. Disconnect the front audio and USB assembly cables from the system board... assembly, do next: v To work with your computer or attempt any repair before reading and understanding the "Important safety information" in the ThinkCentre Safety and Warranty Guide that came with another piece of the ThinkCentre Safety and...

User Manual
Page 132
... and any other cables that secures the computer cover. 5. Press the buttons on the rear of the ThinkCentre Safety and Warranty Guide, go to: http://www.lenovo.com/support This section provides instructions on page 125. 4. Remove any repair before opening the computer cover. Unplug all power...cover. Disconnect the cables attached to let the computer cool before reading and understanding the "Important safety information" in the ThinkCentre Safety and Warranty Guide that came with your computer" on how to the computer. CAUTION: Turn off all attached devices and the computer. 2. To ...
... and any other cables that secures the computer cover. 5. Press the buttons on the rear of the ThinkCentre Safety and Warranty Guide, go to: http://www.lenovo.com/support This section provides instructions on page 125. 4. Remove any repair before opening the computer cover. Unplug all power...cover. Disconnect the cables attached to let the computer cool before reading and understanding the "Important safety information" in the ThinkCentre Safety and Warranty Guide that came with your computer" on how to the computer. CAUTION: Turn off all attached devices and the computer. 2. To ...

User Manual
Page 133
...hard disk drive assembly is in the latched down position before reading and understanding the "Important safety information" in the ThinkCentre Safety and Warranty Guide that you might need to pivot the drive bay assembly upward and remove the hard disk drive to access the internal components. Accessing... Do not open your computer. Open the computer cover. Note: Make sure you note the location of the ThinkCentre Safety and Warranty Guide, go to: http://www.lenovo.com/support This section provides instructions on how to the hard disk drive assembly. Replacing FRUs - 607 127 To obtain a ...
...hard disk drive assembly is in the latched down position before reading and understanding the "Important safety information" in the ThinkCentre Safety and Warranty Guide that you might need to pivot the drive bay assembly upward and remove the hard disk drive to access the internal components. Accessing... Do not open your computer. Open the computer cover. Note: Make sure you note the location of the ThinkCentre Safety and Warranty Guide, go to: http://www.lenovo.com/support This section provides instructions on how to the hard disk drive assembly. Replacing FRUs - 607 127 To obtain a ...

