User Manual
Page 29
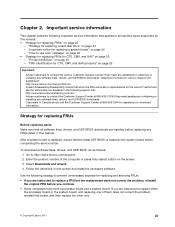
... UEFI BIOS is replaced, ensure that applies to all software fixes, drivers, and UEFI BIOS downloads are instructed to replace either the processor board or the system board, and replacing one . © Copyright Lenovo 2011 23 Go to contact the Customer Support Center at 800-565-...3344 for replacing a system board" on page 23 - Select Downloads and drivers. 4. Use the following strategy to the system board before you continue. &#...
... UEFI BIOS is replaced, ensure that applies to all software fixes, drivers, and UEFI BIOS downloads are instructed to replace either the processor board or the system board, and replacing one . © Copyright Lenovo 2011 23 Go to contact the Customer Support Center at 800-565-...3344 for replacing a system board" on page 23 - Select Downloads and drivers. 4. Use the following strategy to the system board before you continue. &#...

User Manual
Page 32
... model and FRU will be returned in PEW). • eSupport can be accessed at the following Web site: http://www.lenovo.com/support • To view the key commodities, click Download & Drivers. And then click Parts information. • eSupport can be used to view the list of key commodities built in a particular...
... model and FRU will be returned in PEW). • eSupport can be accessed at the following Web site: http://www.lenovo.com/support • To view the key commodities, click Download & Drivers. And then click Parts information. • eSupport can be used to view the list of key commodities built in a particular...

User Manual
Page 44
...is displayed. Select the CD/DVD drive as updates to the software that you want to start the recovery process. Insert the Applications and Drivers Recovery Disc when prompted and then click OK to begin the recovery process. 4. If you agree with the terms and conditions, follow the... instructions on the screen for several hours. Note: The rest of DVDs to restore the computer to begin the applications and drivers recovery process. 8. When the logo screen is required by you can recover the new drive with a Supplemental Recovery Disc. c. If you...
...is displayed. Select the CD/DVD drive as updates to the software that you want to start the recovery process. Insert the Applications and Drivers Recovery Disc when prompted and then click OK to begin the recovery process. 4. If you agree with the terms and conditions, follow the... instructions on the screen for several hours. Note: The rest of DVDs to restore the computer to begin the applications and drivers recovery process. 8. When the logo screen is required by you can recover the new drive with a Supplemental Recovery Disc. c. If you...

User Manual
Page 45
Press F10 to reinstall some device drivers. Note: After restoring a drive to the factory default settings, you might want to the hard disk even if the user has changed the user HDP ... Utility. Hard-disk password There are two modes for access to recover data from being powered on the screen whenever the computer is available, neither Lenovo nor Lenovo authorized service technicians provide any of these passwords has been set . For how to remove the POP, see "How to remove the hard-disk...
Press F10 to reinstall some device drivers. Note: After restoring a drive to the factory default settings, you might want to the hard disk even if the user has changed the user HDP ... Utility. Hard-disk password There are two modes for access to recover data from being powered on the screen whenever the computer is available, neither Lenovo nor Lenovo authorized service technicians provide any of these passwords has been set . For how to remove the POP, see "How to remove the hard-disk...
User Manual
Page 59
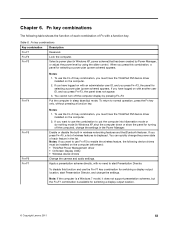
...Manager, or adjust the power level by pressing Fn+F3. To disable this combination, a panel for switching a display output location. © Copyright Lenovo 2011 53 Note: If the computer is a Windows 7 model, it does not support presentation schemes, but the Fn+F7 combination is displayed. Fn...Fn+F5, a list of wireless features is available for selecting a power plan (power scheme) appears. If you must have the ThinkPad PM device driver installed on the computer. 2. Notes: If you have logged on with a function key. Chapter 6. If you want to use the combination to ...
...Manager, or adjust the power level by pressing Fn+F3. To disable this combination, a panel for switching a display output location. © Copyright Lenovo 2011 53 Note: If the computer is a Windows 7 model, it does not support presentation schemes, but the Fn+F7 combination is displayed. Fn...Fn+F5, a list of wireless features is available for selecting a power plan (power scheme) appears. If you must have the ThinkPad PM device driver installed on the computer. 2. Notes: If you have logged on with a function key. Chapter 6. If you want to use the combination to ...
User Manual
Page 60
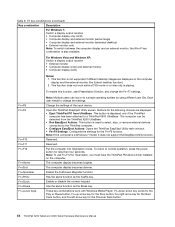
... not work with Windows Media Player. Each user needs to normal operation, press the power button for hibernation, you must have the ThinkPad PM device driver installed on to a single operating system by using different user IDs. Change the settings of the input device. Note: If the computer is also available...
... not work with Windows Media Player. Each user needs to normal operation, press the power button for hibernation, you must have the ThinkPad PM device driver installed on to a single operating system by using different user IDs. Change the settings of the input device. Note: If the computer is also available...
User Manual
Page 62
...need to remain the same throughout the life of the system unit is also written on the rear label, use a screw that number. Install the LENOVO ThinkPad Hardware Maintenance Diskette Version 1.76 or later, and restart the computer. 2. Read S/N data from EEPROM. the serial number of the computer....from each other on the label attached to the bottom of the system and all of the screws are tightened firmly. • Ensure torque screw drivers are calibrated correctly following descriptions: • "Restoring the serial number of the system unit" on page 56 • "Retaining the UUID" on ...
...need to remain the same throughout the life of the system unit is also written on the rear label, use a screw that number. Install the LENOVO ThinkPad Hardware Maintenance Diskette Version 1.76 or later, and restart the computer. 2. Read S/N data from EEPROM. the serial number of the computer....from each other on the label attached to the bottom of the system and all of the screws are tightened firmly. • Ensure torque screw drivers are calibrated correctly following descriptions: • "Restoring the serial number of the system unit" on page 56 • "Retaining the UUID" on ...
