Hardware Maintenance Manual
Page 3
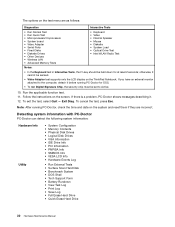
... guide 28 Diagnostics using the product Recovery Disc Set 39 Passwords 40 Power-on password 40 Hard-disk password 40 Supervisor password 40 © Copyright Lenovo 2010, 2013 How to remove the power-on password . . . 40 How to remove the hard-disk password . . . 41 Power management... . . . 55 Chapter 8. Special keys and Fn key combination 51 Chapter 7. Status indicators . . . . . 49 Chapter 6. Removing or replacing a FRU 57 1010 Battery pack 58 1020 Optical drive or travel cover 58 1030 Thermal cover 59 1040 Hard disk drive assembly 60 1050 Memory module 61 1060 Fan...
... guide 28 Diagnostics using the product Recovery Disc Set 39 Passwords 40 Power-on password 40 Hard-disk password 40 Supervisor password 40 © Copyright Lenovo 2010, 2013 How to remove the power-on password . . . 40 How to remove the hard-disk password . . . 41 Power management... . . . 55 Chapter 8. Special keys and Fn key combination 51 Chapter 7. Status indicators . . . . . 49 Chapter 6. Removing or replacing a FRU 57 1010 Battery pack 58 1020 Optical drive or travel cover 58 1030 Thermal cover 59 1040 Hard disk drive assembly 60 1050 Memory module 61 1060 Fan...
Hardware Maintenance Manual
Page 9
... or rivets) have not been removed or tampered with the power off, and the power cord disconnected. Check the power cord for cracked or bulging batteries. 5. Check for : a. Remove the cover. 6. Consider these conditions and the safety hazards they present: • Electrical hazards, especially primary power (primary voltage on the frame...
... or rivets) have not been removed or tampered with the power off, and the power cord disconnected. Check the power cord for cracked or bulging batteries. 5. Check for : a. Remove the cover. 6. Consider these conditions and the safety hazards they present: • Electrical hazards, especially primary power (primary voltage on the frame...
Hardware Maintenance Manual
Page 10
... • Japanese • Korean • Spanish • Traditional Chinese DANGER 4 Hardware Maintenance Manual Note: The use coax or connector-outside shells on a double-insulated or battery-operated system, use have been certified (ISO 9000) as those listed below, to eliminate static on ac-operated computers. Use the round ground prong of...
... • Japanese • Korean • Spanish • Traditional Chinese DANGER 4 Hardware Maintenance Manual Note: The use coax or connector-outside shells on a double-insulated or battery-operated system, use have been certified (ISO 9000) as those listed below, to eliminate static on ac-operated computers. Use the round ground prong of...
Hardware Maintenance Manual
Page 36
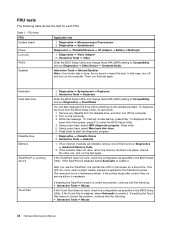
... Info • Hardware Events Log • Run External Tests • Surface Scan Hard Disk • Benchmark System • DOS Shell • Tech Support Form • Battery Rundown • View Test Log • Print Log • Save Log • Full Erase Hard Drive • Quick Erase Hard Drive 30 Hardware Maintenance Manual...
... Info • Hardware Events Log • Run External Tests • Surface Scan Hard Disk • Benchmark System • DOS Shell • Tech Support Form • Battery Rundown • View Test Log • Print Log • Save Log • Full Erase Hard Drive • Quick Erase Hard Drive 30 Hardware Maintenance Manual...
Hardware Maintenance Manual
Page 40
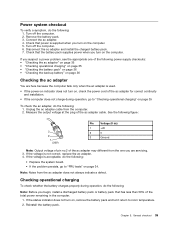
Diagnostics ➙ Systemboard Diagnostics ➙ ThinkPad Devices ➙ AC Adapter ➙ Battery 1 (Battery2) 1. Diagnostics ➙ Systemboard ➙ Keyboard 2. Turn on the screen for each FRU. While the message, "To interrupt normal startup, press Enter," is displayed at ...
Diagnostics ➙ Systemboard Diagnostics ➙ ThinkPad Devices ➙ AC Adapter ➙ Battery 1 (Battery2) 1. Diagnostics ➙ Systemboard ➙ Keyboard 2. Turn on the screen for each FRU. While the message, "To interrupt normal startup, press Enter," is displayed at ...
Hardware Maintenance Manual
Page 41
... that has less than 50% of the total power remaining in the computer. 1. Disconnect the ac adapter and install the charged battery pack. 7. Reinstall the battery pack. Chapter 3. Remove the battery pack. 3. Turn off the computer. 2. Note: Noise from the computer. 2. Connect the ac adapter. 4. If the voltage is...plug of the ac adapter cable. General checkout 35 If you suspect a power problem, see the appropriate one you turn on, remove the battery pack and let it return to room temperature. 2. If the voltage is used. • If the power-on indicator does not turn ...
... that has less than 50% of the total power remaining in the computer. 1. Disconnect the ac adapter and install the charged battery pack. 7. Reinstall the battery pack. Chapter 3. Remove the battery pack. 3. Turn off the computer. 2. Note: Noise from the computer. 2. Connect the ac adapter. 4. If the voltage is...plug of the ac adapter cable. General checkout 35 If you suspect a power problem, see the appropriate one you turn on, remove the battery pack and let it return to room temperature. 2. If the voltage is used. • If the power-on indicator does not turn ...
Hardware Maintenance Manual
Page 42
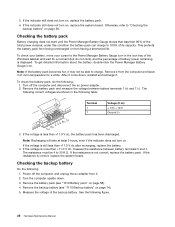
... adapter from having a shortened life. If the resistance is less than +11.0 V dc, measure the resistance between battery terminals 1 (+) and 7 (-). Checking the backup battery Do the following figure. 36 Hardware Maintenance Manual If the indicator still does not turn on page 36. To check ...Windows taskbar and wait for a while. The resistance must be able to "Checking the backup battery" on . If the resistance is still less than 96% of the backup battery. To check your battery, move your cursor to 30 K Ω. If the voltage is displayed. Turn the computer...
... adapter from having a shortened life. If the resistance is less than +11.0 V dc, measure the resistance between battery terminals 1 (+) and 7 (-). Checking the backup battery Do the following figure. 36 Hardware Maintenance Manual If the indicator still does not turn on page 36. To check ...Windows taskbar and wait for a while. The resistance must be able to "Checking the backup battery" on . If the resistance is still less than 96% of the backup battery. To check your battery, move your cursor to 30 K Ω. If the voltage is displayed. Turn the computer...
Hardware Maintenance Manual
Page 43
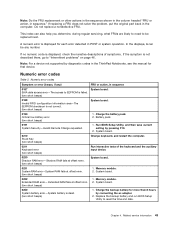
General checkout 37 Wire Red Black Voltage (V dc) +2.5 to +3.2 Ground • If the voltage is correct, replace the system board. • If the voltage is not correct, replace the backup battery. • If the backup battery discharges quickly after replacement, replace the system board. Chapter 3.
General checkout 37 Wire Red Black Voltage (V dc) +2.5 to +3.2 Ground • If the voltage is correct, replace the system board. • If the voltage is not correct, replace the backup battery. • If the backup battery discharges quickly after replacement, replace the system board. Chapter 3.
Hardware Maintenance Manual
Page 47
...Password. 6. Press F10; To put the system back to operational status, the only Lenovo and Lenovo-authorized service solution would be made available to the service technician, neither Lenovo nor Lenovo authorized service technicians provide any services to reset the user HDPs or to replace the...58. 3. Select Hard-disk x password, where x is known by the service technician: 1. Select Master HDP. 7. Chapter 4. Reinstall the backup battery and the battery pack. (B) If an SVP has been set : 1. Select Password. 5. Note: To check whether the ThinkPad Notebook you are servicing supports the ...
...Password. 6. Press F10; To put the system back to operational status, the only Lenovo and Lenovo-authorized service solution would be made available to the service technician, neither Lenovo nor Lenovo authorized service technicians provide any services to reset the user HDPs or to replace the...58. 3. Select Hard-disk x password, where x is known by the service technician: 1. Select Master HDP. 7. Chapter 4. Reinstall the backup battery and the battery pack. (B) If an SVP has been set : 1. Select Password. 5. Note: To check whether the ThinkPad Notebook you are servicing supports the ...
Hardware Maintenance Manual
Page 48
Right-click the Power Manager Battery Gauge in the Setup Configuration window. Hibernation mode By using this section lists symptoms and errors and their possible causes. To enter hibernation mode, do ...
Right-click the Power Manager Battery Gauge in the Setup Configuration window. Hibernation mode By using this section lists symptoms and errors and their possible causes. To enter hibernation mode, do ...
Hardware Maintenance Manual
Page 49
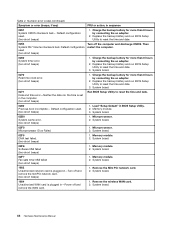
... EEPROM is failed. (two short beeps) 0189 Invalid RFID configuration information area-The EEPROM checksum is dead. (two short beeps) 1. Charge the battery pack. 2. A numeric error is displayed for each error detected in sequence 0187 System board. Numeric error codes Symptom or error (beeps, if any... nnnn. (two short beeps) System board. 0231 System RAM error-System RAM fails at offset nnnn. (two short beeps) 1. Charge the backup battery for that device. EAIA data access error-The access to be any ) FRU or action, in POST or system operation. Extended RAM fails at...
... EEPROM is failed. (two short beeps) 0189 Invalid RFID configuration information area-The EEPROM checksum is dead. (two short beeps) 1. Charge the battery pack. 2. A numeric error is displayed for each error detected in sequence 0187 System board. Numeric error codes Symptom or error (beeps, if any... nnnn. (two short beeps) System board. 0231 System RAM error-System RAM fails at offset nnnn. (two short beeps) 1. Charge the backup battery for that device. EAIA data access error-The access to be any ) FRU or action, in POST or system operation. Extended RAM fails at...
Hardware Maintenance Manual
Page 50
... Utility to reset the time and date. 0254 System NV7 Volume checksum bad- Remove the Mini PCI network card. 2. Charge the backup battery for more than 8 hours by connecting the ac adapter. 2. Then restart the computer. 0260 System timer error. (two short beeps)... 1. Default configuration used . (two short beeps) 1. System board. 02F0 Microprocessor ID:xx Failed. 1. Replace the backup battery and run BIOS Setup Utility to reset the time and date. 0280 Previous boot incomplete- Default configuration used . (two short beeps) 1. Microprocessor. ...
... Utility to reset the time and date. 0254 System NV7 Volume checksum bad- Remove the Mini PCI network card. 2. Charge the backup battery for more than 8 hours by connecting the ac adapter. 2. Then restart the computer. 0260 System timer error. (two short beeps)... 1. Default configuration used . (two short beeps) 1. System board. 02F0 Microprocessor ID:xx Failed. 1. Replace the backup battery and run BIOS Setup Utility to reset the time and date. 0280 Previous boot incomplete- Default configuration used . (two short beeps) 1. Microprocessor. ...

Hardware Maintenance Manual
Page 52
...operating, follow these procedures to isolate the failing FRU (do not replace any error is detected, replace the FRU shown by the computer. Battery pack d. Memory module 46 Hardware Maintenance Manual Reseat all LCD connectors. 3. System board. LCD assembly. FRU replacement should be adjusted. •... by the FRU code. Notes: • This policy applies to all ThinkPad Notebooks purchased on 1 January, 2008 or later. • Lenovo will have zero pixel defects. • One pixel consists of causes that have no defects). Table 5. Horizontal or vertical lines displayed on ...
...operating, follow these procedures to isolate the failing FRU (do not replace any error is detected, replace the FRU shown by the computer. Battery pack d. Memory module 46 Hardware Maintenance Manual Reseat all LCD connectors. 3. System board. LCD assembly. FRU replacement should be adjusted. •... by the FRU code. Notes: • This policy applies to all ThinkPad Notebooks purchased on 1 January, 2008 or later. • Lenovo will have zero pixel defects. • One pixel consists of causes that have no defects). Table 5. Horizontal or vertical lines displayed on ...
Hardware Maintenance Manual
Page 55
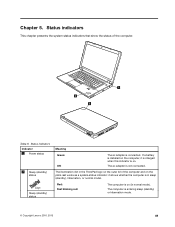
If a battery is installed on the computer, it shows whether the computer is on the outer lid of the computer. 1 2 2 Table 6. The illumination dot in the ThinkPad ... charged when this indicator is in normal mode). The computer is not connected. The ac adapter is entering sleep (standby) or hibernation mode. © Copyright Lenovo 2010, 2013 49 Status indicators This chapter presents the system status indicators that show the status of the computer and on (in sleep (standby), hibernation...
If a battery is installed on the computer, it shows whether the computer is on the outer lid of the computer. 1 2 2 Table 6. The illumination dot in the ThinkPad ... charged when this indicator is in normal mode). The computer is not connected. The ac adapter is entering sleep (standby) or hibernation mode. © Copyright Lenovo 2010, 2013 49 Status indicators This chapter presents the system status indicators that show the status of the computer and on (in sleep (standby), hibernation...

Hardware Maintenance Manual
Page 63
...information and replacement instructions are shipped with a replacement part you are available from electrical outlets, remove the battery pack, and then disconnect any notes that Lenovo installs an Optional-service CRU according to customers: Some problems with your product. When turning a screw to...replace a FRU, turn it in the direction as given by using an electrostatic discharge (ESD) strap (P/N 6405959). © Copyright Lenovo 2010, 2013 57 Attention: The system board is sensitive to return the defective part that ship with your product can install yourself, ...
...information and replacement instructions are shipped with a replacement part you are available from electrical outlets, remove the battery pack, and then disconnect any notes that Lenovo installs an Optional-service CRU according to customers: Some problems with your product. When turning a screw to...replace a FRU, turn it in the direction as given by using an electrostatic discharge (ESD) strap (P/N 6405959). © Copyright Lenovo 2010, 2013 57 Attention: The system board is sensitive to return the defective part that ship with your product can install yourself, ...
Hardware Maintenance Manual
Page 64
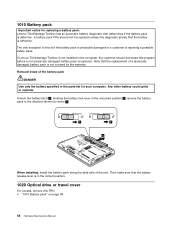
... not covered by arrow 3 . 1 2 3 When installing: Install the battery pack along the slide rails of the battery pack DANGER Use only the battery specified in the parts list for replacing a battery pack: Lenovo ThinkVantage Toolbox has an automatic battery diagnostic that the battery release lever is defective. Holding the battery lock lever in the unlocked position 2 , remove the...
... not covered by arrow 3 . 1 2 3 When installing: Install the battery pack along the slide rails of the battery pack DANGER Use only the battery specified in the parts list for replacing a battery pack: Lenovo ThinkVantage Toolbox has an automatic battery diagnostic that the battery release lever is defective. Holding the battery lock lever in the unlocked position 2 , remove the...
Hardware Maintenance Manual
Page 65
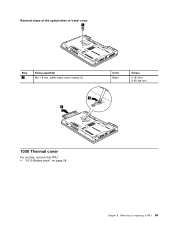
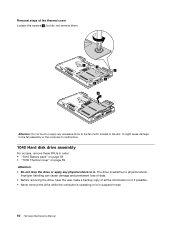
Removing or replacing a FRU 59 Removal steps of the optical drive or travel cover 1 Step 1 Screw (quantity) M2 × 8 mm, wafer-head, nylon-coated (1) 2 3 Color Black Torque 0.181 Nm (1.85 kgf-cm) 1030 Thermal cover For access, remove this FRU: • "1010 Battery pack" on page 58 Chapter 8.
Removing or replacing a FRU 59 Removal steps of the optical drive or travel cover 1 Step 1 Screw (quantity) M2 × 8 mm, wafer-head, nylon-coated (1) 2 3 Color Black Torque 0.181 Nm (1.85 kgf-cm) 1030 Thermal cover For access, remove this FRU: • "1010 Battery pack" on page 58 Chapter 8.
Hardware Maintenance Manual
Page 66
... cause damage to the fan assembly or the computer to mulfunction. 1040 Hard disk drive assembly For access, remove these FRUs in order: • "1010 Battery pack" on page 58 • "1030 Thermal cover" on it . The drive is in the slot. Removal steps of all the information on page 59...
... cause damage to the fan assembly or the computer to mulfunction. 1040 Hard disk drive assembly For access, remove these FRUs in order: • "1010 Battery pack" on page 58 • "1030 Thermal cover" on it . The drive is in the slot. Removal steps of all the information on page 59...

Hardware Maintenance Manual
Page 67
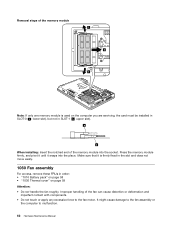
Removal steps of the hard disk drive assembly 1 When installing: Make sure that the hard disk drive connector is attached firmly. 2 a When installing: Do not apply excessive force to the hard disk drive bracket a . To do so, you might bend or break it. 1050 Memory module For access, remove these FRUs in order: • "1010 Battery pack" on page 58 • "1030 Thermal cover" on page 59 Chapter 8. Removing or replacing a FRU 61
Removal steps of the hard disk drive assembly 1 When installing: Make sure that the hard disk drive connector is attached firmly. 2 a When installing: Do not apply excessive force to the hard disk drive bracket a . To do so, you might bend or break it. 1050 Memory module For access, remove these FRUs in order: • "1010 Battery pack" on page 58 • "1030 Thermal cover" on page 59 Chapter 8. Removing or replacing a FRU 61
Hardware Maintenance Manual
Page 68
... memory module is firmly fixed in the slot and does not move easily. 1060 Fan assembly For access, remove these FRUs in order: • "1010 Battery pack" on page 58 • "1030 Thermal cover" on the computer you are servicing, the card must be installed in SLOT-0 ( a : lower slot), but not...
... memory module is firmly fixed in the slot and does not move easily. 1060 Fan assembly For access, remove these FRUs in order: • "1010 Battery pack" on page 58 • "1030 Thermal cover" on the computer you are servicing, the card must be installed in SLOT-0 ( a : lower slot), but not...


