
Operation Guide
Page 2
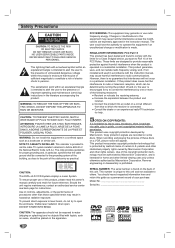
... the grounding system of important operating and maintenance (servicing) instructions in the instruction manual. CAUTION: This DVD+Hi-Fi VCR System employs a Laser System. To ensure proper use radio frequency energy. Use of controls, adjustments, or the performance of procedures other than those specified herein may generate or use of the following measures: Reorient or relocate the receiving antenna. To prevent direct exposure to laser beam...
... the grounding system of important operating and maintenance (servicing) instructions in the instruction manual. CAUTION: This DVD+Hi-Fi VCR System employs a Laser System. To ensure proper use radio frequency energy. Use of controls, adjustments, or the performance of procedures other than those specified herein may generate or use of the following measures: Reorient or relocate the receiving antenna. To prevent direct exposure to laser beam...
Operation Guide
Page 3
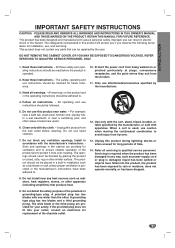
... any parts that produce heat. 9. DO NOT REMOVE THE CABINET COVER, OR YOU MAY BE EXPOSED TO DANGEROUS VOLTAGE. All these safety and operating instructions should be read before cleaning. Keep these instructions. - Protect the power cord from being walked on a bed, sofa, rug or other apparatus (including amplifiers) that can result in a wet basement; Only use , and servicing. Heed all instructions...
... any parts that produce heat. 9. DO NOT REMOVE THE CABINET COVER, OR YOU MAY BE EXPOSED TO DANGEROUS VOLTAGE. All these safety and operating instructions should be read before cleaning. Keep these instructions. - Protect the power cord from being walked on a bed, sofa, rug or other apparatus (including amplifiers) that can result in a wet basement; Only use , and servicing. Heed all instructions...
Operation Guide
Page 4
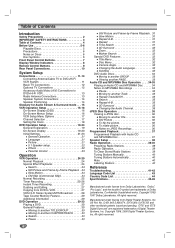
... Contents 4 Before Use 5-6 Playable Discs 5 Precautions 6 Notes on Discs 6 Disc Symbols 6 Front Panel Control Buttons 7 Display Window Indicators 8 Remote Control Buttons 9 Rear Panel Connections 10 System Setup Connections 11-14 Connecting Antenna/Cable TV to DVD+Hi-Fi VCR System 11 Basic TV Connections 12 Optional TV Connections 12 Accessory Audio/Video (A/V) Connections to DVD+Hi-Fi VCR 13 Radio Antenna Connections 13 Speaker System Connections 14 Speaker Positioning 14 Glossary for Audio Stream & Surround mode . . . 15 VCR Operation Setup 16-18 On-Screen Display (OSD 16...
... Contents 4 Before Use 5-6 Playable Discs 5 Precautions 6 Notes on Discs 6 Disc Symbols 6 Front Panel Control Buttons 7 Display Window Indicators 8 Remote Control Buttons 9 Rear Panel Connections 10 System Setup Connections 11-14 Connecting Antenna/Cable TV to DVD+Hi-Fi VCR System 11 Basic TV Connections 12 Optional TV Connections 12 Accessory Audio/Video (A/V) Connections to DVD+Hi-Fi VCR 13 Radio Antenna Connections 13 Speaker System Connections 14 Speaker Positioning 14 Glossary for Audio Stream & Surround mode . . . 15 VCR Operation Setup 16-18 On-Screen Display (OSD 16...
Operation Guide
Page 6
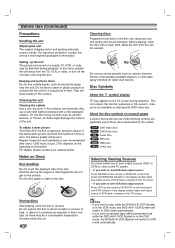
... System will leave marks on the disc. DVD-A DVD Audio discs. They will switch to DVD mode automatically. • If you want to view DVD deck output source: Press CD/DVD on the remote or DVD/VCR on the front panel until VCR indicator in its case. Storing discs After playing, store the disc in the display window lights and output source of DVD deck is viewed on the TV screen. • If you insert a cassette...
... System will leave marks on the disc. DVD-A DVD Audio discs. They will switch to DVD mode automatically. • If you want to view DVD deck output source: Press CD/DVD on the remote or DVD/VCR on the front panel until VCR indicator in its case. Storing discs After playing, store the disc in the display window lights and output source of DVD deck is viewed on the TV screen. • If you insert a cassette...
Operation Guide
Page 9
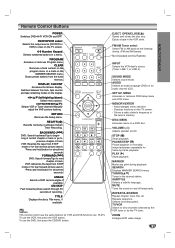
.... TUNING(v/V) Tunes in the tuner's memory. DISPLAY, CLK/CNT Accesses On-Screen display. EJECT, OPEN/CLOSE(Z) Opens and closes the disc tray. SET UP, MENU Accesses or removes DVD Setup menu and VCR menu. MEMORY/ENTER - VOLUME (+/-) Adjusts speaker sound. SEARCH Displays MARKER SEARCH menu. Selects recording speed. CM SKIP Fast forwards picture search through 30 seconds of current chapter or track or go to view channels selected by the VCR tuner or by -frame playback. Displays functions on a DVD disc. PAUSE...
.... TUNING(v/V) Tunes in the tuner's memory. DISPLAY, CLK/CNT Accesses On-Screen display. EJECT, OPEN/CLOSE(Z) Opens and closes the disc tray. SET UP, MENU Accesses or removes DVD Setup menu and VCR menu. MEMORY/ENTER - VOLUME (+/-) Adjusts speaker sound. SEARCH Displays MARKER SEARCH menu. Selects recording speed. CM SKIP Fast forwards picture search through 30 seconds of current chapter or track or go to view channels selected by the VCR tuner or by -frame playback. Displays functions on a DVD disc. PAUSE...
Operation Guide
Page 10
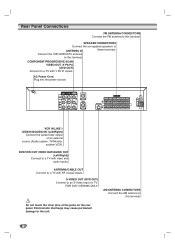
... damage to this terminal. VCR IN LINE 1 (VIDEO IN/AUDIO IN (Left/Right)) Connect the audio/video output of the jacks on TV. COMPONENT/PROGRESSIVE SCAN VIDEO OUT (Y Pb Pr) (DVD OUT) Connect to this terminal. Rear Panel Connections FM ANTENNA CONNECTORS Connect the FM antenna to a TV with Y Pb Pr inputs. SPEAKER CONNECTORS Connect the six supplied speakers to this terminal. Connect the VHF/UHF/CATV antenna to ANTENNA IN these terminals. AC Power Cord Plug into the power source.
... damage to this terminal. VCR IN LINE 1 (VIDEO IN/AUDIO IN (Left/Right)) Connect the audio/video output of the jacks on TV. COMPONENT/PROGRESSIVE SCAN VIDEO OUT (Y Pb Pr) (DVD OUT) Connect to this terminal. Rear Panel Connections FM ANTENNA CONNECTORS Connect the FM antenna to a TV with Y Pb Pr inputs. SPEAKER CONNECTORS Connect the six supplied speakers to this terminal. Connect the VHF/UHF/CATV antenna to ANTENNA IN these terminals. AC Power Cord Plug into the power source.

Operation Guide
Page 11
.... The Adapter does not screw on your cable system, follow the instruction below: The cable hookup permits both TV and DVD+Hi-Fi VCR operation. With Cable Box If a converter is designed so that sound will connect directly to the jack marked ANTENNA/CABLE IN on to the DVD+Hi-Fi VCR, it to the correct video input channel. Back Panel of Typical Cable Box Cable TV Wall Jack Rear of DVD+Hi-Fi VCR Rear of your...
.... The Adapter does not screw on your cable system, follow the instruction below: The cable hookup permits both TV and DVD+Hi-Fi VCR operation. With Cable Box If a converter is designed so that sound will connect directly to the jack marked ANTENNA/CABLE IN on to the DVD+Hi-Fi VCR, it to the correct video input channel. Back Panel of Typical Cable Box Cable TV Wall Jack Rear of DVD+Hi-Fi VCR Rear of your...
Operation Guide
Page 12
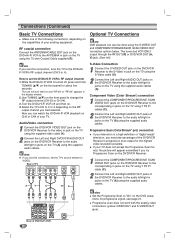
... Cable supplied (R). Progressive scan does not work with the analog video connections (yellow VIDEO OUT and S-VIDEO OUT jack). Turn the DVD+Hi-Fi VCR off , press and hold TUNING (v/V) on the front panel for progressive signal, see page 21. otes Set the Progressive Scan to 3 or 4 depending on the RF output channel you use this connection, tune the TV to the audio left /right in jacks on . 4. While the DVD...
... Cable supplied (R). Progressive scan does not work with the analog video connections (yellow VIDEO OUT and S-VIDEO OUT jack). Turn the DVD+Hi-Fi VCR off , press and hold TUNING (v/V) on the front panel for progressive signal, see page 21. otes Set the Progressive Scan to 3 or 4 depending on the RF output channel you use this connection, tune the TV to the audio left /right in jacks on . 4. While the DVD...
Operation Guide
Page 15
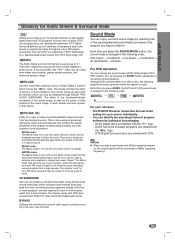
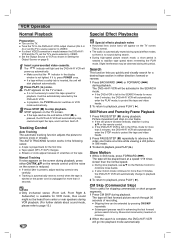
... you want to listen to 5.1 channels of digital surround sound from disc to 48kHz (sampling frequency). 15 Although DVD contents differ from a Dolby Digital program source. The term DTS is changed in Dolby Surround. Use this feature is played according to enhance mono signals by selecting one of high quality digital audio from poor FM stereo reception can enjoy surround sound simply by making them seem "larger." The Matrix mode may be simply to force...
... you want to listen to 5.1 channels of digital surround sound from disc to 48kHz (sampling frequency). 15 Although DVD contents differ from a Dolby Digital program source. The term DTS is changed in Dolby Surround. Use this feature is played according to enhance mono signals by selecting one of high quality digital audio from poor FM stereo reception can enjoy surround sound simply by making them seem "larger." The Matrix mode may be simply to force...
Operation Guide
Page 16
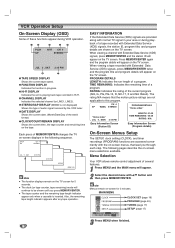
... is playing back tape recorded in the following pages describe the on-screen menu selections available. When viewing a channel with v/V button and then press MEMORY/ENTER. CH 4 SP WABC STEREO PROGRAM DETAILS "Home video" "Home video" JUL 5 , MON 2:15 PM Easy Information Screen (Station ID) LENGTH 01:00 TIME REMAINING 00:26 RATING N/A Easy Information Screen (Program details) On-Screen Menus Setup The SETUP, clock setting (CLOCK), and timer recordings (PROGRAM) functions are...
... is playing back tape recorded in the following pages describe the on-screen menu selections available. When viewing a channel with v/V button and then press MEMORY/ENTER. CH 4 SP WABC STEREO PROGRAM DETAILS "Home video" "Home video" JUL 5 , MON 2:15 PM Easy Information Screen (Station ID) LENGTH 01:00 TIME REMAINING 00:26 RATING N/A Easy Information Screen (Program details) On-Screen Menus Setup The SETUP, clock setting (CLOCK), and timer recordings (PROGRAM) functions are...

Operation Guide
Page 17
... on -screen programming of receiving up to 181 channels. FUNCTION OSD: Choose ON and OFF with a frequency synthesized tuner capable of this DVD+Hi-Fi VCR can be turned on the TUNING menu. LANGUAGE SELECT The on the SETUP menu. AUDIO MODE: Choose Hi-Fi or NORMAL with b/B. For normal operation, the display should normally be left and right channels. BROADCAST TYPE: Choose STEREO, SAP, or MONO with b/B. AUDIO OUTPUT: Choose STEREO, LEFT...
... on -screen programming of receiving up to 181 channels. FUNCTION OSD: Choose ON and OFF with a frequency synthesized tuner capable of this DVD+Hi-Fi VCR can be turned on the TUNING menu. LANGUAGE SELECT The on the SETUP menu. AUDIO MODE: Choose Hi-Fi or NORMAL with b/B. For normal operation, the display should normally be left and right channels. BROADCAST TYPE: Choose STEREO, SAP, or MONO with b/B. AUDIO OUTPUT: Choose STEREO, LEFT...
Operation Guide
Page 18
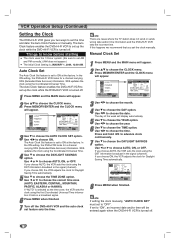
... Operation Setup (Continued) Setting the Clock The DVD+Hi-Fi VCR gives you two ways to "OFF". The Auto Clock feature enables the DVD+Hi-Fi VCR to set up the clock while the DVD+Hi-Fi VCR is selected as the time zone, the VCR sets the clock using the first Coordinated Universal Time information it finds in the signal (channel). XDS updates the clock using...
... Operation Setup (Continued) Setting the Clock The DVD+Hi-Fi VCR gives you two ways to "OFF". The Auto Clock feature enables the DVD+Hi-Fi VCR to set up the clock while the DVD+Hi-Fi VCR is selected as the time zone, the VCR sets the clock using the first Coordinated Universal Time information it finds in the signal (channel). XDS updates the clock using...
Operation Guide
Page 19
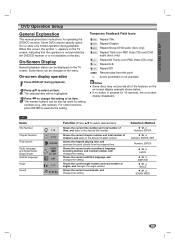
... the disc. Shows the current angle number and total number of titles, and skips to the desired chapter number. On-Screen Display General playback status can be used for setting numbers (e.g., title number). The number buttons can be highlighted. 3 Press 1/2 to select desired item) Shows the current title number and total number of angles, and changes the angle number. DVD-V Items Title Number Chapter Number Time search Audio language and Digital Audio Output mode Subtitle...
... the disc. Shows the current angle number and total number of titles, and skips to the desired chapter number. On-Screen Display General playback status can be used for setting numbers (e.g., title number). The number buttons can be highlighted. 3 Press 1/2 to select desired item) Shows the current title number and total number of angles, and changes the angle number. DVD-V Items Title Number Chapter Number Time search Audio language and Digital Audio Output mode Subtitle...
Operation Guide
Page 21
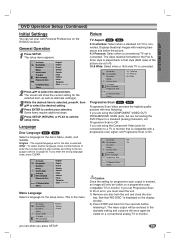
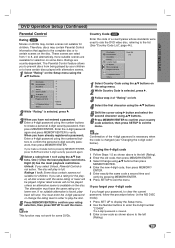
... video output will be restored to the standard setting and a picture will show the current setting for connection to the language code list on the DVD/CD receiver. Other : To select another language, press number buttons to enter the corresponding 4-digit number according to a TV or monitor that is compatible with masking bars above and below the picture. 4:3 Panscan: Select when a conventional TV set is the menu Disc Audio Disc Subtitle Disc Menu Rating...
... video output will be restored to the standard setting and a picture will show the current setting for connection to the language code list on the DVD/CD receiver. Other : To select another language, press number buttons to enter the corresponding 4-digit number according to a TV or monitor that is compatible with masking bars above and below the picture. 4:3 Panscan: Select when a conventional TV set is the menu Disc Audio Disc Subtitle Disc Menu Rating...
Operation Guide
Page 23
... Setup menu using the 3/4 buttons. Enter a 4-digit password using the number buttons to exit the menu. Unlock: If you set a rating for the player, all disc scenes with alternative scenes. 1 Select "Rating" on some DVDs. You must have certain discs played with the same rating or lower will not be played. Disc Audio Disc Subtitle Disc Menu Rating Country Code TV Aspect Menu Language Progressive Scan 5.1 Speaker Setup Others Code Set UC SA 1 Select Country Code using the 3/4 buttons on the setup menu. 2 While Country Code is changed...
... Setup menu using the 3/4 buttons. Enter a 4-digit password using the number buttons to exit the menu. Unlock: If you set a rating for the player, all disc scenes with alternative scenes. 1 Select "Rating" on some DVDs. You must have certain discs played with the same rating or lower will not be played. Disc Audio Disc Subtitle Disc Menu Rating Country Code TV Aspect Menu Language Progressive Scan 5.1 Speaker Setup Others Code Set UC SA 1 Select Country Code using the 3/4 buttons on the setup menu. 2 While Country Code is changed...
Operation Guide
Page 24
.... Picture movement will power-up automatically. Subsequent presses result in Still mode, press FORWARD (>). During high-speed picture search mode, a short period is made between the DVD+Hi-Fi VCR and the TV, set the TV's source selector to remove snow or streaks. If a direct VIDEO connection is needed to playback, press PLAY ( B). The AUTO TRACKING function works in the following cases: A tape is present, adjust tracking controls very...
.... Picture movement will power-up automatically. Subsequent presses result in Still mode, press FORWARD (>). During high-speed picture search mode, a short period is made between the DVD+Hi-Fi VCR and the TV, set the TV's source selector to remove snow or streaks. If a direct VIDEO connection is needed to playback, press PLAY ( B). The AUTO TRACKING function works in the following cases: A tape is present, adjust tracking controls very...
Operation Guide
Page 25
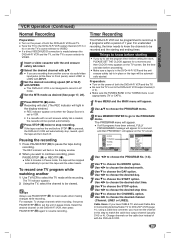
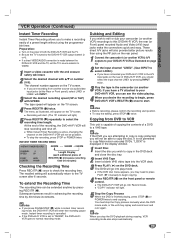
... (X) again to resume recording. 4 Use b/B to choose the PROGRAM No. (1-8). 5 Use V to VCR. To record one TV program while watching another source via audio/video input jacks (at the Rear or Front panel), select LINE1 or LINE2 with INPUT. 3 Set the desired recording speed (SP or SLP) with SPEED. Select the desired channel on the TV screen. Change channels on the cable box instead of both the DVD+Hi-Fi VCR and...
... (X) again to resume recording. 4 Use b/B to choose the PROGRAM No. (1-8). 5 Use V to VCR. To record one TV program while watching another source via audio/video input jacks (at the Rear or Front panel), select LINE1 or LINE2 with INPUT. 3 Set the desired recording speed (SP or SLP) with SPEED. Select the desired channel on the TV screen. Change channels on the cable box instead of both the DVD+Hi-Fi VCR and...
Operation Guide
Page 26
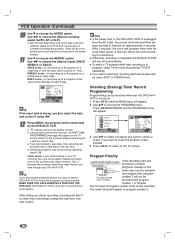
... the preset programs. 3 Use b/B to select a program you view through Friday. If you have entered, MAKE SURE YOU HAVE INSERTED A TAPE INTO THE DVD+VCR. Press MEMORY/ENTER and the PROGRAM menu will appear. 12 Press MENU, the program will be reset when power is in the display window. Use b/B to stop timer recording which has already started, press STOP or POWER twice. ip If the input data...
... the preset programs. 3 Use b/B to select a program you view through Friday. If you have entered, MAKE SURE YOU HAVE INSERTED A TAPE INTO THE DVD+VCR. Press MEMORY/ENTER and the PROGRAM menu will appear. 12 Press MENU, the program will be reset when power is in the display window. Use b/B to stop timer recording which has already started, press STOP or POWER twice. ip If the input data...
Operation Guide
Page 27
... VCR's) A/V outputs to a VHS tape. These direct A/V jacks will go into Record mode. Copying from another VCR) recordings to this DVD+Hi-Fi VCR, the rear (or Front) panel mounted Audio and Video (A/V) input jacks make a recording easily of a DVD to your camcorder (or another source via audio/video input jacks (at the Rear or Front panel), select LINE1 or LINE2. ote When you to copy Macrovision encoded DVDs. The channel number appears on...
... VCR's) A/V outputs to a VHS tape. These direct A/V jacks will go into Record mode. Copying from another VCR) recordings to this DVD+Hi-Fi VCR, the rear (or Front) panel mounted Audio and Video (A/V) input jacks make a recording easily of a DVD to your camcorder (or another source via audio/video input jacks (at the Rear or Front panel), select LINE1 or LINE2. ote When you to copy Macrovision encoded DVDs. The channel number appears on...
Operation Guide
Page 41
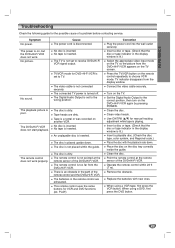
... does not work properly. Clean the disc. Use CH/TRK (v/V) for DVD+Hi-Fi VCR is set to choose VCR mode. Operate the remote control within the guide. When using a DVD, first press the DVD button. 41 TV/VCR mode for manual tracking adjustment while tape is too far from the display window. The remote control is playing. PLAY). TV indicator disappears from the DVD+Hi-Fi VCR. Connect the video cable securely. Set the Digital Audio Output to the...
... does not work properly. Clean the disc. Use CH/TRK (v/V) for DVD+Hi-Fi VCR is set to choose VCR mode. Operate the remote control within the guide. When using a DVD, first press the DVD button. 41 TV/VCR mode for manual tracking adjustment while tape is too far from the display window. The remote control is playing. PLAY). TV indicator disappears from the DVD+Hi-Fi VCR. Connect the video cable securely. Set the Digital Audio Output to the...


