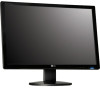

User Guide
Page 3
...or strike the Active Matrix LCD with cloth or other material. If possible, use the recommended resolution to use an aerosol directly on this product contains a small amount of the fixed-resolution LCD panel. On Cleaning Unplug the display before cleaning the face of this display near a bathtub... this product. Do not use a screen saver on the screen. On Disposal The fluorescent lamp used under any mode except the recommended resolution, some afterimages. On Repacking Do not throw away the carton and packing materials. Main power breaker is the power cord and this may...
...or strike the Active Matrix LCD with cloth or other material. If possible, use the recommended resolution to use an aerosol directly on this product contains a small amount of the fixed-resolution LCD panel. On Cleaning Unplug the display before cleaning the face of this display near a bathtub... this product. Do not use a screen saver on the screen. On Disposal The fluorescent lamp used under any mode except the recommended resolution, some afterimages. On Repacking Do not throw away the carton and packing materials. Main power breaker is the power cord and this may...

User Guide
Page 8
... may differ from the view as blurry screen, blurred letters, screen flicker or tilted screen while using the device or after changing screen resolution, press the AUTO/SET function button to maintain standard compliance for the first time, this function automatically adjusts the display to a 15 pin...the supplied cable to optimal settings for individual input signals. 'AUTO/SET' Function? This function provides the user with ferrite cores to improve resolution. Make sure to turn off the computer and product. Press button on , the 'Self Image Setting Function' is needed to change the...
... may differ from the view as blurry screen, blurred letters, screen flicker or tilted screen while using the device or after changing screen resolution, press the AUTO/SET function button to maintain standard compliance for the first time, this function automatically adjusts the display to a 15 pin...the supplied cable to optimal settings for individual input signals. 'AUTO/SET' Function? This function provides the user with ferrite cores to improve resolution. Make sure to turn off the computer and product. Press button on , the 'Self Image Setting Function' is needed to change the...

User Guide
Page 10
... changes to decrease or increase the speaker volume. If the display is W1942PM : 1440 x 900 W2042PM/W2242PM : 1680 x 1050 Power Button Power Indicator Use this button to the ideal settings for the current screen resolution size (display mode). This will automatically adjust your display settings, always press the AUTO/SET button before...
... changes to decrease or increase the speaker volume. If the display is W1942PM : 1440 x 900 W2042PM/W2242PM : 1680 x 1050 Power Button Power Indicator Use this button to the ideal settings for the current screen resolution size (display mode). This will automatically adjust your display settings, always press the AUTO/SET button before...
User Guide
Page 16
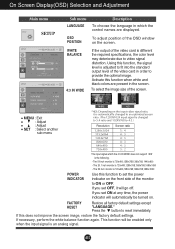
..., the color level may deteriorate due to provide the optimal image. If this function when white and black colors are displayed. Using this function to 4:3.) Resolution Screen ratio 1280x1024 5 : 4 1152x864 4 : 3 1024x768 4 : 3 800x600 4 : 3 640x480 4 : 3 720x480 3 : 2 The input signal which the control names are present in which the 4:3 IN WIDE does not support...
..., the color level may deteriorate due to provide the optimal image. If this function when white and black colors are displayed. Using this function to 4:3.) Resolution Screen ratio 1280x1024 5 : 4 1152x864 4 : 3 1024x768 4 : 3 800x600 4 : 3 640x480 4 : 3 720x480 3 : 2 The input signal which the control names are present in which the 4:3 IN WIDE does not support...
User Guide
Page 19
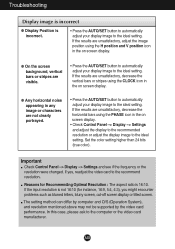
... automatically adjust your display image to the ideal setting. G Any horizontal noise appearing in the on screen display. Reasons for Recommending Optimal Resolution : The aspect ratio is not 16:10 (for instance, 16:9, 5:4, 4:3), you might encounter problems such as blurred letters, blurry screen..., decrease the horizontal bars using the CLOCK icon in the on screen display. In this case, please ask to the recommend resolution. Troubleshooting Display image is incorrect G Display Position is incorrect. • Press the AUTO/SET button to automatically adjust your display...
... automatically adjust your display image to the ideal setting. G Any horizontal noise appearing in the on screen display. Reasons for Recommending Optimal Resolution : The aspect ratio is not 16:10 (for instance, 16:9, 5:4, 4:3), you might encounter problems such as blurred letters, blurry screen..., decrease the horizontal bars using the CLOCK icon in the on screen display. In this case, please ask to the recommend resolution. Troubleshooting Display image is incorrect G Display Position is incorrect. • Press the AUTO/SET button to automatically adjust your display...
User Guide
Page 20
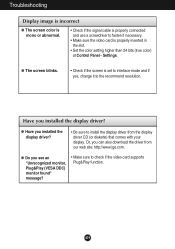
... mode and if yes, change it to fasten if necessary. • Make sure the video card is properly connected and use a screwdriver to the recommend resolution. G Have you can also download the driver from the display driver CD (or diskette) that comes with your display. Or, you installed the display driver...
... mode and if yes, change it to fasten if necessary. • Make sure the video card is properly connected and use a screwdriver to the recommend resolution. G Have you can also download the driver from the display driver CD (or diskette) that comes with your display. Or, you installed the display driver...

User Guide
Page 21
... TTL, Positive/Negative SOG (Sync On Green) Digital (HDCP) Signal Input Input Form 15 pin D-Sub Connector DVI - Specifications W1942PM Display Sync Input Video Input Resolution Plug&Play Power Consumption Dimensions & Weight Tilt Range Power Input Environmental Conditions Stand Base Power cord 19 inches (48.1 cm) Flat Panel Active matrix-TFT...
... TTL, Positive/Negative SOG (Sync On Green) Digital (HDCP) Signal Input Input Form 15 pin D-Sub Connector DVI - Specifications W1942PM Display Sync Input Video Input Resolution Plug&Play Power Consumption Dimensions & Weight Tilt Range Power Input Environmental Conditions Stand Base Power cord 19 inches (48.1 cm) Flat Panel Active matrix-TFT...

User Guide
Page 22
... TTL, Positive/Negative SOG (Sync On Green), Digital (HDCP) Signal Input Input Form 15 pin D-Sub Connector DVI - Specifications W2042PM Display Sync Input Video Input Resolution Plug&Play Power Consumption Dimensions & Weight Tilt Range Power Input Environmental Conditions Stand Base Power cord 20.1 inches (51.1 cm) Flat Panel Active matrix-TFT...
... TTL, Positive/Negative SOG (Sync On Green), Digital (HDCP) Signal Input Input Form 15 pin D-Sub Connector DVI - Specifications W2042PM Display Sync Input Video Input Resolution Plug&Play Power Consumption Dimensions & Weight Tilt Range Power Input Environmental Conditions Stand Base Power cord 20.1 inches (51.1 cm) Flat Panel Active matrix-TFT...

User Guide
Page 23
...) Separate TTL, Positive/Negative SOG (Sync On Green), Digital (HDCP) Signal Input Input Form 15 pin D-Sub Connector DVI - Vertical Freq. Specifications W2242PM Display Sync Input Video Input Resolution Plug&Play Power Consumption Dimensions & Weight Tilt Range Power Input Environmental Conditions Stand Base Power cord 22 inches (55.8 cm) Flat Panel Active...
...) Separate TTL, Positive/Negative SOG (Sync On Green), Digital (HDCP) Signal Input Input Form 15 pin D-Sub Connector DVI - Vertical Freq. Specifications W2242PM Display Sync Input Video Input Resolution Plug&Play Power Consumption Dimensions & Weight Tilt Range Power Input Environmental Conditions Stand Base Power cord 22 inches (55.8 cm) Flat Panel Active...

User Guide
Page 24
Specifications Preset Modes (Resolution) 19 inch monitor Display Modes (Resolution) 1 640 x 350 2 720 x 400 3 640 x 480 4 640 x 480 5 800 x 600 6 800 x 600 7 832 x 624 8 1024 x 768 9 1024 x 768 10 1152 x 870 11 1152 x 900 12 ...1280 x 1024 13 1280 x 1024 14 1440 x 900 *15 1440 x 900 **16 1440 x 900 20.1/22 inch monitor Display Modes (Resolution) 1 720 x 400 2 640 x 480 3 640 x 480 4 800 x 600 5 800 x 600 6 1024 x 768 7 1024 x 768 8 1152 x 864 9 1280 x 1024 10 1280 x 1024 11 1680 x 1050 *12...
Specifications Preset Modes (Resolution) 19 inch monitor Display Modes (Resolution) 1 640 x 350 2 720 x 400 3 640 x 480 4 640 x 480 5 800 x 600 6 800 x 600 7 832 x 624 8 1024 x 768 9 1024 x 768 10 1152 x 870 11 1152 x 900 12 ...1280 x 1024 13 1280 x 1024 14 1440 x 900 *15 1440 x 900 **16 1440 x 900 20.1/22 inch monitor Display Modes (Resolution) 1 720 x 400 2 640 x 480 3 640 x 480 4 800 x 600 5 800 x 600 6 1024 x 768 7 1024 x 768 8 1152 x 864 9 1280 x 1024 10 1280 x 1024 11 1680 x 1050 *12...


