
User Manual
Page 4
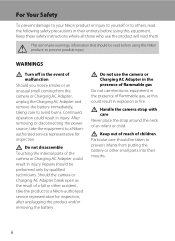
... them. Do not disassemble Touching the internal parts of malfunction Should you notice smoke or an unusual smell coming from putting the battery or other accident, take the equipment to a Nikonauthorized service representative for inspection, after unplugging the product and/or removing the... battery. Handle the camera strap with care Never place the strap around the neck of children Particular care should be performed only by qualified...
... them. Do not disassemble Touching the internal parts of malfunction Should you notice smoke or an unusual smell coming from putting the battery or other accident, take the equipment to a Nikonauthorized service representative for inspection, after unplugging the product and/or removing the... battery. Handle the camera strap with care Never place the strap around the neck of children Particular care should be performed only by qualified...
User Manual
Page 5
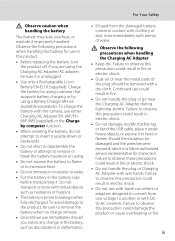
...heat. • Do not immerse in or expose to water. • Put the battery in the battery, such as necklaces or hairpins. • The battery is unplugged. • Use only a Rechargeable Li-ion Battery EN-EL10 (supplied). To avoid damage to another or with a dry cloth. Observe the... to observe these precautions could damage the product or cause overheating or fire. Failure to observe this product: • Before replacing the battery, turn the product off. Observe the following precautions when handling the Charging AC Adapter • Keep dry. For Your Safety Observe caution...
...heat. • Do not immerse in or expose to water. • Put the battery in the battery, such as necklaces or hairpins. • The battery is unplugged. • Use only a Rechargeable Li-ion Battery EN-EL10 (supplied). To avoid damage to another or with a dry cloth. Observe the... to observe these precautions could damage the product or cause overheating or fire. Failure to observe this product: • Before replacing the battery, turn the product off. Observe the following precautions when handling the Charging AC Adapter • Keep dry. For Your Safety Observe caution...

User Manual
Page 8
..., a chemical known to the State of California WARNING Handling the cord on this product is to users in European countries: • All batteries, whether marked with Canadian ICES-003. ATTENTION Cet appareil numérique de la classe B est conforme à la norme NMB-003 du... waste. • For more information, contact the retailer or the local authorities in charge of waste management. This symbol indicates that the battery is designated for separate collection at an appropriate collection point. Do not dispose of as household waste. • For more information, contact ...
..., a chemical known to the State of California WARNING Handling the cord on this product is to users in European countries: • All batteries, whether marked with Canadian ICES-003. ATTENTION Cet appareil numérique de la classe B est conforme à la norme NMB-003 du... waste. • For more information, contact the retailer or the local authorities in charge of waste management. This symbol indicates that the battery is designated for separate collection at an appropriate collection point. Do not dispose of as household waste. • For more information, contact ...
User Manual
Page 9
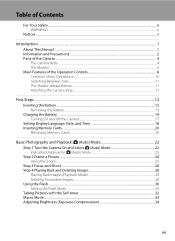
... Menu Operations...10 Switching Between Tabs...11 The Shutter-release Button...11 Attaching the Camera Strap ...11 First Steps ...12 Inserting the Battery ...12 Removing the Battery ...13 Charging the Battery ...14 Turning On and Off the Camera...17 Setting Display Language, Date, and Time 18 Inserting Memory Cards ...20 Removing Memory Cards...
... Menu Operations...10 Switching Between Tabs...11 The Shutter-release Button...11 Attaching the Camera Strap ...11 First Steps ...12 Inserting the Battery ...12 Removing the Battery ...13 Charging the Battery ...14 Turning On and Off the Camera...17 Setting Display Language, Date, and Time 18 Inserting Memory Cards ...20 Removing Memory Cards...
User Manual
Page 14
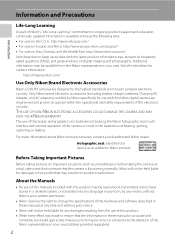
...Learning As part of the Nikon representative in your area. Additional information may be available from the Nikon representative in the batteries overheating, igniting, rupturing, or leaking. For more information about Nikon brand accessories, contact a local authorized Nikon dealer. ...and safety requirements of the camera or result in your area (address provided separately). 2 Only Nikon brand electronic accessories (including battery charger, batteries, Charging AC Adapter, and AC adapters) certified by any means, without Nikon's prior written permission. • Nikon reserves...
...Learning As part of the Nikon representative in your area. Additional information may be available from the Nikon representative in the batteries overheating, igniting, rupturing, or leaking. For more information about Nikon brand accessories, contact a local authorized Nikon dealer. ...and safety requirements of the camera or result in your area (address provided separately). 2 Only Nikon brand electronic accessories (including battery charger, batteries, Charging AC Adapter, and AC adapters) certified by any means, without Nikon's prior written permission. • Nikon reserves...

User Manual
Page 17
... lamp 15, 113 Flash lamp 31 6 Tripod socket 159 7 d button 10, 36, 83, 103, 121 8 l (delete) button 29, 92, 106 9 Cover latch 12, 20 10 Battery-chamber/ memory card slot cover 12, 20 15 16 17 18 11 k (apply selection) button 9 12 Eyelet for camera strap 11 13 c (playback) button 8, 28..., 77 14 USB/audio/video output connector 14, 107, 109, 115 15 Connector cover........... 14, 107, 109, 115 16 Battery latch 12, 13 17 Battery chamber 12 18 Memory card slot 20 5
... lamp 15, 113 Flash lamp 31 6 Tripod socket 159 7 d button 10, 36, 83, 103, 121 8 l (delete) button 29, 92, 106 9 Cover latch 12, 20 10 Battery-chamber/ memory card slot cover 12, 20 15 16 17 18 11 k (apply selection) button 9 12 Eyelet for camera strap 11 13 c (playback) button 8, 28..., 77 14 USB/audio/video output connector 14, 107, 109, 115 15 Connector cover........... 14, 107, 109, 115 16 Battery latch 12, 13 17 Battery chamber 12 18 Memory card slot 20 5

User Manual
Page 18
... 19 Focus area (for manual or center) ..... 45 4 Focus indicator 26 20 Focus area (face detection 45, 64 5 AE/AF-L indicator 63 6 Flash mode 30 7 Battery level indicator 22 8 Vibration reduction icon 23, 129 9 Motion detection icon 23, 130 10 "Date not set" indicator 123, 147 11 Travel destination icon 123...
... 19 Focus area (for manual or center) ..... 45 4 Focus indicator 26 20 Focus area (face detection 45, 64 5 AE/AF-L indicator 63 6 Flash mode 30 7 Battery level indicator 22 8 Vibration reduction icon 23, 129 9 Motion detection icon 23, 130 10 "Date not set" indicator 123, 147 11 Travel destination icon 123...

User Manual
Page 19
.../9999 a 1m00s 9 1m00s b 1 Date of recording 18 2 Time of recording 18 3 Protect icon 88 4 Volume indicator 92, 106 5 Category icon in auto sort mode1 ....78 6 Battery level indicator 22 7 Movie options2 104 8 Image mode2 37 (a) Current frame number/ 9 total number of frames 28 (b) Movie length 106 10 Internal memory indicator 28...
.../9999 a 1m00s 9 1m00s b 1 Date of recording 18 2 Time of recording 18 3 Protect icon 88 4 Volume indicator 92, 106 5 Category icon in auto sort mode1 ....78 6 Battery level indicator 22 7 Movie options2 104 8 Image mode2 37 (a) Current frame number/ 9 total number of frames 28 (b) Movie length 106 10 Internal memory indicator 28...

User Manual
Page 24
...) into the camera. • Charge the battery before the first use or when the battery is in place. Use the edge of the battery to check that the battery is running low (A 14). 1 Open the battery-chamber/memory card slot cover. 2 Insert the supplied battery. Battery chamber B Inserting the Battery Inserting the battery upside down or backwards could damage...
...) into the camera. • Charge the battery before the first use or when the battery is in place. Use the edge of the battery to check that the battery is running low (A 14). 1 Open the battery-chamber/memory card slot cover. 2 Insert the supplied battery. Battery chamber B Inserting the Battery Inserting the battery upside down or backwards could damage...
User Manual
Page 25
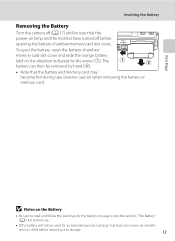
...flat before opening the battery-chamber/memory card slot cover. observe caution when removing the battery or memory card. The battery can then be removed by the arrow (1). First Steps B Notes on the Battery • Be sure to storage. 13 Inserting the Battery Removing the Battery Turn the camera off... (A 17) and be sure that the battery and memory card ...
...flat before opening the battery-chamber/memory card slot cover. observe caution when removing the battery or memory card. The battery can then be removed by the arrow (1). First Steps B Notes on the Battery • Be sure to storage. 13 Inserting the Battery Removing the Battery Turn the camera off... (A 17) and be sure that the battery and memory card ...
User Manual
Page 26
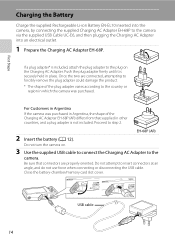
...). Do not turn the camera on the Charging AC Adapter. If a plug adapter* is not included. Close the battery-chamber/memory card slot cover. Be sure that connectors are connected, attempting to forcibly remove the plug adapter could damage the product. * The shape of ..., and then plugging the Charging AC Adapter into an electrical outlet. 1 Prepare the Charging AC Adapter EH-68P. First Steps Charging the Battery Charge the supplied Rechargeable Li-ion Battery EN-EL10 inserted into the camera, by connecting the supplied Charging AC Adapter EH-68P to step 2. Do not attempt to the...
...). Do not turn the camera on the Charging AC Adapter. If a plug adapter* is not included. Close the battery-chamber/memory card slot cover. Be sure that connectors are connected, attempting to forcibly remove the plug adapter could damage the product. * The shape of ..., and then plugging the Charging AC Adapter into an electrical outlet. 1 Prepare the Charging AC Adapter EH-68P. First Steps Charging the Battery Charge the supplied Rechargeable Li-ion Battery EN-EL10 inserted into the camera, by connecting the supplied Charging AC Adapter EH-68P to step 2. Do not attempt to the...

User Manual
Page 27
... cable or Charging AC Adapter is not properly connected, or there is charging. Off Battery not charging. First Steps 4 Plug the Charging AC Adapter into the electrical outlet. Charging the Battery The following chart explains charge lamp status when the camera is complete, the charge lamp... (green) • The ambient temperature is not suited to charge a fully exhausted battery. Disconnect the USB cable or unplug the Charging AC Adapter and correctly connect it again, or change the battery. 5 Disconnect the Charging AC Adapter from the electrical outlet and then disconnect the USB...
... cable or Charging AC Adapter is not properly connected, or there is charging. Off Battery not charging. First Steps 4 Plug the Charging AC Adapter into the electrical outlet. Charging the Battery The following chart explains charge lamp status when the camera is complete, the charge lamp... (green) • The ambient temperature is not suited to charge a fully exhausted battery. Disconnect the USB cable or unplug the Charging AC Adapter and correctly connect it again, or change the battery. 5 Disconnect the Charging AC Adapter from the electrical outlet and then disconnect the USB...
User Manual
Page 28
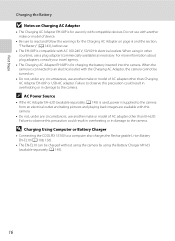
... camera. • Do not, under any circumstances, use a plug adapter (commercially available) as necessary. D Charging Using Computer or Battery Charger • Connecting the COOLPIX S5100 to a computer also charges the Rechargeable Li-ion Battery EN-EL10 (A 108, 136). • The EN-EL10 can be turned on. • Do not, under any circumstances, use...
... camera. • Do not, under any circumstances, use a plug adapter (commercially available) as necessary. D Charging Using Computer or Battery Charger • Connecting the COOLPIX S5100 to a computer also charges the Rechargeable Li-ion Battery EN-EL10 (A 108, 136). • The EN-EL10 can be turned on. • Do not, under any circumstances, use...
User Manual
Page 29
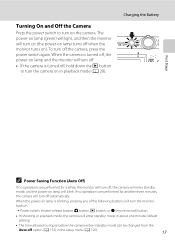
... Off the Camera Press the power switch to turn on ). The power-on lamp (green) will light, and then the monitor will blink. Charging the Battery First Steps C Power Saving Function (Auto Off) If no operations are performed for another three minutes, the camera will enter standby mode, and the power...
... Off the Camera Press the power switch to turn on ). The power-on lamp (green) will light, and then the monitor will blink. Charging the Battery First Steps C Power Saving Function (Auto Off) If no operations are performed for another three minutes, the camera will enter standby mode, and the power...

User Manual
Page 32
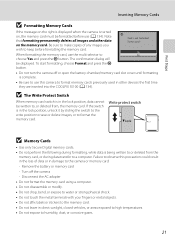
...cover. Press the card in (1) to partially eject the card, then remove the card by hand while being careful not to check that the battery and memory card may become hot during use; Memory card slot B Inserting Memory Cards Inserting the memory card upside down or backwards could damage... the camera or the memory card. Removing Memory Cards Turn the camera off and be played back, deleted, or transferred. observe caution when removing the battery or memory card. 20 First Steps 2 Insert the memory card. A 145). Be sure to remove the card at an angle (2). • Note ...
...cover. Press the card in (1) to partially eject the card, then remove the card by hand while being careful not to check that the battery and memory card may become hot during use; Memory card slot B Inserting Memory Cards Inserting the memory card upside down or backwards could damage... the camera or the memory card. Removing Memory Cards Turn the camera off and be played back, deleted, or transferred. observe caution when removing the battery or memory card. 20 First Steps 2 Insert the memory card. A 145). Be sure to remove the card at an angle (2). • Note ...
User Manual
Page 33
... B Formatting Memory Cards If the message on the right is displayed when the camera is turned on the memory card. Remove the battery or memory card - The confirmation dialog will be written to humidity, dust, or corrosive gases. 21 Note that formatting permanently deletes ...all images and other devices the first time they are inserted into the COOLPIX S5100 (A 134). Card is not formatted. Disconnect the AC adapter • Do not format the memory card using a computer. • Do ...
... B Formatting Memory Cards If the message on the right is displayed when the camera is turned on the memory card. Remove the battery or memory card - The confirmation dialog will be written to humidity, dust, or corrosive gases. 21 Note that formatting permanently deletes ...all images and other devices the first time they are inserted into the COOLPIX S5100 (A 134). Card is not formatted. Disconnect the AC adapter • Do not format the memory card using a computer. • Do ...
User Manual
Page 34
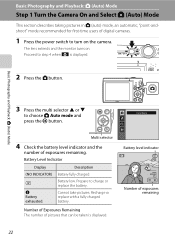
... and the number of pictures that can be taken is displayed. 2 Press the A button. Battery low. Number of Exposures Remaining The number of exposures remaining. Battery level indicator 9 Number of exposures remaining 22 Recharge or replace with a fully charged battery. Prepare to choose A Auto mode and press the k button. Basic Photography and Playback...
... and the number of pictures that can be taken is displayed. 2 Press the A button. Battery low. Number of Exposures Remaining The number of exposures remaining. Battery level indicator 9 Number of exposures remaining 22 Recharge or replace with a fully charged battery. Prepare to choose A Auto mode and press the k button. Basic Photography and Playback...

User Manual
Page 39
... use focus lock (A 46). Basic Photography and Playback: A (Auto) Mode Step 3 Focus and Shoot B During Saving While images are being saved. Do not open the battery-chamber/memory card slot cover while images are being saved, the number of a white wall) • Several objects are at the same distance from the...
... use focus lock (A 46). Basic Photography and Playback: A (Auto) Mode Step 3 Focus and Shoot B During Saving While images are being saved. Do not open the battery-chamber/memory card slot cover while images are being saved, the number of a white wall) • Several objects are at the same distance from the...

User Manual
Page 43
... red-eye reduction (In-Camera Red-Eye Fix). Set Vibration reduction (A 129) to W (off , and reapplied the next time A (auto) mode is saved. If the battery is low, the monitor display will fire when picture is taken. See "Camera Settings that Cannot Be Applied Simultaneously" (A 49) for Blink proof; The flash...
... red-eye reduction (In-Camera Red-Eye Fix). Set Vibration reduction (A 129) to W (off , and reapplied the next time A (auto) mode is saved. If the battery is low, the monitor display will fire when picture is taken. See "Camera Settings that Cannot Be Applied Simultaneously" (A 49) for Blink proof; The flash...
User Manual
Page 113
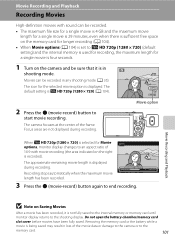
.... When x HD 720p (1280 × 720) is selected for Movie options, monitor display changes to the memory card. 101 Removing the memory card or the battery while a movie is being saved may result in loss of the movie data or damage to the camera or to an aspect ratio of the... B Note on Saving Movies After a movie has been recorded, it is in shooting mode. Focus areas are not displayed during recording. Do not open the battery-chamber/memory card slot cover before movies have been fully saved. Movies can be recorded. • The maximum file size for a single movie is 4 GB...
.... When x HD 720p (1280 × 720) is selected for Movie options, monitor display changes to the memory card. 101 Removing the memory card or the battery while a movie is being saved may result in loss of the movie data or damage to the camera or to an aspect ratio of the... B Note on Saving Movies After a movie has been recorded, it is in shooting mode. Focus areas are not displayed during recording. Do not open the battery-chamber/memory card slot cover before movies have been fully saved. Movies can be recorded. • The maximum file size for a single movie is 4 GB...

