Operation Guide
Page 5
The installer remote allows access to duplicate a LG TV's setup and install it on another identical LG TV. TABLE OF CONTENTS Use this page as the LP702, and the LT2000 Quickset II Clone Programmer-both are subject to change without ... 6 Optional LP702 Installer's remote control 7 Connections/Installation Overview 8 Step 1. The LT2000 Quickset II Clone Programmer is used to the Installer and User menus. Note: Design and specifications are shown and described in later sections. See your LG Dealer. TV Reception Set Up & Channel Search Auto Program: Select Antenna, or ...
The installer remote allows access to duplicate a LG TV's setup and install it on another identical LG TV. TABLE OF CONTENTS Use this page as the LP702, and the LT2000 Quickset II Clone Programmer-both are subject to change without ... 6 Optional LP702 Installer's remote control 7 Connections/Installation Overview 8 Step 1. The LT2000 Quickset II Clone Programmer is used to the Installer and User menus. Note: Design and specifications are shown and described in later sections. See your LG Dealer. TV Reception Set Up & Channel Search Auto Program: Select Antenna, or ...

Operation Guide
Page 6
... Off and On, while the picture remains. Aux Channel allows the guest to 4-hours. CHANNEL -+ 1 2 3 4 5 6 7 8 9 0 ENTER TIMER ALARM CH PREVIEW Remote Control part number SC652LG 6710V00108B FLASHBK (FLASHBACK) Returns to access closed options. Press ENTER to set AM/PM on the SC652LG user...'s remote supplied with the TV and their functions. POWER CC FLSHBK MUTE VOLUME + - ALARM Press to display menu, follow onscreen instructions to ...
... Off and On, while the picture remains. Aux Channel allows the guest to 4-hours. CHANNEL -+ 1 2 3 4 5 6 7 8 9 0 ENTER TIMER ALARM CH PREVIEW Remote Control part number SC652LG 6710V00108B FLASHBK (FLASHBACK) Returns to access closed options. Press ENTER to set AM/PM on the SC652LG user...'s remote supplied with the TV and their functions. POWER CC FLSHBK MUTE VOLUME + - ALARM Press to display menu, follow onscreen instructions to ...
Operation Guide
Page 7
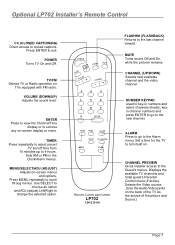
...Press to view the Channel/Time display or to the last channel viewed. FLSHBK MUTE CHANNEL -+ 1 2 3 4 5 6 7 8 9 0 ENTER TIMER MENU ALARM SELECT CH PREVIEW ADJ ADJ Remote Control part number LP702 124-213-04 FLASHBK (FLASHBACK) Returns to remove any on the back of the TV as the source of the picture... and Sound.) Page 7 Optional LP702 Installer's Remote Control CC (CLOSED CAPTIONING) Direct access to the new channel. POWER CC TV/FM VOLUME + - POWER Turns TV On and Off.
...Press to view the Channel/Time display or to the last channel viewed. FLSHBK MUTE CHANNEL -+ 1 2 3 4 5 6 7 8 9 0 ENTER TIMER MENU ALARM SELECT CH PREVIEW ADJ ADJ Remote Control part number LP702 124-213-04 FLASHBK (FLASHBACK) Returns to remove any on the back of the TV as the source of the picture... and Sound.) Page 7 Optional LP702 Installer's Remote Control CC (CLOSED CAPTIONING) Direct access to the new channel. POWER CC TV/FM VOLUME + - POWER Turns TV On and Off.

Operation Guide
Page 10
Remove the back of the Remote Plug in two AA batteries. They are usually about an inch long with a wire sticking...300 TO 75 OHM ADAPTER A small device that connects a two-wire 300 ohm antenna to one end and a round opening with the LG TV. 300/75 ohm Adapter Typical TV Back Matrix Out Antenna Cable Component Video Input Pr Pb R Audio L Y Video In R ... you have a 75 ohm RF cable, then you don't need any adapters! Antenna Flat wire (300 ohm) Back of the remote 3 and put in your TV. Connect the antenna that comes from 2 the wall directly to this jack, according to a 75...
Remove the back of the Remote Plug in two AA batteries. They are usually about an inch long with a wire sticking...300 TO 75 OHM ADAPTER A small device that connects a two-wire 300 ohm antenna to one end and a round opening with the LG TV. 300/75 ohm Adapter Typical TV Back Matrix Out Antenna Cable Component Video Input Pr Pb R Audio L Y Video In R ... you have a 75 ohm RF cable, then you don't need any adapters! Antenna Flat wire (300 ohm) Back of the remote 3 and put in your TV. Connect the antenna that comes from 2 the wall directly to this jack, according to a 75...

Operation Guide
Page 11
... Back Matrix Out Antenna Cable Component Video Input Pr Pb R Audio L Y Video In R Audio In L M.P.I . The TV is on (usually channel 3 or 4). Back of the remote and install two AA batteries. Do not attempt to operate it on DC Current. 120 Volt 60 Hz AC Cable TV Wall Jack In Cable... to the TV. 1 Locate the Antenna/Cable in the TV. S-Video In R Audio In L Page 11 Cable TV Wall Jack Remove the back of the Remote RF Coaxial Wire (75 ohm) Plug in jack on the back of the TV set. 2 Connect the CATV cable that 's all you need!
... Back Matrix Out Antenna Cable Component Video Input Pr Pb R Audio L Y Video In R Audio In L M.P.I . The TV is on (usually channel 3 or 4). Back of the remote and install two AA batteries. Do not attempt to operate it on DC Current. 120 Volt 60 Hz AC Cable TV Wall Jack In Cable... to the TV. 1 Locate the Antenna/Cable in the TV. S-Video In R Audio In L Page 11 Cable TV Wall Jack Remove the back of the Remote RF Coaxial Wire (75 ohm) Plug in jack on the back of the TV set. 2 Connect the CATV cable that 's all you need!

Operation Guide
Page 12
... Adapter In output switch 3 4 Out Video Audio VCR Back AV Panel Typical TV Back 120 Volt 60 Hz AC No A/V cables are included with the LG TV. Matrix Out Antenna Cable Component Video Input Pr Pb R Audio L Y Video In R Audio In L M.P.I. Locate the Antenna/Cable (In) jack on 1 the back... of the Remote Plug in stereo sound. Hook Up Over-The-Air Antenna and VCR Connect your off-air antenna and VCR to operate it on DC Current...
... Adapter In output switch 3 4 Out Video Audio VCR Back AV Panel Typical TV Back 120 Volt 60 Hz AC No A/V cables are included with the LG TV. Matrix Out Antenna Cable Component Video Input Pr Pb R Audio L Y Video In R Audio In L M.P.I. Locate the Antenna/Cable (In) jack on 1 the back... of the Remote Plug in stereo sound. Hook Up Over-The-Air Antenna and VCR Connect your off-air antenna and VCR to operate it on DC Current...

Operation Guide
Page 13
... TV. Connect the CATV cable that runs 2 from the wall directly to this jack, according to one of the VCR. Remove the back of the Remote Plug in stereo sound. Matrix Out Antenna Cable Component Video Input Pr Pb R Audio L Y Video In R Audio In L M.P.I . In Cable Box Out output switch 3 ...4 RF Coaxial Wire (75 ohm) Typical TV Back VCR Back In output switch 3 4 Out Video Audio Back of the remote 3 and install two AA batteries. No A/V cables are included with the TV 120 Volt 60 Hz AC Tune the VCR and television to channel 3 or...
... TV. Connect the CATV cable that runs 2 from the wall directly to this jack, according to one of the VCR. Remove the back of the Remote Plug in stereo sound. Matrix Out Antenna Cable Component Video Input Pr Pb R Audio L Y Video In R Audio In L M.P.I . In Cable Box Out output switch 3 ...4 RF Coaxial Wire (75 ohm) Typical TV Back VCR Back In output switch 3 4 Out Video Audio Back of the remote 3 and install two AA batteries. No A/V cables are included with the TV 120 Volt 60 Hz AC Tune the VCR and television to channel 3 or...

Operation Guide
Page 14
... the TV's connection panel. Hook up your S-Video 1 type VCR or DVD player to the TV according to the diagram. 2 Remove the back of the Remote VCR Back VCR Back AV Panel S-Video Out Output Switch 3 4 Audio Out R L 3 Plug in two AA batteries. Y Video In R Audio In L S-Video In R Audio In... L Page 14 Hook Up S-Video VCR/DVD Player Your LG TV may be connected to connect other S-Video type equipment. The TV is designed to the Source menu on standard current. 120 Volt 60 Hz...
... the TV's connection panel. Hook up your S-Video 1 type VCR or DVD player to the TV according to the diagram. 2 Remove the back of the Remote VCR Back VCR Back AV Panel S-Video Out Output Switch 3 4 Audio Out R L 3 Plug in two AA batteries. Y Video In R Audio In L S-Video In R Audio In... L Page 14 Hook Up S-Video VCR/DVD Player Your LG TV may be connected to connect other S-Video type equipment. The TV is designed to the Source menu on standard current. 120 Volt 60 Hz...

Operation Guide
Page 15
... S-Video In R Audio In L Page 15 To use this equipment you must use the optional LP702 remote control, refer to operate it on DC power. 120 Volt 60 Hz AC DVD Player with Component Video...attempt to the Source menu on page 20. Remove the back of the Remote Plug in your component 1 video device according to the diagram at the right. quality alkaline AA batteries. Back of ...the 2 remote and install two high- The TV is 3 designed to a Component Video device like a DVD player or other component video source. Hook up your TV. Hook Up Component Video The LG TV may be connected ...
... S-Video In R Audio In L Page 15 To use this equipment you must use the optional LP702 remote control, refer to operate it on DC power. 120 Volt 60 Hz AC DVD Player with Component Video...attempt to the Source menu on page 20. Remove the back of the Remote Plug in your component 1 video device according to the diagram at the right. quality alkaline AA batteries. Back of ...the 2 remote and install two high- The TV is 3 designed to a Component Video device like a DVD player or other component video source. Hook up your TV. Hook Up Component Video The LG TV may be connected ...

Operation Guide
Page 17
...work unless you subscribe to turn the TV on. 2 Press MENU repeatedly until the Setup menu appears. 3 Using SELECT on the remote control, highlight Auto Program on the channel/time/audio display. SETUP MENU AUTO PROGRAM ADD/DEL/BLNK CH. Choose from the preset label...1 2 3 4 5 6 7 8 9 0 ENTER 7 Auto Program finds channels being received by the channel search in non-volatile memory. 1 With the optional LP702 Installer's remote control in hand, press POWER to a cable service, select Cable. Page 17 Press the Right or Left ADJ arrow to begin the 6 Channel Search. 7 Press...
...work unless you subscribe to turn the TV on. 2 Press MENU repeatedly until the Setup menu appears. 3 Using SELECT on the remote control, highlight Auto Program on the channel/time/audio display. SETUP MENU AUTO PROGRAM ADD/DEL/BLNK CH. Choose from the preset label...1 2 3 4 5 6 7 8 9 0 ENTER 7 Auto Program finds channels being received by the channel search in non-volatile memory. 1 With the optional LP702 Installer's remote control in hand, press POWER to a cable service, select Cable. Page 17 Press the Right or Left ADJ arrow to begin the 6 Channel Search. 7 Press...

Operation Guide
Page 19
... Video/Audio In jacks can change channels using the TV tuner until you have devices connected to these jacks, you will not be on the remote number keypad. Page 19 Picture/Sound Source Selection Note: The Installer, by changing options in the service menu, can also be selected by keying in...
... Video/Audio In jacks can change channels using the TV tuner until you have devices connected to these jacks, you will not be on the remote number keypad. Page 19 Picture/Sound Source Selection Note: The Installer, by changing options in the service menu, can also be selected by keying in...

Operation Guide
Page 20
... and sound sources. Page 20 Notes: • The selection of the sources appearing in the source menu may vary depending on the optional 1 LP702 Installer's remote until the Source menu appears. 2 Choose the input source using SELECT. Press ENTER, or the Left/Right ADJ 3 arrow to go to the selected source...
... and sound sources. Page 20 Notes: • The selection of the sources appearing in the source menu may vary depending on the optional 1 LP702 Installer's remote until the Source menu appears. 2 Choose the input source using SELECT. Press ENTER, or the Left/Right ADJ 3 arrow to go to the selected source...

Operation Guide
Page 21
...; Captions/Text 22 Turns selected Caption/Text option On and Off; On-Screen Menus/Displays Overview Descriptions of the menus and on the optional Installer's remote, the user can access the menus/displays described below. Tilt 30 Adjusts the tilt if the set is moved and the image requires alignment. Sleep...
...; Captions/Text 22 Turns selected Caption/Text option On and Off; On-Screen Menus/Displays Overview Descriptions of the menus and on the optional Installer's remote, the user can access the menus/displays described below. Tilt 30 Adjusts the tilt if the set is moved and the image requires alignment. Sleep...

Operation Guide
Page 22
... access to access these menus and displays. Ghost Channel Display Channel number appears in red on or off. Other Menus & On-Screen Displays Press the remote keys indicated below to the Parental Control menu. 21 CC CAPTION 1 IS ON Closed Captions Menu Press CC. Page 22 ALARM MENU TIME NOW 3:11...
... access to access these menus and displays. Ghost Channel Display Channel number appears in red on or off. Other Menus & On-Screen Displays Press the remote keys indicated below to the Parental Control menu. 21 CC CAPTION 1 IS ON Closed Captions Menu Press CC. Page 22 ALARM MENU TIME NOW 3:11...

Operation Guide
Page 23
...the NUMBER keypad and ENTER.) Using the Right/Left ADJ arrow, specify whether 4 that the user can scroll through using the NUMBER keypad on the remote, select a channel. (If adding a deleted channel, you delete a channel, it can specify Add, Delete or Blank for VCR3, VCR4, and ...Aux. Deletes the video but retains the audio, if present on the Installer's remote so 1 the Setup menu appears. Setting Add/Delete/ Blank Channels Fine-tune the channel selection list. FLSHBK MUTE CHANNEL -+ 1 2 3 4 5 6 7 8 9 0 ...
...the NUMBER keypad and ENTER.) Using the Right/Left ADJ arrow, specify whether 4 that the user can scroll through using the NUMBER keypad on the remote, select a channel. (If adding a deleted channel, you delete a channel, it can specify Add, Delete or Blank for VCR3, VCR4, and ...Aux. Deletes the video but retains the audio, if present on the Installer's remote so 1 the Setup menu appears. Setting Add/Delete/ Blank Channels Fine-tune the channel selection list. FLSHBK MUTE CHANNEL -+ 1 2 3 4 5 6 7 8 9 0 ...

Operation Guide
Page 24
... each channel. i.e., A & E - if one is one programmable label each label. Pressing either the NUMBER keypad or the 1 Channel Up/Down arrows on the optional Installer's remote, select a channel. NONE: Prevents any channel label from appearing. Page 24 Press MENU repeatedly on ... SETUP MENU AUTO PROGRAM ADD/DEL/BLNK CH. LABELS SOURCE...Preset Channel Labels Selecting channel names from the preset Channel Labels (See the next page to appear; Movies and so on the optional 2 LP702 Installer's remote until the Setup menu appears. 3 Choose the Ch Labels option using SELECT.
... each channel. i.e., A & E - if one is one programmable label each label. Pressing either the NUMBER keypad or the 1 Channel Up/Down arrows on the optional Installer's remote, select a channel. NONE: Prevents any channel label from appearing. Page 24 Press MENU repeatedly on ... SETUP MENU AUTO PROGRAM ADD/DEL/BLNK CH. LABELS SOURCE...Preset Channel Labels Selecting channel names from the preset Channel Labels (See the next page to appear; Movies and so on the optional 2 LP702 Installer's remote until the Setup menu appears. 3 Choose the Ch Labels option using SELECT.

Operation Guide
Page 25
... title Label. To Program a Channel Label First select a channel using the NUMBER keypad and ENTER or the Channel Up/Down arrow, on the optional Installer's remote control. (To select a deleted channel, use the Adjust Left/Right arrow to the next or previous character space. Symbol.) SETUP MENU AUTO PROGRAM ADD/DEL...
... title Label. To Program a Channel Label First select a channel using the NUMBER keypad and ENTER or the Channel Up/Down arrow, on the optional Installer's remote control. (To select a deleted channel, use the Adjust Left/Right arrow to the next or previous character space. Symbol.) SETUP MENU AUTO PROGRAM ADD/DEL...

Operation Guide
Page 26
Press MENU repeatedly on the optional 1 LP702 Installer's remote until the Source menu appears. 2 Choose the Source Name using SELECT. SOURCE NAME CAMPORT F S-VIDEO R S-VIDEO COMP. Y Pr Pb AUX VIDEO CAMPORT PRESS VOL UP/...
Press MENU repeatedly on the optional 1 LP702 Installer's remote until the Source menu appears. 2 Choose the Source Name using SELECT. SOURCE NAME CAMPORT F S-VIDEO R S-VIDEO COMP. Y Pr Pb AUX VIDEO CAMPORT PRESS VOL UP/...

Operation Guide
Page 27
... TIMER CAPTIONS TILT DEGAUSS LANGUAGE TO SET CLOCK CLOCK MENU CLOCK SET TIME SET Clock Auto/Manual Operating Modes Setup On the optional LP702 Installer's remote, use MENU, SELECT, and the ADJ Left/Right arrows to set AM/PM. Clock Set Auto: TV automatically sets the time. AUTOMATIC OFF ON AUTOMATIC...
... TIMER CAPTIONS TILT DEGAUSS LANGUAGE TO SET CLOCK CLOCK MENU CLOCK SET TIME SET Clock Auto/Manual Operating Modes Setup On the optional LP702 Installer's remote, use MENU, SELECT, and the ADJ Left/Right arrows to set AM/PM. Clock Set Auto: TV automatically sets the time. AUTOMATIC OFF ON AUTOMATIC...

Operation Guide
Page 28
... option, press the Left/Right ADJ arrow. LABELS SOURCE NAME CLOCK SET TIMER CAPTIONS TILT DEGAUSS LANGUAGE TO SET TIMER 1 On the optional LP702 Installer's remote, press MENU repeatedly until the Setup menu appears.
... option, press the Left/Right ADJ arrow. LABELS SOURCE NAME CLOCK SET TIMER CAPTIONS TILT DEGAUSS LANGUAGE TO SET TIMER 1 On the optional LP702 Installer's remote, press MENU repeatedly until the Setup menu appears.


