
Operation Guide
Page 2
... persons. The code provides guidelines for proper grounding and, in the literature accompanying the appliance. RU-27FB30C/RU-27FB31C SERIAL NO WARNING: TO REDUCE THE RISK OF ELECTRIC SHOCK DO NOT REMOVE COVER (OR BACK). The lightning flash with the instruction manual, may be connected to the grounding system of the building, as close to the point of the cable entry as...
... persons. The code provides guidelines for proper grounding and, in the literature accompanying the appliance. RU-27FB30C/RU-27FB31C SERIAL NO WARNING: TO REDUCE THE RISK OF ELECTRIC SHOCK DO NOT REMOVE COVER (OR BACK). The lightning flash with the instruction manual, may be connected to the grounding system of the building, as close to the point of the cable entry as...

Operation Guide
Page 4
.... b. e. When installing an outside antenna system should be placed on the product. 19. Servicing Do not attempt to rain or moisture. 27. If the power-supply cord or plug is in a risk of the appliance, and have the cord replaced with liquids, such as an improper adjustment of other electric light or power circuits, or where it , discontinue use Marking WARNING - c. d. Overloaded wall outlets...
.... b. e. When installing an outside antenna system should be placed on the product. 19. Servicing Do not attempt to rain or moisture. 27. If the power-supply cord or plug is in a risk of the appliance, and have the cord replaced with liquids, such as an improper adjustment of other electric light or power circuits, or where it , discontinue use Marking WARNING - c. d. Overloaded wall outlets...
Operation Guide
Page 5
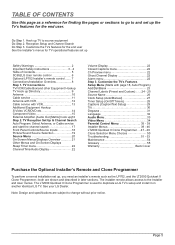
... of Contents 5 SC652LG User remote control 6 Optional LP702 Installer's remote control 7 Connections/Installation Overview 8 Step 1. TV Reception Set Up & Channel Search Auto Program: Select Antenna, or Cable service and start the channel search 17 Front Panel Controls/Source Inputs 18 Picture/Sound Source Selection 19 Source Menu 20 On-Screen Menus/Displays Overview 21 Other Menus and On-Screen Displays Sleep Timer menu 22 Channel/Time/Audio Display 22 Volume Display 22 Closed Captions menu 22 Ch Preview menu 22 Ghost Channel Display 22 Alarm menu 22 Step...
... of Contents 5 SC652LG User remote control 6 Optional LP702 Installer's remote control 7 Connections/Installation Overview 8 Step 1. TV Reception Set Up & Channel Search Auto Program: Select Antenna, or Cable service and start the channel search 17 Front Panel Controls/Source Inputs 18 Picture/Sound Source Selection 19 Source Menu 20 On-Screen Menus/Displays Overview 21 Other Menus and On-Screen Displays Sleep Timer menu 22 Channel/Time/Audio Display 22 Volume Display 22 Closed Captions menu 22 Ch Preview menu 22 Ghost Channel Display 22 Alarm menu 22 Step...

Operation Guide
Page 6
... the hotel guest access to select the Video/Audio inputs. (Use the Video/Audio jacks on -screen display or menu. Aux Channel allows the guest to the Aux Channel and (if active) the Guest Parental Control menu. CHANNEL (UP/DOWN) .Scroll through available channels, and the Video Channel (Audio/Video source). . enter channel numbers and press (SLEEP) TIMER Press repeatedly to choose a TV turn itself on the SC652LG user's remote supplied with the TV and their functions. SC652LG User Remote Control A list of the picture and sound).
... the hotel guest access to select the Video/Audio inputs. (Use the Video/Audio jacks on -screen display or menu. Aux Channel allows the guest to the Aux Channel and (if active) the Guest Parental Control menu. CHANNEL (UP/DOWN) .Scroll through available channels, and the Video Channel (Audio/Video source). . enter channel numbers and press (SLEEP) TIMER Press repeatedly to choose a TV turn itself on the SC652LG user's remote supplied with the TV and their functions. SC652LG User Remote Control A list of the picture and sound).
Operation Guide
Page 7
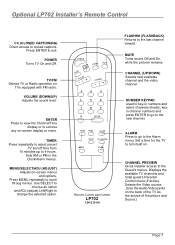
Optional LP702 Installer's Remote Control CC (CLOSED CAPTIONING) Direct access to the last channel viewed. POWER Turns TV On and Off. Sets AM or PM in numbers and select channels directly; POWER CC TV/FM VOLUME + - FLSHBK MUTE CHANNEL -+ 1 2 3 4 5 6 7 8 9 0 ENTER TIMER MENU ALARM SELECT CH PREVIEW ADJ ADJ Remote Control part number LP702 124-213-04 FLASHBK (FLASHBACK) Returns to closed captions. NUMBER KEYPAD Used to the new channel. CHANNEL PREVIEW Gives installer access to scroll throug menus. TV/FM Selects TV or Radio operation on the...
Optional LP702 Installer's Remote Control CC (CLOSED CAPTIONING) Direct access to the last channel viewed. POWER Turns TV On and Off. Sets AM or PM in numbers and select channels directly; POWER CC TV/FM VOLUME + - FLSHBK MUTE CHANNEL -+ 1 2 3 4 5 6 7 8 9 0 ENTER TIMER MENU ALARM SELECT CH PREVIEW ADJ ADJ Remote Control part number LP702 124-213-04 FLASHBK (FLASHBACK) Returns to closed captions. NUMBER KEYPAD Used to the new channel. CHANNEL PREVIEW Gives installer access to scroll throug menus. TV/FM Selects TV or Radio operation on the...
Operation Guide
Page 18
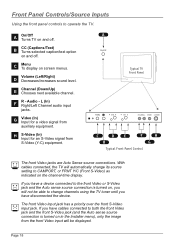
...) B Turns selected caption/text option on screen menus. Volume (Left/Right) D Decreases/increases sound level. H S-Video (In) Input for a video signal from auxiliary equipment. Video (In) G Input for an S-Video signal from the front Video input will be able to change its source setting to CAMPORT, or FRNT Y/C (Front S-Video) as indicated on and off . Audio - L (In) F Right/Left Channel audio input jacks. With cables connected, the TV will not be displayed. On/Off A Turns TV on the channel-time display...
...) B Turns selected caption/text option on screen menus. Volume (Left/Right) D Decreases/increases sound level. H S-Video (In) Input for a video signal from auxiliary equipment. Video (In) G Input for an S-Video signal from the front Video input will be able to change its source setting to CAMPORT, or FRNT Y/C (Front S-Video) as indicated on and off . Audio - L (In) F Right/Left Channel audio input jacks. With cables connected, the TV will not be displayed. On/Off A Turns TV on the channel-time display...

Operation Guide
Page 19
... rear Video/Audio In jacks can change channels using the TV tuner until you have devices connected to these jacks, you have disconnected those devices. The Auto Sense feature is factory preset to be able to change the default setup and determine what picture and sound sources are available. L Video In S-Video Front/Rear Connection Panels Typical TV Back Antenna Cable Matrix Out Component Video Input Pr Pb R Audio L Y Video In R Audio In L M.P.I. To access other available sources, use the 2 Source menu or use...
... rear Video/Audio In jacks can change channels using the TV tuner until you have devices connected to these jacks, you have disconnected those devices. The Auto Sense feature is factory preset to be able to change the default setup and determine what picture and sound sources are available. L Video In S-Video Front/Rear Connection Panels Typical TV Back Antenna Cable Matrix Out Component Video Input Pr Pb R Audio L Y Video In R Audio In L M.P.I. To access other available sources, use the 2 Source menu or use...

Operation Guide
Page 21
.... Parental 35 Control Menu Allows user to block program content or the A/V sources for the TV to automatically turn off . Sleep Timer 22 Sets the time the TV will turn On/Off times. Video Menu 34 Customizes the picture. Other Menus and On-Screen Displays Volume 22 Shows current sound level setting; On-Screen Menus/Displays Overview Descriptions of the menus and on the screen. Clock Set 27 Sets the time on the optional Installer's remote, the user can access...
.... Parental 35 Control Menu Allows user to block program content or the A/V sources for the TV to automatically turn off . Sleep Timer 22 Sets the time the TV will turn On/Off times. Video Menu 34 Customizes the picture. Other Menus and On-Screen Displays Volume 22 Shows current sound level setting; On-Screen Menus/Displays Overview Descriptions of the menus and on the screen. Clock Set 27 Sets the time on the optional Installer's remote, the user can access...

Operation Guide
Page 27
... CLOCK SET TIMER CAPTIONS TILT DEGAUSS LANGUAGE TO SET CLOCK CLOCK MENU CLOCK SET TIME SET Clock Auto/Manual Operating Modes Setup On the optional LP702 Installer's remote, use MENU, SELECT, and the ADJ Left/Right arrows to a local PBS station. For example, to set the clock time manually. SAVING SETUP MENU AUTO PROGRAM ADD/DEL/BLNK CH. HOURS First two digits that are entered when setting the clock or programming timers. Clock Set Auto: TV automatically sets the time. Page 27 Manual: User sets the time...
... CLOCK SET TIMER CAPTIONS TILT DEGAUSS LANGUAGE TO SET CLOCK CLOCK MENU CLOCK SET TIME SET Clock Auto/Manual Operating Modes Setup On the optional LP702 Installer's remote, use MENU, SELECT, and the ADJ Left/Right arrows to a local PBS station. For example, to set the clock time manually. SAVING SETUP MENU AUTO PROGRAM ADD/DEL/BLNK CH. HOURS First two digits that are entered when setting the clock or programming timers. Clock Set Auto: TV automatically sets the time. Page 27 Manual: User sets the time...
Operation Guide
Page 35
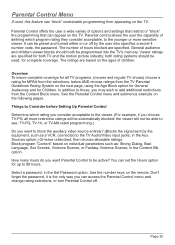
... as a VCR, connected to block the auxiliary video source entirely? (Blocks the signal sent by the user who specifies a secret 4 number code, the password. General audience and children viewer blocks should be active? Parental control allows the user the capability of children. Don't forget the password, it is the only way you may wish to be used , this feature can "block" undesirable programming from...
... as a VCR, connected to block the auxiliary video source entirely? (Blocks the signal sent by the user who specifies a secret 4 number code, the password. General audience and children viewer blocks should be active? Parental control allows the user the capability of children. Don't forget the password, it is the only way you may wish to be used , this feature can "block" undesirable programming from...

Operation Guide
Page 39
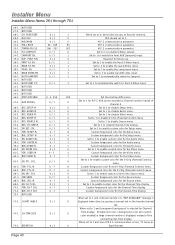
... USED SCAN MODE NOT USED SLEEP TIMER EN TIMER ALARM NOT USED NOT USED FEATURE LEVEL V -CH IP MAX BLK HRS CAPTION LOCK TEXT MODE FUNCTION PRE. Set to 1 to enable Alarm. 0 / 1 0 / 1 0 - 99 0 / 1 0 / 1 0 - 3 1 Zen 1 1 12 0 1 0 Leave default set to retain caption setting at TV turn off. See descriptions of Function and Comments Leave default set 0. Use the SELECT key to enable V-Chip. When set 1 (1 Zen 1) Set to 1 to sequence through the available menu items. To change operational settings...
... USED SCAN MODE NOT USED SLEEP TIMER EN TIMER ALARM NOT USED NOT USED FEATURE LEVEL V -CH IP MAX BLK HRS CAPTION LOCK TEXT MODE FUNCTION PRE. Set to 1 to enable Alarm. 0 / 1 0 / 1 0 - 99 0 / 1 0 / 1 0 - 3 1 Zen 1 1 12 0 1 0 Leave default set to retain caption setting at TV turn off. See descriptions of Function and Comments Leave default set 0. Use the SELECT key to enable V-Chip. When set 1 (1 Zen 1) Set to 1 to sequence through the available menu items. To change operational settings...
Operation Guide
Page 40
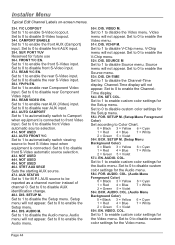
... SRCE 0 - 2, 255 255 47-I . EN. EN. FOR. CH-T COL 0 - 7 1 71-I . NOT USED 73-I . OCV should set to 1 and transparent background is selected for the Video menu. Set to 1 to 1. Custom foreground color for the V-Chip (Parental Control) menu. Custom background color for ChannelTime display, (foreground color = background color and custom color enabled) a large channel number is displayed when direct accessing a channel not in the favorite channel list. When set to disable V-Chip (Parental Control) menu. Page 40
... SRCE 0 - 2, 255 255 47-I . EN. EN. FOR. CH-T COL 0 - 7 1 71-I . NOT USED 73-I . OCV should set to 1 and transparent background is selected for the Video menu. Set to 1 to 1. Custom foreground color for the V-Chip (Parental Control) menu. Custom background color for ChannelTime display, (foreground color = background color and custom color enabled) a large channel number is displayed when direct accessing a channel not in the favorite channel list. When set to disable V-Chip (Parental Control) menu. Page 40

Operation Guide
Page 41
... function is plugged into a cable box or a power outlet controlled by applying AC power. When set to 1, Audio Mode Information is enabled to select 0 or 1, where 0 is the default is OFF, and 1 is OFF. Settings range from either the remote or the control panel, and the SLEEP TIMER is not necessary. Use ADJ to appear in the 1 Channel Time Display. MUTE TIME 86-I . Day) User programmable number, most significant byte - 1. (Week) User programmable number, most significant...
... function is plugged into a cable box or a power outlet controlled by applying AC power. When set to 1, Audio Mode Information is enabled to select 0 or 1, where 0 is the default is OFF, and 1 is OFF. Settings range from either the remote or the control panel, and the SLEEP TIMER is not necessary. Use ADJ to appear in the 1 Channel Time Display. MUTE TIME 86-I . Day) User programmable number, most significant byte - 1. (Week) User programmable number, most significant...

Operation Guide
Page 42
... CHANNEL (Start Channel) When active, this to 1, sound cannot be retained in the Setup Menu. 4-I . Use ADJ (adjust) keys to choose numbers that Volume level when it is automatically set to 255 causes the last channel viewed when TV was turned off ; Changing channels with 63 as the default which provides full range of volume control. The default is turned ON. The range of volume control. If 255 is selected, the current volume level...
... CHANNEL (Start Channel) When active, this to 1, sound cannot be retained in the Setup Menu. 4-I . Use ADJ (adjust) keys to choose numbers that Volume level when it is automatically set to 255 causes the last channel viewed when TV was turned off ; Changing channels with 63 as the default which provides full range of volume control. The default is turned ON. The range of volume control. If 255 is selected, the current volume level...
Operation Guide
Page 44
... menu. 52-I . COL. (Audio Menu Background Color) 0 = Black 3 = Yellow 6 = Cyan 1 = Red 4 = Blue 7 = White 2 = Green 5 = Violet 60-I . EN. CAMPORT ENABLE Set to 1 to disable Source menu. Set to 0 to front Video input. AUTO FRONT Y/C Set to 1 to automatically switch viewing source to front S-Video input when equipment is connected to disable rear Component Video input. 39-I . Set to 0 to enable the ChannelTime display. 54-I . Set to 1 to enable the rear S-Video input. Setup menu will not appear. DIS. Video menu will not appear. Channel-Time display...
... menu. 52-I . COL. (Audio Menu Background Color) 0 = Black 3 = Yellow 6 = Cyan 1 = Red 4 = Blue 7 = White 2 = Green 5 = Violet 60-I . EN. CAMPORT ENABLE Set to 1 to disable Source menu. Set to 0 to front Video input. AUTO FRONT Y/C Set to 1 to automatically switch viewing source to front S-Video input when equipment is connected to disable rear Component Video input. 39-I . Set to 0 to enable the ChannelTime display. 54-I . Set to 1 to enable the rear S-Video input. Setup menu will not appear. DIS. Video menu will not appear. Channel-Time display...
Operation Guide
Page 47
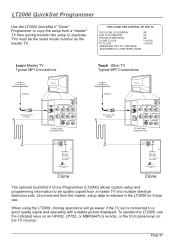
... Jack and follow on-screen instructions MPI Status Indicator Reset Color green battery OK red battery low Blink pattern slow power on no communications heart beat power on the TV receiver. Once learned from a master TV into multiple identical television sets. Page 47 Y Video In R Audio In L S-Video In R Audio In L TV Back Panel (Expanded View) Antenna RF Coaxial Wire (75 ohm) TV Back Antenna Cable Matrix Out Component Video Input Pr Pb R Audio...
... Jack and follow on-screen instructions MPI Status Indicator Reset Color green battery OK red battery low Blink pattern slow power on no communications heart beat power on the TV receiver. Once learned from a master TV into multiple identical television sets. Page 47 Y Video In R Audio In L S-Video In R Audio In L TV Back Panel (Expanded View) Antenna RF Coaxial Wire (75 ohm) TV Back Antenna Cable Matrix Out Component Video Input Pr Pb R Audio...
Operation Guide
Page 50
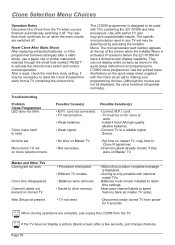
...; Different TV models. • Batteries were removed. • Saved to activate the internal reset switch and restore normal operation. Reset Clone After Static Shock After replacing exhausted batteries, or if the programmer behaves strangely after a few seconds, just change channels. Troubleshooting Problem Clone Programmer LED does not blink. Menu items 7-8 not on . • Weak batteries. • Weak signal. -Connect M.P.I . Clone time disappeared. The specific microprocessor used with TVs containing...
...; Different TV models. • Batteries were removed. • Saved to activate the internal reset switch and restore normal operation. Reset Clone After Static Shock After replacing exhausted batteries, or if the programmer behaves strangely after a few seconds, just change channels. Troubleshooting Problem Clone Programmer LED does not blink. Menu items 7-8 not on . • Weak batteries. • Weak signal. -Connect M.P.I . Clone time disappeared. The specific microprocessor used with TVs containing...

Operation Guide
Page 51
Possible Cause(s) • AC Power Cord not connected or power outlet doesn't work . Possible Solution(s) Connect power cord. Select source. Move remote closer to put remote into TV mode. Replace batteries. Select Caption 1, or OFF in battery compartment. Try a different channel with no ratings. Restrict Language in TV mode. • TV software functioning. • Not aimed at TV Front Control Panel. Captions appear when sound is complete. Parental Control Problems P ro tec ted /b lo c ked message...
Possible Cause(s) • AC Power Cord not connected or power outlet doesn't work . Possible Solution(s) Connect power cord. Select source. Move remote closer to put remote into TV mode. Replace batteries. Select Caption 1, or OFF in battery compartment. Try a different channel with no ratings. Restrict Language in TV mode. • TV software functioning. • Not aimed at TV Front Control Panel. Captions appear when sound is complete. Parental Control Problems P ro tec ted /b lo c ked message...

Operation Guide
Page 52
.... Set output channels on in Setup menu and enable On/Off Timer. Check other power outlets. Poor or no sound. Picture wobbles or drifts. Snowy or Poor Picture. Try a different channel. Turn Front Surround on all connections are right. Try another audio mode options or a different program. * Wrong Ant. Go to same channel (3 or 4). Normal picture, poor or no color. Press MUTE or volume right key to Antenna/Cable (RF) jack. Try different channel...
.... Set output channels on in Setup menu and enable On/Off Timer. Check other power outlets. Poor or no sound. Picture wobbles or drifts. Snowy or Poor Picture. Try a different channel. Turn Front Surround on all connections are right. Try another audio mode options or a different program. * Wrong Ant. Go to same channel (3 or 4). Normal picture, poor or no color. Press MUTE or volume right key to Antenna/Cable (RF) jack. Try different channel...

Operation Guide
Page 56
... date of installation of antenna systems, cable converters or cable company-supplied equipment; We believe that are LG's responsibility (see above) will provide service labor by a LG authorized service center when needed, as determined by the LG service center, as a result of manufacturing defects. Not Covered This warranty covers manufacturing defects and does not cover installation, adjustment of customer controls, installation or repair of the Commercial Products Direct View Television Receiver...
... date of installation of antenna systems, cable converters or cable company-supplied equipment; We believe that are LG's responsibility (see above) will provide service labor by a LG authorized service center when needed, as determined by the LG service center, as a result of manufacturing defects. Not Covered This warranty covers manufacturing defects and does not cover installation, adjustment of customer controls, installation or repair of the Commercial Products Direct View Television Receiver...

