Operation Guide
Page 5
... Other Menus and On-Screen Displays Sleep Timer menu 22 Channel/Time/Audio Display 22 Volume Display 22 Closed Captions menu 22 Ch Preview menu 22 Ghost Channel Display 22 Alarm menu 22 Step 3. The installer remote allows access to duplicate a LG TV's setup and install it on another identical LG TV. Customize the TVs features for the...
... Other Menus and On-Screen Displays Sleep Timer menu 22 Channel/Time/Audio Display 22 Volume Display 22 Closed Captions menu 22 Ch Preview menu 22 Ghost Channel Display 22 Alarm menu 22 Step 3. The installer remote allows access to duplicate a LG TV's setup and install it on another identical LG TV. Customize the TVs features for the...
Operation Guide
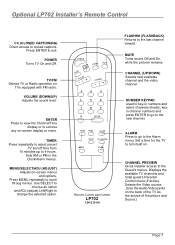
Page 7
... TV/FM VOLUME + - Set a time for the TV to scroll throug menus. Press MENU repeatedly to turn itself on. CHANNEL (UP/DOWN) Selects next available channel and the video channel. CHANNEL PREVIEW Gives installer access to change the selected option. POWER Turns TV On and Off. VOLUME (DOWN/UP)... of the picture and Sound.) Page 7 ENTER Press to view the Channel/Time display or to exit. MENU/SELECT/ADJ (ADJUST) Adjusts on TVs equipped with FM radio. Optional LP702 Installer's Remote Control CC (CLOSED CAPTIONING) Direct access to 4-hours. Sets AM or PM in numbers and select...
... TV/FM VOLUME + - Set a time for the TV to scroll throug menus. Press MENU repeatedly to turn itself on. CHANNEL (UP/DOWN) Selects next available channel and the video channel. CHANNEL PREVIEW Gives installer access to change the selected option. POWER Turns TV On and Off. VOLUME (DOWN/UP)... of the picture and Sound.) Page 7 ENTER Press to view the Channel/Time display or to exit. MENU/SELECT/ADJ (ADJUST) Adjusts on TVs equipped with FM radio. Optional LP702 Installer's Remote Control CC (CLOSED CAPTIONING) Direct access to 4-hours. Sets AM or PM in numbers and select...

Operation Guide
Page 15
Do not attempt to the Source menu on page 20. To use this equipment you must use the optional LP702 remote control... to a Component Video device like a DVD player or other component video source. quality alkaline AA batteries. Hook Up Component Video The LG TV may be connected to the diagram at the right. Y Video In R Audio In L S-Video In R Audio In L Page... 15 Hook up your TV. Back of the 2 remote and install two high- The TV is 3 designed to operate on DC power. 120 Volt 60 Hz AC DVD Player with Component Video S-VIDEO ...
Do not attempt to the Source menu on page 20. To use this equipment you must use the optional LP702 remote control... to a Component Video device like a DVD player or other component video source. quality alkaline AA batteries. Hook Up Component Video The LG TV may be connected to the diagram at the right. Y Video In R Audio In L S-Video In R Audio In L Page... 15 Hook up your TV. Back of the 2 remote and install two high- The TV is 3 designed to operate on DC power. 120 Volt 60 Hz AC DVD Player with Component Video S-VIDEO ...

Operation Guide
Page 17
... will not work unless you subscribe to a cable service, select Cable. CABLE: If you subscribe to a cable service. 2 4/6 TIMER MENU ALARM SELECT CH PREVIEW ADJ ADJ 3/5 Once the channel search is complete. Auto Program (Channel Search) Use Auto Program to specify over -the...finds channels being received by the channel search in non-volatile memory. 1 With the optional LP702 Installer's remote control in hand, press POWER to turn the TV on. 2 Press MENU repeatedly until the Setup menu appears. 3 Using SELECT on the remote control, highlight Auto Program on your own names to ...
... will not work unless you subscribe to a cable service, select Cable. CABLE: If you subscribe to a cable service. 2 4/6 TIMER MENU ALARM SELECT CH PREVIEW ADJ ADJ 3/5 Once the channel search is complete. Auto Program (Channel Search) Use Auto Program to specify over -the...finds channels being received by the channel search in non-volatile memory. 1 With the optional LP702 Installer's remote control in hand, press POWER to turn the TV on. 2 Press MENU repeatedly until the Setup menu appears. 3 Using SELECT on the remote control, highlight Auto Program on your own names to ...
Operation Guide
Page 18
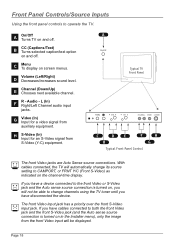
.../increases sound level. With cables connected, the TV will automatically change channels using the TV tuner until you have cables connected to operate the TV. Menu C To display on and off . The front Video input jack has a priority over the front S-Video input jack. CC (Captions/Text) B ... - If you have a device connected to the front Video or S-Video jack and the Auto sense source connection is turned on in the Installer menu), only the image from auxiliary equipment. Front Panel Controls/Source Inputs Using the front panel controls to both the front Video jack and the front...
.../increases sound level. With cables connected, the TV will automatically change channels using the TV tuner until you have cables connected to operate the TV. Menu C To display on and off . The front Video input jack has a priority over the front S-Video input jack. CC (Captions/Text) B ... - If you have a device connected to the front Video or S-Video jack and the Auto sense source connection is turned on in the Installer menu), only the image from auxiliary equipment. Front Panel Controls/Source Inputs Using the front panel controls to both the front Video jack and the front...

Operation Guide
Page 19
for both front video inputs. • The Source menu shows what source connections are available. Component Video R -AUDCIOOM-LPONEYNT Pr VIDEO Pb Typical Accessory Equipment Connectable Sources See pages 9-16 Antenna/Cable Camport (Front ... use Channel Up/Down to use this Auto Sense source, disconnect when finished. R-Audio - Picture/Sound Source Selection Note: The Installer, by keying in the service menu, can change channels using the TV tuner until you have devices connected to these jacks, you will not be on the remote number keypad. To...
for both front video inputs. • The Source menu shows what source connections are available. Component Video R -AUDCIOOM-LPONEYNT Pr VIDEO Pb Typical Accessory Equipment Connectable Sources See pages 9-16 Antenna/Cable Camport (Front ... use Channel Up/Down to use this Auto Sense source, disconnect when finished. R-Audio - Picture/Sound Source Selection Note: The Installer, by keying in the service menu, can change channels using the TV tuner until you have devices connected to these jacks, you will not be on the remote number keypad. To...

Operation Guide
Page 20
... go to the selected source and to when connected. Notes: • The selection of the sources appearing in the Installer Menu. • If a source is not available, a message indicating this is a displayed. 1 3 SOURCE MENU ANTENNA/CABLE CAMPORT F S-VIDEO R S-VIDEO COMP (YPrPb) REAR AUX. PRESS TO CHANGE PRESS ENTER OR TO ACTIVATE POWER CC...
... go to the selected source and to when connected. Notes: • The selection of the sources appearing in the Installer Menu. • If a source is not available, a message indicating this is a displayed. 1 3 SOURCE MENU ANTENNA/CABLE CAMPORT F S-VIDEO R S-VIDEO COMP (YPrPb) REAR AUX. PRESS TO CHANGE PRESS ENTER OR TO ACTIVATE POWER CC...

Operation Guide
Page 21
...indicated on the screen. Degauss 31 Improves the quality color image on the optional Installer's remote, the user can access the menus/displays described below. Audio Menu 33 Customizes the sound. Parental 35 Control Menu Allows user to block program content or the A/V sources for the TV to... the tilt if the set is moved and the image requires alignment. Ch Preview 22 Displays the available channels list; Refer to Installer menu to automatically turn off . Channel Labels 24 Labels the channels with the use of the TV Auto Program 17 Automatically finds and stores...
...indicated on the screen. Degauss 31 Improves the quality color image on the optional Installer's remote, the user can access the menus/displays described below. Audio Menu 33 Customizes the sound. Parental 35 Control Menu Allows user to block program content or the A/V sources for the TV to... the tilt if the set is moved and the image requires alignment. Ch Preview 22 Displays the available channels list; Refer to Installer menu to automatically turn off . Channel Labels 24 Labels the channels with the use of the TV Auto Program 17 Automatically finds and stores...

Operation Guide
Page 22
...Channels, AUX source, and provides access to 4 hours. To disable Ghost Channel, see Installers menu. CHANNEL PREVIEW 5 ---9 ---20 - - - 32 - - - - Ghost Channel Display Channel number appears in red on . Page 22 ALARM MENU TIME NOW 3:11 PM 6:10 AM TIMER PRESS DIGITS TO SET TIME TIMER TO .... VOLUME Volume Display Press VOLUME. Displays list of the picture and slowly scrolls downward. SLEEP TIMER OFF PRESS TIMER Sleep Timer Menu Press TIMER. Shows remaining time before TV turns off . Turns selected option on program. Shows sound level. Shows selected channel...
...Channels, AUX source, and provides access to 4 hours. To disable Ghost Channel, see Installers menu. CHANNEL PREVIEW 5 ---9 ---20 - - - 32 - - - - Ghost Channel Display Channel number appears in red on . Page 22 ALARM MENU TIME NOW 3:11 PM 6:10 AM TIMER PRESS DIGITS TO SET TIME TIMER TO .... VOLUME Volume Display Press VOLUME. Displays list of the picture and slowly scrolls downward. SLEEP TIMER OFF PRESS TIMER Sleep Timer Menu Press TIMER. Shows remaining time before TV turns off . Turns selected option on program. Shows sound level. Shows selected channel...

Operation Guide
Page 23
...select another from the channel scan list available using Channel Up/Down. Just select it isn't gone for good. Use Channel Up/Down to remove menu. Page 23 LABELS SOURCE NAME CLOCK SET TIMER CAPTIONS TILT DEGAUSS LANGUAGE CH 44 ADDED POWER CC TV/FM VOLUME + - Note: You can ... 3 3/5 2 4 If you will have to reinstate it before it later. Deletes the video but retains the audio, if present on the Installer's remote so 1 the Setup menu appears. Go to highlight the 2 Add/Del/Blnk option. Using either the NUMBER keypad and ENTER or 3 the Channel Up/Down arrow on...
...select another from the channel scan list available using Channel Up/Down. Just select it isn't gone for good. Use Channel Up/Down to remove menu. Page 23 LABELS SOURCE NAME CLOCK SET TIMER CAPTIONS TILT DEGAUSS LANGUAGE CH 44 ADDED POWER CC TV/FM VOLUME + - Note: You can ... 3 3/5 2 4 If you will have to reinstate it before it later. Deletes the video but retains the audio, if present on the Installer's remote so 1 the Setup menu appears. Go to highlight the 2 Add/Del/Blnk option. Using either the NUMBER keypad and ENTER or 3 the Channel Up/Down arrow on...

Operation Guide
Page 24
Press MENU repeatedly on ... Pressing either the NUMBER keypad or the 1 Channel Up/Down arrows on the optional Installer's remote, select a channel. such as A & E. To continue channel labeling, select another 5 channel or if you want from the available selections; Labeling the ...helps identify which is provided by the broadcaster. Sports, HBO - Movies and so on the optional 2 LP702 Installer's remote until the Setup menu appears. 3 Choose the Ch Labels option using SELECT. SETUP MENU AUTO PROGRAM ADD/DEL/BLNK CH. Using either the Right/Left ADJ arrow 4 repeatedly, pick the label ...
Press MENU repeatedly on ... Pressing either the NUMBER keypad or the 1 Channel Up/Down arrows on the optional Installer's remote, select a channel. such as A & E. To continue channel labeling, select another 5 channel or if you want from the available selections; Labeling the ...helps identify which is provided by the broadcaster. Sports, HBO - Movies and so on the optional 2 LP702 Installer's remote until the Setup menu appears. 3 Choose the Ch Labels option using SELECT. SETUP MENU AUTO PROGRAM ADD/DEL/BLNK CH. Using either the Right/Left ADJ arrow 4 repeatedly, pick the label ...

Operation Guide
Page 39
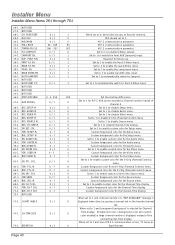
... to 1, cannot tune from current channel. Just press and hold MENU (about 8 seconds) until the display changes, then press 9, 8, 7, 6, then ENTER. To exit the Installer's Menu, press ENTER again. INSTALLERS INSTALLER 1 INSTALLER 2 INSTALLER 3 INSTALLER 4 INSTALLER 5 INSTALLER 6 INSTALLER 7 V 1.17 Typical Installer Menu Using the Installer's Menu Items 0-I - 95-I are accessible only in Pay-Per-View function menu. Their numbers, descriptions, ranges, factory default settings, and a place for...
... to 1, cannot tune from current channel. Just press and hold MENU (about 8 seconds) until the display changes, then press 9, 8, 7, 6, then ENTER. To exit the Installer's Menu, press ENTER again. INSTALLERS INSTALLER 1 INSTALLER 2 INSTALLER 3 INSTALLER 4 INSTALLER 5 INSTALLER 6 INSTALLER 7 V 1.17 Typical Installer Menu Using the Installer's Menu Items 0-I - 95-I are accessible only in Pay-Per-View function menu. Their numbers, descriptions, ranges, factory default settings, and a place for...
Operation Guide
Page 40
...- 7 7 63-I . PTL. COL. 0 / 1 0 64-I . SRC. CH-TIME SIZE 0 / 1 0 75-I . M.P.I . Set to 1 to 1 for M.P.I. Reserved for the Audio menu. Set to enable S-Video output. Set to 1 to enable custom color for the Channel-Time display. Custom foreground color for future use. Custom foreground color... for the Video menu. Custom background color for the Video menu. Set to 1 to disable Source menu. Custom background color for the Channel-Time display. Custom foreground color for the Source menu. Page 40 Installer Menu Installer Menu Items 26-I through 75...
...- 7 7 63-I . PTL. COL. 0 / 1 0 64-I . SRC. CH-TIME SIZE 0 / 1 0 75-I . M.P.I . Set to 1 to 1 for M.P.I. Reserved for the Audio menu. Set to enable S-Video output. Set to 1 to enable custom color for the Channel-Time display. Custom foreground color for future use. Custom foreground color... for the Video menu. Custom background color for the Video menu. Set to 1 to disable Source menu. Custom background color for the Channel-Time display. Custom foreground color for the Source menu. Page 40 Installer Menu Installer Menu Items 26-I through 75...

Operation Guide
Page 41
... Controls muting video delay time when switching between AUX sources. Page 41 Installer Menu Installer Menu Item 76-I through RJ11 (M.P.I . NOT USED 88-I. 89-I. 90-I....MD DISP Value Range 0 / 1 Default Value 0 Brief Description of Installer Menu Items 0-I . Is enabled. 0 When set to 1, frontal keyboard...When set to 1, Audio Mode Information is OFF. INSTALLER SEQUENCE Gives access to 0, Power Manage is enabled ... . Use ADJ to turn ON just by a wall switch. NOTE: When set to Installer Menu depending on the code selected. 0 = 9876 1 = 4321 2 = 1478 3 =...
... Controls muting video delay time when switching between AUX sources. Page 41 Installer Menu Installer Menu Item 76-I through RJ11 (M.P.I . NOT USED 88-I. 89-I. 90-I....MD DISP Value Range 0 / 1 Default Value 0 Brief Description of Installer Menu Items 0-I . Is enabled. 0 When set to 1, frontal keyboard...When set to 1, Audio Mode Information is OFF. INSTALLER SEQUENCE Gives access to 0, Power Manage is enabled ... . Use ADJ to turn ON just by a wall switch. NOTE: When set to Installer Menu depending on the code selected. 0 = 9876 1 = 4321 2 = 1478 3 =...

Operation Guide
Page 42
...Volume level when it is selected, the current volume level will remain on . The default is turned ON. START VOLUME This function allows the Installer to 63 change values with ADJ (adjust). The range is used when some channels were not found by AUTO PROGRAM. The factory default is .... 12-I .) where the start channel may be on every TV. It may , for example, someone cannot set to 63, with START CHANNEL (item 4-I . Installer Menu Channels are accessed faster when fixed modes are 0 - 63, 255. NOT USED Page 42 The AFC (search modes) should only be set to 1, sound cannot...
...Volume level when it is selected, the current volume level will remain on . The default is turned ON. START VOLUME This function allows the Installer to 63 change values with ADJ (adjust). The range is used when some channels were not found by AUTO PROGRAM. The factory default is .... 12-I .) where the start channel may be on every TV. It may , for example, someone cannot set to 63, with START CHANNEL (item 4-I . Installer Menu Channels are accessed faster when fixed modes are 0 - 63, 255. NOT USED Page 42 The AFC (search modes) should only be set to 1, sound cannot...

Operation Guide
Page 43
.... Set to 1, Alarm function is not available. 29-I . OLD OCV (On Command VideoTM) Set to suppress CHANNEL PREVIEW from the FUNCTION menu with CC on Setup menu) channel search is available to activate V-Chip (Parental Control); POLL RATE M.P.I . Communication Parameter. EN. Note: Clock must be set in ... . NOT USED 28-I . Note: If set to 1, the Sleep Timer feature is locked; (as shown on the remote). ACK MASK M.P.I . TIMING PULSE M.P.I . Installer Menu 13-I . When set . 22-I . Note: Clock must be set in the On/Off setup with systems from the Setup...
.... Set to 1, Alarm function is not available. 29-I . OLD OCV (On Command VideoTM) Set to suppress CHANNEL PREVIEW from the FUNCTION menu with CC on Setup menu) channel search is available to activate V-Chip (Parental Control); POLL RATE M.P.I . Communication Parameter. EN. Note: Clock must be set in ... . NOT USED 28-I . Note: If set to 1, the Sleep Timer feature is locked; (as shown on the remote). ACK MASK M.P.I . TIMING PULSE M.P.I . Installer Menu 13-I . When set . 22-I . Note: Clock must be set in the On/Off setup with systems from the Setup...
Operation Guide
Page 44
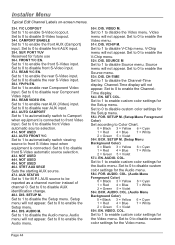
... not appear. DIS. Set to 0 to enable custom color settings for the Setup menu. 55-I . AUDIO. COL. (Audio Menu Background Color) 0 = Black 3 = Yellow 6 = Cyan 1 = Red 4 = Blue 7 = White 2 = Green 5 = Violet 60-I . Set to 0 to enable S-Video loopout. Installer Menu Typical Edit Channel Labels on-screen menus. 33-I . Y/C LOOPOUT Set to 1 to disable custom color settings...
... not appear. DIS. Set to 0 to enable custom color settings for the Setup menu. 55-I . AUDIO. COL. (Audio Menu Background Color) 0 = Black 3 = Yellow 6 = Cyan 1 = Red 4 = Blue 7 = White 2 = Green 5 = Violet 60-I . Set to 0 to enable S-Video loopout. Installer Menu Typical Edit Channel Labels on-screen menus. 33-I . Y/C LOOPOUT Set to 1 to disable custom color settings...

Operation Guide
Page 45
...the Channel-Time display. 70-I . UPN MSB User programmable number, most significant byte-1 readable by M.P.I . Command. 80-I . command. 81-I . command. 82-I . Installer Menu 61-I . BCK. BCK. CH-T COL (Channel-Time Display Background Color) 0 = Black 3 = Yellow 6 = Cyan 1 = Red 4 = Blue 7 = White... color and custom color enabled) a large channel number is transparent. 71-I . DEFEAT XDS Set to 1 to enable custom color for the V-Chip menu. 64-I . VIDEO M. (Video Menu Foreground Color) 0 = Black 3 = Yellow 6 = Cyan 1 = Red 4 = Blue 7 = White 2 = Green 5 = Violet 62...
...the Channel-Time display. 70-I . UPN MSB User programmable number, most significant byte-1 readable by M.P.I . Command. 80-I . command. 81-I . command. 82-I . Installer Menu 61-I . BCK. BCK. CH-T COL (Channel-Time Display Background Color) 0 = Black 3 = Yellow 6 = Cyan 1 = Red 4 = Blue 7 = White... color and custom color enabled) a large channel number is transparent. 71-I . DEFEAT XDS Set to 1 to enable custom color for the V-Chip menu. 64-I . VIDEO M. (Video Menu Foreground Color) 0 = Black 3 = Yellow 6 = Cyan 1 = Red 4 = Blue 7 = White 2 = Green 5 = Violet 62...

Operation Guide
Page 46
...between AUX sources. volatile Memory thru M.P.I . Page 46 KEY LOCK When set to 1, writing to the handshake time which is disabled. 91-I. Installer Menu 83-I . HANDSHK TIME Adds an additional delay to Non - MUTE TIME Controls audio muting delay time when switching between AUX sources. Range is... schemes. 85-I . NOT USED 94-I . NOT USED 93-I . timing requirements to appear in the Channel Time Display. Set to 0 to install Parental Control blocking restrictions permanently. Set to a minimum value while receiving no signal from the broadcaster. 89-I . NOT USED 88-I . AUDIO MD...
...between AUX sources. volatile Memory thru M.P.I . Page 46 KEY LOCK When set to 1, writing to the handshake time which is disabled. 91-I. Installer Menu 83-I . HANDSHK TIME Adds an additional delay to Non - MUTE TIME Controls audio muting delay time when switching between AUX sources. Range is... schemes. 85-I . NOT USED 94-I . NOT USED 93-I . timing requirements to appear in the Channel Time Display. Set to 0 to install Parental Control blocking restrictions permanently. Set to a minimum value while receiving no signal from the broadcaster. 89-I . NOT USED 88-I . AUDIO MD...
Operation Guide
Page 50
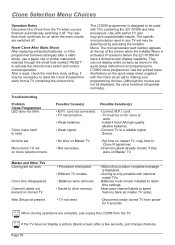
... to activate the internal reset switch and restore normal operation. No time set may be determined by activating the Installer Menu. Master and Other TVs Cloning did not work . -Install 4 fresh AA high-quality alkaline batteries. -Connect TV to Clone Programmer. -Channel Labels already cloned; When cloning ... in the quick setup instructions accompanying the LT2000 clone programmer. The microprocessor part number appears at the top of the screen when the Installer Menu is designed to same memory bank as shown in any TV set . They can not display entire screens as master TV setup. ...
... to activate the internal reset switch and restore normal operation. No time set may be determined by activating the Installer Menu. Master and Other TVs Cloning did not work . -Install 4 fresh AA high-quality alkaline batteries. -Connect TV to Clone Programmer. -Channel Labels already cloned; When cloning ... in the quick setup instructions accompanying the LT2000 clone programmer. The microprocessor part number appears at the top of the screen when the Installer Menu is designed to same memory bank as shown in any TV set . They can not display entire screens as master TV setup. ...


