Owners Manual
Page 1
Retain it for future reference. LCD Color Television OWNER'S MANUAL MODEL: RU-20LA80C Please read this information to your set . Internet Home Page : http://www.lgcommercial.com P/NO : 3828TUL267D (0409-REV01) Printed in Korea See the label attached on the back cover and quote this manual carefully before operating your dealer when you require service. Record model number and serial number of the set .
Retain it for future reference. LCD Color Television OWNER'S MANUAL MODEL: RU-20LA80C Please read this information to your set . Internet Home Page : http://www.lgcommercial.com P/NO : 3828TUL267D (0409-REV01) Printed in Korea See the label attached on the back cover and quote this manual carefully before operating your dealer when you require service. Record model number and serial number of the set .

Owners Manual
Page 2
... not installed and used in the literature accompanying the appliance. Reorient or relocate the receiving antenna. - Any changes or modifications not expressly approved by turning the equipment off and on a circuit different from LG Electronics Corporation. However, there is : LG Electronics U.S.A., Inc. 1000 Sylvan Avenue, Englewood Cliffs, NJ 07632 Phone: 1-201-816-2000 http://www.lgusa.com 2 Connect the...
... not installed and used in the literature accompanying the appliance. Reorient or relocate the receiving antenna. - Any changes or modifications not expressly approved by turning the equipment off and on a circuit different from LG Electronics Corporation. However, there is : LG Electronics U.S.A., Inc. 1000 Sylvan Avenue, Englewood Cliffs, NJ 07632 Phone: 1-201-816-2000 http://www.lgusa.com 2 Connect the...
Owners Manual
Page 3
Clean only with the manufacturer's instructions. 8. Do not install near water. 6. Protect the power cord from being walked on the apparatus. To reduce the risk of electric shock, do so. Do not use by qualified service personnel only. A grounding type plug has two blades and a third grounding prong. Install in the operating instructions unless you are for replacement of the obsolete outlet. 10...
Clean only with the manufacturer's instructions. 8. Do not install near water. 6. Protect the power cord from being walked on the apparatus. To reduce the risk of electric shock, do so. Do not use by qualified service personnel only. A grounding type plug has two blades and a third grounding prong. Install in the operating instructions unless you are for replacement of the obsolete outlet. 10...
Owners Manual
Page 5
... Channels Setup 15 Picture Menu Options EZ Video 16 Manual Picture Control (User option 16 Sound Menu Options EZ Audio 17 Equalizer Adjustments 17 AVL (Auto Volume Leveler 17 Sound Balance 18 Stereo/SAP Broadcasts Setup 18 Timer Menu Options Auto Clock Setup 19 Manual Clock Setup 19 On/Off Timer Setup 20 Sleep Timer Setup 20 Auto Off 20 Special Menu Options Closed Captions 21 Caption/Text 22 Captions 22 Key Lock 22 Lock Options 23 Lock Menu Setup 24 External Control Device Setup 25 IR codes 29 Maintenance 31 Product Specifications 31 Troubleshooting...
... Channels Setup 15 Picture Menu Options EZ Video 16 Manual Picture Control (User option 16 Sound Menu Options EZ Audio 17 Equalizer Adjustments 17 AVL (Auto Volume Leveler 17 Sound Balance 18 Stereo/SAP Broadcasts Setup 18 Timer Menu Options Auto Clock Setup 19 Manual Clock Setup 19 On/Off Timer Setup 20 Sleep Timer Setup 20 Auto Off 20 Special Menu Options Closed Captions 21 Caption/Text 22 Captions 22 Key Lock 22 Lock Options 23 Lock Menu Setup 24 External Control Device Setup 25 IR codes 29 Maintenance 31 Product Specifications 31 Troubleshooting...

Owners Manual
Page 8
... p.15) EXIT NUMBER buttons AUDIO (Refer to p.16) CC (Refer to the last channel you were watching. Don't mix used batteries with correct polarity. • Install two 1.5V batteries of AAA type. TV/VIDEO Selects: TV, Video, S-Video or Component mode. Introduction Remote Control Key Functions - MUTE Switches the sound on the TV. POWER MTS (Refer to p.18) MENU ENTER CH D / E (Channel button) VOL F / G (Volume button) VIDEO (Refer to p.16) SLEEP (Refer to p.20...
... p.15) EXIT NUMBER buttons AUDIO (Refer to p.16) CC (Refer to the last channel you were watching. Don't mix used batteries with correct polarity. • Install two 1.5V batteries of AAA type. TV/VIDEO Selects: TV, Video, S-Video or Component mode. Introduction Remote Control Key Functions - MUTE Switches the sound on the TV. POWER MTS (Refer to p.18) MENU ENTER CH D / E (Channel button) VOL F / G (Volume button) VIDEO (Refer to p.16) SLEEP (Refer to p.20...
Owners Manual
Page 9
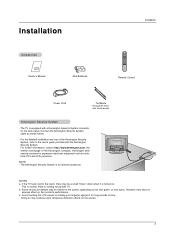
... further information, contact http://www.kensington.com, the internet homepage of the Kensington company. However, they have no adverse effect on the screen. 9 Installation Accessories Owner's Manual 1.5V 1.5V AAA Batteries Installation mute power tv/video multimedia mts fcr exit menu ch enter vol vol ch 123 456 78 audio 0 9 video cc flashbk sleep Remote Control Power Cord Tie Bands - Arrange the wires with TV. NOTE...
... further information, contact http://www.kensington.com, the internet homepage of the Kensington company. However, they have no adverse effect on the screen. 9 Installation Accessories Owner's Manual 1.5V 1.5V AAA Batteries Installation mute power tv/video multimedia mts fcr exit menu ch enter vol vol ch 123 456 78 audio 0 9 video cc flashbk sleep Remote Control Power Cord Tie Bands - Arrange the wires with TV. NOTE...
Owners Manual
Page 10
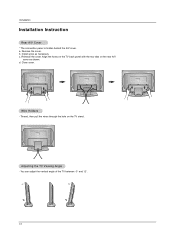
You can adjust the vertical angle of the TV between -3° and 12°. 10 Installation Installation Instruction Rear A/V Cover * The connection panel is hidden behind the A/V cover. a. Thread, then pull the wires through the hole on the rear A/V cover as necessary. Close cover. b. Reinstall the cover. Remove the cover. c. Adjusting the TV Viewing Angle - Align the holes on the TV back panel with the two tabs on the TV stand. Wire Holders - Install wires as shown. d.
You can adjust the vertical angle of the TV between -3° and 12°. 10 Installation Installation Instruction Rear A/V Cover * The connection panel is hidden behind the A/V cover. a. Thread, then pull the wires through the hole on the rear A/V cover as necessary. Close cover. b. Reinstall the cover. Remove the cover. c. Adjusting the TV Viewing Angle - Align the holes on the TV back panel with the two tabs on the TV stand. Wire Holders - Install wires as shown. d.

Owners Manual
Page 11
... poor signal areas, to get better picture quality, install a signal amplifier to the antenna as shown below. (Use the correct type of antenna cable for connection. If signal needs to the right. - Typical wall antenna jack used in apartment buildings, connect the antenna cable as shown to be split for two TVs, use an antenna signal splitter for the type of antenna is commonly used in single family dwellings. 300Ω Flat Wire VHF Antenna Turn clockwise...
... poor signal areas, to get better picture quality, install a signal amplifier to the antenna as shown below. (Use the correct type of antenna cable for connection. If signal needs to the right. - Typical wall antenna jack used in apartment buildings, connect the antenna cable as shown to be split for two TVs, use an antenna signal splitter for the type of antenna is commonly used in single family dwellings. 300Ω Flat Wire VHF Antenna Turn clockwise...
Owners Manual
Page 12
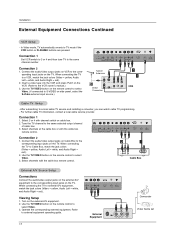
...external equipment operating guide. 12 S-VIDEO VIDEO(MONO) L AUDIO R VIDEO IN RS-232C INPUT External Equipment R AUDIO L VIDEO Camcorder Video Game set Use the TV/VIDEO button on side panel, select the S-Video external input source.) AC INPUT Y PB PR COMPONENT(480i/480p) DVD/DTV IN H/P S-VIDEO VIDEO(MONO) L AUDIO R VIDEO IN RS-232C INPUT Typical Antennas ANT IN ANT OUT S-VIDEO OUT Direct Connection CH3 IN CH4 VIDEO (R) AUDIO(L) 2 1 VCR Cable TV Setup - Tune the TV channel to select Video. 3. Turn on the remote control to the same selected output channel of cable...
...external equipment operating guide. 12 S-VIDEO VIDEO(MONO) L AUDIO R VIDEO IN RS-232C INPUT External Equipment R AUDIO L VIDEO Camcorder Video Game set Use the TV/VIDEO button on side panel, select the S-Video external input source.) AC INPUT Y PB PR COMPONENT(480i/480p) DVD/DTV IN H/P S-VIDEO VIDEO(MONO) L AUDIO R VIDEO IN RS-232C INPUT Typical Antennas ANT IN ANT OUT S-VIDEO OUT Direct Connection CH3 IN CH4 VIDEO (R) AUDIO(L) 2 1 VCR Cable TV Setup - Tune the TV channel to select Video. 3. Turn on the remote control to the same selected output channel of cable...
Owners Manual
Page 13
... remote control to sound through a headphone(s), TV speakers will not be heard. Turn on the digital set -top box.) 2. Refer to the DVD player's manual for the digital set -top box. (Refer to the AUDIO jacks. 2. Connections Connect the digital set-top box video outputs to the COMPONENT (Y, PB, PR) jacks and connect the digital set -top box. Connect the DVD video outputs to the COMPONENT (Y, PB, PR) jacks and connect the DVD audio outputs to the owner's manual for operating instructions. • Component Input ports To get better picture quality, connect a DVD player to the AUDIO...
... remote control to sound through a headphone(s), TV speakers will not be heard. Turn on the digital set -top box.) 2. Refer to the DVD player's manual for the digital set -top box. (Refer to the AUDIO jacks. 2. Connections Connect the digital set-top box video outputs to the COMPONENT (Y, PB, PR) jacks and connect the digital set -top box. Connect the DVD video outputs to the COMPONENT (Y, PB, PR) jacks and connect the DVD audio outputs to the owner's manual for operating instructions. • Component Input ports To get better picture quality, connect a DVD player to the AUDIO...
Owners Manual
Page 14
... TV is switched to standby mode. • In standby mode, press the POWER, CH (D,E), TV/VIDEO, MULTIMEDIA or number button on the remote control or ON/OFF, CH (D,E), TV/VIDEO located on the TV to turn the TV on the TV. NOTE • If you want to turn the TV off, press the on/off button located on . 2. Menu Language Selection - Press the MENU button and then use D / E button to receive channels in the...
... TV is switched to standby mode. • In standby mode, press the POWER, CH (D,E), TV/VIDEO, MULTIMEDIA or number button on the remote control or ON/OFF, CH (D,E), TV/VIDEO located on the TV to turn the TV on the TV. NOTE • If you want to turn the TV off, press the on/off button located on . 2. Menu Language Selection - Press the MENU button and then use D / E button to receive channels in the...
Owners Manual
Page 15
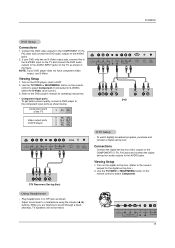
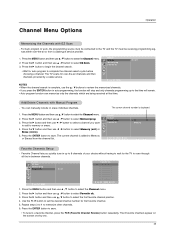
... Channels Setup - To set the desired channel number for over -the-air or from the channel list. Channel Menu Options Operation Memorizing the Channels with Manual Program - Favorite ch. Press the G button and then use F / G button to Memory or Erased from a cable-type service provider. 1. Press the E button and then use F / G button to select a channel you want to add to save . Press the ENTER button to memory or erase. 4. For Auto program to work, the programming source must be connected...
... Channels Setup - To set the desired channel number for over -the-air or from the channel list. Channel Menu Options Operation Memorizing the Channels with Manual Program - Favorite ch. Press the G button and then use F / G button to Memory or Erased from a cable-type service provider. 1. Press the E button and then use F / G button to select a channel you want to add to save . Press the ENTER button to memory or erase. 4. For Auto program to work, the programming source must be connected...
Owners Manual
Page 17
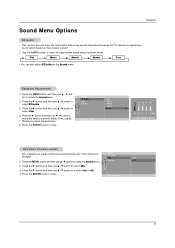
... OK MENU Flat Music Movie Sports User G 0.1 0.5 1 5 10 KHz F G Move D E Adjust  Exit AVL (Auto Volume Leveler) - Balance Off 2. Press the MENU button and then use D / E button to select the Sound menu. 2. Press the G button and then use D / E button to select User. 4. Press the G button and then use D / E button to select the band you enjoy the best sound without any special adjustment because the TV selects the appropriate sound option based on the program content...
... OK MENU Flat Music Movie Sports User G 0.1 0.5 1 5 10 KHz F G Move D E Adjust  Exit AVL (Auto Volume Leveler) - Balance Off 2. Press the MENU button and then use D / E button to select the Sound menu. 2. Press the G button and then use D / E button to select User. 4. Press the G button and then use D / E button to select the band you enjoy the best sound without any special adjustment because the TV selects the appropriate sound option based on the program content...
Owners Manual
Page 20
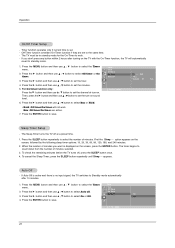
... no input signal, the TV switches to select the Timer menu. Press the MENU button and then use D / E button to set to select the number of minutes you don't press any button within 2 hours after 10 minutes. 1. On timer Auto off , press the SLEEP button once. 4. Then, press the G button and then use D / E button to Standby mode automatically after turning on sound level. 6. When the number of minutes. appears. Press the G button and then use D / E button to set...
... no input signal, the TV switches to select the Timer menu. Press the MENU button and then use D / E button to set to select the number of minutes you don't press any button within 2 hours after 10 minutes. 1. On timer Auto off , press the SLEEP button once. 4. Then, press the G button and then use D / E button to Standby mode automatically after turning on sound level. 6. When the number of minutes. appears. Press the G button and then use D / E button to set...
Owners Manual
Page 21
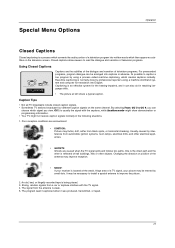
... signals from the antenna is being played. 3. Special Menu Options Operation Closed Captions Closed captioning is normally done by professional reporters using a process called real-time captioning, which creates captions instantly. Real-time captioning is a process which converts the audio portion of a television program into written words which signal you view. An old, bad, or illegally recorded tape is weak. 5. The signal from a car or airplane interfere with the captions, while Another mode...
... signals from the antenna is being played. 3. Special Menu Options Operation Closed Captions Closed captioning is normally done by professional reporters using a process called real-time captioning, which creates captions instantly. Real-time captioning is a process which converts the audio portion of a television program into written words which signal you view. An old, bad, or illegally recorded tape is weak. 5. The signal from a car or airplane interfere with the captions, while Another mode...
Owners Manual
Page 23
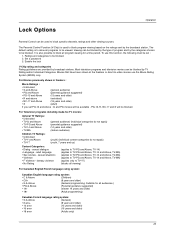
...Categories: • Dialog - Lock Options Operation Parental Control can be used to block program viewing based on the ratings sent by the broadcast station. To use the Movie Rating System (MPAA) only. adult language • Sex scenes - Viewing can be blocked. 2. ...be blocked. The default setting is also possible to block all programs to -video movies use this function, the following must be viewed. Most television programs and television movies can be blocked by the type of program and by broadcast stations. The Parental Control Function (V-Chip) is used to be blocked....
...Categories: • Dialog - Lock Options Operation Parental Control can be used to block program viewing based on the ratings sent by the broadcast station. To use the Movie Rating System (MPAA) only. adult language • Sex scenes - Viewing can be blocked. 2. ...be blocked. The default setting is also possible to block all programs to -video movies use this function, the following must be viewed. Most television programs and television movies can be blocked by the type of program and by broadcast stations. The Parental Control Function (V-Chip) is used to be blocked....
Owners Manual
Page 25
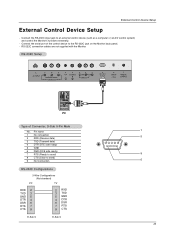
RS-232C Setup AC INPUT Y PB PR COMPONENT(480i/480p) DVD/DTV IN H/P S-VIDEO VIDEO(MONO) L AUDIO R VIDEO IN RS-232C INPUT PC Type of the control device to the RS-232C jack on the Monitor back panel. - RS-232C connection cables are not supplied with the Monitor. Pin name 1 No connection 2 RXD (Receive data) 3 TXD (Transmit data) 4 DTR (DTE side ready) 5 GND 6 DSR (DCE side ready) 7 RTS (Ready to...
RS-232C Setup AC INPUT Y PB PR COMPONENT(480i/480p) DVD/DTV IN H/P S-VIDEO VIDEO(MONO) L AUDIO R VIDEO IN RS-232C INPUT PC Type of the control device to the RS-232C jack on the Monitor back panel. - RS-232C connection cables are not supplied with the Monitor. Pin name 1 No connection 2 RXD (Receive data) 3 TXD (Transmit data) 4 DTR (DTE side ready) 5 GND 6 DSR (DCE side ready) 7 RTS (Ready to...
Owners Manual
Page 26
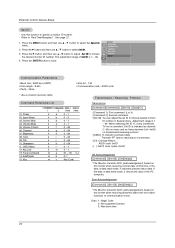
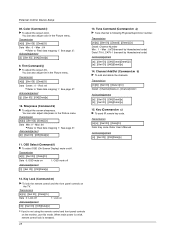
... 15. When selecting Set ID '0', every connected TV set ID to read mode, it returns the data of Set ID is 1 ~ 99. Data 1: Illegal Code 2: Not supported function 3: Wait more time 26 Use this format when receiving abnormal data from non-viable functions or communication errors. Refer to choose Parental the desired monitor ID number. Press the MENU button and then use D / E button to specify a monitor ID number. - Captions Key lock 3. Set ID -- 4. Press...
... 15. When selecting Set ID '0', every connected TV set ID to read mode, it returns the data of Set ID is 1 ~ 99. Data 1: Illegal Code 2: Not supported function 3: Wait more time 26 Use this format when receiving abnormal data from non-viable functions or communication errors. Refer to choose Parental the desired monitor ID number. Press the MENU button and then use D / E button to specify a monitor ID number. - Captions Key lock 3. Set ID -- 4. Press...
Owners Manual
Page 27
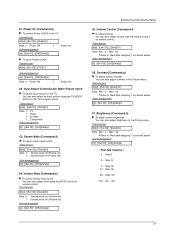
... 0 : Power Off 1 : Power On Acknowledgement [a][ ][Set ID][ ][OK][Data][x] G To show Power On/Off. You can also adjust brightness in the Picture menu. You can also adjust mute using the TV/VIDEO button on ) Acknowledgement [e][ ][Set ID][ ][OK][Data][x] External Control Device Setup 05. Screen Mute (Command:d) G To select screen mute on remote control. Power On (Command:a) G To control Power On/Off of the TV. Volume Mute (Command:e) G To control volume mute on remote control. Transmission [k][f][ ][Set ID...
... 0 : Power Off 1 : Power On Acknowledgement [a][ ][Set ID][ ][OK][Data][x] G To show Power On/Off. You can also adjust brightness in the Picture menu. You can also adjust mute using the TV/VIDEO button on ) Acknowledgement [e][ ][Set ID][ ][OK][Data][x] External Control Device Setup 05. Screen Mute (Command:d) G To select screen mute on remote control. Power On (Command:a) G To control Power On/Off of the TV. Volume Mute (Command:e) G To control volume mute on remote control. Transmission [k][f][ ][Set ID...
Owners Manual
Page 28
... panel controls on the monitor, use this mode. Transmission [k][j][ ][Set ID][ ][Data][Cr] Data Green : 0 ~ Red: 64 • Refer to 'Real data mapping 1'. Sharpness (Command:k) G To adjust the screen sharpness. Transmission [k][m][ ][Set ID][ ][Data][Cr] Data 0: Lock off , remote control lock is on/off 1: Lock on Acknowledgement [m][ ][Set ID][ ][OK][Data][x] • If you're not using the remote control and front panel controls on the TV. External Control Device Setup 08. Color (Command:i) G To adjust the screen color...
... panel controls on the monitor, use this mode. Transmission [k][j][ ][Set ID][ ][Data][Cr] Data Green : 0 ~ Red: 64 • Refer to 'Real data mapping 1'. Sharpness (Command:k) G To adjust the screen sharpness. Transmission [k][m][ ][Set ID][ ][Data][Cr] Data 0: Lock off , remote control lock is on/off 1: Lock on Acknowledgement [m][ ][Set ID][ ][OK][Data][x] • If you're not using the remote control and front panel controls on the TV. External Control Device Setup 08. Color (Command:i) G To adjust the screen color...


