
Owners Manual
Page 2
... can radiate radio frequency energy and, if not installed and used in a residential installation. Consult the dealer or an experienced radio/TV technician for a Class B digital device, pursuant to persons. The code provides guidelines for this equipment does cause harmful interference to ...National Electric Code (U.S.A.). Increase the separation between the equipment and receiver. - Connect the equipment into an outlet on , the user is : LG Electronics U.S.A., Inc. 1000 Sylvan Avenue, Englewood Cliffs, NJ 07632 Phone: 1-201-816-2000 http://www.lgusa.com 2 CAUTION: Do not attempt...
... can radiate radio frequency energy and, if not installed and used in a residential installation. Consult the dealer or an experienced radio/TV technician for a Class B digital device, pursuant to persons. The code provides guidelines for this equipment does cause harmful interference to ...National Electric Code (U.S.A.). Increase the separation between the equipment and receiver. - Connect the equipment into an outlet on , the user is : LG Electronics U.S.A., Inc. 1000 Sylvan Avenue, Englewood Cliffs, NJ 07632 Phone: 1-201-816-2000 http://www.lgusa.com 2 CAUTION: Do not attempt...
Owners Manual
Page 5
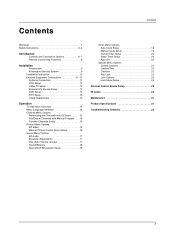
... Security System 9 Installation Instruction 10 External Equipment Connections 11~13 Antenna Connection 11 VCR Setup 12 Cable TV Setup 12 External A/V Source Setup 12 DVD Setup 13 DTV Setup 13 Using Headphones 13 Operation TV Operation Overview 14 Menu Language Selection 14 Channel Menu Options Memorizing the Channels with EZ Scan . . . . . .15...
... Security System 9 Installation Instruction 10 External Equipment Connections 11~13 Antenna Connection 11 VCR Setup 12 Cable TV Setup 12 External A/V Source Setup 12 DVD Setup 13 DTV Setup 13 Using Headphones 13 Operation TV Operation Overview 14 Menu Language Selection 14 Channel Menu Options Memorizing the Channels with EZ Scan . . . . . .15...
Owners Manual
Page 6
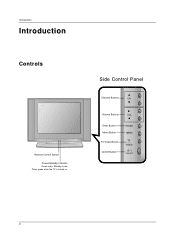
Side Control Panel Channel Buttons CH Volume Buttons VOL Enter Button Menu Button TV/Video Button On/Off Button ENTER MENU TV VIDEO / I ON/OFF 6 Introduction Introduction Controls Remote Control Sensor Power/Standby Indicator Glows red in Standby mode, Glows green when the TV is turned on.
Side Control Panel Channel Buttons CH Volume Buttons VOL Enter Button Menu Button TV/Video Button On/Off Button ENTER MENU TV VIDEO / I ON/OFF 6 Introduction Introduction Controls Remote Control Sensor Power/Standby Indicator Glows red in Standby mode, Glows green when the TV is turned on.

Owners Manual
Page 8
TV/VIDEO Selects: TV, Video, S-Video or Component mode. Don't mix used batteries with correct polarity. • Install two 1.5V batteries of AAA type. When using the remote control, ... p.22) MUTE POWER FCR EXIT MENU CH ENTER VOL VOL CH 123 456 789 AUDIO VIDEO 0 CC MULTIMEDIA Selects: TV or Component mode. Installing Batteries 8 • Open the battery compartment cover on the TV. FCR (Refer to p.15) EXIT NUMBER buttons AUDIO (Refer to p.16) CC (Refer to the last channel you...
TV/VIDEO Selects: TV, Video, S-Video or Component mode. Don't mix used batteries with correct polarity. • Install two 1.5V batteries of AAA type. When using the remote control, ... p.22) MUTE POWER FCR EXIT MENU CH ENTER VOL VOL CH 123 456 789 AUDIO VIDEO 0 CC MULTIMEDIA Selects: TV or Component mode. Installing Batteries 8 • Open the battery compartment cover on the TV. FCR (Refer to p.15) EXIT NUMBER buttons AUDIO (Refer to p.16) CC (Refer to the last channel you...
Owners Manual
Page 9
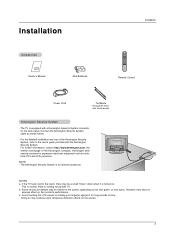
...screen, appearing as tiny red, green, or blue spots. NOTES a. Installation Accessories Owner's Manual 1.5V 1.5V AAA Batteries Installation mute power tv/video multimedia mts fcr exit menu ch enter vol vol ch 123 456 78 audio 0 9 video cc flashbk sleep Remote Control Power Cord ...Kensington Security System is nothing wrong with the tie bands. Arrange the wires with TV. Doing so may be a small "flicker" when when it for expensive electronic equipment such as shown below. - The TV is turned on the monitor's performance. Some minute dot defects may produce some...
...screen, appearing as tiny red, green, or blue spots. NOTES a. Installation Accessories Owner's Manual 1.5V 1.5V AAA Batteries Installation mute power tv/video multimedia mts fcr exit menu ch enter vol vol ch 123 456 78 audio 0 9 video cc flashbk sleep Remote Control Power Cord ...Kensington Security System is nothing wrong with the tie bands. Arrange the wires with TV. Doing so may be a small "flicker" when when it for expensive electronic equipment such as shown below. - The TV is turned on the monitor's performance. Some minute dot defects may produce some...
Owners Manual
Page 10
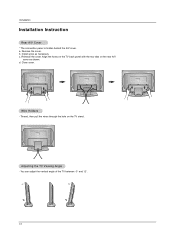
Remove the cover. Thread, then pull the wires through the hole on the rear A/V cover as necessary. You can adjust the vertical angle of the TV between -3° and 12°. 10 Install wires as shown. Wire Holders - Reinstall the cover. c. Installation Installation Instruction Rear A/V Cover * The connection panel is hidden behind the A/V cover. Align the holes on the TV back panel with the two tabs on the TV stand. Close cover. a. b. Adjusting the TV Viewing Angle - d.
Remove the cover. Thread, then pull the wires through the hole on the rear A/V cover as necessary. You can adjust the vertical angle of the TV between -3° and 12°. 10 Install wires as shown. Wire Holders - Reinstall the cover. c. Installation Installation Instruction Rear A/V Cover * The connection panel is hidden behind the A/V cover. Align the holes on the TV back panel with the two tabs on the TV stand. Close cover. a. b. Adjusting the TV Viewing Angle - d.

Owners Manual
Page 11
... flat wire, connect the twisted wire to the antenna converter and then connect the converter to tighten. If signal needs to be split for two TVs, use an antenna signal splitter for the type of antenna is commonly used in single family dwellings. 300Ω Flat Wire VHF Antenna Turn clockwise... to the antenna jack on the TV. - For optimum picture quality, adjust antenna direction. If using 75Ω round cable, do not bend the bronze wire. This type of wall antenna ...
... flat wire, connect the twisted wire to the antenna converter and then connect the converter to tighten. If signal needs to be split for two TVs, use an antenna signal splitter for the type of antenna is commonly used in single family dwellings. 300Ω Flat Wire VHF Antenna Turn clockwise... to the antenna jack on the TV. - For optimum picture quality, adjust antenna direction. If using 75Ω round cable, do not bend the bronze wire. This type of wall antenna ...
Owners Manual
Page 12
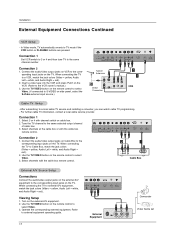
...L AUDIO R VIDEO IN RS-232C INPUT Connection 2 1. Select channels with the cable box remote control. 2 1 (R) AUDIO (L) VIDEO TV VCR RF Cable Cable Box External A/V Source Setup Connections Connect the audio/video output jacks on the external A/V equipment to the corresponding input jacks....) 3. Connection 2 1. Connect the audio/video output jacks on VCR to S-VIDEO on the TV. When connecting the TV to a local cable TV service and installing a converter, you can watch cable TV programming. - After subscribing to external A/V equipment, match the jack colors (Video = yellow, ...
...L AUDIO R VIDEO IN RS-232C INPUT Connection 2 1. Select channels with the cable box remote control. 2 1 (R) AUDIO (L) VIDEO TV VCR RF Cable Cable Box External A/V Source Setup Connections Connect the audio/video output jacks on the external A/V equipment to the corresponding input jacks....) 3. Connection 2 1. Connect the audio/video output jacks on VCR to S-VIDEO on the TV. When connecting the TV to a local cable TV service and installing a converter, you can watch cable TV programming. - After subscribing to external A/V equipment, match the jack colors (Video = yellow, ...
Owners Manual
Page 13
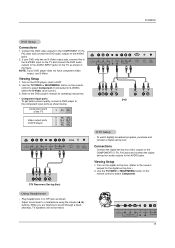
... figure. Connect the DVD video outputs to the COMPONENT (Y, PB, PR) jacks and connect the DVD audio outputs to sound through a headphone(s), TV speakers will not be heard. AC INPUT Y PB PR COMPONENT(480i/480p) DVD/DTV IN H/P S-VIDEO VIDEO(MONO) L VIDEO IN 13 ... Y PB PR (R) AUDIO (L) DVD S-VIDEO (R) AUDIO (L) DTV Setup - Installation DVD Setup Connections 1. Adjust sound level to select Component. Use the TV/VIDEO or MULTIMEDIA button on the remote control to select Component (If connected to the AUDIO INPUT jacks on the DVD player, insert a DVD. 2. Viewing...
... figure. Connect the DVD video outputs to the COMPONENT (Y, PB, PR) jacks and connect the DVD audio outputs to sound through a headphone(s), TV speakers will not be heard. AC INPUT Y PB PR COMPONENT(480i/480p) DVD/DTV IN H/P S-VIDEO VIDEO(MONO) L VIDEO IN 13 ... Y PB PR (R) AUDIO (L) DVD S-VIDEO (R) AUDIO (L) DTV Setup - Installation DVD Setup Connections 1. Adjust sound level to select Component. Use the TV/VIDEO or MULTIMEDIA button on the remote control to select Component (If connected to the AUDIO INPUT jacks on the DVD player, insert a DVD. 2. Viewing...
Owners Manual
Page 14
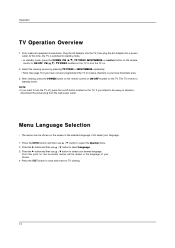
..., press the on/off button located on vacation, disconnect the power plug from the wall power outlet. Select the viewing source by pressing TV/VIDEO or MULTIMEDIA repeatedly. • Note: See page 16 if you want to receive channels in your choice. 4. NOTE • If you have ...OFF located on -screen menus will be shown in the selected language. Press the G button and then use D / E button to be shown on . 2. Operation TV Operation Overview 1. Press the MENU button and then use D / E button to standby mode. Press the EXIT button to save and return to select Language. 3. Press...
..., press the on/off button located on vacation, disconnect the power plug from the wall power outlet. Select the viewing source by pressing TV/VIDEO or MULTIMEDIA repeatedly. • Note: See page 16 if you want to receive channels in your choice. 4. NOTE • If you have ...OFF located on -screen menus will be shown in the selected language. Press the G button and then use D / E button to be shown on . 2. Operation TV Operation Overview 1. Press the MENU button and then use D / E button to standby mode. Press the EXIT button to save and return to select Language. 3. Press...
Owners Manual
Page 15
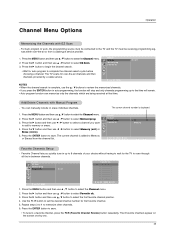
...To tune to Memory or Erased from a cable-type service provider. 1. Use the F / G button to complete the channel search cycle before choosing a channel. The TV scans for auto program to set D E FG OK MENU Favorite Ch. Press the MENU button and then use D / E button to select EZ Scan. 3. ... MENU button and then use D / E button to select the Channel menu. 2. Press the G button and then use D / E button to the TV and the TV must be receiving programming signals either over -the-air channels and then channels provided by -one. 15 Favorite ch. Favorite ch. For Auto program...
...To tune to Memory or Erased from a cable-type service provider. 1. Use the F / G button to complete the channel search cycle before choosing a channel. The TV scans for auto program to set D E FG OK MENU Favorite Ch. Press the MENU button and then use D / E button to select EZ Scan. 3. ... MENU button and then use D / E button to select the Channel menu. 2. Press the G button and then use D / E button to the TV and the TV must be receiving programming signals either over -the-air channels and then channels provided by -one. 15 Favorite ch. Favorite ch. For Auto program...
Owners Manual
Page 16
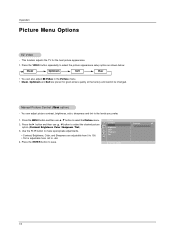
... +50. 4. Use the F / G button to make appropriate adjustments. • Contrast, Brightness, Color, and Sharpness are preset for the best picture appearance. 1. This function adjusts the TV for good picture quality at the factory and cannot be changed. Clear Optimum Soft User • You can adjust picture contrast, brightness, color, sharpness and...
... +50. 4. Use the F / G button to make appropriate adjustments. • Contrast, Brightness, Color, and Sharpness are preset for the best picture appearance. 1. This function adjusts the TV for good picture quality at the factory and cannot be changed. Clear Optimum Soft User • You can adjust picture contrast, brightness, color, sharpness and...
Owners Manual
Page 17
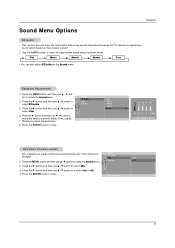
... . Operation Sound Menu Options EZ Audio - Use the AUDIO button to select the band you enjoy the best sound without any special adjustment because the TV selects the appropriate sound option based on the program content. 1. Press the ENTER button to save . Press the G button and then use F / G button to select...
... . Operation Sound Menu Options EZ Audio - Use the AUDIO button to select the band you enjoy the best sound without any special adjustment because the TV selects the appropriate sound option based on the program content. 1. Press the ENTER button to save . Press the G button and then use F / G button to select...

Owners Manual
Page 18
Balance 0 3. The TV can receive MTS stereo programs and any SAP (Secondary Audio Program) that accompanies the stereo program, if the broadcaster transmits an additional sound signal as ...
Balance 0 3. The TV can receive MTS stereo programs and any SAP (Secondary Audio Program) that accompanies the stereo program, if the broadcaster transmits an additional sound signal as ...
Owners Manual
Page 19
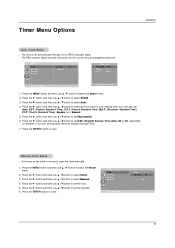
... to select the time zone for the correct time and daylight saving time. Press the G button and then use D / E button to select Manual. 4. AM 19 TV 1 D.S.T. Press the MENU button and then use D / E button to select the Timer menu. 2. Press the G button and then use D / E button to select Clock. 3. Press the...
... to select the time zone for the correct time and daylight saving time. Press the G button and then use D / E button to select Manual. 4. AM 19 TV 1 D.S.T. Press the MENU button and then use D / E button to select the Timer menu. 2. Press the G button and then use D / E button to select Clock. 3. Press the...
Owners Manual
Page 20
.... Timer Clock Off timer On timer Auto off , press the SLEEP button once. 4. If Auto Off is active and there is no input signal, the TV switches to set the hour. 4. Press the MENU button and then use D / E button to Standby mode automatically after turning on . Press the G button...minutes you don't press any button within 2 hours after 10 minutes. 1. Off 4. Press the G button and then use D / E button to select On or Off. AM TV 2 Volume 30 Run Sleep Timer Setup - D E F OK MENU 20 Then, press the G button and then use D / E button to set to count down from ...
.... Timer Clock Off timer On timer Auto off , press the SLEEP button once. 4. If Auto Off is active and there is no input signal, the TV switches to set the hour. 4. Press the MENU button and then use D / E button to Standby mode automatically after turning on . Press the G button...minutes you don't press any button within 2 hours after 10 minutes. 1. Off 4. Press the G button and then use D / E button to select On or Off. AM TV 2 Volume 30 Run Sleep Timer Setup - D E F OK MENU 20 Then, press the G button and then use D / E button to set to count down from ...
Owners Manual
Page 21
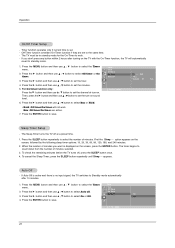
.... The signal from a car or airplane interfere with the captions, while Another mode might show demonstration or programming information. • Your TV might not receive caption signals normally in the following situations. 1. One is the direct path and the other electrical appliances. • GHOSTS... system for translation into written words which then appear as subtitles on the same channel. Real-time captioning is usually the signal with the TV signal. 4. By selecting From CC 1 to caption a live program by small dots. Closed captions allow viewers to improve the picture....
.... The signal from a car or airplane interfere with the captions, while Another mode might show demonstration or programming information. • Your TV might not receive caption signals normally in the following situations. 1. One is the direct path and the other electrical appliances. • GHOSTS... system for translation into written words which then appear as subtitles on the same channel. Real-time captioning is usually the signal with the TV signal. 4. By selecting From CC 1 to caption a live program by small dots. Closed captions allow viewers to improve the picture....
Owners Manual
Page 22
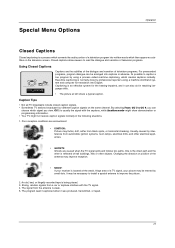
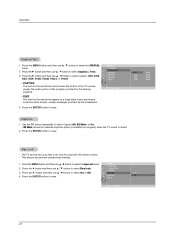
...to select the Special menu. Press the G button and then use D / E button to select Key lock. usually the audio portion of the TV screen; usually messages provided by the broadcaster. 4. Use the CC button repeatedly to save. Special Language 2. Operation Caption/Text 1. Press the ENTER... button to select Caption / Text. 3. Key Lock - The TV can be set up so that it can prevent unauthorized viewing. 1. Press the G button and then use D / E button to save . Key ...
...to select the Special menu. Press the G button and then use D / E button to select Key lock. usually the audio portion of the TV screen; usually messages provided by the broadcaster. 4. Use the CC button repeatedly to save. Special Language 2. Operation Caption/Text 1. Press the ENTER... button to select Caption / Text. 3. Key Lock - The TV can be set up so that it can prevent unauthorized viewing. 1. Press the G button and then use D / E button to save . Key ...
Owners Manual
Page 23
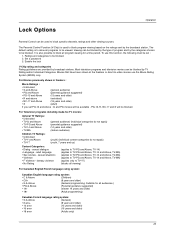
.... fantasy violence • No Rating (applies to TV-PG and Above, TV-14) (applies to TV-PG and Above, TV-14 and Above, TV-MA) (applies to TV-PG and Above, TV-14 and Above, TV-MA) (applies to TV-PG and Above, TV-14 and Above, TV-MA) (applies only to -video movies use this...sources. Movies that have been shown at the theaters or direct-to TV-Y7) (blocks all program viewing for -TV movies: General TV Ratings: • Unblocked • TV-G and Above • TV-PG and Above • TV-14 and Above • TV-MA (general audience) (individual categories do not apply) (parental guidance...
.... fantasy violence • No Rating (applies to TV-PG and Above, TV-14) (applies to TV-PG and Above, TV-14 and Above, TV-MA) (applies to TV-PG and Above, TV-14 and Above, TV-MA) (applies to TV-PG and Above, TV-14 and Above, TV-MA) (applies only to -video movies use this...sources. Movies that have been shown at the theaters or direct-to TV-Y7) (blocks all program viewing for -TV movies: General TV Ratings: • Unblocked • TV-G and Above • TV-PG and Above • TV-14 and Above • TV-MA (general audience) (individual categories do not apply) (parental guidance...
Owners Manual
Page 24
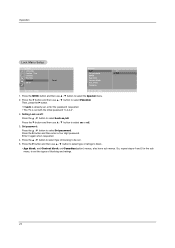
... Parental Set ID To set with the initial password "0-0-0-0". 2. Then, press the G button. • If Lock is already set, enter the password requested. • The TV is set Parental Lock On Set password Off MPAA Age block Content block Aux. Setting Lock on/off: Press the D / E button to select on /off...
... Parental Set ID To set with the initial password "0-0-0-0". 2. Then, press the G button. • If Lock is already set, enter the password requested. • The TV is set Parental Lock On Set password Off MPAA Age block Content block Aux. Setting Lock on/off: Press the D / E button to select on /off...


