
Owner's Manual
Page 7
Place the monitor face down and retry it in the arrow direction. A5 If you can't release the stand base even the locking knob is at a release position, Please push the indicated knob down on the cushion or soft cloth. 3. Put a cushion or soft cloth on the product as it follows and turn it . 4. Pull out the stand to remove. Change your lock on a flat surface. 2. Connecting the Display Disassembling the stand 1.
Place the monitor face down and retry it in the arrow direction. A5 If you can't release the stand base even the locking knob is at a release position, Please push the indicated knob down on the cushion or soft cloth. 3. Put a cushion or soft cloth on the product as it follows and turn it . 4. Pull out the stand to remove. Change your lock on a flat surface. 2. Connecting the Display Disassembling the stand 1.

Owner's Manual
Page 9
... view. NOTE ' Self Image Setting Function'? A7 This function provides the user with optimal display settings.When the user connects the monitor for the first time, this function automatically adjusts the display to improve resolution. This rear view represents a general model; your display...blurred letters, screen flicker or tilted screen while using the device or after changing screen resolution, press the AUTO/SET function button to optimal settings for individual input signals. 'AUTO/SET' Function? When monitor power is turned on . Connecting the Display Using the Computer NOTE This ...
... view. NOTE ' Self Image Setting Function'? A7 This function provides the user with optimal display settings.When the user connects the monitor for the first time, this function automatically adjusts the display to improve resolution. This rear view represents a general model; your display...blurred letters, screen flicker or tilted screen while using the device or after changing screen resolution, press the AUTO/SET function button to optimal settings for individual input signals. 'AUTO/SET' Function? When monitor power is turned on . Connecting the Display Using the Computer NOTE This ...

Owner's Manual
Page 10
... a PS/2-type keyboard/mouse. Connect the cable as blurry screen, blurred letters, screen flicker or titled screen while using the device or after changing screen resolution, press the AUTO/SET function button to 5 ports are supported per X550 PCI Card. Up to turn the power on the front... switch panel to the highest level and adjust the monitor volume. Make sure to 5 ports can be connected if necessary. (This item must be purchased separately.) Headphone/Earphone Input Automatically mutes the speaker...
... a PS/2-type keyboard/mouse. Connect the cable as blurry screen, blurred letters, screen flicker or titled screen while using the device or after changing screen resolution, press the AUTO/SET function button to 5 ports are supported per X550 PCI Card. Up to turn the power on the front... switch panel to the highest level and adjust the monitor volume. Make sure to 5 ports can be connected if necessary. (This item must be purchased separately.) Headphone/Earphone Input Automatically mutes the speaker...

Owner's Manual
Page 13
... for several seconds. or • D-sub : This menu is available, use this button to lock the current control settings, so that they cannot be inadvertently changed. THIS MENU IS NOT AVAILABLE MENU Button Use this button to switch the sound on or off. Press and hold the MENU button for several...
... for several seconds. or • D-sub : This menu is available, use this button to lock the current control settings, so that they cannot be inadvertently changed. THIS MENU IS NOT AVAILABLE MENU Button Use this button to switch the sound on or off. Press and hold the MENU button for several...
Owner's Manual
Page 14
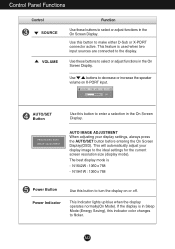
... or adjust functions in the On Screen Display. N1642W : 1360 x 768 - Use this indicator color changes to select or adjust functions in the On Screen Display. AUTO/SET Button Use this button to the display. N1941W : 1360 x 768 Power Button Power Indicator Use this button to make either D-Sub or X-PORT connector...
... or adjust functions in the On Screen Display. N1642W : 1360 x 768 - Use this indicator color changes to select or adjust functions in the On Screen Display. AUTO/SET Button Use this button to the display. N1941W : 1360 x 768 Power Button Power Indicator Use this button to make either D-Sub or X-PORT connector...
Owner's Manual
Page 19
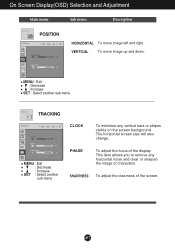
VERTICAL To move image left and right. A17 The horizontal screen size will also change. MENU : Exit : Decrease : Increase SET : Select another sub-menu PHASE To adjust the focus of the display. This item allows you to remove any vertical ...
VERTICAL To move image left and right. A17 The horizontal screen size will also change. MENU : Exit : Decrease : Increase SET : Select another sub-menu PHASE To adjust the focus of the display. This item allows you to remove any vertical ...

Owner's Manual
Page 20
... SETUP control names are displayed. WIDE 4:3 • WIDE : Switch to full screen mode according to input image signal. • 4 : 3 : Change the image signal ratio into the standard output level of the monitor to provide the optimal image. If necessary, perform the white balance function again. If this function, the signal level is...
... SETUP control names are displayed. WIDE 4:3 • WIDE : Switch to full screen mode according to input image signal. • 4 : 3 : Change the image signal ratio into the standard output level of the monitor to provide the optimal image. If necessary, perform the white balance function again. If this function, the signal level is...

Owner's Manual
Page 22
... appears when the signal cable between your PC and your display again. You can secure the current control settings, so that they cannot be inadvertently changed. See the 'Specifications' section of the • Check and see a "OSD LOCKED" message on PC (video card) is connected display connected? Troubleshooting Check the following...
... appears when the signal cable between your PC and your display again. You can secure the current control settings, so that they cannot be inadvertently changed. See the 'Specifications' section of the • Check and see a "OSD LOCKED" message on PC (video card) is connected display connected? Troubleshooting Check the following...
Owner's Manual
Page 23
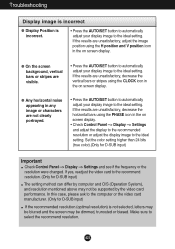
..., please ask to the recommend resolution. (Only for D-SUB input) Important Check Control Panel --> Display --> Settings and see if the frequency or the resolution were changed. If the results are not clearly portrayed. • Press the AUTO/SET button to automatically adjust your display image to the ideal setting. A21 Troubleshooting...
..., please ask to the recommend resolution. (Only for D-SUB input) Important Check Control Panel --> Display --> Settings and see if the frequency or the resolution were changed. If the results are not clearly portrayed. • Press the AUTO/SET button to automatically adjust your display image to the ideal setting. A21 Troubleshooting...
Owner's Manual
Page 24
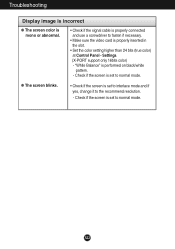
... if necessary. • Make sure the video card is set to normal mode. Check if the screen is set to interlace mode and if yes, change it to normal mode. G The screen blinks. • Check if the screen is performed on black/white pattern. - Check if the screen is properly inserted...
... if necessary. • Make sure the video card is set to normal mode. Check if the screen is set to interlace mode and if yes, change it to normal mode. G The screen blinks. • Check if the screen is performed on black/white pattern. - Check if the screen is properly inserted...

Owner's Manual
Page 25
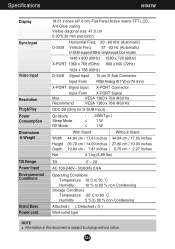
... Plug&Play Power Consumption Dimensions & Weight Tilt Range Power Input Environmental Conditions Stand Base Power cord 15.6 inches (39.6 cm) Flat Panel Active matrix-TFT LCD, AntiGlare coating Visible diagonal size: 39.6 cm 0.252*0.252 mm pixel pitch Horizontal Freq. 30 - 66 kHz (Automatic) D-SUB Vertical Freq. 57 - 63 Hz (Automatic... Conditions Temperature -20˚C to 60 ˚C Humidity 5 % to 90 % non-Condensing Attached ( ), Detached ( O ) Wall-outlet type NOTE Information in this document is subject to change without notice.
... Plug&Play Power Consumption Dimensions & Weight Tilt Range Power Input Environmental Conditions Stand Base Power cord 15.6 inches (39.6 cm) Flat Panel Active matrix-TFT LCD, AntiGlare coating Visible diagonal size: 39.6 cm 0.252*0.252 mm pixel pitch Horizontal Freq. 30 - 66 kHz (Automatic) D-SUB Vertical Freq. 57 - 63 Hz (Automatic... Conditions Temperature -20˚C to 60 ˚C Humidity 5 % to 90 % non-Condensing Attached ( ), Detached ( O ) Wall-outlet type NOTE Information in this document is subject to change without notice.
Owner's Manual
Page 26
A24 Specifications N1941W Display Sync Input Video Input Resolution Plug&Play Power Consumption Dimensions & Weight Tilt Range Power Input Environmental Conditions Stand Base Power cord 18.51 inches (47.0 cm) Flat Panel Active matrix-TFT LCD, Anti-Glare coating Visible diagonal size: 47.0 cm 0.30*0.30 mm pixel pitch Horizontal Freq. 30 - 66 kHz... Conditions Temperature -20˚C to 60 ˚C Humidity 5 % to 90 % non-Condensing Attached ( ), Detached ( O ) Wall-outlet type NOTE Information in this document is subject to change without notice.
A24 Specifications N1941W Display Sync Input Video Input Resolution Plug&Play Power Consumption Dimensions & Weight Tilt Range Power Input Environmental Conditions Stand Base Power cord 18.51 inches (47.0 cm) Flat Panel Active matrix-TFT LCD, Anti-Glare coating Visible diagonal size: 47.0 cm 0.30*0.30 mm pixel pitch Horizontal Freq. 30 - 66 kHz... Conditions Temperature -20˚C to 60 ˚C Humidity 5 % to 90 % non-Condensing Attached ( ), Detached ( O ) Wall-outlet type NOTE Information in this document is subject to change without notice.


