
Owners Manual
Page 1
Retain it for future reference. Record model number and serial number of the set and quote this manual carefully before operating your dealer when you require service. Please read this information to your set. Model number : Serial number : PLASMA MONITOR MW-71PY10 MW-71PY10G OWNER'S MANUAL See the label attached on the back of the set.
Retain it for future reference. Record model number and serial number of the set and quote this manual carefully before operating your dealer when you require service. Please read this information to your set. Model number : Serial number : PLASMA MONITOR MW-71PY10 MW-71PY10G OWNER'S MANUAL See the label attached on the back of the set.

Owners Manual
Page 3
... following safety instructions shall be included where applicable, and, when used . If the provided plug does not fit into your safety. PORTABLE CART WARNING Owner's Manual 3 This information shall be given in a language acceptable to the country where the apparatus is used, use this apparatus near any ventilation openings. Keep these...
... following safety instructions shall be included where applicable, and, when used . If the provided plug does not fit into your safety. PORTABLE CART WARNING Owner's Manual 3 This information shall be given in a language acceptable to the country where the apparatus is used, use this apparatus near any ventilation openings. Keep these...
Owners Manual
Page 4
...install the monitor near any way, such as power-supply cord or plug is loose. Use soft gloves while installing or removing this owner's manual to be connected to dripping or splashing and no additional outlets or branch circuits. that is required when the apparatus has been damaged in ...avoid wire damage. 16. To Reduce The Risk Of Fire Or Electric Shock, Do Not Expose This Appliance To Rain Or Moisture. 17. Safety instruction (MW-71PY10G only) 18. Protect the power cord from physical or mechanical abuse, such as vases, shall be exposed to a dedicated circuit; Use a dedicated ...
...install the monitor near any way, such as power-supply cord or plug is loose. Use soft gloves while installing or removing this owner's manual to be connected to dripping or splashing and no additional outlets or branch circuits. that is required when the apparatus has been damaged in ...avoid wire damage. 16. To Reduce The Risk Of Fire Or Electric Shock, Do Not Expose This Appliance To Rain Or Moisture. 17. Safety instruction (MW-71PY10G only) 18. Protect the power cord from physical or mechanical abuse, such as vases, shall be exposed to a dedicated circuit; Use a dedicated ...

Owners Manual
Page 5
... Options APC (Auto Picture Control 19 XD 19 Auto Color Temperature Control 19 Fleshtone 20 sRGB 20 Manual Picture Control 20 Sound Menu Options DASP (Digital Auto Sound Processing 21 Manual Sound Control 21 BBE 21 AVL (Auto Volume Leveler 21 Timer Menu Options Clock Setup 22 On/...power 23 XD Demo 24 Index 24 Contents Screen Menu Options Auto Adjustment 25 Setting Picture Format 25 Split Zoom 26 Screen Position 26 Manual Configure 26 Initializing 27 Selecting Wide VGA mode 27 Screen Adjustments 28 Cinema Mode Setup 28 Luminance Noise Reduction 28 PIP (Picture-in-Picture...
... Options APC (Auto Picture Control 19 XD 19 Auto Color Temperature Control 19 Fleshtone 20 sRGB 20 Manual Picture Control 20 Sound Menu Options DASP (Digital Auto Sound Processing 21 Manual Sound Control 21 BBE 21 AVL (Auto Volume Leveler 21 Timer Menu Options Clock Setup 22 On/...power 23 XD Demo 24 Index 24 Contents Screen Menu Options Auto Adjustment 25 Setting Picture Format 25 Split Zoom 26 Screen Position 26 Manual Configure 26 Initializing 27 Selecting Wide VGA mode 27 Screen Adjustments 28 Cinema Mode Setup 28 Luminance Noise Reduction 28 PIP (Picture-in-Picture...

Owners Manual
Page 7
Owner's Manual 7 Sub power Button E, D Buttons VOLUME (F,G) Buttons MENU Button INPUT Button Remote Control Sensor Power Indicator Illuminates red in standby mode, Illuminates green when the monitor is turned on or off. Controls Front Panel Controls Introduction INPUT MENU VOL INDEX Switches LED Display on .
Owner's Manual 7 Sub power Button E, D Buttons VOLUME (F,G) Buttons MENU Button INPUT Button Remote Control Sensor Power Indicator Illuminates red in standby mode, Illuminates green when the monitor is turned on or off. Controls Front Panel Controls Introduction INPUT MENU VOL INDEX Switches LED Display on .
Owners Manual
Page 8
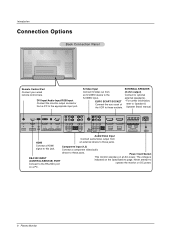
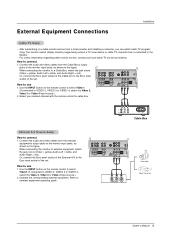
... the monitor on an AC power. on the Specifications page. S-Video Input EXTERNAL SPEAKER Connect S-Video out from a PC to optional S-VIDEO input. Speaker Stand' manual. Introduction Connection Options Back Connection Panel Remote Control Port Connect your wired remote control here. DVI Input/Audio Input/RGB Input Connect the monitor output...
... the monitor on an AC power. on the Specifications page. S-Video Input EXTERNAL SPEAKER Connect S-Video out from a PC to optional S-VIDEO input. Speaker Stand' manual. Introduction Connection Options Back Connection Panel Remote Control Port Connect your wired remote control here. DVI Input/Audio Input/RGB Input Connect the monitor output...

Owners Manual
Page 9
.... INDEX Switches LED Display on or off , depending on or off . Installing Batteries • Open the battery compartment cover on the monitor. - Replace cover. Owner's Manual 9
.... INDEX Switches LED Display on or off , depending on or off . Installing Batteries • Open the battery compartment cover on the monitor. - Replace cover. Owner's Manual 9

Owners Manual
Page 10
...Ensure that the following accessories are included with your dealer for quality improvement without any notification new optional extras can be added. - Owner's Manual LIGHT INPUT MODE PIP POWER DW APC DASP MUTE VOL SLEEP CH WIN. SIZE ENTER MENU PIP INPUT ARC EXIT PLAY PAUSE STOP RECORD...COM1 COM2 RGB DVI HDMI KEY LOCK INDEX Remote Control 1.5V 1.5V Batteries Power Cord D-sub 15 pin cable DVI computer cable Soft cloth (MW-71PY10G only ) Option Extras - Contract your plasma display. If an accessory is missing, please contact the dealer where you purchased the product....
...Ensure that the following accessories are included with your dealer for quality improvement without any notification new optional extras can be added. - Owner's Manual LIGHT INPUT MODE PIP POWER DW APC DASP MUTE VOL SLEEP CH WIN. SIZE ENTER MENU PIP INPUT ARC EXIT PLAY PAUSE STOP RECORD...COM1 COM2 RGB DVI HDMI KEY LOCK INDEX Remote Control 1.5V 1.5V Batteries Power Cord D-sub 15 pin cable DVI computer cable Soft cloth (MW-71PY10G only ) Option Extras - Contract your plasma display. If an accessory is missing, please contact the dealer where you purchased the product....

Owners Manual
Page 11
... Breaker Wall Mount Installation For proper ventilation, allow a clearance of 4" on each side and the top, 2.36" on each side and 2" from the wall. Owner's Manual 11 Detailed installation instructions are included in a location where adequate ventilation is available. If grounding methods are available from your dealer. Do not try to...
... Breaker Wall Mount Installation For proper ventilation, allow a clearance of 4" on each side and the top, 2.36" on each side and 2" from the wall. Owner's Manual 11 Detailed installation instructions are included in a location where adequate ventilation is available. If grounding methods are available from your dealer. Do not try to...
Owners Manual
Page 12
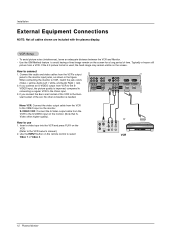
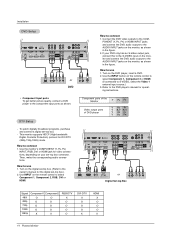
... on the VCR. (Refer to the SVIDEO input, the picture quality is improved; If you connect an S-VIDEO output from VCR to the VCR owner's manual.) 2. VIDEO COMPONENT INPUT 2 COMPONENT INPUT 1 R L AUDIO S-VIDEO R MONO L AUDIO VIDEO INPUT 2 VIDEO INPUT 1 VIDEO VIDEO3 VIDEO4 Mono VCR: Connect the video output cable from the...
... on the VCR. (Refer to the SVIDEO input, the picture quality is improved; If you connect an S-VIDEO output from VCR to the VCR owner's manual.) 2. VIDEO COMPONENT INPUT 2 COMPONENT INPUT 1 R L AUDIO S-VIDEO R MONO L AUDIO VIDEO INPUT 2 VIDEO INPUT 1 VIDEO VIDEO3 VIDEO4 Mono VCR: Connect the video output cable from the...
Owners Manual
Page 13
... Video 4 input source.) 2. VIDEO COMPONENT INPUT 2 COMPONENT INPUT 1 R L AUDIO VIDEO INPUT 2 VIDEO VID INPUT 1 S-VIDEO R MONO L AUDIO VIDEO R AUDIO L VIDEO Camcorder Video Game Set Owner's Manual 13 How to external equipment, match the jack colors (Video = yellow, Audio Left = white, and Audio Right = red). When connecting the monitor to connect 1. VIDEO...
... Video 4 input source.) 2. VIDEO COMPONENT INPUT 2 COMPONENT INPUT 1 R L AUDIO VIDEO INPUT 2 VIDEO VID INPUT 1 S-VIDEO R MONO L AUDIO VIDEO R AUDIO L VIDEO Camcorder Video Game Set Owner's Manual 13 How to external equipment, match the jack colors (Video = yellow, Audio Left = white, and Audio Right = red). When connecting the monitor to connect 1. VIDEO...
Owners Manual
Page 14
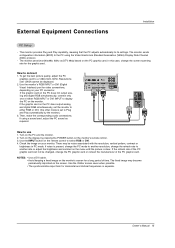
How to use 1. Turn on the remote control to the owner's manual for video connections, depending on your DVD only has an S-Video output jack, connect this to the S-VIDEO input on the monitor and connect the ... outputs to the AUDIO INPUT jacks on the remote control to select Component 1, Component 2 or HDMI. (If connected to use 1. Refer to the DVD player's manual for DVI DTV (480p,720p,1080i) mode. To watch digitally broadcast programs, purchase and connect a digital set -top box.) 2.
How to use 1. Turn on the remote control to the owner's manual for video connections, depending on your DVD only has an S-Video output jack, connect this to the S-VIDEO input on the monitor and connect the ... outputs to the AUDIO INPUT jacks on the remote control to select Component 1, Component 2 or HDMI. (If connected to use 1. Refer to the DVD player's manual for DVI DTV (480p,720p,1080i) mode. To watch digitally broadcast programs, purchase and connect a digital set -top box.) 2.
Owners Manual
Page 15
... set the monitor to either RGB INPUT or DVI INPUT to select RGB or DVI. 4. There may become permanently imprinted on your PC connector. Owner's Manual 15 This monitor provides Plug and Play capability, meaning that the PC adjusts automatically to connect 1. To get the best picture quality, adjust the PC...
... set the monitor to either RGB INPUT or DVI INPUT to select RGB or DVI. 4. There may become permanently imprinted on your PC connector. Owner's Manual 15 This monitor provides Plug and Play capability, meaning that the PC adjusts automatically to connect 1. To get the best picture quality, adjust the PC...

Owners Manual
Page 17
...can receive the High-Definition Multimedia Interface(HDMI). - If Source Devices support Auto HDMI, automatically, Source Devices divert output resolution in monitor is setted, manually. - How to 1920 x 1080i. HDMI Installation - After reading in HDMI Source Devices using HDMI Cable. To get the best picture quality, ...adjust the DVD Player or Set Top Box output resolution to DTV with HDMI Cable .(not supplied with the product) Owner's Manual 17 To get the best picture quality, adjust the DVD Player or Set Top Box output resolution to connect When Source Devices(DVD ...
...can receive the High-Definition Multimedia Interface(HDMI). - If Source Devices support Auto HDMI, automatically, Source Devices divert output resolution in monitor is setted, manually. - How to 1920 x 1080i. HDMI Installation - After reading in HDMI Source Devices using HDMI Cable. To get the best picture quality, ...adjust the DVD Player or Set Top Box output resolution to DTV with HDMI Cable .(not supplied with the product) Owner's Manual 17 To get the best picture quality, adjust the DVD Player or Set Top Box output resolution to connect When Source Devices(DVD ...

Owners Manual
Page 19
... settings are preset for the best picture appearance. - Cool Normal Warm Owner's Manual 19 Picture Menu Options - When adjusting Picture menu options (contrast, brightness, color, sharpness, and tint) manually, APC automati- cally changes to default settings), select the Normal option. 1. When... selecting APC options (Daylight, Optimum and Night time), XD is LG Electronic's unique picture improving technology to display a real ...
... settings are preset for the best picture appearance. - Cool Normal Warm Owner's Manual 19 Picture Menu Options - When adjusting Picture menu options (contrast, brightness, color, sharpness, and tint) manually, APC automati- cally changes to default settings), select the Normal option. 1. When... selecting APC options (Daylight, Optimum and Night time), XD is LG Electronic's unique picture improving technology to display a real ...

Owners Manual
Page 20
... difference. 1. Press the G button and then use D / E button to make appropriate adjustments. Press the MENU button and then use F / G button to select the PICTURE menu. Manual Picture Control (Off option) - Press the ENTER button to the levels you prefer. 1. SCREEN Tint 0 4. You can adjust picture contrast, brightness, color, sharpness, and tint...
... difference. 1. Press the G button and then use D / E button to make appropriate adjustments. Press the MENU button and then use F / G button to select the PICTURE menu. Manual Picture Control (Off option) - Press the ENTER button to the levels you prefer. 1. SCREEN Tint 0 4. You can adjust picture contrast, brightness, color, sharpness, and tint...
Owners Manual
Page 21
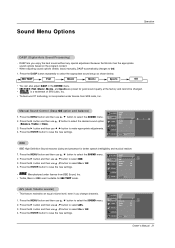
... Press the G button and then use D / E button to select On or Off. 4. When adjusting sound options (treble, bass) manually, DASP automatically changes to select the appropriate sound setup as shown below. This feature maintains an equal volume level; Press the G button and ...select On or Off. 4. DASP lets you change channels. 1. SCREEN PIP/DW Menu Prev. Press the ENTER button to select the SOUND menu. 2. Manual Sound Control (Dasp Off option and balance) PICTURE DASP BBE 1. BBE - Press the MENU button and then use D / E button to select the ...
... Press the G button and then use D / E button to select On or Off. 4. When adjusting sound options (treble, bass) manually, DASP automatically changes to select the appropriate sound setup as shown below. This feature maintains an equal volume level; Press the G button and ...select On or Off. 4. DASP lets you change channels. 1. SCREEN PIP/DW Menu Prev. Press the ENTER button to select the SOUND menu. 2. Manual Sound Control (Dasp Off option and balance) PICTURE DASP BBE 1. BBE - Press the MENU button and then use D / E button to select the ...
Owners Manual
Page 23
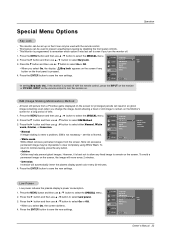
... normal viewing, press the any fixed image to allow any button. Press the G button and then use D / E button to select Low power. 3. G On Off Owner's Manual 23 Press the MENU button and then use D / E button to select the SPECIAL menu. 2. Press the ENTER button to Normal. • White wash White Wash...
... normal viewing, press the any fixed image to allow any button. Press the G button and then use D / E button to select Low power. 3. G On Off Owner's Manual 23 Press the MENU button and then use D / E button to select the SPECIAL menu. 2. Press the ENTER button to Normal. • White wash White Wash...

Owners Manual
Page 25
...the position of the picture will be adjusted more enlarged at both sides, to view a picture with an original 4:3 aspect ratio, with the Manual config. Press the ARC button repeatedly to select the SCREEN menu. 2. Automatically adjusts picture position and minimizes image shaking. - Reset VGA Mode... you want to adjust the picture in the SCREEN menu. • 4:3 - Press the G button to select Auto config.. 3. option. ARC Position Manual config. RGB-DTV/DVI-DTV/Component 480p,720p,1080i/HDMI 480p,720p,1080i : 4:3, 16:9 and Zoom. 1. Choose 4:3 when you want to view ...
...the position of the picture will be adjusted more enlarged at both sides, to view a picture with an original 4:3 aspect ratio, with the Manual config. Press the ARC button repeatedly to select the SCREEN menu. 2. Automatically adjusts picture position and minimizes image shaking. - Reset VGA Mode... you want to adjust the picture in the SCREEN menu. • 4:3 - Press the G button to select Auto config.. 3. option. ARC Position Manual config. RGB-DTV/DVI-DTV/Component 480p,720p,1080i/HDMI 480p,720p,1080i : 4:3, 16:9 and Zoom. 1. Choose 4:3 when you want to view ...

Owners Manual
Page 26
...Press the SPLIT ZOOM button repeatedly to save the new settings. Screen Position - PICTURE Auto config. Press the G button and then use D / E button to select Manual config.. 3. Press the ENTER button to select either 2, 4 , or 9 Split Zoom. 2-Split zoom 1 4 4-Split zoom 1 2 4 5 9-Split zoom 12...Phase adjustment range is 0 ~ 30. • The Clock adjustment range is completed and especially if characters are still jittery, adjust the picture Phase manually. - G Phase 0 Clock 0 26 Plasma Monitor Press the MENU button and then use D / E button to to select the SCREEN menu....
...Press the SPLIT ZOOM button repeatedly to save the new settings. Screen Position - PICTURE Auto config. Press the G button and then use D / E button to select Manual config.. 3. Press the ENTER button to select either 2, 4 , or 9 Split Zoom. 2-Split zoom 1 4 4-Split zoom 1 2 4 5 9-Split zoom 12...Phase adjustment range is 0 ~ 30. • The Clock adjustment range is completed and especially if characters are still jittery, adjust the picture Phase manually. - G Phase 0 Clock 0 26 Plasma Monitor Press the MENU button and then use D / E button to to select the SCREEN menu....


