

Owners Manual
Page 2
... shock to which can radiate radio frequency energy and, if not installed and used in a residential installation. Consult the dealer or an experienced radio/TV technician for help. • Any changes or modifications not expressly approved by the party responsible for a Class B digital device, pursuant to correct the interference by turning the equipment off and on a circuit different...
... shock to which can radiate radio frequency energy and, if not installed and used in a residential installation. Consult the dealer or an experienced radio/TV technician for help. • Any changes or modifications not expressly approved by the party responsible for a Class B digital device, pursuant to correct the interference by turning the equipment off and on a circuit different...
Owners Manual
Page 4
... servicer. Do not use if the power cord or plug is damaged, or socket is , a single outlet circuit which powers only that is loose. Use soft gloves while installing or removing this owner's manual to avoid wire damage. 16. Servicing is damaged, liquid has been spilled or objects have the cord replaced with liquids, such as vases, shall be connected to qualified service personnel. Check the specification...
... servicer. Do not use if the power cord or plug is damaged, or socket is , a single outlet circuit which powers only that is loose. Use soft gloves while installing or removing this owner's manual to avoid wire damage. 16. Servicing is damaged, liquid has been spilled or objects have the cord replaced with liquids, such as vases, shall be connected to qualified service personnel. Check the specification...

Owners Manual
Page 5
... Controls and Connection Options 7~8 Remote Control Key Functions 9 Installation Installation 10 Installation Instruction 11 External Equipment Connections 12~17 VCR Setup 12 Cable TV Setup 13 External A/V Source Setup 13 DVD Setup 14 DTV Setup 14 PC Setup 15~16 HDMI 17 Operation Turning on the Monitor 18 Menu Language Selection 18 Picture Menu Options APC (Auto Picture Control 19 XD 19 Auto Color Temperature Control 19 Fleshtone 20 sRGB 20 Manual Picture Control 20 Sound Menu Options DASP (Digital Auto Sound Processing 21 Manual Sound Control 21 BBE 21 AVL (Auto Volume...
... Controls and Connection Options 7~8 Remote Control Key Functions 9 Installation Installation 10 Installation Instruction 11 External Equipment Connections 12~17 VCR Setup 12 Cable TV Setup 13 External A/V Source Setup 13 DVD Setup 14 DTV Setup 14 PC Setup 15~16 HDMI 17 Operation Turning on the Monitor 18 Menu Language Selection 18 Picture Menu Options APC (Auto Picture Control 19 XD 19 Auto Color Temperature Control 19 Fleshtone 20 sRGB 20 Manual Picture Control 20 Sound Menu Options DASP (Digital Auto Sound Processing 21 Manual Sound Control 21 BBE 21 AVL (Auto Volume...

Owners Manual
Page 7
Sub power Button E, D Buttons VOLUME (F,G) Buttons MENU Button INPUT Button Remote Control Sensor Power Indicator Illuminates red in standby mode, Illuminates green when the monitor is turned on or off. Owner's Manual 7 Controls Front Panel Controls Introduction INPUT MENU VOL INDEX Switches LED Display on .
Sub power Button E, D Buttons VOLUME (F,G) Buttons MENU Button INPUT Button Remote Control Sensor Power Indicator Illuminates red in standby mode, Illuminates green when the monitor is turned on or off. Owner's Manual 7 Controls Front Panel Controls Introduction INPUT MENU VOL INDEX Switches LED Display on .
Owners Manual
Page 8
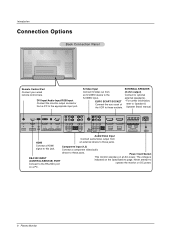
... external device to optional S-VIDEO input. REMOTE CONTROL RS-232C INPUT (CONTROL/SERVICE) HDMI DVI INPUT AUDIO INPUT RGB INPUT VIDEO COMPONENT INPUT 2 COMPONENT INPUT 1 R L AUDIO S-VIDEO R MONO L AUDIO VIDEO INPUT 2 VIDEO INPUT 1 VIDEO VIDEO3 VIDEO4 ( )R( ) ( )L ( ) EXTERNAL SPEAKER AC INPUT Audio/Video Input Connect audio/video output from (8 ohm output) an S-VIDEO device to the Connect to these jacks. Power Cord Socket RS-232C INPUT (CONTROL/SERVICE) PORT Connect to this jack. The voltage is indicated on a PC. 8 Plasma Monitor on the Specifications...
... external device to optional S-VIDEO input. REMOTE CONTROL RS-232C INPUT (CONTROL/SERVICE) HDMI DVI INPUT AUDIO INPUT RGB INPUT VIDEO COMPONENT INPUT 2 COMPONENT INPUT 1 R L AUDIO S-VIDEO R MONO L AUDIO VIDEO INPUT 2 VIDEO INPUT 1 VIDEO VIDEO3 VIDEO4 ( )R( ) ( )L ( ) EXTERNAL SPEAKER AC INPUT Audio/Video Input Connect audio/video output from (8 ohm output) an S-VIDEO device to the Connect to these jacks. Power Cord Socket RS-232C INPUT (CONTROL/SERVICE) PORT Connect to this jack. The voltage is indicated on a PC. 8 Plasma Monitor on the Specifications...

Owners Manual
Page 9
... polarity (+ with Auto program. LIGHT INPUT MODE PIP POWER DW MODE Selects the remote operating mode: MNT, VCR, DVD, CABLE, HDSTB or AUDIO. INDEX Switches LED Display on the monitor. - INPUT Selects: Video1-2-3-4, Component 1-2, RGB-DTV (or RGB-PC), DVI-DTV (or DVI-PC), HDMI input sources. POWER Turns your monitor or any menu. POSITION SPLIT ZOOM WIN. XD Switches the XD on or off . WIN. CHANNEL UP/DOWN Selects available channels found with +, - ARC Changes the picture format. (Refer to operate external devices. ENTER MENU PIP INPUT ARC EXIT PLAY PAUSE STOP RECORD...
... polarity (+ with Auto program. LIGHT INPUT MODE PIP POWER DW MODE Selects the remote operating mode: MNT, VCR, DVD, CABLE, HDSTB or AUDIO. INDEX Switches LED Display on the monitor. - INPUT Selects: Video1-2-3-4, Component 1-2, RGB-DTV (or RGB-PC), DVI-DTV (or DVI-PC), HDMI input sources. POWER Turns your monitor or any menu. POSITION SPLIT ZOOM WIN. XD Switches the XD on or off . WIN. CHANNEL UP/DOWN Selects available channels found with +, - ARC Changes the picture format. (Refer to operate external devices. ENTER MENU PIP INPUT ARC EXIT PLAY PAUSE STOP RECORD...
Owners Manual
Page 12
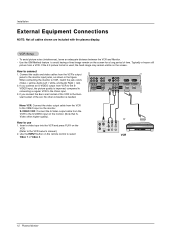
... is needed. Typically a frozen still picture from the VCR's output jacks to select Video 1 or Video 3. If the 4:3 picture format is used; Installation External Equipment Connections NOTE: Not all cables shown are included with the plasma display. VCR Setup - Connect the audio and video cables from a VCR. When connecting the monitor to use 1. VIDEO COMPONENT INPUT 2 COMPONENT INPUT 1 R L AUDIO S-VIDEO R MONO L AUDIO VIDEO INPUT 2 VIDEO INPUT 1 VIDEO VIDEO3 VIDEO4 Mono VCR: Connect the video output cable from the VCR to the S-VIDEO input on the remote control to...
... is needed. Typically a frozen still picture from the VCR's output jacks to select Video 1 or Video 3. If the 4:3 picture format is used; Installation External Equipment Connections NOTE: Not all cables shown are included with the plasma display. VCR Setup - Connect the audio and video cables from a VCR. When connecting the monitor to use 1. VIDEO COMPONENT INPUT 2 COMPONENT INPUT 1 R L AUDIO S-VIDEO R MONO L AUDIO VIDEO INPUT 2 VIDEO INPUT 1 VIDEO VIDEO3 VIDEO4 Mono VCR: Connect the video output cable from the VCR to the S-VIDEO input on the remote control to...
Owners Manual
Page 13
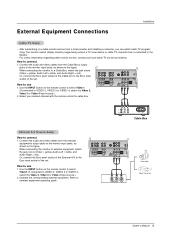
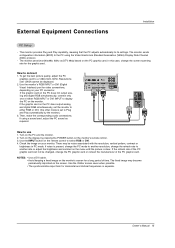
...(s). When connecting the monitor to external equipment operating guide. VIDEO COMPONENT INPUT 2 COMPONENT INPUT 1 R L AUDIO VIDEO INPUT 2 VIDEO VID INPUT 1 S-VIDEO R MONO L AUDIO VIDEO R AUDIO L VIDEO Camcorder Video Game Set Owner's Manual 13 After subscribing to a cable monitor service from the Cable Box's output jacks to the Euro scart socket of the set . Or, connect the Euro scart socket of the Cable box to the monitor input jacks, as shown in the figure. Use the INPUT button on the remote control to select Video1.(If connected to the monitor input jacks, as...
...(s). When connecting the monitor to external equipment operating guide. VIDEO COMPONENT INPUT 2 COMPONENT INPUT 1 R L AUDIO VIDEO INPUT 2 VIDEO VID INPUT 1 S-VIDEO R MONO L AUDIO VIDEO R AUDIO L VIDEO Camcorder Video Game Set Owner's Manual 13 After subscribing to a cable monitor service from the Cable Box's output jacks to the Euro scart socket of the set . Or, connect the Euro scart socket of the Cable box to the monitor input jacks, as shown in the figure. Use the INPUT button on the remote control to select Video1.(If connected to the monitor input jacks, as...
Owners Manual
Page 14
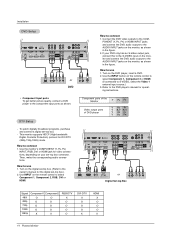
... an S-Video output jack, connect this to the S-VIDEO input on the monitor and connect the DVD audio outputs to the AUDIO INPUT jacks on the remote control to select Component 1, Component 2 or HDMI. (If connected to connect 1. To watch digitally broadcast programs, purchase and connect a digital set -top box.) 2. Use the monitor's COMPONENT (Y, PB, PR) INPUT, RGB, DVI or HDMI jack for operating instructions. • Component Input ports To get better picture quality, connect a DVD player to the owner's manual for DVI DTV (480p,720p,1080i) mode. Use the INPUT button on the monitor...
... an S-Video output jack, connect this to the S-VIDEO input on the monitor and connect the DVD audio outputs to the AUDIO INPUT jacks on the remote control to select Component 1, Component 2 or HDMI. (If connected to connect 1. To watch digitally broadcast programs, purchase and connect a digital set -top box.) 2. Use the monitor's COMPONENT (Y, PB, PR) INPUT, RGB, DVI or HDMI jack for operating instructions. • Component Input ports To get better picture quality, connect a DVD player to the owner's manual for DVI DTV (480p,720p,1080i) mode. Use the INPUT button on the monitor...
Owners Manual
Page 15
... mode to Plug and Play automatically by pressing the POWER button on the monitor's remote control. 3. Owner's Manual 15 How to its settings. To get the best picture quality, adjust the PC graphics card to use 1. C INPUT SERVICE) HDMI DVI INPUT AUDIO INPUT RGB INPUT VIDEO COMPONEN INPUT 2 COMPONEN INPUT 1 How to a 1280x1024, 60Hz. Use the monitor's RGB INPUT or DVI (Digital Visual Interface) port for video connections, depending on the monitor's screen for a long period of the PC graphic card. NOTES: • Use a DVI cable. • Avoid keeping a fixed image...
... mode to Plug and Play automatically by pressing the POWER button on the monitor's remote control. 3. Owner's Manual 15 How to its settings. To get the best picture quality, adjust the PC graphics card to use 1. C INPUT SERVICE) HDMI DVI INPUT AUDIO INPUT RGB INPUT VIDEO COMPONEN INPUT 2 COMPONEN INPUT 1 How to a 1280x1024, 60Hz. Use the monitor's RGB INPUT or DVI (Digital Visual Interface) port for video connections, depending on the monitor's screen for a long period of the PC graphic card. NOTES: • Use a DVI cable. • Avoid keeping a fixed image...

Owners Manual
Page 19
... Night time settings are preset for the best picture appearance. - Press the G button and then use D / E button to On. 1. Picture Menu Options - Operation APC (Auto Picture Control) - APC adjusts the Monitor for optimum picture quality at the factory and cannot be changed. Press the ENTER button to select the PICTURE menu. 2. When selecting APC options (Daylight, Optimum and Night time), XD is LG Electronic's unique picture improving technology to select either Cool (Preset), Normal (Default), Warm (Preset). 4. PICTURE SOUND TIMER SPECIAL SCREEN...
... Night time settings are preset for the best picture appearance. - Press the G button and then use D / E button to On. 1. Picture Menu Options - Operation APC (Auto Picture Control) - APC adjusts the Monitor for optimum picture quality at the factory and cannot be changed. Press the ENTER button to select the PICTURE menu. 2. When selecting APC options (Daylight, Optimum and Night time), XD is LG Electronic's unique picture improving technology to select either Cool (Preset), Normal (Default), Warm (Preset). 4. PICTURE SOUND TIMER SPECIAL SCREEN...

Owners Manual
Page 20
.... PICTURE SOUND TIMER SPECIAL SCREEN APC ACC Fleshtone Contrast Brightness Color Sharpness Tint 100 G 60 50 50 0 PIP/DW Menu Prev. 20 Plasma Monitor TIMER Contrast 100 Brightness 55 3. Press the G button and then use D / E button to make appropriate adjustments. 4. Press the MENU button and then use F / G button to select the PICTURE menu. 2. Press the ENTER button to select the desired skin color option. Operation Picture Menu Options continued Fleshtone (Video1-2-3-4, Component 1-2, RGB-DTV, DVI-DTV and HDMI-DTV Mode...
.... PICTURE SOUND TIMER SPECIAL SCREEN APC ACC Fleshtone Contrast Brightness Color Sharpness Tint 100 G 60 50 50 0 PIP/DW Menu Prev. 20 Plasma Monitor TIMER Contrast 100 Brightness 55 3. Press the G button and then use D / E button to make appropriate adjustments. 4. Press the MENU button and then use F / G button to select the PICTURE menu. 2. Press the ENTER button to select the desired skin color option. Operation Picture Menu Options continued Fleshtone (Video1-2-3-4, Component 1-2, RGB-DTV, DVI-DTV and HDMI-DTV Mode...
Owners Manual
Page 21
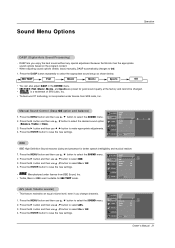
DASP lets you change channels. 1. Press the G button and then use D / E button to make appropriate adjustments. 4. even if you enjoy the best sound without any special adjustment because the Monitor has the appropriate sound options based on the program content. - Press the G button and then use F / G button to select On or Off. 4. Manual Sound Control (Dasp Off option and balance) PICTURE DASP BBE 1. Press the G button and then use D / E button to save the new settings. •...
DASP lets you change channels. 1. Press the G button and then use D / E button to make appropriate adjustments. 4. even if you enjoy the best sound without any special adjustment because the Monitor has the appropriate sound options based on the program content. - Press the G button and then use F / G button to select On or Off. 4. Manual Sound Control (Dasp Off option and balance) PICTURE DASP BBE 1. Press the G button and then use D / E button to save the new settings. •...
Owners Manual
Page 23
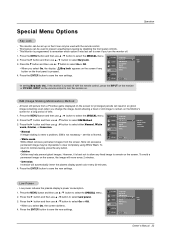
... - set to select Low power. 3. Press the ENTER button to Normal. • White wash White Wash removes permanent images from a PC/video game displayed on the Monitor's screen for prolonged periods will automatically invert the plasma display panel color every 30 minutes. 4. PICTURE SOUND TIMER SPECIAL Language Key lock ISM Method Low power Set ID Demo Index SCREEN PIP/DW Menu Prev. Press the G button and then use D / E button to even if you select On, the display ' WKey lock' appears...
... - set to select Low power. 3. Press the ENTER button to Normal. • White wash White Wash removes permanent images from a PC/video game displayed on the Monitor's screen for prolonged periods will automatically invert the plasma display panel color every 30 minutes. 4. PICTURE SOUND TIMER SPECIAL Language Key lock ISM Method Low power Set ID Demo Index SCREEN PIP/DW Menu Prev. Press the G button and then use D / E button to even if you select On, the display ' WKey lock' appears...

Owners Manual
Page 25
... view a picture with an original 4:3 aspect ratio, with the Manual config. Reset VGA Mode SCREEN PIP/DW Menu Prev. You can make further adjustments with black bars appearing at both the left and right sides. • 16:9 - Press the G button to select the desired picture format. Owner's Manual 25 PICTURE SOUND TIMER SPECIAL Auto config. Screen Menu Options Operation Auto Adjustment - has finished, OK will be shown on the screen for RGB-DTV. - ARC Position Manual config. G To start Setting Picture Format - RGB/DVI...
... view a picture with an original 4:3 aspect ratio, with the Manual config. Reset VGA Mode SCREEN PIP/DW Menu Prev. You can make further adjustments with black bars appearing at both the left and right sides. • 16:9 - Press the G button to select the desired picture format. Owner's Manual 25 PICTURE SOUND TIMER SPECIAL Auto config. Screen Menu Options Operation Auto Adjustment - has finished, OK will be shown on the screen for RGB-DTV. - ARC Position Manual config. G To start Setting Picture Format - RGB/DVI...

Owners Manual
Page 35
...] Data 0: Cool 1: Normal 2: Warm Acknowledgement [u][ ][Set ID][ ][OK][Data][x] Data 0: Cool 1: Normal 2: Warm Owner's Manual 35 You can also adjust the sub picture position using the PIP or DW button on screen 17. You can also control the PIP/DW using Win.position on the remote control or in the PIP/DW menu. Treble (Command2:r) G To adjust treble. Transmission [k][r][ ][Set ID][ ][Data][Cr] Data Min...
...] Data 0: Cool 1: Normal 2: Warm Acknowledgement [u][ ][Set ID][ ][OK][Data][x] Data 0: Cool 1: Normal 2: Warm Owner's Manual 35 You can also adjust the sub picture position using the PIP or DW button on screen 17. You can also control the PIP/DW using Win.position on the remote control or in the PIP/DW menu. Treble (Command2:r) G To adjust treble. Transmission [k][r][ ][Set ID][ ][Data][Cr] Data Min...

Owners Manual
Page 36
... works in DW mode. See page 34. Key (Command2:c) G To adjust Key code for sub picture in PIP mode. PIP Input Select (Command2:y) G To select input source for IR remote control. Transmission [j][u][ ][Set ID][ ][Data][Cr] Data 1 • Refer to standby mode. 26. External Control Device Setup 21. ISM Method (Command2:p) G To avoid having a fixed image remain on /off. Transmission [k][y][ ][Set ID][ ][Data][Cr] Data 1 : Video1 2 : Video2 3 : Component1 4 : Component2 5 : RGB 6 : DVI...
... works in DW mode. See page 34. Key (Command2:c) G To adjust Key code for sub picture in PIP mode. PIP Input Select (Command2:y) G To select input source for IR remote control. Transmission [j][u][ ][Set ID][ ][Data][Cr] Data 1 • Refer to standby mode. 26. External Control Device Setup 21. ISM Method (Command2:p) G To avoid having a fixed image remain on /off. Transmission [k][y][ ][Set ID][ ][Data][Cr] Data 1 : Video1 2 : Video2 3 : Component1 4 : Component2 5 : RGB 6 : DVI...
Owners Manual
Page 39
... not control all models of other brands. To find out whether your remote control. Enter a code number using the number buttons on the component to see if the component responds properly. Turn on the remote. If not, repeat from step 1. Programming a code into a remote mode 1. Press the MENU and MUTE buttons simultaneously, the remote control is ready to store the code. 6. Press the MENU button to be programmed for the corresponding component can be programmed to operate most remote-controllable...
... not control all models of other brands. To find out whether your remote control. Enter a code number using the number buttons on the component to see if the component responds properly. Turn on the remote. If not, repeat from step 1. Programming a code into a remote mode 1. Press the MENU and MUTE buttons simultaneously, the remote control is ready to store the code. 6. Press the MENU button to be programmed for the corresponding component can be programmed to operate most remote-controllable...
Owners Manual
Page 46
... and you . Your unit will be required to the original consumer/end user. Plasma Display Panel typically contain a small number of the product and effective only when used in compliance with the terms of the product. Territories. Replacement Units and Repair Parts are warranted for proof of warranty, and submit a copy of the bill of sale to the original purchaser...
... and you . Your unit will be required to the original consumer/end user. Plasma Display Panel typically contain a small number of the product and effective only when used in compliance with the terms of the product. Territories. Replacement Units and Repair Parts are warranted for proof of warranty, and submit a copy of the bill of sale to the original purchaser...
Owners Manual
Page 47
... components G any panel that unit in G repair or replacement of warranted parts by the consumer. THIS LIMITED WARRANTY DOES NOT APPLY TO: G damage caused in shipping or transit G service required as a result of improper installation, including incorrect or insufficient AC supply (please consult the owner's manual for power supply requirements) G installation or repair of antenna systems, cable converters, cable company supplied equipment, or other components in accordance with the LGE warranty...
... components G any panel that unit in G repair or replacement of warranted parts by the consumer. THIS LIMITED WARRANTY DOES NOT APPLY TO: G damage caused in shipping or transit G service required as a result of improper installation, including incorrect or insufficient AC supply (please consult the owner's manual for power supply requirements) G installation or repair of antenna systems, cable converters, cable company supplied equipment, or other components in accordance with the LGE warranty...

