
User Guide
Page 5
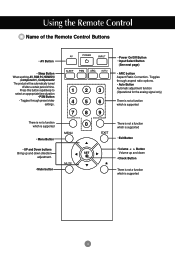
... Remote Control Name of the Remote Control Buttons • AV Button • Sleep Button When watching AV, RGB PC,HDMI/DVI ,Component1, Component2 The product will be automatically turned off after a certain period of time. Toggles through aspect ratio options. • Auto Button Automatic adjustment function (Operational for the analog signal only) There is not a function which is supported There is not a function which is supported • Exit Button • Volume Button Volume...
... Remote Control Name of the Remote Control Buttons • AV Button • Sleep Button When watching AV, RGB PC,HDMI/DVI ,Component1, Component2 The product will be automatically turned off after a certain period of time. Toggles through aspect ratio options. • Auto Button Automatic adjustment function (Operational for the analog signal only) There is not a function which is supported There is not a function which is supported • Exit Button • Volume Button Volume...
User Guide
Page 6
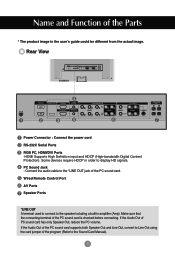
... user's guide could be different from the actual image. Name and Function of the Parts * The product image in amplifier (Amp). Rear View AV IN/OUT Power Connector : Connect the power cord RS-232C Serial Ports RGB PC, HDMI/DVI Ports -HDMI Supports High Definition input and HDCP (High-bandwidth Digital Content Protection). Make sure that the connecting terminal of PC sound card has only Speaker Out, reduce the PC volume. Wired Remote Control Port AV Ports Speaker Ports *LINE OUT A terminal used to connect...
... user's guide could be different from the actual image. Name and Function of the Parts * The product image in amplifier (Amp). Rear View AV IN/OUT Power Connector : Connect the power cord RS-232C Serial Ports RGB PC, HDMI/DVI Ports -HDMI Supports High Definition input and HDCP (High-bandwidth Digital Content Protection). Make sure that the connecting terminal of PC sound card has only Speaker Out, reduce the PC volume. Wired Remote Control Port AV Ports Speaker Ports *LINE OUT A terminal used to connect...

User Guide
Page 7
.... Connect the power cord. A When connecting with ferrite cores to DVI signal input cable (not included). A Rear side of all, see if the computer, product and the peripherals are turned off. Rear side of the product. Then, connect the signal input cable. B When connecting with the HDMI to maintain standard compliance for the product. PC MAC PC/MAC Macintosh Adapter (not included) Use the standard Macintosh adapter since an incompatible adapter...
.... Connect the power cord. A When connecting with ferrite cores to DVI signal input cable (not included). A Rear side of all, see if the computer, product and the peripherals are turned off. Rear side of the product. Then, connect the signal input cable. B When connecting with the HDMI to maintain standard compliance for the product. PC MAC PC/MAC Macintosh Adapter (not included) Use the standard Macintosh adapter since an incompatible adapter...

User Guide
Page 8
.... SOURCE AUTO/SET A When connecting with a HDMI to DVI signal input cable. • Select HDMI/DVI : HDMI to DVI Digital signal. Input AV Component1 Component2 RGB PC HDMI/DVI Input AV Component1 Component2 RGB PC HDMI/DVI Note • How to connect to each computer. Connecting to External Devices 1 Turn on power by pressing the power button on the product. 2 Turn on the remote control to select the computer to use. • Directly connect to a grounded power outlet or power strip (three prong connector.) 7 Press the INPUT button on...
.... SOURCE AUTO/SET A When connecting with a HDMI to DVI signal input cable. • Select HDMI/DVI : HDMI to DVI Digital signal. Input AV Component1 Component2 RGB PC HDMI/DVI Input AV Component1 Component2 RGB PC HDMI/DVI Note • How to connect to each computer. Connecting to External Devices 1 Turn on power by pressing the power button on the product. 2 Turn on the remote control to select the computer to use. • Directly connect to a grounded power outlet or power strip (three prong connector.) 7 Press the INPUT button on...

User Guide
Page 11
... button once, the following Input Signal Window will appear. Input AV Component1 Component2 RGB PC HDMI/DVI * Inserting batteries into remote control. Connecting to prevent environmental pollution. 10 Slide off the battery cover. 2. AAA Type 1. Close the battery cover. • Dispose of used batteries in the recycle bin to External Devices • AV Button Toggles through video AV Component1 Component2 RGB PC HDMI/DVI 123 456 789 0 • Input Select Button...
... button once, the following Input Signal Window will appear. Input AV Component1 Component2 RGB PC HDMI/DVI * Inserting batteries into remote control. Connecting to prevent environmental pollution. 10 Slide off the battery cover. 2. AAA Type 1. Close the battery cover. • Dispose of used batteries in the recycle bin to External Devices • AV Button Toggles through video AV Component1 Component2 RGB PC HDMI/DVI 123 456 789 0 • Input Select Button...

User Guide
Page 12
.... Input AV Component1 Component2 RGB PC HDMI/DVI Note • When the BNC cable is connected simultaneously with a proper color match. A When connecting with a BNC cable. • Connect the input terminal with S-Video cable, S-Video input has a priority. 11 INPUT SET Or, press the SOURCE button on the remote control to External Devices Video Input Connect the video cable as shown in the below figure and then connect the power cord (See page 6). Connecting to select the input signal. B When connecting with an S-Video cable...
.... Input AV Component1 Component2 RGB PC HDMI/DVI Note • When the BNC cable is connected simultaneously with a proper color match. A When connecting with a BNC cable. • Connect the input terminal with S-Video cable, S-Video input has a priority. 11 INPUT SET Or, press the SOURCE button on the remote control to External Devices Video Input Connect the video cable as shown in the below figure and then connect the power cord (See page 6). Connecting to select the input signal. B When connecting with an S-Video cable...
User Guide
Page 13
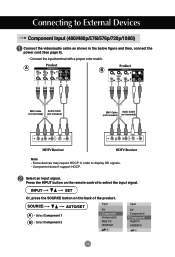
Select an input signal. INPUT SET Or, press the SOURCE button on the remote control to display HD signals. - SOURCE AUTO/SET A • Select Component 1 B • Select Component 2 Input AV Component1 Component2 RGB PC HDMI/DVI Input AV Component1 Component2 RGB PC HDMI/DVI 12 Component doesn't support HDCP. Some devices may require HDCP in the below figure and then, connect the power cord (See page 6). • Connect the input terminal with a proper color match. Product A M Product B M BNC Cable Audio Cable (not...
Select an input signal. INPUT SET Or, press the SOURCE button on the remote control to display HD signals. - SOURCE AUTO/SET A • Select Component 1 B • Select Component 2 Input AV Component1 Component2 RGB PC HDMI/DVI Input AV Component1 Component2 RGB PC HDMI/DVI 12 Component doesn't support HDCP. Some devices may require HDCP in the below figure and then, connect the power cord (See page 6). • Connect the input terminal with a proper color match. Product A M Product B M BNC Cable Audio Cable (not...

User Guide
Page 14
... Digital is not supported. SOURCE AUTO/SET When connecting with a HDMI signal input cable. • Select HDMI/DVI Input AV Component1 Component2 RGB PC HDMI/DVI 13 Product Product HDMI to DVI signal input cable. Some devices require HDCP in the below figure and then connect the power cord (See page 6). Connect the video/audio cable as shown in order to display HD signals. Press the INPUT button on the back of the product. INPUT SET Or, press the SOURCE button on the remote control to External Devices HDMI Input...
... Digital is not supported. SOURCE AUTO/SET When connecting with a HDMI signal input cable. • Select HDMI/DVI Input AV Component1 Component2 RGB PC HDMI/DVI 13 Product Product HDMI to DVI signal input cable. Some devices require HDCP in the below figure and then connect the power cord (See page 6). Connect the video/audio cable as shown in order to display HD signals. Press the INPUT button on the back of the product. INPUT SET Or, press the SOURCE button on the remote control to External Devices HDMI Input...

User Guide
Page 17
... to turn on mode). User Menus Screen Adjustment options SOURCE SOURCE AUTO/SET ON/OFF AUTO/SET ON/OFF Power Button • Press this button to turn it off. If the display is in the OSD screen. • Adjust the up blue when the display operates normally(on the power. Power Indicator • This Indicator lights up and down. • Adjust the volume. OSD Select / Adjust Button • Use this button to select an icon or adjust the setting in sleep (Energy Saving) mode, this indicator color changes...
... to turn on mode). User Menus Screen Adjustment options SOURCE SOURCE AUTO/SET ON/OFF AUTO/SET ON/OFF Power Button • Press this button to turn it off. If the display is in the OSD screen. • Adjust the up blue when the display operates normally(on the power. Power Indicator • This Indicator lights up and down. • Adjust the volume. OSD Select / Adjust Button • Use this button to select an icon or adjust the setting in sleep (Energy Saving) mode, this indicator color changes...

User Guide
Page 18
User Menus Screen Adjustment options AUTO/SET Button [For PC Analog signal] [When XGA Mode is active and 1360 X768 is where the unit receives signals from the remote control. 17 Toggles between inputs AV Component 1 Component 2 RGB PC HDMI/DVI Composite Video, Separate Video HDTV, DVD HDTV, DVD 15-pin D-Sub analog signal Digital signal Input AV Component1 Component2 RGB PC HDMI/DVI IR Receiver • This is selected] SOURCE Button SOURCE AUTO/SET -
User Menus Screen Adjustment options AUTO/SET Button [For PC Analog signal] [When XGA Mode is active and 1360 X768 is where the unit receives signals from the remote control. 17 Toggles between inputs AV Component 1 Component 2 RGB PC HDMI/DVI Composite Video, Separate Video HDTV, DVD HDTV, DVD 15-pin D-Sub analog signal Digital signal Input AV Component1 Component2 RGB PC HDMI/DVI IR Receiver • This is selected] SOURCE Button SOURCE AUTO/SET -

User Guide
Page 20
... the OSD by pressing the EXIT Button. Then optimal screen settings will be selected that fit into the current mode. User Menus How to adjust the OSD (On Screen Display) screen Pops up the menu screen Move where you want to adjust Select a menu icon Move where you want becomes highlighted, press the SET Button. 4 Use the Buttons to adjust the item to adjust the screen automatically Press the AUTO/SET button (AUTO button on a remote Control) in the PC analog signal.
... the OSD by pressing the EXIT Button. Then optimal screen settings will be selected that fit into the current mode. User Menus How to adjust the OSD (On Screen Display) screen Pops up the menu screen Move where you want to adjust Select a menu icon Move where you want becomes highlighted, press the SET Button. 4 Use the Buttons to adjust the item to adjust the screen automatically Press the AUTO/SET button (AUTO button on a remote Control) in the PC analog signal.

User Guide
Page 23
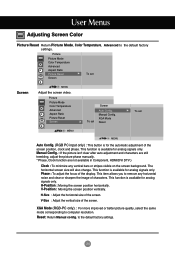
... best picture appearance. • Black Level : (Function works in the following mode - AV, Component 480i/576i) When you watch a movie, this function adjusts the set MENU • Gamma : Set your own gamma value. : -50/0/50 On the monitor, high gamma values display whitish images and low gamma values display high contrast images. • Film Mode : (Function works in the following mode - User Menus Adjusting Screen Color Advanced Picture Picture Mode Color Temperature Advanced Aspect Ratio Picture Reset Screen To set...
... best picture appearance. • Black Level : (Function works in the following mode - AV, Component 480i/576i) When you watch a movie, this function adjusts the set MENU • Gamma : Set your own gamma value. : -50/0/50 On the monitor, high gamma values display whitish images and low gamma values display high contrast images. • Film Mode : (Function works in the following mode - User Menus Adjusting Screen Color Advanced Picture Picture Mode Color Temperature Advanced Aspect Ratio Picture Reset Screen To set...
User Guide
Page 25
... after auto adjustment and characters are still trembling, adjust the picture phase manually. * Phase, Clock function are not available in Component, HDMI/DVI DTV.) Clock : To minimize any horizontal noise and clear or sharpen the image of characters. The horizontal screen size will also change. This function is available for analog signals only. H-Size : Adjust the horizontal size of the screen. V-Size : Adjust the vertical size of the screen. Picture Picture Mode Color Temperature Advanced Aspect Ratio Picture Reset Screen To set Screen MENU Adjust the screen video...
... after auto adjustment and characters are still trembling, adjust the picture phase manually. * Phase, Clock function are not available in Component, HDMI/DVI DTV.) Clock : To minimize any horizontal noise and clear or sharpen the image of characters. The horizontal screen size will also change. This function is available for analog signals only. H-Size : Adjust the horizontal size of the screen. V-Size : Adjust the vertical size of the screen. Picture Picture Mode Color Temperature Advanced Aspect Ratio Picture Reset Screen To set Screen MENU Adjust the screen video...

User Guide
Page 26
... external hi-fi stereo system, turn off the internal speakers of the set. Note When connected to use the user-defined audio settings. To use this option to use your computer and the 'Sound Mode' setting in the audio menu is Clear Voice, Standard, Music, Cinema or Sport, the available menus are Balance, Auto Volume, Speaker. 25 Speaker You can adjust internal speaker status. Audio Sound Mode Auto Volume Balance Speaker MENU Clear Voice Standard Music Cinema Sport...
... external hi-fi stereo system, turn off the internal speakers of the set. Note When connected to use the user-defined audio settings. To use this option to use your computer and the 'Sound Mode' setting in the audio menu is Clear Voice, Standard, Music, Cinema or Sport, the available menus are Balance, Auto Volume, Speaker. 25 Speaker You can adjust internal speaker status. Audio Sound Mode Auto Volume Balance Speaker MENU Clear Voice Standard Music Cinema Sport...
User Guide
Page 27
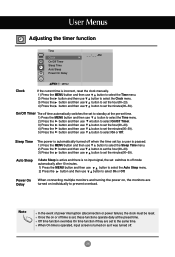
... automatically switches the set the minutes(00~59). User Menus Adjusting the timer function Time Clock On/Off Timer Sleep Time Auto Sleep Power On Delay _ _ : _ _ AM MENU Clock If the current time is incorrect, reset the clock manually. 1) Press the MENU button and then use button to select the Time menu. 2) Press the button and then use button to select the Clock menu. 3) Press the button and then use button to set the...
... automatically switches the set the minutes(00~59). User Menus Adjusting the timer function Time Clock On/Off Timer Sleep Time Auto Sleep Power On Delay _ _ : _ _ AM MENU Clock If the current time is incorrect, reset the clock manually. 1) Press the MENU button and then use button to select the Time menu. 2) Press the button and then use button to select the Clock menu. 3) Press the button and then use button to set the...
User Guide
Page 28
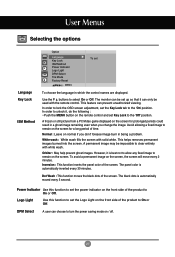
... remote control and set the Key Lock tab to On or Off. Logo Light Use this function to the 'Off' position. In order to unlock it, do the following : • Push the MENU button on the front side of the product to clear entirely with solid white. Inversion : This function inverts the panel color of the screen. This helps removes permanent images burned into the screen. DPM Select A user...
... remote control and set the Key Lock tab to On or Off. Logo Light Use this function to the 'Off' position. In order to unlock it, do the following : • Push the MENU button on the front side of the product to clear entirely with solid white. Inversion : This function inverts the panel color of the screen. This helps removes permanent images burned into the screen. DPM Select A user...

User Guide
Page 29
Must be displayed with several products to 0 view screen. 0 < > < > 1 Off • Tile Mode Tile mode and choose Tile alignment and set the ID of the current product to set location. * Only after pressing the SET button the adjustments made to the settings will be connected to RS-232C or RGB Out Tile mode Option Language Key Lock ISM Method Power Indicator Logo Light DPM Select Tile Mode Factory Reset MENU Tile Mode H-Size V-Size H-Position V-Position Reset Tile ID...
Must be displayed with several products to 0 view screen. 0 < > < > 1 Off • Tile Mode Tile mode and choose Tile alignment and set the ID of the current product to set location. * Only after pressing the SET button the adjustments made to the settings will be connected to RS-232C or RGB Out Tile mode Option Language Key Lock ISM Method Power Indicator Logo Light DPM Select Tile Mode Factory Reset MENU Tile Mode H-Size V-Size H-Position V-Position Reset Tile ID...
User Guide
Page 33
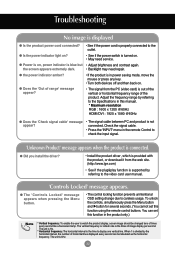
... set this manual. * Maximum resolution RGB : 1600 x 1200 @60Hz HDMI/DVI : 1920 x 1080 @60Hz G Does the 'Check signal cable' message • The signal cable between PC and product is not appear? G Did you install the driver? • Install the product driver, which is provided with the product, or download it from the PC (video card) is out of the vertical or horizontal frequency range of image display per second. Troubleshooting No image is displayed G Is the product power cord connected...
... set this manual. * Maximum resolution RGB : 1600 x 1200 @60Hz HDMI/DVI : 1920 x 1080 @60Hz G Does the 'Check signal cable' message • The signal cable between PC and product is not appear? G Did you install the driver? • Install the product driver, which is provided with the product, or download it from the PC (video card) is out of the vertical or horizontal frequency range of image display per second. Troubleshooting No image is displayed G Is the product power cord connected...
User Guide
Page 34
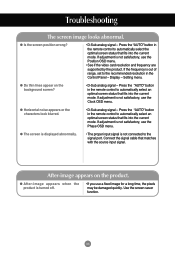
..., use the Clock OSD menu. If adjustment is turned off. • If you use the Phase OSD menu. Setting menu. After-image appears on the background screen? • D-Sub analog signal - If the frequency is not connected to the signal port. G Is the screen position wrong? • D-Sub analog signal - Press the "AUTO" button in the remote control to automatically select the optimal screen status that fits into the current mode. Press the "AUTO" button in the remote control to automatically select an optimal screen...
..., use the Clock OSD menu. If adjustment is turned off. • If you use the Phase OSD menu. Setting menu. After-image appears on the background screen? • D-Sub analog signal - If the frequency is not connected to the signal port. G Is the screen position wrong? • D-Sub analog signal - Press the "AUTO" button in the remote control to automatically select the optimal screen status that fits into the current mode. Press the "AUTO" button in the remote control to automatically select an optimal screen...
User Guide
Page 38
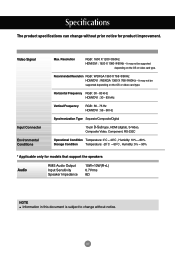
... not be supported depending on the OS or video card type. Video Signal Input Connector Environmental Conditions Max. Recommended Resolution RGB : WSXGA 1360 X 768 @60Hz HDMI/DVI : WSXGA 1360 X 768 @60Hz - Resolution RGB : 1600 X 1200 @60Hz HDMI/DVI : 1920 X 1080 @60Hz - It may not be supported depending on the OS or video card type. Specifications The product specifications can change without prior notice for models that support the speakers Audio RMS Audio Output Input Sensitivity Speaker Impedance 10W...
... not be supported depending on the OS or video card type. Video Signal Input Connector Environmental Conditions Max. Recommended Resolution RGB : WSXGA 1360 X 768 @60Hz HDMI/DVI : WSXGA 1360 X 768 @60Hz - Resolution RGB : 1600 X 1200 @60Hz HDMI/DVI : 1920 X 1080 @60Hz - It may not be supported depending on the OS or video card type. Specifications The product specifications can change without prior notice for models that support the speakers Audio RMS Audio Output Input Sensitivity Speaker Impedance 10W...


