
User Manual
Page 2
Take the parts for the stand out of the product as shown in the diagram. 1 Screws (6) Stand (1) Stand Cover(1) 2. Use the screws to secure the stand on the rear side of the box and assemble them as shown in the picture. Place a soft cloth on some models. 1. Parts First, check if the following picture. 3. Connect the stand as shown in the following parts are all present. Connecting the stand - Only on the table and put the product with the screen facing downward.
Take the parts for the stand out of the product as shown in the diagram. 1 Screws (6) Stand (1) Stand Cover(1) 2. Use the screws to secure the stand on the rear side of the box and assemble them as shown in the picture. Place a soft cloth on some models. 1. Parts First, check if the following picture. 3. Connect the stand as shown in the following parts are all present. Connecting the stand - Only on the table and put the product with the screen facing downward.
User Manual
Page 3
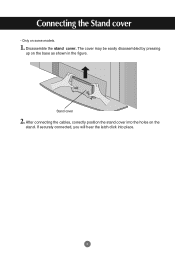
Only on the base as shown in the figure. The cover may be easily disassembled by pressing up on some models. 1. If securely connected, you will hear the latch click into the holes on the stand. Connecting the Stand cover - Stand cover 2. After connecting the cables, correctly position the stand cover into place. 2 Disassemble the stand cover.
Only on the base as shown in the figure. The cover may be easily disassembled by pressing up on some models. 1. If securely connected, you will hear the latch click into the holes on the stand. Connecting the Stand cover - Stand cover 2. After connecting the cables, correctly position the stand cover into place. 2 Disassemble the stand cover.

User Manual
Page 50
... 4 : Turn the monitor off by RS-232C function 8 : Turn the monitor off by off time function 9 : Turn the monitor off by auto off status when Stand-by mode. Transmission [j][p][ ][Set ID][ ][Data][Cr] Data 1H : Inversion 2H : Orbiter 4H : White Wash 8H : Normal 10H : Dot Wash Acknowledgement [p][ ][Set ID][ ][OK][Data...
... 4 : Turn the monitor off by RS-232C function 8 : Turn the monitor off by off time function 9 : Turn the monitor off by auto off status when Stand-by mode. Transmission [j][p][ ][Set ID][ ][Data][Cr] Data 1H : Inversion 2H : Orbiter 4H : White Wash 8H : Normal 10H : Dot Wash Acknowledgement [p][ ][Set ID][ ][OK][Data...

Brochure
Page 2
.../Cool/User 2 Hi-Res (BNC) 1/1 1 (BNC) / 1 (BNC) www.LGcommercial.com LG Electronics U.S.A., Inc. VESA is a registered trademark of LG Corp. LCD (Liquid Crystal Display) Panel (M3202C-BA) 37.0" diagonal (M3702C-BA) 31.5" diagonal (M3202C-BA) 16:9 1366 x 768 3,147,264 500 cd/m2 3,000:1(DCR) 178°/178° ...trademarks of their respective companies. Printed in Power Power Switch Type Tact Switch Power Saving Normal 180 W (37"), 145 W (32") Stand-by/Suspend 1W(RGB)/4W(HDMI/DVI) DPM Off 1W(RGB)/4W(HDMI/DVI) Switch Off 1W STANDARD (CERTIFICATIONS) Safety EMC OPTIONAL ...
.../Cool/User 2 Hi-Res (BNC) 1/1 1 (BNC) / 1 (BNC) www.LGcommercial.com LG Electronics U.S.A., Inc. VESA is a registered trademark of LG Corp. LCD (Liquid Crystal Display) Panel (M3202C-BA) 37.0" diagonal (M3702C-BA) 31.5" diagonal (M3202C-BA) 16:9 1366 x 768 3,147,264 500 cd/m2 3,000:1(DCR) 178°/178° ...trademarks of their respective companies. Printed in Power Power Switch Type Tact Switch Power Saving Normal 180 W (37"), 145 W (32") Stand-by/Suspend 1W(RGB)/4W(HDMI/DVI) DPM Off 1W(RGB)/4W(HDMI/DVI) Switch Off 1W STANDARD (CERTIFICATIONS) Safety EMC OPTIONAL ...


