
Owner's Manual (English)
Page 1
... OSD (On Screen Display) Screen A22 Adjusting Screen Color A23 and Tracking Adjusting the audio function A24 Selecting the Options A25 Adjusting Screen CLOCK/PHASE and Position A29 Adjusting PIP/POP/PBP Mode (Multiple Screen) Functions A30 Miscellaneous Troubleshooting A32 Specifications A35 is incorporated under license from SRS Labs,Inc. technology is a trademark of Contents Installation Safety Precautions A1 and Accessories A4 Using the Remote Control A5 Connection To arrange cables in order - ENGLISH...
... OSD (On Screen Display) Screen A22 Adjusting Screen Color A23 and Tracking Adjusting the audio function A24 Selecting the Options A25 Adjusting Screen CLOCK/PHASE and Position A29 Adjusting PIP/POP/PBP Mode (Multiple Screen) Functions A30 Miscellaneous Troubleshooting A32 Specifications A35 is incorporated under license from SRS Labs,Inc. technology is a trademark of Contents Installation Safety Precautions A1 and Accessories A4 Using the Remote Control A5 Connection To arrange cables in order - ENGLISH...

Owner's Manual (English)
Page 3
... be damaged, which may cause electric shock or fire. Use the rated voltage only. - Additionally, if the cord pin is connected to remove all cables before moving the product. - Fix the power cable completely. - Do not insert a conductor (like a metal chopstick) into the wall input terminal. - Make sure to the input terminal on the power cord. - You may be electrocuted or the product can be...
... be damaged, which may cause electric shock or fire. Use the rated voltage only. - Additionally, if the cord pin is connected to remove all cables before moving the product. - Fix the power cable completely. - Do not insert a conductor (like a metal chopstick) into the wall input terminal. - Make sure to the input terminal on the power cord. - You may be electrocuted or the product can be...
Owner's Manual (English)
Page 4
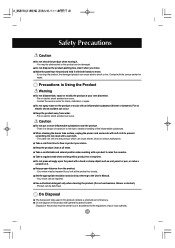
... of your own discretion. - Product can occur. - When cleaning the brown tube surface, unplug the power cord and scrub with a wet cloth. - Use authorized detergent only when cleaning the product. (Do not use benzene, thinner or alcohol.) - On Disposal The fluorescent lamp used in accordance to the User's Manual. - Set the appropriate resolution and clock by referring to the regulations of...
... of your own discretion. - Product can occur. - When cleaning the brown tube surface, unplug the power cord and scrub with a wet cloth. - Use authorized detergent only when cleaning the product. (Do not use benzene, thinner or alcohol.) - On Disposal The fluorescent lamp used in accordance to the User's Manual. - Set the appropriate resolution and clock by referring to the regulations of...
Owner's Manual (English)
Page 5
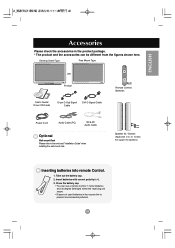
... figures shown here. Desktop Stand Type Free Mount Type OR Product User's Guide/ Driver CD/Cards 15-pin D-Sub Signal Cable DVI-D Signal Cable Remote Control/ Batteries Power Cord Audio Cable (PC) RCA-PC Audio Cable Optional Wall-mount Rack Please refer to prevent environmental pollution. ENGLISH Accessories Please check the accessories in the recycle bin to the enclosed "Installation Guide" when installing the wall-mount rack. Speaker kit / Screws (Applicable only for models that support the speakers) Inserting batteries into remote Control. 1. A4 Take out...
... figures shown here. Desktop Stand Type Free Mount Type OR Product User's Guide/ Driver CD/Cards 15-pin D-Sub Signal Cable DVI-D Signal Cable Remote Control/ Batteries Power Cord Audio Cable (PC) RCA-PC Audio Cable Optional Wall-mount Rack Please refer to prevent environmental pollution. ENGLISH Accessories Please check the accessories in the recycle bin to the enclosed "Installation Guide" when installing the wall-mount rack. Speaker kit / Screws (Applicable only for models that support the speakers) Inserting batteries into remote Control. 1. A4 Take out...
Owner's Manual (English)
Page 6
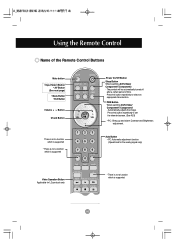
Press this button repetitively to set the intended screen. (See A23) • PC : Bring up and down Contrast and Brightness adjustment. Auto Button • PC: Automatic adjustment function (Operational for the analog signal only) Video Operation Button Applicable for LG products only * There is not a function which is supported A5 The product will be automatically turned off after a certain period of the Remote Control Buttons Mute button • Input Select Button • AV...
Press this button repetitively to set the intended screen. (See A23) • PC : Bring up and down Contrast and Brightness adjustment. Auto Button • PC: Automatic adjustment function (Operational for the analog signal only) Video Operation Button Applicable for LG products only * There is not a function which is supported A5 The product will be automatically turned off after a certain period of the Remote Control Buttons Mute button • Input Select Button • AV...
Owner's Manual (English)
Page 10
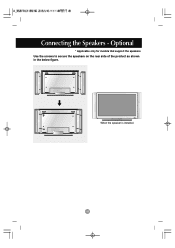
A9 Connecting the Speakers - Optional * Applicable only for models that support the speakers Use the screws to secure the speakers on the rear side of the product as shown in the below figure. When the speaker is installed.
A9 Connecting the Speakers - Optional * Applicable only for models that support the speakers Use the screws to secure the speakers on the rear side of the product as shown in the below figure. When the speaker is installed.
Owner's Manual (English)
Page 11
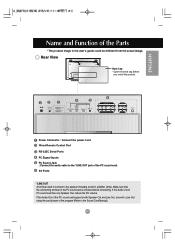
Make sure that the connecting terminal of PC sound card has only Speaker Out, reduce the PC volume. If the Audio Out of the PC sound card is checked before you install the product. AV Ports *LINE OUT A terminal used to connect to the speaker including a built-in the user's guide could be different from the actual image. Rear View Back Cap - Power Connector : Connect the power cord Wired Remote Control Port RS-232C Serial Ports PC Signal Inputs PC Sound Jack : Connect the...
Make sure that the connecting terminal of PC sound card has only Speaker Out, reduce the PC volume. If the Audio Out of the PC sound card is checked before you install the product. AV Ports *LINE OUT A terminal used to connect to the speaker including a built-in the user's guide could be different from the actual image. Rear View Back Cap - Power Connector : Connect the power cord Wired Remote Control Port RS-232C Serial Ports PC Signal Inputs PC Sound Jack : Connect the...
Owner's Manual (English)
Page 12
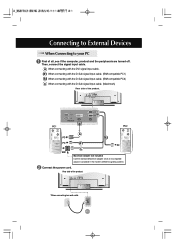
... C MAC Macintosh Adapter (not included) Use the standard Macintosh adapter since an incompatible adaptor is available in the market. (Different signaling system) Connect the power cord. Rear side of all, see if the computer, product and the peripherals are turned off. B1 When connecting with the D-Sub signal input cable. (IBM compatible PC1) B2 When connecting with the D-Sub signal input cable. (IBM compatible PC2) C When connecting with the DVI signal input cable. A When connecting...
... C MAC Macintosh Adapter (not included) Use the standard Macintosh adapter since an incompatible adaptor is available in the market. (Different signaling system) Connect the power cord. Rear side of all, see if the computer, product and the peripherals are turned off. B1 When connecting with the D-Sub signal input cable. (IBM compatible PC1) B2 When connecting with the D-Sub signal input cable. (IBM compatible PC2) C When connecting with the DVI signal input cable. A When connecting...
Owner's Manual (English)
Page 13
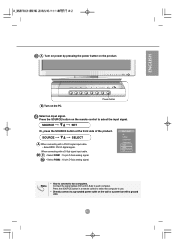
... SOURCE button in a remote control to select the computer to use. • Directly connect to select the input signal. When connecting with a DVI-D signal input cable. • Select DVI : DVI-D digital signal. B1 C • Select RGB1 : 15-pin D-Sub analog signal. SOURCE SET Or, press the SOURCE button at the front side of the product. Note • How to connect to each computer. B2 • Select RGB2 : 15-pin D-Sub analog signal. ENGLISH A Turn on power by pressing the power button...
... SOURCE button in a remote control to select the computer to use. • Directly connect to select the input signal. When connecting with a DVI-D signal input cable. • Select DVI : DVI-D digital signal. B1 C • Select RGB1 : 15-pin D-Sub analog signal. SOURCE SET Or, press the SOURCE button at the front side of the product. Note • How to connect to each computer. B2 • Select RGB2 : 15-pin D-Sub analog signal. ENGLISH A Turn on power by pressing the power button...
Owner's Manual (English)
Page 15
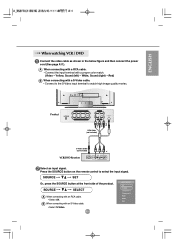
... input terminal with a S-Video cable. • Connect to the S-Video input terminal to select the input signal. Press the SOURCE button on the remote control to watch high image quality movies. Yellow, Sound (left) - Product Red White Yellow RCA Cable (not included) R W Y S-Video Cable (not included) VCR/DVD Receiver Select an input signal. Red) B When connecting with a proper color match. (Video - ENGLISH When watching VCR / DVD Connect the video cable as shown in the below figure and then connect the power cord...
... input terminal with a S-Video cable. • Connect to the S-Video input terminal to select the input signal. Press the SOURCE button on the remote control to watch high image quality movies. Yellow, Sound (left) - Product Red White Yellow RCA Cable (not included) R W Y S-Video Cable (not included) VCR/DVD Receiver Select an input signal. Red) B When connecting with a proper color match. (Video - ENGLISH When watching VCR / DVD Connect the video cable as shown in the below figure and then connect the power cord...
Owner's Manual (English)
Page 16
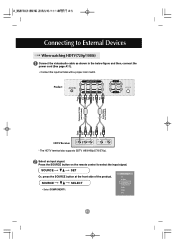
... SOURCE button on the remote control to External Devices When watching HDTV(720p/1080i) Connect the video/audio cable as shown in the below figure and then, connect the power cord (See page A11). • Connect the input terminal with a proper color match. A15 Select an input signal. SOURCE SELECT • Select COMPONENT 1. SOURCE SET Or, press the SOURCE button at the front side of the product. Connecting to select the input signal. Product Green Blue Red White Red...
... SOURCE button on the remote control to External Devices When watching HDTV(720p/1080i) Connect the video/audio cable as shown in the below figure and then, connect the power cord (See page A11). • Connect the input terminal with a proper color match. A15 Select an input signal. SOURCE SELECT • Select COMPONENT 1. SOURCE SET Or, press the SOURCE button at the front side of the product. Connecting to select the input signal. Product Green Blue Red White Red...
Owner's Manual (English)
Page 17
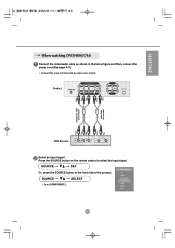
SOURCE SET Or, press the SOURCE button at the front side of the product. SOURCE SELECT • Select COMPONENT 2. Product White Red Green Blue Red Audio Cable (not included) Component Cable (not included) White Red Green Blue Red DVD Receiver Select an input signal. ENGLISH When watching DVD(480i/576i) Connect the video/audio cable as shown in the below figure and then, connect the power cord (See page A11). • Connect the input terminal with a proper color match. Press the SOURCE button on the remote control to select the input signal. A16
SOURCE SET Or, press the SOURCE button at the front side of the product. SOURCE SELECT • Select COMPONENT 2. Product White Red Green Blue Red Audio Cable (not included) Component Cable (not included) White Red Green Blue Red DVD Receiver Select an input signal. ENGLISH When watching DVD(480i/576i) Connect the video/audio cable as shown in the below figure and then, connect the power cord (See page A11). • Connect the input terminal with a proper color match. Press the SOURCE button on the remote control to select the input signal. A16
Owner's Manual (English)
Page 20
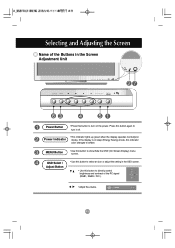
... Power Button • Press this button to amber. MENU Button • Use this indicator color changes to turn it off. Selecting and Adjusting the Screen Name of the PC signal (RGB1, RGB2 / DVI ). • Adjust the volume. Press this button again to show/hide the OSD (On Screen Display) menu screen. OSD Select / Adjust Button • Use this button to select an icon or adjust the setting in sleep (Energy Saving) mode, this button to turn on mode). A19 Power Indicator • This Indicator lights up green...
... Power Button • Press this button to amber. MENU Button • Use this indicator color changes to turn it off. Selecting and Adjusting the Screen Name of the PC signal (RGB1, RGB2 / DVI ). • Adjust the volume. Press this button again to show/hide the OSD (On Screen Display) menu screen. OSD Select / Adjust Button • Use this button to select an icon or adjust the setting in sleep (Energy Saving) mode, this button to turn on mode). A19 Power Indicator • This Indicator lights up green...
Owner's Manual (English)
Page 23
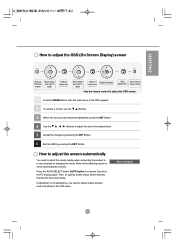
... the AUTO/SELECT button (AUTO button in a remote Control) in the OSD menu. Then, an optimal screen status will be selected that fits into the current mode. If adjustment is not satisfactory, you want becomes highlighted, press the SET Button. 4 Use the Buttons to adjust the item to adjust screen position, clock and phase in the PC analog signal. ENGLISH How to adjust the OSD (On Screen Display) screen Pops up the menu screen Move where you want to adjust Select a menu...
... the AUTO/SELECT button (AUTO button in a remote Control) in the OSD menu. Then, an optimal screen status will be selected that fits into the current mode. If adjustment is not satisfactory, you want becomes highlighted, press the SET Button. 4 Use the Buttons to adjust the item to adjust screen position, clock and phase in the PC analog signal. ENGLISH How to adjust the OSD (On Screen Display) screen Pops up the menu screen Move where you want to adjust Select a menu...
Owner's Manual (English)
Page 24
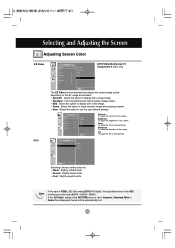
... level. Note If the input is set to desired level. Brightness To adjust the brightness of the screen. If the 'EZ Video' setting in the PICTURE menu is RGB1, 2(D-Sub analog)/DVI(DVI Digital), the adjustable items in the ACC function are color temp (6500K / 9300K / 3600K). Sharpness To adjust the cleaness of the screen. Color To adjust the color to use the user-defined settings. Selecting a factory setting color set . Tint To adjust the tint to Dynamic, Standard...
... level. Note If the input is set to desired level. Brightness To adjust the brightness of the screen. If the 'EZ Video' setting in the PICTURE menu is RGB1, 2(D-Sub analog)/DVI(DVI Digital), the adjustable items in the ACC function are color temp (6500K / 9300K / 3600K). Sharpness To adjust the cleaness of the screen. Color To adjust the color to use the user-defined settings. Selecting a factory setting color set . Tint To adjust the tint to Dynamic, Standard...

Owner's Manual (English)
Page 25
... and profound sound tone. To use the user-defined settings. Note When connected to your own color levels. Contrast To adjust the contrast of the screen. Red / Green / Blue Set your computer and the 'EZ Audio' setting in the audio menu is one of Flat, Music, Movie or Speech, the available menus are Balance, AVL and SRS WOW . Use this feature, select On. To adjust uneven sound volumes across all channels or signals automatically...
... and profound sound tone. To use the user-defined settings. Note When connected to your own color levels. Contrast To adjust the contrast of the screen. Red / Green / Blue Set your computer and the 'EZ Audio' setting in the audio menu is one of Flat, Music, Movie or Speech, the available menus are Balance, AVL and SRS WOW . Use this feature, select On. To adjust uneven sound volumes across all channels or signals automatically...
Owner's Manual (English)
Page 26
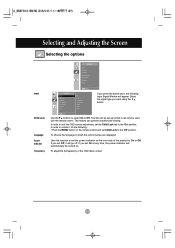
... Input Signal Window will automatically be used with the remote control. Select the signal type you set the power indicator on the front side of the OSD menu screen. Child Lock Language Power Indicator Transparency Use the buttons to lock the OSD screen adjustment, set up so that it can only be turned on. Selecting and Adjusting the Screen Selecting the options Input If you press the button once, the following : • Push the MENU button on the remote control and set...
... Input Signal Window will automatically be used with the remote control. Select the signal type you set the power indicator on the front side of the OSD menu screen. Child Lock Language Power Indicator Transparency Use the buttons to lock the OSD screen adjustment, set up so that it can only be turned on. Selecting and Adjusting the Screen Selecting the options Input If you press the button once, the following : • Push the MENU button on the remote control and set...

Owner's Manual (English)
Page 33
... * Vertical frequency: To enable the user to the video card user's guide. 'Controls Locked' message appears. When 1 is out of the vertical or horizontal frequency range of horizontal lines displayed every second can set this function in this user's guide. * Maximum resolution - 32 / 37 / 42 inch model RGB1 / RGB2 : 1600 x 1200 @60Hz DVI : 1360 x 768 @60Hz - 46 inch model RGB1 / RGB2 : 1920 x 1080 @60Hz DVI : 1920 x 1080 @60Hz q Does the 'Check signal cable' message appear? • The signal cable between...
... * Vertical frequency: To enable the user to the video card user's guide. 'Controls Locked' message appears. When 1 is out of the vertical or horizontal frequency range of horizontal lines displayed every second can set this function in this user's guide. * Maximum resolution - 32 / 37 / 42 inch model RGB1 / RGB2 : 1600 x 1200 @60Hz DVI : 1360 x 768 @60Hz - 46 inch model RGB1 / RGB2 : 1920 x 1080 @60Hz DVI : 1920 x 1080 @60Hz q Does the 'Check signal cable' message appear? • The signal cable between...
Owner's Manual (English)
Page 34
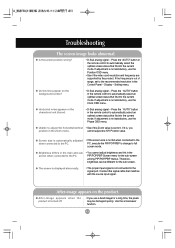
... screen when connected to full screen mode. If it is not connected to automatically select the optimal screen status that matches with the source input signal. q The screen is displayed abnormally. • The proper input signal is , you use the Phase OSD menu. q Horizontal noise appears or the characters look blurred. • D-Sub analog signal - Troubleshooting The screen image looks abnormal. A33 If adjustment is not satisfactory, use the Position OSD menu. • See if the video card resolution and frequency are supported...
... screen when connected to full screen mode. If it is not connected to automatically select the optimal screen status that matches with the source input signal. q The screen is displayed abnormally. • The proper input signal is , you use the Phase OSD menu. q Horizontal noise appears or the characters look blurred. • D-Sub analog signal - Troubleshooting The screen image looks abnormal. A33 If adjustment is not satisfactory, use the Position OSD menu. • See if the video card resolution and frequency are supported...
Owner's Manual (English)
Page 35
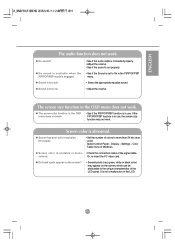
.... • Select the appropriate equalize sound. q Screen has poor color resolution (16 colors). • Set the number of the LCD. It is abnormal. Screen color is not a malfunction of colors to On in the OSD menu does not work . Settings - colored. A34 menu. ENGLISH The audio function does not work . q No sound? • See if the audio cable is connected properly. • Adjust the volume. • See if the sound is in Windows. Or, re-insert the PC video card.
.... • Select the appropriate equalize sound. q Screen has poor color resolution (16 colors). • Set the number of the LCD. It is abnormal. Screen color is not a malfunction of colors to On in the OSD menu does not work . Settings - colored. A34 menu. ENGLISH The audio function does not work . q No sound? • See if the audio cable is connected properly. • Adjust the volume. • See if the sound is in Windows. Or, re-insert the PC video card.


