
User Guide
Page 1
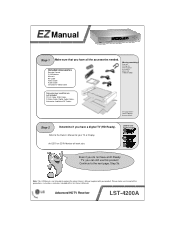
... Cable Component Video Cable Missing something? Even if you do not have all the precautions, instructions, and notes Included within the Owner's Manuals. EZ Manual Step 1 Make sure that are not included DVI-D Cable, RGB Cable, S-Video Cable, Digital Audio Cables, Attenuator, Additional RF Cables... work also. Look for your product. Note: This EZ Manual is not intended to the next page, Step 3b. Step 2 Determine if you can still use this product! Continue to replace the actual Owner's Manual supplied with your TV or Display. Advanced HDTV Receiver LST-4200A
... Cable Component Video Cable Missing something? Even if you do not have all the precautions, instructions, and notes Included within the Owner's Manuals. EZ Manual Step 1 Make sure that are not included DVI-D Cable, RGB Cable, S-Video Cable, Digital Audio Cables, Attenuator, Additional RF Cables... work also. Look for your product. Note: This EZ Manual is not intended to the next page, Step 3b. Step 2 Determine if you can still use this product! Continue to replace the actual Owner's Manual supplied with your TV or Display. Advanced HDTV Receiver LST-4200A
User Guide
Page 2
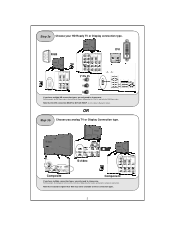
For this product, the DVI Connection is the best one to choose one . See the Owner's Manual for details. Note that the DVI connection MUST be available on these connection types. 2 OR Step 3b Choose you only need to choose, followed by ...
For this product, the DVI Connection is the best one to choose one . See the Owner's Manual for details. Note that the DVI connection MUST be available on these connection types. 2 OR Step 3b Choose you only need to choose, followed by ...
User Guide
Page 3
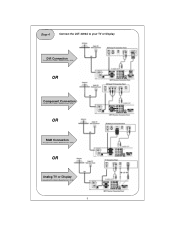
OR Analog TV or Display See pg113 of the Owner's Manual for more details. OR RGB Connection See pg13 of the Owner's Manual for more details. 3 Step 4 Connect the LST-4200A to your TV or Display DVI Connection See pg14 of the Owner's Manual for more details. OR Component Connection See pg12 of the Owner's Manual for more details.
OR Analog TV or Display See pg113 of the Owner's Manual for more details. OR RGB Connection See pg13 of the Owner's Manual for more details. 3 Step 4 Connect the LST-4200A to your TV or Display DVI Connection See pg14 of the Owner's Manual for more details. OR Component Connection See pg12 of the Owner's Manual for more details.
User Guide
Page 4
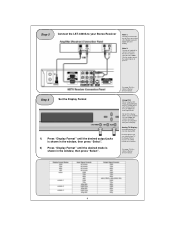
... Analog TV/Display: A standard analog TV can only display 480i Even though you can simply connect the Audio Outputs to enjoy the LST-4200A. Not all of the Owner's Manual for more details. 4 See page 16 of these connections either Digital Coaxial or Digital Optical or Analog Note 2: You are not compatible... with your TV/Display. Using DVI: When using the DVI output, your TV, the Display Format must be available. The LST-4200A will make one of the Owner's Manual for more details. You can see Menus. See page 17 of the Display Modes may be set to 480i in order to...
... Analog TV/Display: A standard analog TV can only display 480i Even though you can simply connect the Audio Outputs to enjoy the LST-4200A. Not all of the Owner's Manual for more details. 4 See page 16 of these connections either Digital Coaxial or Digital Optical or Analog Note 2: You are not compatible... with your TV/Display. Using DVI: When using the DVI output, your TV, the Display Format must be available. The LST-4200A will make one of the Owner's Manual for more details. You can see Menus. See page 17 of the Display Modes may be set to 480i in order to...
User Guide
Page 5
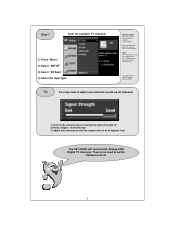
... the Remote 3) Adjust your antenna so that the signal meter is at its highest level The LST-4200A will tune to the lowest channel number found. Step 7 Scan for more details. See page 19 of the Owner's Manual for available TV channels 1) Press "Menu" 2) Select "SETUP" 3) Select "EZ Scan" 4) Select the input type...
... the Remote 3) Adjust your antenna so that the signal meter is at its highest level The LST-4200A will tune to the lowest channel number found. Step 7 Scan for more details. See page 19 of the Owner's Manual for available TV channels 1) Press "Menu" 2) Select "SETUP" 3) Select "EZ Scan" 4) Select the input type...
User Guide
Page 7
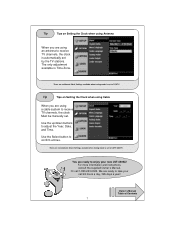
...24 hours a day, 365 days a year! Owner's Manual Table of Contents 7 There are no Automatic Clock Settings available when tuning mode is set to TV/DTV. Use the Select button to adjust the Year, Date, and Time. We are ready to take your new LST-4200A! Use the up/down buttons to confirm... entries. There are no Manual Clock Settings available when tuning mode is set to CATV/CADTV. Tip Tips on Setting the Clock when using Cable...
...24 hours a day, 365 days a year! Owner's Manual Table of Contents 7 There are no Automatic Clock Settings available when tuning mode is set to TV/DTV. Use the Select button to adjust the Year, Date, and Time. We are ready to take your new LST-4200A! Use the up/down buttons to confirm... entries. There are no Manual Clock Settings available when tuning mode is set to CATV/CADTV. Tip Tips on Setting the Clock when using Cable...
User Guide
Page 8
Owner's Manual Table of Contents Warranty Period: • Labor : 90 days from the Date of Purchase • All Parts: 1 year from the Date of Purchase 8
Owner's Manual Table of Contents Warranty Period: • Labor : 90 days from the Date of Purchase • All Parts: 1 year from the Date of Purchase 8
Service Manual
Page 1
When servicing the unit, please follow this manual. MODEL : LST-4200A That's why they are already controlled in Korea MODEL : LST-4200A Digital Set Top Box SERVICE MANUAL INTRODUCTION: This manual is to prevent you from any damage to the unit if you violate it. "Warning": It may cause ... and etc. SAFETY PRECAUTIONS • Before servicing the unit, read and observe the safety precautions to service it . P/NO : 3829RVN007H SERVICE MANUAL JUNE, 2004 Printed in the production stage at factory, which is divided into "Warning" and "Caution" as follows. "Caution": It may cause...
When servicing the unit, please follow this manual. MODEL : LST-4200A That's why they are already controlled in Korea MODEL : LST-4200A Digital Set Top Box SERVICE MANUAL INTRODUCTION: This manual is to prevent you from any damage to the unit if you violate it. "Warning": It may cause ... and etc. SAFETY PRECAUTIONS • Before servicing the unit, read and observe the safety precautions to service it . P/NO : 3829RVN007H SERVICE MANUAL JUNE, 2004 Printed in the production stage at factory, which is divided into "Warning" and "Caution" as follows. "Caution": It may cause...
Service Manual
Page 8
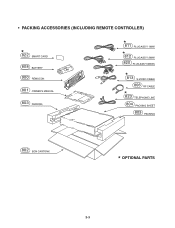
• PACKING ACCESSORIES (INCLUDING REMOTE CONTROLLER) 822 SMART CARD 808 BATTERY 900 REMOCON 801 OWNER'S MANUAL 803 PACKING 811 PLUG ASS'Y 1WAY 812 PLUG ASS'Y 2WAY 820 PLUG ASS'Y(3WAY) 813 S-VIDEO CABLE 806 RF CABLE 823 TELEPHONE LINE 804 PACKING SHEET 803 PACKING 802 BOX CARTONX OPTIONAL PARTS 2-3
• PACKING ACCESSORIES (INCLUDING REMOTE CONTROLLER) 822 SMART CARD 808 BATTERY 900 REMOCON 801 OWNER'S MANUAL 803 PACKING 811 PLUG ASS'Y 1WAY 812 PLUG ASS'Y 2WAY 820 PLUG ASS'Y(3WAY) 813 S-VIDEO CABLE 806 RF CABLE 823 TELEPHONE LINE 804 PACKING SHEET 803 PACKING 802 BOX CARTONX OPTIONAL PARTS 2-3


