

Owners Manual
Page 3
... IMPORTANT SAFETY INSTRUCTIONS CAUTION: PLEASE READ AND OBSERVE ALL WARNINGS AND INSTRUCTIONS IN THIS INSTALLATION AND OPERATING GUIDE AND THOSE MARKED ON THE UNIT. This set has been designed and manufactured to rain or moisture, does not operate normally, or has been dropped. 9. heating. Improper use attachments/accessories specified by the...
... IMPORTANT SAFETY INSTRUCTIONS CAUTION: PLEASE READ AND OBSERVE ALL WARNINGS AND INSTRUCTIONS IN THIS INSTALLATION AND OPERATING GUIDE AND THOSE MARKED ON THE UNIT. This set has been designed and manufactured to rain or moisture, does not operate normally, or has been dropped. 9. heating. Improper use attachments/accessories specified by the...
Owners Manual
Page 4
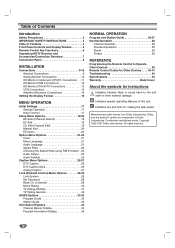
...Connections . . 11 HD Monitor RGB Connections 12 HD Monitor DVI-HDTV Connections 13 VCR Connections 14 Amplifier (Receiver) Connections 15 Setting the Display Format 16 MENU OPERATION Initial Settings 17 General Operation 17 Help Function 17 Setup Menu Options 18-20 EZ Scan (Channel Search 18 EZ Add 18 Ch. ...Menu Options 25-27 DTV Caption 25 DTV Caption Style 26 Analog Caption 27 Lock (Parental Control) Menu Options 28-32 Lock System 28 Set Password 28 Block Ch. (Channel 29 Movie Rating 30 TV Rating-Children 31 TV Rating-General 32 GUIDE Options 33-35 Program Guide 33...
...Connections . . 11 HD Monitor RGB Connections 12 HD Monitor DVI-HDTV Connections 13 VCR Connections 14 Amplifier (Receiver) Connections 15 Setting the Display Format 16 MENU OPERATION Initial Settings 17 General Operation 17 Help Function 17 Setup Menu Options 18-20 EZ Scan (Channel Search 18 EZ Add 18 Ch. ...Menu Options 25-27 DTV Caption 25 DTV Caption Style 26 Analog Caption 27 Lock (Parental Control) Menu Options 28-32 Lock System 28 Set Password 28 Block Ch. (Channel 29 Movie Rating 30 TV Rating-Children 31 TV Rating-General 32 GUIDE Options 33-35 Program Guide 33...

Owners Manual
Page 5
...5 Remote Control Sensor Receives signals from any menu. If no menu is displayed, pressing the SELECT button will be displayed. Display Window DISPLAY FORMAT Sets the output resolution to 1080i, 720p, 480p, or 480i formats and chooses the correct display format for your TV. (Refer to page 16) MENU... remote control. POWER Turns the HDTV Receiver on -screen menus and to adjust the system settings and preferences. SELECT If the main menu is displayed, the LEFT/RIGHT arrows control the volume setting and the UP/DOWN arrows select channels. EXIT Clears all on the screen. You can ...
...5 Remote Control Sensor Receives signals from any menu. If no menu is displayed, pressing the SELECT button will be displayed. Display Window DISPLAY FORMAT Sets the output resolution to 1080i, 720p, 480p, or 480i formats and chooses the correct display format for your TV. (Refer to page 16) MENU... remote control. POWER Turns the HDTV Receiver on -screen menus and to adjust the system settings and preferences. SELECT If the main menu is displayed, the LEFT/RIGHT arrows control the volume setting and the UP/DOWN arrows select channels. EXIT Clears all on the screen. You can ...

Owners Manual
Page 6
... number for DVD players, VCRs, and similar components. Arrow Buttons (3 / 4 / 1 / 2) Selects options in the channel list. VOL (Volume) (+/-) Changes volume. Remote Control Key Functions STB Sets operational mode of the remote control, and insert two batteries (size AA) with and aligned correctly. Pressing the PG UP/DN buttons pages through the...
... number for DVD players, VCRs, and similar components. Arrow Buttons (3 / 4 / 1 / 2) Selects options in the channel list. VOL (Volume) (+/-) Changes volume. Remote Control Key Functions STB Sets operational mode of the remote control, and insert two batteries (size AA) with and aligned correctly. Pressing the PG UP/DN buttons pages through the...
Owners Manual
Page 10
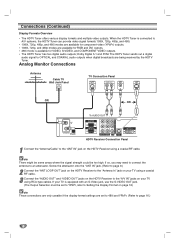
... HDTV Tuner has two digital audio outputs; The HDTV Tuner sends out a digital audio signal to OPTICAL and COAXIAL audio outputs when digital broadcasts are set to YPbPr, refer to page 16.) 10 When the HDTV Tuner is connected to the "A/V IN" jacks on your TV using a coaxial RF cable. ...OUT" jack on the HDTV Receiver to the "Antenna In" jack on page 16) ote These connections are only useable if the display format settings are being received by the HDTV Tuner. Connections (Continued) Display Formats Overview • The HDTV Tuner offers various display formats and multiple video outputs....
... HDTV Tuner has two digital audio outputs; The HDTV Tuner sends out a digital audio signal to OPTICAL and COAXIAL audio outputs when digital broadcasts are set to YPbPr, refer to page 16.) 10 When the HDTV Tuner is connected to the "A/V IN" jacks on your TV using a coaxial RF cable. ...OUT" jack on the HDTV Receiver to the "Antenna In" jack on page 16) ote These connections are only useable if the display format settings are being received by the HDTV Tuner. Connections (Continued) Display Formats Overview • The HDTV Tuner offers various display formats and multiple video outputs....

Owners Manual
Page 11
... HDTV Receiver Connection Panel 1 Connect the "Antenna/Cable" to an attenuator. ote There might be some areas where the signal strength could be set to YPbPr, refer to Setting the Display Format on page 16) 4 Connect the L/R "AUDIO OUT" jacks on the HDTV Receiver to the L/R "AUDIO IN" jacks on your TV...
... HDTV Receiver Connection Panel 1 Connect the "Antenna/Cable" to an attenuator. ote There might be some areas where the signal strength could be set to YPbPr, refer to Setting the Display Format on page 16) 4 Connect the L/R "AUDIO OUT" jacks on the HDTV Receiver to the L/R "AUDIO IN" jacks on your TV...

Owners Manual
Page 12
... using VGA-type connector. (The Output Selection must be too high. ote There might be some areas where the signal strength could be set to RGB, refer to Setting the Display Format on page 16) 4 Connect the L/R "AUDIO OUT" jacks on the HDTV Receiver to an attenuator. ote 1080i, 720p, and 480p...
... using VGA-type connector. (The Output Selection must be too high. ote There might be some areas where the signal strength could be set to RGB, refer to Setting the Display Format on page 16) 4 Connect the L/R "AUDIO OUT" jacks on the HDTV Receiver to an attenuator. ote 1080i, 720p, and 480p...

Owners Manual
Page 13
ote There might be some areas where the signal strength could be set to DVI, refer to Setting the Display Format on page 16) 4 Connect the L/R "AUDIO OUT" jacks on the HDTV Receiver to the L/R "AUDIO IN" jacks on your TV or monitor's ...
ote There might be some areas where the signal strength could be set to DVI, refer to Setting the Display Format on page 16) 4 Connect the L/R "AUDIO OUT" jacks on the HDTV Receiver to the L/R "AUDIO IN" jacks on your TV or monitor's ...
Owners Manual
Page 16
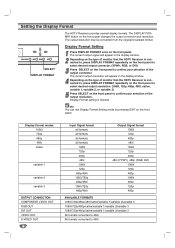
...native/variable 1/variable 2/variable 3 All formats converted to 480i All formats converted to confirm your selection of the output resolution. DIsplay Format setting is connected to, press DISPLAY FORMAT repeatedly on the front panel to select desired output connector. (YPbPr, RGB, or DVI) 3... may be converted from the original broadcast format. SELECT DISPLAY FORMAT Display Format Setting 1 Press DISPLAY FORMAT once on the front panel changes the output connector and resolution. Setting the Display Format The HDTV Receiver provides several display formats. The current output ...
...native/variable 1/variable 2/variable 3 All formats converted to 480i All formats converted to confirm your selection of the output resolution. DIsplay Format setting is connected to, press DISPLAY FORMAT repeatedly on the front panel to select desired output connector. (YPbPr, RGB, or DVI) 3... may be converted from the original broadcast format. SELECT DISPLAY FORMAT Display Format Setting 1 Press DISPLAY FORMAT once on the front panel changes the output connector and resolution. Setting the Display Format The HDTV Receiver provides several display formats. The current output ...
Owners Manual
Page 17
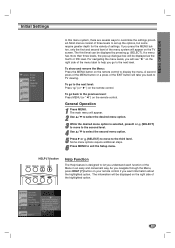
... information about the highlighted option. To show and remove the Menu: Press the MENU button on your remote control if you understand each function of settings. Most menus consist of the menu label to TV viewing. For navigating the menu levels, you will see " 2 " on the TV screen. General Operation 1 ...the MENU button or a press of the menu system will appear on the right side of three levels to display the menu. MENU OPERATION Initial Settings STB TV VCR DVD AUX STB MODE POWER TV/INPUT ez ADD AUDIO CC * SIGNAL MUTE SELECT FLASHBK PG UP HEPLG DPN (?) button RATIO ...
... information about the highlighted option. To show and remove the Menu: Press the MENU button on your remote control if you understand each function of settings. Most menus consist of the menu label to TV viewing. For navigating the menu levels, you will see " 2 " on the TV screen. General Operation 1 ...the MENU button or a press of the menu system will appear on the right side of three levels to display the menu. MENU OPERATION Initial Settings STB TV VCR DVD AUX STB MODE POWER TV/INPUT ez ADD AUDIO CC * SIGNAL MUTE SELECT FLASHBK PG UP HEPLG DPN (?) button RATIO ...
Owners Manual
Page 18
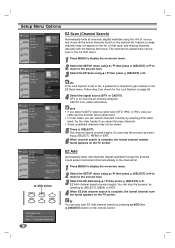
... is complete, the lowest channel number found on the remote control. 18 MUTE SELECT FLASHBK PG UP PG DN ote If the Lock System is set to On, a password is for cable subscribers. CADTV is required to gain access to the second level. 3 Select the EZ Scan using the 'Ant In...
... is complete, the lowest channel number found on the remote control. 18 MUTE SELECT FLASHBK PG UP PG DN ote If the Lock System is set to On, a password is for cable subscribers. CADTV is required to gain access to the second level. 3 Select the EZ Scan using the 'Ant In...

Owners Manual
Page 21
...OPTION menu using 3 / 4 then press (SELECT). 4 Press MENU to return to the previous menu or press EXIT on the remote control to return to manually set Time Zone: (Atlantic, Eastern, Central, Mountain, Pacific, Alaska, Hawaii, New F.land) 5 Press MENU to return to the previous menu or press EXIT on ...the remote control to return to the previous menu or press EXIT on the program information display or Program guide. You can not be set using 3 / 4 then press (SELECT). 4 Press MENU to return to TV viewing. STB TV VCR DVD AUX STB MODE POWER AUDTVI/OINPUbTuttoenz ADD AUDIO CC...
...OPTION menu using 3 / 4 then press (SELECT). 4 Press MENU to return to the previous menu or press EXIT on the remote control to return to manually set Time Zone: (Atlantic, Eastern, Central, Mountain, Pacific, Alaska, Hawaii, New F.land) 5 Press MENU to return to the previous menu or press EXIT on ...the remote control to return to the previous menu or press EXIT on the program information display or Program guide. You can not be set using 3 / 4 then press (SELECT). 4 Press MENU to return to TV viewing. STB TV VCR DVD AUX STB MODE POWER AUDTVI/OINPUbTuttoenz ADD AUDIO CC...

Owners Manual
Page 22
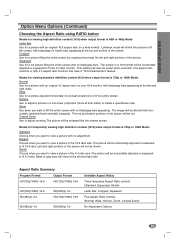
... Zoom Cinema Zoom otes • If program format is High Definition (16:9) and the display format selected is 1080i or 720p, the Aspect Ratio is set to Wide . • If program format is Standard Definition (4:3) and the display format selected is 480p or 480i, the Aspect Ratio is... picture with a normal (4:3) aspect ratio at 480i or 480p mode output format, you choose the screen format. To view a picture with 480i or 480p format setting, use the RATIO button on the remote control to change the wide mode in the following cycle: Normal, Wide, Horizon, Zoom, to Cinema Zoom. (Refer...
... Zoom Cinema Zoom otes • If program format is High Definition (16:9) and the display format selected is 1080i or 720p, the Aspect Ratio is set to Wide . • If program format is Standard Definition (4:3) and the display format selected is 480p or 480i, the Aspect Ratio is... picture with a normal (4:3) aspect ratio at 480i or 480p mode output format, you choose the screen format. To view a picture with 480i or 480p format setting, use the RATIO button on the remote control to change the wide mode in the following cycle: Normal, Wide, Horizon, Zoom, to Cinema Zoom. (Refer...
Owners Manual
Page 23
... sides) to fit the 4:3 ratio monitor. Black or gray bars will be useful when used with 16:9 aspect ratio monitors or with no adjustment. This setting can also be cut. Horizon Use to adjust zooming.
... sides) to fit the 4:3 ratio monitor. Black or gray bars will be useful when used with 16:9 aspect ratio monitors or with no adjustment. This setting can also be cut. Horizon Use to adjust zooming.
Owners Manual
Page 24
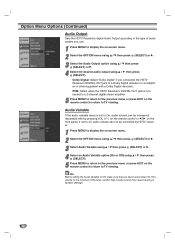
... 2. 3 Select Audio Variable using 3 / 4 then press (SELECT) or 2. 4 Select an Audio Variable option (On or Off) using 3 / 4 then press (SELECT). ote Before setting the Audio Variable to Off, make sure that you have turned down the TV's volume to On, audio volume can not be increased/ decreased with..."Dolby Digital" if you connected the HDTV Receiver's DIGITAL OUT jack to TV viewing. PCM: Select when the HDTV Receiver's DIGITAL OUT jack is set to off, audio volume can be controlled by HDTV receiver. 1 Press MENU to display the on the front panel. Option Menu Options (Continued)...
... 2. 3 Select Audio Variable using 3 / 4 then press (SELECT) or 2. 4 Select an Audio Variable option (On or Off) using 3 / 4 then press (SELECT). ote Before setting the Audio Variable to Off, make sure that you have turned down the TV's volume to On, audio volume can not be increased/ decreased with..."Dolby Digital" if you connected the HDTV Receiver's DIGITAL OUT jack to TV viewing. PCM: Select when the HDTV Receiver's DIGITAL OUT jack is set to off, audio volume can be controlled by HDTV receiver. 1 Press MENU to display the on the front panel. Option Menu Options (Continued)...

Owners Manual
Page 26
... edge. Depressed: The text is shown when captions appear. Right Shadow: The text has a right-shadow edge. Flash: The text background color blinks twice a second. Set By Program: Default text provided by the program or customize caption appearance with the Custom menu options. Custom: Customized text is transparent (In this case...
... edge. Depressed: The text is shown when captions appear. Right Shadow: The text has a right-shadow edge. Flash: The text background color blinks twice a second. Set By Program: Default text provided by the program or customize caption appearance with the Custom menu options. Custom: Customized text is transparent (In this case...

Owners Manual
Page 28
...to activate or disable all of the lock schemes previously set to Off, the Channel and Program Rating are not effective. 1 Press MENU. Set Password Changes the password. 1 Follow steps 1-2 as shown above (Lock System). 2 Use 3 / 4 to select the Set Password option. 3 Press 2 or (SELECT) to move...then press 2 or to the second level. Also allows you have already entered a password; A password is set up specific channels and ratings through blocking schemes. When you to set up . Lock (Parental Control) Menu Options Lock System Allows you have not entered a password yet; (SELECT...
...to activate or disable all of the lock schemes previously set to Off, the Channel and Program Rating are not effective. 1 Press MENU. Set Password Changes the password. 1 Follow steps 1-2 as shown above (Lock System). 2 Use 3 / 4 to select the Set Password option. 3 Press 2 or (SELECT) to move...then press 2 or to the second level. Also allows you have already entered a password; A password is set up specific channels and ratings through blocking schemes. When you to set up . Lock (Parental Control) Menu Options Lock System Allows you have not entered a password yet; (SELECT...

Owners Manual
Page 29
... list menu. 4 Press MENU to return to the previous menu or press EXIT on the block channel menu. This menu can override Channel Edit menu settings (page 19). 1 Follow Steps 1-2 as shown for the Lock System on page 28. 2 Use 3 / 4 to block or unblock the channel on the block channel menu...
... list menu. 4 Press MENU to return to the previous menu or press EXIT on the block channel menu. This menu can override Channel Edit menu settings (page 19). 1 Follow Steps 1-2 as shown for the Lock System on page 28. 2 Use 3 / 4 to block or unblock the channel on the block channel menu...

Owners Manual
Page 30
... children to view the program. All Block: All programs with ratings above a specified level. Strong elements of offensive material than a PG rated program. You can set the ratings to TV viewing. 30 Strong sexual content. G (General Audiences): Content is not offensive to the movie ratings so children cannot view certain movies...
... children to view the program. All Block: All programs with ratings above a specified level. Strong elements of offensive material than a PG rated program. You can set the ratings to TV viewing. 30 Strong sexual content. G (General Audiences): Content is not offensive to the movie ratings so children cannot view certain movies...

Owners Manual
Page 31
... audiences in the TV Rating - General menu, your selection. TV-Y7: Directed to TV programs for children. This program is designed to the ratings limit set. Age: Selection applies regardless of content category of rating. MENU OPERATION Lock (Parental Control) Menu Options (Continued) TV Rating-Children Keeps children from watching certain...
... audiences in the TV Rating - General menu, your selection. TV-Y7: Directed to TV programs for children. This program is designed to the ratings limit set. Age: Selection applies regardless of content category of rating. MENU OPERATION Lock (Parental Control) Menu Options (Continued) TV Rating-Children Keeps children from watching certain...


