
Owner's Manual
Page 6
... Getting Started with Your Phone . .15 The Battery 15 Installing the Battery 15 Removing the Battery 15 Charging the Battery 15 Battery Temperature Protection . . .16 Battery Charge Level 16 Turning the Phone On and Off . . . . .16 Signal Strength 16 Screen Icons 16 Making Calls 17 Redialing Calls 17 Receiving Calls 17 Quick Access to Convenient Features 18 Vibrate Mode 18 Lock Mode 18 Keyguard Mode 19 Mute Function 19 Volume Quick Adjustment 19 Call Waiting 20 Caller ID 20 Speed Dialing 20 Entering and Editing Information . .21 Text...
... Getting Started with Your Phone . .15 The Battery 15 Installing the Battery 15 Removing the Battery 15 Charging the Battery 15 Battery Temperature Protection . . .16 Battery Charge Level 16 Turning the Phone On and Off . . . . .16 Signal Strength 16 Screen Icons 16 Making Calls 17 Redialing Calls 17 Receiving Calls 17 Quick Access to Convenient Features 18 Vibrate Mode 18 Lock Mode 18 Keyguard Mode 19 Mute Function 19 Volume Quick Adjustment 19 Call Waiting 20 Caller ID 20 Speed Dialing 20 Entering and Editing Information . .21 Text...
Owner's Manual
Page 7
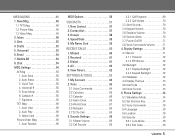
...Quick Text 55 4. Entry Mode 55 6. Auto Receive 56 MSG Options 56 CONTACTS 57 1. Received 61 3. Phone Settings 74 5.1 Standalone Mode 74 5.2 Set Shortcut Key 74 5.3 Voice Commands 75 5.4 Language 75 5.5 Location 75 5.6 Security 75 5.6.1 Lock Mode 76 5.6.2 Edit Code 76 VX9400 5 Auto Save 55 2. Auto Play 56 3. View Timers 62 SETTINGS & TOOLS 63 1. Sent 52 4. Email 54 7. Callback 55 7. Auto View 56 2. Name Card 56 Picture-Video Msg 56 1. New Contact 57 2. Groups 58 4. Missed 60 2. My Name Card 59 RECENT CALLS 60 1. Display Settings...
...Quick Text 55 4. Entry Mode 55 6. Auto Receive 56 MSG Options 56 CONTACTS 57 1. Received 61 3. Phone Settings 74 5.1 Standalone Mode 74 5.2 Set Shortcut Key 74 5.3 Voice Commands 75 5.4 Language 75 5.5 Location 75 5.6 Security 75 5.6.1 Lock Mode 76 5.6.2 Edit Code 76 VX9400 5 Auto Save 55 2. Auto Play 56 3. View Timers 62 SETTINGS & TOOLS 63 1. Sent 52 4. Email 54 7. Callback 55 7. Auto View 56 2. Name Card 56 Picture-Video Msg 56 1. New Contact 57 2. Groups 58 4. Missed 60 2. My Name Card 59 RECENT CALLS 60 1. Display Settings...
Owner's Manual
Page 8
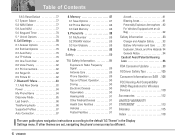
... Call Options 79 6.3 Auto Retry 79 6.4 TTY Mode 79 6.5 One Touch Dial 82 6.6 Voice Privacy 82 6.7 PC Connections 82 6.8 Ringer ID 82 6.9 Picture ID 82 7. Help 88 Safety 89 TIA Safety Information 89 Exposure to the default "LG Theme" in the Display Settings menu. Bluetooth® Menu 83 7.1 Add New Device 83 Power 84 My Phone Name 84 Discovery Mode 85 Last Search 86 Transferring Audio 86 Supported Profiles 87 Auto Connection 87 8. Table of Contents 5.6.3 Reset Default...
... Call Options 79 6.3 Auto Retry 79 6.4 TTY Mode 79 6.5 One Touch Dial 82 6.6 Voice Privacy 82 6.7 PC Connections 82 6.8 Ringer ID 82 6.9 Picture ID 82 7. Help 88 Safety 89 TIA Safety Information 89 Exposure to the default "LG Theme" in the Display Settings menu. Bluetooth® Menu 83 7.1 Add New Device 83 Power 84 My Phone Name 84 Discovery Mode 85 Last Search 86 Transferring Audio 86 Supported Profiles 87 Auto Connection 87 8. Table of Contents 5.6.3 Reset Default...
Owner's Manual
Page 9
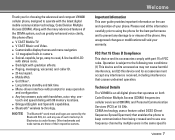
... phone. Please read , 8-line backlit LCD with status icons. ● Backlight with gradation effects. ● Paging, messaging, voicemail, and caller ID. ● 23-key keypad. ● Mobile Web. ● Get It Now®. ● Long battery standby and talk time. ● Menu-driven interface with prompts for easy operation and configuration. ● Any key answer, auto with handsfree, auto retry, one frequency channel by multiple users in camera...
... phone. Please read , 8-line backlit LCD with status icons. ● Backlight with gradation effects. ● Paging, messaging, voicemail, and caller ID. ● 23-key keypad. ● Mobile Web. ● Get It Now®. ● Long battery standby and talk time. ● Menu-driven interface with prompts for easy operation and configuration. ● Any key answer, auto with handsfree, auto retry, one frequency channel by multiple users in camera...
Owner's Manual
Page 12
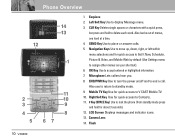
... or answer calls. 5. SEND Key Use to end a call. OK Key Use to display Message menu. 3. Navigation Keys Use to move up, down, right, or left within menu selections and for quick access to delete each word. Left Soft Key Use to accept entered or highlighted information. 7. Also use to return to assign other menus as your shortcut). 6. Flash 10 VX9400 Mobile TV Key Use for quick access to Get It Now, Scheduler, Picture & Video, and Mobile Web by default (Use Settings menu to standby mode. 9. LCD Screen Displays messages...
... or answer calls. 5. SEND Key Use to end a call. OK Key Use to display Message menu. 3. Navigation Keys Use to move up, down, right, or left within menu selections and for quick access to delete each word. Left Soft Key Use to accept entered or highlighted information. 7. Also use to return to assign other menus as your shortcut). 6. Flash 10 VX9400 Mobile TV Key Use for quick access to Get It Now, Scheduler, Picture & Video, and Mobile Web by default (Use Settings menu to standby mode. 9. LCD Screen Displays messages...
Owner's Manual
Page 15
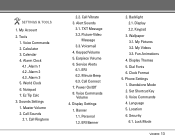
...5. Phone Settings 1. Voice Commands 2. Alarm 2 4.3. Ez Tip Calc 3. Call Vibrate 3. Picture-Video Message 3.3. Service Alerts 6.1. Call Connect 7. Standalone Mode 2. Sounds Settings 1. ERI 6.2. Power On/Off 8. ERI Banner 2. Wallpaper 3.1. My Videos 3.3. Location 6. Notepad 7. Backlight 2.1. Keypad 3. My Pictures 3.2. Fun Animations 4. Dial Fonts 6. Voice Commands 4. Master Volume 2. Security 6.1. Alarm 1 4.2. Alarm Clock 4.1. Voice Commands Volume 4. Alarm 3 5. Earpiece Volume 6. My Account 2. Set Shortcut Key 3. SETTINGS & TOOLS 1. World Clock...
...5. Phone Settings 1. Voice Commands 2. Alarm 2 4.3. Ez Tip Calc 3. Call Vibrate 3. Picture-Video Message 3.3. Service Alerts 6.1. Call Connect 7. Standalone Mode 2. Sounds Settings 1. ERI 6.2. Power On/Off 8. ERI Banner 2. Wallpaper 3.1. My Videos 3.3. Location 6. Notepad 7. Backlight 2.1. Keypad 3. My Pictures 3.2. Fun Animations 4. Dial Fonts 6. Voice Commands 4. Master Volume 2. Security 6.1. Alarm 1 4.2. Alarm Clock 4.1. Voice Commands Volume 4. Alarm 3 5. Earpiece Volume 6. My Account 2. Set Shortcut Key 3. SETTINGS & TOOLS 1. World Clock...
Owner's Manual
Page 20
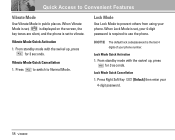
... phone. Press Right Soft Key 4-digit password. [Unlock] then enter your phone. From standby mode with the swivel up , press for 3 seconds. Lock Mode Quick Cancellation 1. Press to switch to Convenient Features Vibrate Mode Use Vibrate Mode in public places. NOTE The default lock code/password is the last 4 digits of your 4-digit password is set , your phone number. From standby mode with the swivel up , press for 3 seconds. When Vibrate Mode is set, is displayed on the screen, the key tones...
... phone. Press Right Soft Key 4-digit password. [Unlock] then enter your phone. From standby mode with the swivel up , press for 3 seconds. Lock Mode Quick Cancellation 1. Press to switch to Convenient Features Vibrate Mode Use Vibrate Mode in public places. NOTE The default lock code/password is the last 4 digits of your 4-digit password is set , your phone number. From standby mode with the swivel up , press for 3 seconds. When Vibrate Mode is set, is displayed on the screen, the key tones...
Owner's Manual
Page 27
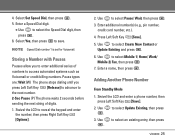
... Key [Save]. 5. Use to select the Speed Dial digit, then press . 6. Enter a Speed Dial digit. ● Use to select an existing entry, then press . Use to select Mobile 1/ Home/ Work/ Mobile 2/ Fax, then press . 7. Adding Another Phone Number From Standby Mode 1. 4. Use to select Pause/ Wait, then press . 3. Select Yes, then press to select Create New Contact or Update Existing and press . 6. Swivel the LCD and enter a phone number, then press Left Soft Key [Save]. 2. Use to save. Use...
... Key [Save]. 5. Use to select the Speed Dial digit, then press . 6. Enter a Speed Dial digit. ● Use to select an existing entry, then press . Use to select Mobile 1/ Home/ Work/ Mobile 2/ Fax, then press . 7. Adding Another Phone Number From Standby Mode 1. 4. Use to select Pause/ Wait, then press . 3. Select Yes, then press to select Create New Contact or Update Existing and press . 6. Swivel the LCD and enter a phone number, then press Left Soft Key [Save]. 2. Use to save. Use...
Owner's Manual
Page 41
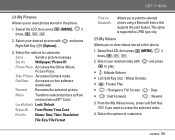
... New Accesses on-line software downloads Rename Renames the selected picture. Lock/Unlock Lock/ Unlock Erase All From Phone/ From Card File Info Name/ Date/ Time/ Resolution/ File Size/ File Format GET IT NOW Print via Bluetooth Allows you want to erase the selected video. 4. and press 3. Send Sends a picture message. Take Picture Accesses Camera mode. Move Transfers selected picture to customize. 2.4 My Pictures Allows you to view photos stored in the phone. 1. Select the options to Full Screen : Stop ● : Fast Forward : Rewind 3. This option is supported...
... New Accesses on-line software downloads Rename Renames the selected picture. Lock/Unlock Lock/ Unlock Erase All From Phone/ From Card File Info Name/ Date/ Time/ Resolution/ File Size/ File Format GET IT NOW Print via Bluetooth Allows you want to erase the selected video. 4. and press 3. Send Sends a picture message. Take Picture Accesses Camera mode. Move Transfers selected picture to customize. 2.4 My Pictures Allows you to view photos stored in the phone. 1. Select the options to Full Screen : Stop ● : Fast Forward : Rewind 3. This option is supported...
Owner's Manual
Page 59
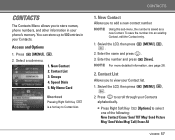
... number and press [Save]. New Contact 2. CONTACTS The Contacts Menu allows you to add a new contact number. Press [MENU], . 2. My Name Card Shortcut Pressing Right Soft Key is saved as a new Contact. You can store up to view your Contacts. Swivel the LCD, then press . [MENU], , 2. Groups 4. NOTE For more detailed information, see page 28. 2. Contact List 3. NOTE Using this sub-menu, the number is a hot key to select one of the following: New Contact/ Erase/ Send TXT Msg/ Send Picture Msg/ Send Video Msg/ Call/ Erase...
... number and press [Save]. New Contact 2. CONTACTS The Contacts Menu allows you to add a new contact number. Press [MENU], . 2. My Name Card Shortcut Pressing Right Soft Key is saved as a new Contact. You can store up to view your Contacts. Swivel the LCD, then press . [MENU], , 2. Groups 4. NOTE For more detailed information, see page 28. 2. Contact List 3. NOTE Using this sub-menu, the number is a hot key to select one of the following: New Contact/ Erase/ Send TXT Msg/ Send Picture Msg/ Send Video Msg/ Call/ Erase...
Owner's Manual
Page 65
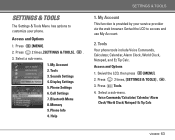
... 1. Swivel the LCD to customize your service provider via the web browser. Press 2 times, [SETTINGS & TOOLS] , . 3. My Account 2. Bluetooth Menu 8. Call Settings 7. Phone Info 0. Help SETTINGS & TOOLS 1. Select a sub-menu. Tools 3. My Account This function is provided by your phone. Access and Options 1. Memory 9. SETTINGS & TOOLS The Settings & Tools Menu has options to access and use My Account. 2. Phone Settings 6. Swivel the LCD, then press [MENU]. 2. Voice Commands/ Calculator/ Calendar/ Alarm Clock/ World Clock/ Notepad/ Ez Tip Calc VX9400 63...
... 1. Swivel the LCD to customize your service provider via the web browser. Press 2 times, [SETTINGS & TOOLS] , . 3. My Account 2. Bluetooth Menu 8. Call Settings 7. Phone Info 0. Help SETTINGS & TOOLS 1. Select a sub-menu. Tools 3. My Account This function is provided by your phone. Access and Options 1. Memory 9. SETTINGS & TOOLS The Settings & Tools Menu has options to access and use My Account. 2. Phone Settings 6. Swivel the LCD, then press [MENU]. 2. Voice Commands/ Calculator/ Calendar/ Alarm Clock/ World Clock/ Notepad/ Ez Tip Calc VX9400 63...
Owner's Manual
Page 78
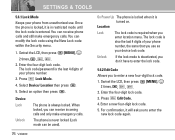
... Security menu. 1. Device Lock Unlock The phone is the last 4 digits of your phone number, the same that you to enter a new four-digit lock code. 1. The phone is required when you to enter the new lock code again. 76 VX9400 The lock code is entered. Press Edit Code. 4. For confirmation, it will ask you use . Swivel the LCD, then press [MENU], 2 times, , , . 2. Enter a new four-digit lock code. 5. Press Lock Mode. 4. When locked, you can receive phone calls and still make emergency calls. You can receive incoming calls and only make emergency calls...
... Security menu. 1. Device Lock Unlock The phone is the last 4 digits of your phone number, the same that you to enter a new four-digit lock code. 1. The phone is required when you to enter the new lock code again. 76 VX9400 The lock code is entered. Press Edit Code. 4. For confirmation, it will ask you use . Swivel the LCD, then press [MENU], 2 times, , , . 2. Enter a new four-digit lock code. 5. Press Lock Mode. 4. When locked, you can receive phone calls and still make emergency calls. You can receive incoming calls and only make emergency calls...

Owner's Manual
Page 86
...). Press Left Soft Key [On]. My Phone Name Allows you to set to edit the name of the Bluetooth® name and view the address of Bluetooth® connection. 1. If Bluetooth power is set the Bluetooth® power On/Off. 1. Power Allows you to off . Enter a new name. 6. NOTE By default, your enunciator when connected to connect with a blue icon on . Highlight the device and press . 5. Press to save and exit. 84 VX9400...
...). Press Left Soft Key [On]. My Phone Name Allows you to set to edit the name of the Bluetooth® name and view the address of Bluetooth® connection. 1. If Bluetooth power is set the Bluetooth® power On/Off. 1. Power Allows you to off . Enter a new name. 6. NOTE By default, your enunciator when connected to connect with a blue icon on . Highlight the device and press . 5. Press to save and exit. 84 VX9400...
Owner's Manual
Page 88
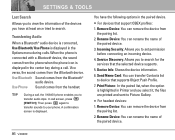
... transfer sounds to search for the services that the selected device supports. 5. Remove Device: You can remove the device from the Bluetooth device. Rename Device: You can transfer Contacts list to search. Send Name Card: You can rename the name of the paired device. 86 VX9400 Rename Device: You can remove the device from the phone when the phone icon is displayed in the Options menu during a call. Transferring Audio When a Bluetooth® audio device is connected, Use Bluetooth/ Use Phone is displayed in the center key...
... transfer sounds to search for the services that the selected device supports. 5. Remove Device: You can remove the device from the Bluetooth device. Rename Device: You can transfer Contacts list to search. Send Name Card: You can rename the name of the paired device. 86 VX9400 Rename Device: You can remove the device from the phone when the phone icon is displayed in the Options menu during a call. Transferring Audio When a Bluetooth® audio device is connected, Use Bluetooth/ Use Phone is displayed in the center key...
Owner's Manual
Page 89
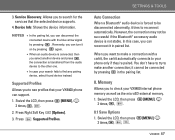
... Soft Key [Options]. 3. Memory Allows you to check your VX9400 phone can turn it in the pairing list. 8. Service Discovery: Allows you to search for the services that your VX9400 internal phone memory as well as the microSD external memory. 1. SETTINGS & TOOLS Auto Connection When a Bluetooth® audio device is forced to make a connection with the blue arrow signal by pressing in paired list. Swivel the LCD, then press 2 times, , . [MENU], 8.1 Save Options...
... Soft Key [Options]. 3. Memory Allows you to check your VX9400 phone can turn it in the pairing list. 8. Service Discovery: Allows you to search for the services that your VX9400 internal phone memory as well as the microSD external memory. 1. SETTINGS & TOOLS Auto Connection When a Bluetooth® audio device is forced to make a connection with the blue arrow signal by pressing in paired list. Swivel the LCD, then press 2 times, , . [MENU], 8.1 Save Options...

Owner's Manual
Page 105
... your body or use a wireless phone connected to Radio Frequency energy from my wireless phone? Again, the scientific data does not demonstrate that there is probably very small. If you can I take to reduce my exposure to a remote antenna. Reducing the time of the human head. The test method uses a tissue-simulating model of wireless phone use a headset and carry the wireless phone away from these...
... your body or use a wireless phone connected to Radio Frequency energy from my wireless phone? Again, the scientific data does not demonstrate that there is probably very small. If you can I take to reduce my exposure to a remote antenna. Reducing the time of the human head. The test method uses a tissue-simulating model of wireless phone use a headset and carry the wireless phone away from these...
Owner's Manual
Page 118
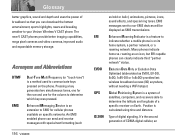
... enabled phone can clearly indicate third "partner network" status. roaming as an icon, but ERI capable phones can send and receive messages with special text formatting (such 116 VX9400 ERI EVDO GPS IS 2000 as bold or italic), animations, pictures, icons, sound effects, and special ring tones. Evolution Data Only or Evolution Data Optimized (abbreviated as EVDO, EV-DO, EvDO, 1xEV-DO or 1xEvDO) provides fast wireless broadband access (3G) anywhere, without needing a WiFi...
... enabled phone can clearly indicate third "partner network" status. roaming as an icon, but ERI capable phones can send and receive messages with special text formatting (such 116 VX9400 ERI EVDO GPS IS 2000 as bold or italic), animations, pictures, icons, sound effects, and special ring tones. Evolution Data Only or Evolution Data Optimized (abbreviated as EVDO, EV-DO, EvDO, 1xEV-DO or 1xEvDO) provides fast wireless broadband access (3G) anywhere, without needing a WiFi...
Owner's Manual
Page 120
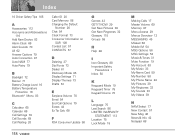
... 78 Keypad Volume 70 L Language 75 Last Search 86 LIMITED WARRANTY STATEMENT 113 Location 75 Lock Mode 18 118 VX9400 M Making Calls 17 Master Volume 69 Memory 87 Menu Access 29 Menus Overview 12 MESSAGING 45 Missed 60 Mobile IM 54 MSG Options 56 MSG Settings 54 Music & Tones 31 Mute Function 19 My Account 63 My Music 33 My Name Card 59 My Number 88 My Phone Name 84 My Pictures 39 My Ringtones...
... 78 Keypad Volume 70 L Language 75 Last Search 86 LIMITED WARRANTY STATEMENT 113 Location 75 Lock Mode 18 118 VX9400 M Making Calls 17 Master Volume 69 Memory 87 Menu Access 29 Menus Overview 12 MESSAGING 45 Missed 60 Mobile IM 54 MSG Options 56 MSG Settings 54 Music & Tones 31 Mute Function 19 My Account 63 My Music 33 My Name Card 59 My Number 88 My Phone Name 84 My Pictures 39 My Ringtones...
Owner's Manual
Page 121
... Picture Place 40 Power 84 Power On/Off 71 Precautions 1 R Received 61 Receiving Calls 17 RECENT CALLS 60 Record Video 42 Ringer ID 82 S Safety 89 Safety Information 93 Save Options 87 Screen Icons 16 Security 75 Sent 52 Service Alerts 70 Set Shortcut Key 74 Setting Up Your Speed Dial 24 SETTINGS & TOOLS 63 Signal Strength 16 Sounds Settings 69 Speed Dialing 20, 28 Speed Dials 58 Standalone Mode 74 Storing Basics 24 Supported Profiles 87 SW Version 88 Sync Music...
... Picture Place 40 Power 84 Power On/Off 71 Precautions 1 R Received 61 Receiving Calls 17 RECENT CALLS 60 Record Video 42 Ringer ID 82 S Safety 89 Safety Information 93 Save Options 87 Screen Icons 16 Security 75 Sent 52 Service Alerts 70 Set Shortcut Key 74 Setting Up Your Speed Dial 24 SETTINGS & TOOLS 63 Signal Strength 16 Sounds Settings 69 Speed Dialing 20, 28 Speed Dials 58 Standalone Mode 74 Storing Basics 24 Supported Profiles 87 SW Version 88 Sync Music...
Data Sheet
Page 2
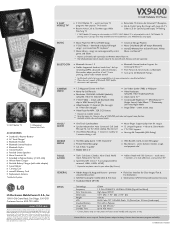
... (for storage)* ■ Video Player for voicemail, #BAL, #MIN, #PMT) * Dependent on photos stored in the V CAST Mobile TV coverage area. each stores 5 numbers, 2 e-mail addresses, and a picture ID* ■ Speed Dial (95 entries + 4 pre-programmed for MP4, 3GP, 3G2 Formats ■ Set Videos (under license. LG is only available in your album (My Pictures). ■ Hidden Keypad & Keyguard Feature - watch real-time TV programs from popular TV channels ■ Receive Voice Calls & Text Messages While...
... (for storage)* ■ Video Player for voicemail, #BAL, #MIN, #PMT) * Dependent on photos stored in the V CAST Mobile TV coverage area. each stores 5 numbers, 2 e-mail addresses, and a picture ID* ■ Speed Dial (95 entries + 4 pre-programmed for MP4, 3GP, 3G2 Formats ■ Set Videos (under license. LG is only available in your album (My Pictures). ■ Hidden Keypad & Keyguard Feature - watch real-time TV programs from popular TV channels ■ Receive Voice Calls & Text Messages While...


