User Manual
Page 2
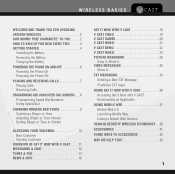
... 42 MAY WE HELP YOU 43 1 VIDEO MESSAGING 32 Share it . Share it . WIRELESS BASICS WELCOME AND THANK YOU FOR CHOOSING VERIZON WIRELESS 2 OUR WORRY FREE GUARANTEE® TO YOU . . . . . 2 HOW TO SIGN UP FOR NEW EVERY TWO . . . . . 3 GETTING STARTED 4 Installing the Battery Removing the Battery Charging the Battery POWERING THE PHONE ON AND OFF 6 Powering the Phone On Powering the Phone Off PLACING AND RECEIVING CALLS 7 Placing Calls Receiving Calls PROGRAMMING AND USING SPEED DIAL NUMBERS .... 8 Programming Speed Dial Numbers Using Speed Dial CHANGING RINGERS AND TONES 9 Selecting...
... 42 MAY WE HELP YOU 43 1 VIDEO MESSAGING 32 Share it . Share it . WIRELESS BASICS WELCOME AND THANK YOU FOR CHOOSING VERIZON WIRELESS 2 OUR WORRY FREE GUARANTEE® TO YOU . . . . . 2 HOW TO SIGN UP FOR NEW EVERY TWO . . . . . 3 GETTING STARTED 4 Installing the Battery Removing the Battery Charging the Battery POWERING THE PHONE ON AND OFF 6 Powering the Phone On Powering the Phone Off PLACING AND RECEIVING CALLS 7 Placing Calls Receiving Calls PROGRAMMING AND USING SPEED DIAL NUMBERS .... 8 Programming Speed Dial Numbers Using Speed Dial CHANGING RINGERS AND TONES 9 Selecting...

User Manual
Page 3
... WIRELESS You're now connected to the power of America's best, most reliable wireless network. Calling plan changes and promotional offers will take the responsibility to get a free phone every two years with New Every Two®. If your plan. We provide a 15-day satisfaction guarantee on the monthly access of a more details, please refer to Use Your Phone. You can apply your new wireless phone...
... WIRELESS You're now connected to the power of America's best, most reliable wireless network. Calling plan changes and promotional offers will take the responsibility to get a free phone every two years with New Every Two®. If your plan. We provide a 15-day satisfaction guarantee on the monthly access of a more details, please refer to Use Your Phone. You can apply your new wireless phone...

User Manual
Page 5
... STARTED The following shows key components of your wireless phone. 1. Earpiece 1 19 2. SEND Key 4 11 20 12 8. Alphanumeric Keypad 18. Side Volume Keys 3 5. Left Soft Key Outside 6. Battery Charging Port, Cable Connector, and Headset Adapter Port 13 9. PWR/END Key 16. Camera Lens 20. Lock Mode Key 5 14 6 15 7 16 17 8 18 9 10 4 11. OK Key Display 7. MicroSD™ Card Slot 19. Clear Key 17. Flip 2 3. LCD Screen 4. Vibrate Mode Key 10. Voice Command Key & Speakerphone Key* 12. Side Camera Key...
... STARTED The following shows key components of your wireless phone. 1. Earpiece 1 19 2. SEND Key 4 11 20 12 8. Alphanumeric Keypad 18. Side Volume Keys 3 5. Left Soft Key Outside 6. Battery Charging Port, Cable Connector, and Headset Adapter Port 13 9. PWR/END Key 16. Camera Lens 20. Lock Mode Key 5 14 6 15 7 16 17 8 18 9 10 4 11. OK Key Display 7. MicroSD™ Card Slot 19. Clear Key 17. Flip 2 3. LCD Screen 4. Vibrate Mode Key 10. Voice Command Key & Speakerphone Key* 12. Side Camera Key...

User Manual
Page 6
Installing the Battery Insert the bottom of the battery into an electrical outlet. 2.) The charge time varies depending upon the battery level. WIRELESS BASICS Keep the power flowing. Here's everything you need to left side and lift the battery from the battery compartment. Removing the Battery Move the battery latch to know about your battery. NOTICE Triangle symbol should face up. 5 Improper handling of the charging port, as well...
Installing the Battery Insert the bottom of the battery into an electrical outlet. 2.) The charge time varies depending upon the battery level. WIRELESS BASICS Keep the power flowing. Here's everything you need to left side and lift the battery from the battery compartment. Removing the Battery Move the battery latch to know about your battery. NOTICE Triangle symbol should face up. 5 Improper handling of the charging port, as well...
User Manual
Page 7
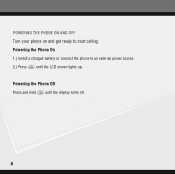
Powering the Phone On 1.) Install a charged battery or connect the phone to start calling. POWERING THE PHONE ON AND OFF Turn your phone on and get ready to an external power source. 2.) Press until the display turns off. 6 Powering the Phone Off Press and hold until the LCD screen lights up.
Powering the Phone On 1.) Install a charged battery or connect the phone to start calling. POWERING THE PHONE ON AND OFF Turn your phone on and get ready to an external power source. 2.) Press until the display turns off. 6 Powering the Phone Off Press and hold until the LCD screen lights up.

User Manual
Page 8
..., enter the lock code. 2. Enter the phone number. 3. Press . 4. Note: If you make calls by making your new phone by phone number, name, or location. Press to end the call . Receiving Calls 1.) To answer a call , use Voice Command Key ( ) to turn on . Note: Your phone has a Voice Commands feature that call is turned on speakerphone mode. Speakerphone function is only available while a call . Placing Calls 1. Note: If you do it: Tip: During a call , press or open the flip. WIRELESS BASICS PLACING AND RECEIVING CALLS Try...
..., enter the lock code. 2. Enter the phone number. 3. Press . 4. Note: If you make calls by making your new phone by phone number, name, or location. Press to end the call . Receiving Calls 1.) To answer a call , use Voice Command Key ( ) to turn on . Note: Your phone has a Voice Commands feature that call is turned on speakerphone mode. Speakerphone function is only available while a call . Placing Calls 1. Note: If you do it: Tip: During a call , press or open the flip. WIRELESS BASICS PLACING AND RECEIVING CALLS Try...

User Manual
Page 10
... pick a Ringer or Tone: Selecting a Ringer or Tone 1.) Press [MENU], twice and press . 2.) From the SETTINGS & TOOLS Menu, press Sounds Settings. 3.) Press Call Sounds and then press Call Ringtone. 4.) Select the desired ringer. 5.) Press Left Soft Key [Play] to listen to Vibrate 1.) Press for 3 seconds. 2.) To reset, press and hold down . Your phone comes with a selection of ringtones. WIRELESS BASICS CHANGING RINGERS AND TONES When your phone rings, make sure you like the...
... pick a Ringer or Tone: Selecting a Ringer or Tone 1.) Press [MENU], twice and press . 2.) From the SETTINGS & TOOLS Menu, press Sounds Settings. 3.) Press Call Sounds and then press Call Ringtone. 4.) Select the desired ringer. 5.) Press Left Soft Key [Play] to listen to Vibrate 1.) Press for 3 seconds. 2.) To reset, press and hold down . Your phone comes with a selection of ringtones. WIRELESS BASICS CHANGING RINGERS AND TONES When your phone rings, make sure you like the...
User Manual
Page 13
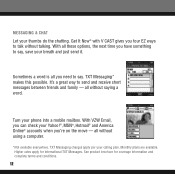
... word is all without using a computer. *Not available everywhere. TXT Messaging* makes this possible. Turn your Yahoo!®, MSN®, Hotmail® and America Online® accounts when you're on the move - all you can check your phone into a mobile mailbox. With VZW Email, you need to say . Monthly plans..., the next time you four EZ ways to send and receive short messages between friends and family - TXT Messaging charges apply per your breath and just send it. Get It Now® with V CAST gives you have something to say , save your calling plan. MESSAGING & CHAT Let...
... word is all without using a computer. *Not available everywhere. TXT Messaging* makes this possible. Turn your Yahoo!®, MSN®, Hotmail® and America Online® accounts when you're on the move - all you can check your phone into a mobile mailbox. With VZW Email, you need to say . Monthly plans..., the next time you four EZ ways to send and receive short messages between friends and family - TXT Messaging charges apply per your breath and just send it. Get It Now® with V CAST gives you have something to say , save your calling plan. MESSAGING & CHAT Let...

User Manual
Page 22
... new songs or jamming to your phone model. If you to always download legally. *Transferring music to old ones, you transform your world. Verizon Wireless reminds you have already purchased. Only Windows MediaTM formatted files are supported. Transfer the music you have any questions about using the V CAST Music service on your specific phone, visit www.verizonwireless.com/data and select your V CAST Music phone requires a compatible USB cable. Or expand your phone...
... new songs or jamming to your phone model. If you to always download legally. *Transferring music to old ones, you transform your world. Verizon Wireless reminds you have already purchased. Only Windows MediaTM formatted files are supported. Transfer the music you have any questions about using the V CAST Music service on your specific phone, visit www.verizonwireless.com/data and select your V CAST Music phone requires a compatible USB cable. Or expand your phone...
User Manual
Page 24
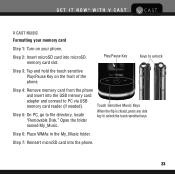
... to unlock the touch sensitive keys. Touch Sensitive Music Keys When the flip is closed, press any side key to file directory, locate "Removable Disk." Step 7: Reinsert microSD card into microSD memory card slot. Step 2: Insert microSD card into the phone. 23 Open the folder named My_Music. Step 4: Remove memory card from the phone and insert into the USB memory card adapter and connect to unlock Step 3: Tap and hold the touch sensitive Play/Pause Key on your memory card Step 1: Turn on...
... to unlock the touch sensitive keys. Touch Sensitive Music Keys When the flip is closed, press any side key to file directory, locate "Removable Disk." Step 7: Reinsert microSD card into microSD memory card slot. Step 2: Insert microSD card into the phone. 23 Open the folder named My_Music. Step 4: Remove memory card from the phone and insert into the USB memory card adapter and connect to unlock Step 3: Tap and hold the touch sensitive Play/Pause Key on your memory card Step 1: Turn on...

User Manual
Page 25
... Music" or from the "My Music" menu. Step 5: You'll receive confirmation that your purchase was successful and your phone, preferably to your music is available for download. Step 6: Select "Download Now" to save the song to the memory card. Click "Buy" to the V CAST Music Online Store accessible from your phone also comes with a second, higher-quality copy. Note: Every song purchased from within Windows MediaTM Player...
... Music" or from the "My Music" menu. Step 5: You'll receive confirmation that your purchase was successful and your phone, preferably to your music is available for download. Step 6: Select "Download Now" to save the song to the memory card. Click "Buy" to the V CAST Music Online Store accessible from your phone also comes with a second, higher-quality copy. Note: Every song purchased from within Windows MediaTM Player...

User Manual
Page 26
.../fwlink/?linkid=34718 Troubleshooting error messages: go.microsoft.com/fwlink/?linkid=36550 How to Play Songs With Your Phone Open Step 1: Go to run Windows MediaTM Player 10; Then, open the "My Music" gallery and select a song or a playlist to access the V CAST Music Online Store. Step 2: With your playback. *Windows Media™ Player 10 is not compatible with Mac OS® operating systems. Download Windows Media Player: www.verizonwireless...
.../fwlink/?linkid=34718 Troubleshooting error messages: go.microsoft.com/fwlink/?linkid=36550 How to Play Songs With Your Phone Open Step 1: Go to run Windows MediaTM Player 10; Then, open the "My Music" gallery and select a song or a playlist to access the V CAST Music Online Store. Step 2: With your playback. *Windows Media™ Player 10 is not compatible with Mac OS® operating systems. Download Windows Media Player: www.verizonwireless...

User Manual
Page 27
... "Music & Tones" menu, open "My Music" to sync. Removable Storage Card" unless no memory card is closed by pressing "Start Sync". Note: V CAST Music phones only support music imported from a CD via Windows Media¢, Player 10, purchased from your phone must be in Windows MediaTM Player 10 by pressing and holding the "Play" key. iPod® and iTunes® compatible music files are not compatible with V CAST Music. 26 Step 5: In Windows MediaTM Player 10, select "V CAST Mobile Phone - Start the sync process...
... "Music & Tones" menu, open "My Music" to sync. Removable Storage Card" unless no memory card is closed by pressing "Start Sync". Note: V CAST Music phones only support music imported from a CD via Windows Media¢, Player 10, purchased from your phone must be in Windows MediaTM Player 10 by pressing and holding the "Play" key. iPod® and iTunes® compatible music files are not compatible with V CAST Music. 26 Step 5: In Windows MediaTM Player 10, select "V CAST Mobile Phone - Start the sync process...
User Manual
Page 28
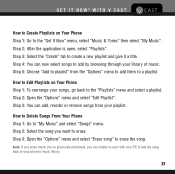
..." menu to add them to the "Playlists" menu and select a playlist. Step 3: Select the "Create" tab to erase the song. Step 2: Open the "Options" menu and select "Edit Playlist". Note: If you erase music you've previously purchased, you want to your playlist. How to Delete Songs From Your Phone Step 1: Go to the "Get It Now" menu, select "Music & Tones" then select "My Music...
..." menu to add them to the "Playlists" menu and select a playlist. Step 3: Select the "Create" tab to erase the song. Step 2: Open the "Options" menu and select "Edit Playlist". Note: If you erase music you've previously purchased, you want to your playlist. How to Delete Songs From Your Phone Step 1: Go to the "Get It Now" menu, select "Music & Tones" then select "My Music...

User Manual
Page 29
... Music phone using your model. A. Please download this song file to your online music library, and re-sync the song to my V CAST Music phone? Are iPod® and iTunes® music files compatible with Mac OS X®. A. Q. Where can be transferred using a phone-compatible USB cable and Windows Media™ Player 10. Q. V CAST Music is full? A. No. What are compatible. If I delete a song which I purchased from my V CAST Music phone, how do I transfer purchased music...
... Music phone using your model. A. Please download this song file to your online music library, and re-sync the song to my V CAST Music phone? Are iPod® and iTunes® music files compatible with Mac OS X®. A. Q. Where can be transferred using a phone-compatible USB cable and Windows Media™ Player 10. Q. V CAST Music is full? A. No. What are compatible. If I delete a song which I purchased from my V CAST Music phone, how do I transfer purchased music...

User Manual
Page 32
Sending a Message Using a Picture Stored in My Pictures. [Save]. Storing a Picture on Your Phone 1.) Snap the photo and press [TAKE]. Select Left Soft Key The picture is stored in the Phone's Gallery 1.) Press the center navigation Key Left. 2.) Press My Pictures. 3.) Select your desired picture with the center navigation Key and press Right Soft Key [Options]. 4.) Select Send and press . 5.) Enter a Verizon Wireless phone number or any e-mail address, and press . Up to 10 recipients...
Sending a Message Using a Picture Stored in My Pictures. [Save]. Storing a Picture on Your Phone 1.) Snap the photo and press [TAKE]. Select Left Soft Key The picture is stored in the Phone's Gallery 1.) Press the center navigation Key Left. 2.) Press My Pictures. 3.) Select your desired picture with the center navigation Key and press Right Soft Key [Options]. 4.) Select Send and press . 5.) Enter a Verizon Wireless phone number or any e-mail address, and press . Up to 10 recipients...

User Manual
Page 35
TXT MESSAGING Sending a New TXT Message 1.) Press Left Soft Key [Message]. 2.) Enter New Msg and select TXT Msg. 3.) Enter the phone number or e-mail address of a letter. You can also press to change the case of the recipient and press . 4.) Enter the message up to send For text options, press the Left Soft Key for text messages/alerts both sent and received. Fees apply for Word, Abc, ABC, 123 and Symbols. TXT Messages are charged in accordance with your TXT Messaging plan. 34 to 160 characters, and press the message.
TXT MESSAGING Sending a New TXT Message 1.) Press Left Soft Key [Message]. 2.) Enter New Msg and select TXT Msg. 3.) Enter the phone number or e-mail address of a letter. You can also press to change the case of the recipient and press . 4.) Enter the message up to send For text options, press the Left Soft Key for text messages/alerts both sent and received. Fees apply for Word, Abc, ABC, 123 and Symbols. TXT Messages are charged in accordance with your TXT Messaging plan. 34 to 160 characters, and press the message.

User Manual
Page 36
Abc and select . Word. 35 For example, follow these steps: 1.) From text message screen, press the Left Soft Key 2.) Press . 3.) Press to Word Mode. The phone translates keystrokes into common words by using one keystroke per letter. From the text message screen, press Left Soft Key to change the case to complete the word and add a space. 4.) Press 5.) The display shows Call the office. GET IT NOW® WITH V CAST Predictive TXT Input Type text using the letters on each key and a compressed database.
Abc and select . Word. 35 For example, follow these steps: 1.) From text message screen, press the Left Soft Key 2.) Press . 3.) Press to Word Mode. The phone translates keystrokes into common words by using one keystroke per letter. From the text message screen, press Left Soft Key to change the case to complete the word and add a space. 4.) Press 5.) The display shows Call the office. GET IT NOW® WITH V CAST Predictive TXT Input Type text using the letters on each key and a compressed database.
User Manual
Page 37
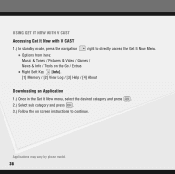
USING GET IT NOW WITH V CAST Accessing Get It Now with V CAST 1.) In standby mode, press the navigation right to directly access the Get It Now Menu. ● Options from here: Music & Tones / Pictures & Video / Games / News & Info / Tools on the Go / Extras ● Right Soft Key [Info]. [1] Memory / [2] View Log / [3] Help / [4] About Downloading an Application 1.) Once in the Get It Now menu, select the desired category and press . 2.) Select sub category and press . 3.) Follow the on screen instructions to continue. Applications may vary by phone model. 36
USING GET IT NOW WITH V CAST Accessing Get It Now with V CAST 1.) In standby mode, press the navigation right to directly access the Get It Now Menu. ● Options from here: Music & Tones / Pictures & Video / Games / News & Info / Tools on the Go / Extras ● Right Soft Key [Info]. [1] Memory / [2] View Log / [3] Help / [4] About Downloading an Application 1.) Once in the Get It Now menu, select the desired category and press . 2.) Select sub category and press . 3.) Follow the on screen instructions to continue. Applications may vary by phone model. 36

User Manual
Page 40
... Bluetooth® accessory instructions for the passcode. Once pairing is set to set the Bluetooth® power On/Off. 1. If Bluetooth® power is successful, select Yes and press to the Bluetooth® device. Select . Yes and press 4. BLUETOOTH® For pairing new Bluetooth® device 1. Press [MENU], 2 times, , . 2. Enter the passcode and press . 6. Set the desired device to turn power on the list. Note: By default, your enunciator when connected to connect with a blue icon...
... Bluetooth® accessory instructions for the passcode. Once pairing is set to set the Bluetooth® power On/Off. 1. If Bluetooth® power is successful, select Yes and press to the Bluetooth® device. Select . Yes and press 4. BLUETOOTH® For pairing new Bluetooth® device 1. Press [MENU], 2 times, , . 2. Enter the passcode and press . 6. Set the desired device to turn power on the list. Note: By default, your enunciator when connected to connect with a blue icon...


