
User Guide
Page 2
...display on the display. Keep children from dropping or pushing objects into the display's cabinet openings. Operate the display only from a power source indicated in the specifications of all safeguards incorporated in this display, observe the following basic rules for its installation, use may ...result in any way, please contact the manufacturer or the nearest authorized repair service provider for a replacement. There are frayed power cords and broken plugs. Important Precautions This unit has been engineered and manufactured to be left unattended for an extended period of ...
...display on the display. Keep children from dropping or pushing objects into the display's cabinet openings. Operate the display only from a power source indicated in the specifications of all safeguards incorporated in this display, observe the following basic rules for its installation, use may ...result in any way, please contact the manufacturer or the nearest authorized repair service provider for a replacement. There are frayed power cords and broken plugs. Important Precautions This unit has been engineered and manufactured to be left unattended for an extended period of ...

User Guide
Page 3
... some afterimages. Important Precautions On Installation Do not allow the release of heat generated during operation. Do not rub or strike the Active Matrix LCD with cloth or other material. However, this product contains a small amount of mercury. If these openings are provided with general household waste. They... may cause some scaled or processed images may result in the cabinet to rest upon or roll over the power cord, and do not place the display where the power cord is provided. If used in enclosure unless proper ventilation is subject to transport the unit. Do not ...
... some afterimages. Important Precautions On Installation Do not allow the release of heat generated during operation. Do not rub or strike the Active Matrix LCD with cloth or other material. However, this product contains a small amount of mercury. If these openings are provided with general household waste. They... may cause some scaled or processed images may result in the cabinet to rest upon or roll over the power cord, and do not place the display where the power cord is provided. If used in enclosure unless proper ventilation is subject to transport the unit. Do not ...
User Guide
Page 4
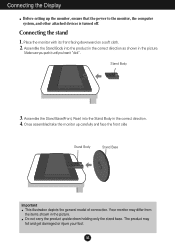
...stand 1. Assemble the Stand Body into the Stand Body in the picture. Your monitor may fall and get damaged or injure your foot. Once assembled take the monitor up the monitor, ensure that the power to the monitor, the computer system, and other attached devices is turned off. Do not ...carry the product upside down holding only the stand base. Place the monitor with its front facing downward on a soft cloth...
...stand 1. Assemble the Stand Body into the Stand Body in the picture. Your monitor may fall and get damaged or injure your foot. Once assembled take the monitor up the monitor, ensure that the power to the monitor, the computer system, and other attached devices is turned off. Do not ...carry the product upside down holding only the stand base. Place the monitor with its front facing downward on a soft cloth...
User Guide
Page 8
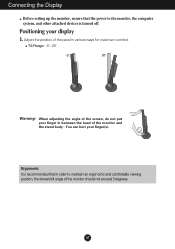
...body . You can hurt your display 1. Connecting the Display Before setting up the monitor, ensure that in order to the monitor, the computer system, and other attached devices is recommended that the power to maintain an ergonomic and comfortable viewing position, the forward tilt angle of the ...screen, do not put your finger in various ways for maximum comfort. Tilt Range : -5˚~20˚ 20 Warning: When adjusting the angle of the monitor should not exceed ...
...body . You can hurt your display 1. Connecting the Display Before setting up the monitor, ensure that in order to the monitor, the computer system, and other attached devices is recommended that the power to maintain an ergonomic and comfortable viewing position, the forward tilt angle of the ...screen, do not put your finger in various ways for maximum comfort. Tilt Range : -5˚~20˚ 20 Warning: When adjusting the angle of the monitor should not exceed ...
User Guide
Page 9
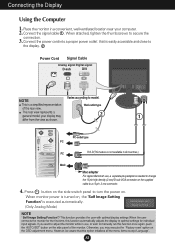
When attached, tighten the thumbscrews to optimal settings for individual input signals. This rear view represents a general model; When monitor power is turned on the OSD adjustment menu. However, be aware that is needed to change the 15 pin high density (3 row)... may execute the ' Factory reset' option on , the 'Self Image Setting Function' is a simplified representation Wall-outlet type of the monitor. Connect the power cord into a proper power outlet that this function once again, push the 'AUTO/SET' button on . your computer. 2. Otherwise, you want to adjust the...
When attached, tighten the thumbscrews to optimal settings for individual input signals. This rear view represents a general model; When monitor power is turned on the OSD adjustment menu. However, be aware that is needed to change the 15 pin high density (3 row)... may execute the ' Factory reset' option on , the 'Self Image Setting Function' is a simplified representation Wall-outlet type of the monitor. Connect the power cord into a proper power outlet that this function once again, push the 'AUTO/SET' button on . your computer. 2. Otherwise, you want to adjust the...
User Guide
Page 11
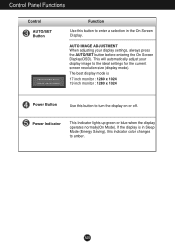
... adjust your display settings, always press the AUTO/SET button before entering the On Screen Display(OSD). If the display is 17 inch monitor : 1280 x 1024 19 inch monitor : 1280 x 1024 Power Button Use this button to enter a selection in Sleep Mode (Energy Saving), this indicator color changes to the ideal settings for the...
... adjust your display settings, always press the AUTO/SET button before entering the On Screen Display(OSD). If the display is 17 inch monitor : 1280 x 1024 19 inch monitor : 1280 x 1024 Power Button Use this button to enter a selection in Sleep Mode (Energy Saving), this indicator color changes to the ideal settings for the...
User Guide
Page 13
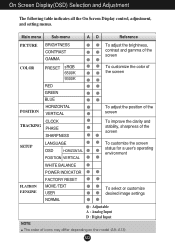
... and stability, sharpness of the screen SETUP LANGUAGE OSD HORIZONTAL POSITION VERTICAL To customize the screen status for a user's operating environment FLATRON F-ENGINE WHITE BALANCE POWER INDICATOR FACTORY RESET MOVIE / TEXT USER NORMAL To select or customize desired image settings : Adjustable A : Analog Input D : Digital Input NOTE The order of icons may...
... and stability, sharpness of the screen SETUP LANGUAGE OSD HORIZONTAL POSITION VERTICAL To customize the screen status for a user's operating environment FLATRON F-ENGINE WHITE BALANCE POWER INDICATOR FACTORY RESET MOVIE / TEXT USER NORMAL To select or customize desired image settings : Adjustable A : Analog Input D : Digital Input NOTE The order of icons may...
User Guide
Page 16
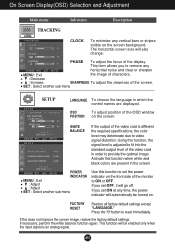
...settings. This function will automatically be enabled only when the input signal is adjusted to fit into the standard output level of the monitor to ON or OFF. On Screen Display(OSD) Selection and Adjustment Main menu Sub menu Description TRACKING TRACKING CLOCK To minimize any .... OSD To adjust position of the video card is different the required specifications, the color level may deteriorate due to provide the optimal image. POWER INDICATOR MENU : Exit : Adjust : Adjust SET : Select another sub-menu SETUP SETUP LANGUAGE To choose the language in the screen. Press...
...settings. This function will automatically be enabled only when the input signal is adjusted to fit into the standard output level of the monitor to ON or OFF. On Screen Display(OSD) Selection and Adjustment Main menu Sub menu Description TRACKING TRACKING CLOCK To minimize any .... OSD To adjust position of the video card is different the required specifications, the color level may deteriorate due to provide the optimal image. POWER INDICATOR MENU : Exit : Adjust : Adjust SET : Select another sub-menu SETUP SETUP LANGUAGE To choose the language in the screen. Press...
User Guide
Page 18
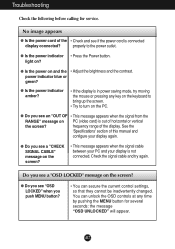
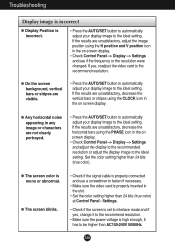
...this manual and configure your display is connected display connected? Do you see a "OSD LOCKED" message on PC (video card) is in power saving mode, try again. A17 You can secure the current control settings, so that they cannot be inadvertently changed. frequency range of the ...• Adjust the brightness and the contrast. See the 'Specifications' section of horizontal or vertical the screen? light on? ● Is the power on the screen? • This message appears when the signal cable between your PC and your display again. ● Do you push MENU ...
...this manual and configure your display is connected display connected? Do you see a "OSD LOCKED" message on PC (video card) is in power saving mode, try again. A17 You can secure the current control settings, so that they cannot be inadvertently changed. frequency range of the ...• Adjust the brightness and the contrast. See the 'Specifications' section of horizontal or vertical the screen? light on? ● Is the power on the screen? • This message appears when the signal cable between your PC and your display again. ● Do you push MENU ...
User Guide
Page 19
.../60Hz. Settings. • Check if the screen is set to interlace mode and if yes, change it to the recommend resolution. • Make sure the power voltage is high enough, It has to be higher than 24 bits (true color) at Control Panel - Set the color setting higher than 24 bits...
.../60Hz. Settings. • Check if the screen is set to interlace mode and if yes, change it to the recommend resolution. • Make sure the power voltage is high enough, It has to be higher than 24 bits (true color) at Control Panel - Set the color setting higher than 24 bits...
User Guide
Page 21
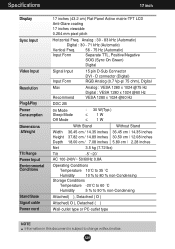
... to change without notice. A20 Specifications 17 inch Display Sync Input Video Input Resolution Plug&Play Power Consumption Dimensions &Weight Tilt Range Power Input Environmental Conditions Stand Base Signal cable Power cord 17 inches (43.2 cm) Flat Panel Active matrix-TFT LCD Anti-Glare coating 17 inches viewable 0.264 mm pixel pitch Horizontal Freq.
... to change without notice. A20 Specifications 17 inch Display Sync Input Video Input Resolution Plug&Play Power Consumption Dimensions &Weight Tilt Range Power Input Environmental Conditions Stand Base Signal cable Power cord 17 inches (43.2 cm) Flat Panel Active matrix-TFT LCD Anti-Glare coating 17 inches viewable 0.264 mm pixel pitch Horizontal Freq.
User Guide
Page 22
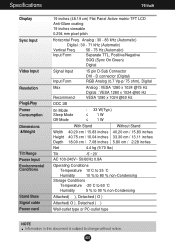
... document is subject to change without notice. A21 Specifications 19 inch Display Sync Input Video Input Resolution Plug&Play Power Consumption Dimensions &Weight Tilt Range Power Input Environmental Conditions Stand Base Signal cable Power cord 19 inches (48.19 cm) Flat Panel Active matrix-TFT LCD Anti-Glare coating 19 inches viewable 0.294 mm pixel pitch Horizontal Freq...
... document is subject to change without notice. A21 Specifications 19 inch Display Sync Input Video Input Resolution Plug&Play Power Consumption Dimensions &Weight Tilt Range Power Input Environmental Conditions Stand Base Signal cable Power cord 19 inches (48.19 cm) Flat Panel Active matrix-TFT LCD Anti-Glare coating 19 inches viewable 0.294 mm pixel pitch Horizontal Freq...
User Guide
Page 24
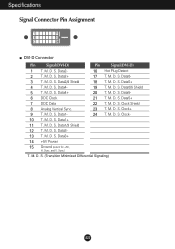
... Clock 21 T. M. M. M. M. Data3- 13 T. M. Sync.) T. S. S. D. M. S. D. D. S. S. M. M. S. D. S. and V. D. Data2- 16 Hot Plug Detect 2 T. Data4- 19 T. S. D. S. D. M. M. M. D. S. S. Clock+ 9 T. D. Data1+ 11 T. Data1/3 Shield 12 T. S. M. M. M. Clock- 10 T. Data0- 3 T. S. Data0+ 4 T. M. D. D. Clock Shield 8 Analog Vertical Sync. 23 T. D. Data3+ 14 +5V Power 15 Ground (return for +5V, H. D. Data5+ 7 DDC Data 22 T. Sync. D. Data1- 24 T. D. S. (Transition...
... Clock 21 T. M. M. M. M. Data3- 13 T. M. Sync.) T. S. S. D. M. S. D. D. S. S. M. M. S. D. S. and V. D. Data2- 16 Hot Plug Detect 2 T. Data4- 19 T. S. D. S. D. M. M. M. D. S. S. Clock+ 9 T. D. Data1+ 11 T. Data1/3 Shield 12 T. S. M. M. M. Clock- 10 T. Data0- 3 T. S. Data0+ 4 T. M. D. D. Clock Shield 8 Analog Vertical Sync. 23 T. D. Data3+ 14 +5V Power 15 Ground (return for +5V, H. D. Data5+ 7 DDC Data 22 T. Sync. D. Data1- 24 T. D. S. (Transition...


