
User Guide
Page 4
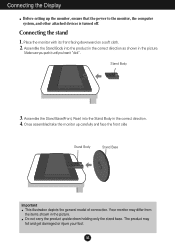
...the Stand Body in the picture. Once assembled take the monitor up the monitor, ensure that the power to the monitor, the computer system, and other attached devices is turned off. Connecting the stand 1. Place the monitor with its front facing downward on a soft cloth. ...2. Assemble the Stand Base(Front, Rear) into the product in the correct direction as shown in the correct direction. 4. REAR REAR Connecting the Display Before setting up carefully and face the front side Important This illustration depicts the general model...
...the Stand Body in the picture. Once assembled take the monitor up the monitor, ensure that the power to the monitor, the computer system, and other attached devices is turned off. Connecting the stand 1. Place the monitor with its front facing downward on a soft cloth. ...2. Assemble the Stand Base(Front, Rear) into the product in the correct direction as shown in the correct direction. 4. REAR REAR Connecting the Display Before setting up carefully and face the front side Important This illustration depicts the general model...
User Guide
Page 9
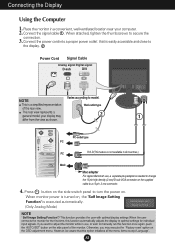
...Function' is a simplified representation Wall-outlet type of the monitor. Otherwise, you want to adjust the monitor while in a convenient, well-ventilated location near your display may execute the ' Factory reset' option on the supplied cable to model. your computer. 2. If you may differ from the ...2 row connector. 4. This function provides the user with optimal display settings.When the user connects the monitor for individual input signals. This rear view represents a general model; However, be aware that is needed to turn the power on the side panel of the rear ...
...Function' is a simplified representation Wall-outlet type of the monitor. Otherwise, you want to adjust the monitor while in a convenient, well-ventilated location near your display may execute the ' Factory reset' option on the supplied cable to model. your computer. 2. If you may differ from the ...2 row connector. 4. This function provides the user with optimal display settings.When the user connects the monitor for individual input signals. This rear view represents a general model; However, be aware that is needed to turn the power on the side panel of the rear ...
User Guide
Page 13
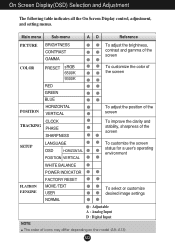
... / TEXT USER NORMAL To select or customize desired image settings : Adjustable A : Analog Input D : Digital Input NOTE The order of icons may differ depending on the model (A9~A13). A12
... / TEXT USER NORMAL To select or customize desired image settings : Adjustable A : Analog Input D : Digital Input NOTE The order of icons may differ depending on the model (A9~A13). A12

