Owners Manual
Page 1
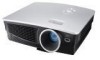
See the label attached on the bottom of the set and quote this manual carefully before operating your dealer when you require service. Model number : Serial number : LG DLP PROJECTOR DX630 OWNER'S MANUAL Record model number and serial number of the set . Retain it for future reference. Please read this information to your set.
See the label attached on the bottom of the set and quote this manual carefully before operating your dealer when you require service. Model number : Serial number : LG DLP PROJECTOR DX630 OWNER'S MANUAL Record model number and serial number of the set . Retain it for future reference. Please read this information to your set.
Owners Manual
Page 3
... Presentation timer Function 26 Using Keystone Function 26 Using Blank Function 27 Using Still Function 27 Selecting Blank image color 27 Color ADJ Function 28 Lamp mode Function 29 Checking lamp time 29 Screen Menu Options Auto configure 30 Using Phase Function 30 Using Clock Function 30 Using Horizontal Function 31 Using Vertical Function 31 RS-232C External Control Device Setup 32 Information Supported Monitor Display 37 Maintenance 37 Replacing the Lamp 38 How to fix the lens...
... Presentation timer Function 26 Using Keystone Function 26 Using Blank Function 27 Using Still Function 27 Selecting Blank image color 27 Color ADJ Function 28 Lamp mode Function 29 Checking lamp time 29 Screen Menu Options Auto configure 30 Using Phase Function 30 Using Clock Function 30 Using Horizontal Function 31 Using Vertical Function 31 RS-232C External Control Device Setup 32 Information Supported Monitor Display 37 Maintenance 37 Replacing the Lamp 38 How to fix the lens...
Owners Manual
Page 5
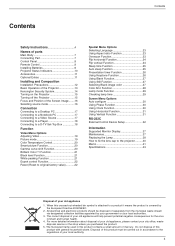
... particular attention to the unit! Do not use . Ensure the power cord does not come into the lens when the projector is spilt into the projector unplug it , discontinue use of the appliance, and have the cord replaced with an exact replacement part by plugging-in overheating of impact shock or damage to cool before removing power.) It may be certain. This may cause...
... particular attention to the unit! Do not use . Ensure the power cord does not come into the lens when the projector is spilt into the projector unplug it , discontinue use of the appliance, and have the cord replaced with an exact replacement part by plugging-in overheating of impact shock or damage to cool before removing power.) It may be certain. This may cause...
Owners Manual
Page 6
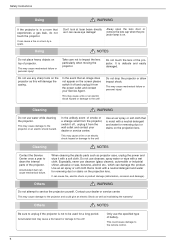
... Instructions Using WARNING If the projector is delicate and easily damaged. It is in a room that an image does not appear on the projector as projector case, unplug the power and wipe it from the wall outlet and contact your dealer or service centre. This may cause mechanical failure or personal injury! Especially, never use any sharp tools on the screen please switch...
... Instructions Using WARNING If the projector is delicate and easily damaged. It is in a room that an image does not appear on the projector as projector case, unplug the power and wipe it from the wall outlet and contact your dealer or service centre. This may cause mechanical failure or personal injury! Especially, never use any sharp tools on the screen please switch...

Owners Manual
Page 7
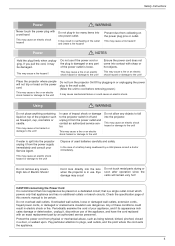
... parts Main Body * The projector is manufactured using high-precision technology. You may, however, see on the Projector screen tiny black points and/or bright points (red, blue, or green). Focus ring Zoom ring Control panel Names of parts Foot adjusting button Front remote control sensor / Light sensor for automatic color adjustment Connecting Part USB(SVC ONLY) COMPONENT IN Rear remote control sensor RS-232C S-VIDEO VIDEO HDMI IN RGB IN RGB OUT PR PB Y USB (SVC ONLY) RS-232C S-VIDEO VIDEO...
... parts Main Body * The projector is manufactured using high-precision technology. You may, however, see on the Projector screen tiny black points and/or bright points (red, blue, or green). Focus ring Zoom ring Control panel Names of parts Foot adjusting button Front remote control sensor / Light sensor for automatic color adjustment Connecting Part USB(SVC ONLY) COMPONENT IN Rear remote control sensor RS-232C S-VIDEO VIDEO HDMI IN RGB IN RGB OUT PR PB Y USB (SVC ONLY) RS-232C S-VIDEO VIDEO...

Owners Manual
Page 8
POWER Button Turn ON/OFF the projector. 8 MENU Keystone + INPUT Blank Color ADJ Keystone AUTO OK POWER INPUT Button Switches to RGB, HDMI, Video, S-Video or Component mode. / Color ADJ Button Adjusts functions of the image at the RGB mode. Button Press the / button to adjust the Keystone function when the Keystone menu is displayed on the screen. OK Button Checks present mode and saves the function changes. AUTO Button It automatically corrects the position and the shaking of menus. / Operates the Automatic Color Adjustment function to provide optimum image according to...
POWER Button Turn ON/OFF the projector. 8 MENU Keystone + INPUT Blank Color ADJ Keystone AUTO OK POWER INPUT Button Switches to RGB, HDMI, Video, S-Video or Component mode. / Color ADJ Button Adjusts functions of the image at the RGB mode. Button Press the / button to adjust the Keystone function when the Keystone menu is displayed on the screen. OK Button Checks present mode and saves the function changes. AUTO Button It automatically corrects the position and the shaking of menus. / Operates the Automatic Color Adjustment function to provide optimum image according to...
Owners Manual
Page 10
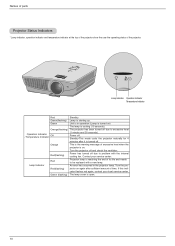
...). cator flashes red again, contact your service center. Names of parts Projector Status Indicators * Lamp indicator, operation indicator and temperature indicator at the top of the projector show the user the operating status of time. Turn the pro- Orange(flashing) The projector has been turned off due to problem with a new lamp. Red Lamp Indicator Projector lamp is turned off. Contact your local service center. If this indi- Red(flashing) Power has turned off due to be replaced with the internal cooling fan. Standby-This mode cools the projector naturally...
...). cator flashes red again, contact your service center. Names of parts Projector Status Indicators * Lamp indicator, operation indicator and temperature indicator at the top of the projector show the user the operating status of time. Turn the pro- Orange(flashing) The projector has been turned off due to problem with a new lamp. Red Lamp Indicator Projector lamp is turned off. Contact your local service center. If this indi- Red(flashing) Power has turned off due to be replaced with the internal cooling fan. Standby-This mode cools the projector naturally...
Owners Manual
Page 12
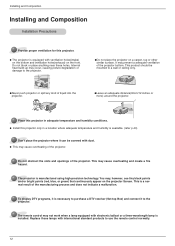
... not place the projector on the projector Screen. You may occur, causing picture degradation or damage to use the remote control normally. 12 Installing and Composition Installing and Composition Installation Precautions Provide proper ventilation for this projector only in adequate temperature and humidity conditions. Internal heat build-up may , however, see tiny black points and/or bright points (red, blue, or green) that continuously appear...
... not place the projector on the projector Screen. You may occur, causing picture degradation or damage to use the remote control normally. 12 Installing and Composition Installing and Composition Installation Precautions Provide proper ventilation for this projector only in adequate temperature and humidity conditions. Internal heat build-up may , however, see tiny black points and/or bright points (red, blue, or green) that continuously appear...

Owners Manual
Page 13
... 8062 8871 9679 10084 1849 2317 2786 3254 3723 4191 4660 5597 6534 7471 8408 9345 10282 11219 11688 * The projector Distancd can be adjusted using the Keystone adjustement. (Refer to page 26.) 4.Connect the power cable to the screen. Although, slight angles can be counteracted using the Zoom function. 13 If the projector is set at a right angle, the screen image will be crooked.
... 8062 8871 9679 10084 1849 2317 2786 3254 3723 4191 4660 5597 6534 7471 8408 9345 10282 11219 11688 * The projector Distancd can be adjusted using the Keystone adjustement. (Refer to page 26.) 4.Connect the power cable to the screen. Although, slight angles can be counteracted using the Zoom function. 13 If the projector is set at a right angle, the screen image will be crooked.
Owners Manual
Page 15
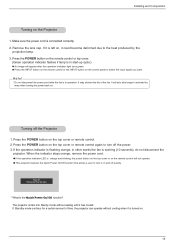
... the power cord while the fan is in operation. Remove the lens cap. G Press the INPUT button on the remote control or the INPUT button on the Projector 1. G If the operation indicator LED is orange and blinking, the power button on the top cover or on the remote control or top cover. (Green operation indicator flashes if lamp is in other words the fan is turned on the top cover or remote control. 2. Please press Power key again. * What is connected correctly. 2. Power off the Projector 1. Press the POWER button...
... the power cord while the fan is in operation. Remove the lens cap. G Press the INPUT button on the remote control or the INPUT button on the Projector 1. G If the operation indicator LED is orange and blinking, the power button on the top cover or on the remote control or top cover. (Green operation indicator flashes if lamp is in other words the fan is turned on the top cover or remote control. 2. Please press Power key again. * What is connected correctly. 2. Power off the Projector 1. Press the POWER button...
Owners Manual
Page 19
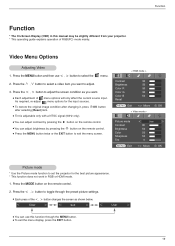
... signal (60Hz only). Soft User G You can use , button to set the projector for the input sources. Press the , button to select a video item you want to adjust the screen condition as shown below. G You can adjust brightness by pressing the button on the remote control. 2. Press the MODE button on the remote control. G To exit the menu display, press the EXIT button. 19 Press the , button to adjust. 3. G To restore the original image condition after changing...
... signal (60Hz only). Soft User G You can use , button to set the projector for the input sources. Press the , button to select a video item you want to adjust the screen condition as shown below. G You can adjust brightness by pressing the button on the remote control. 2. Press the MODE button on the remote control. G To exit the menu display, press the EXIT button. 19 Press the , button to adjust. 3. G To restore the original image condition after changing...

Owners Manual
Page 21
... the screen condition you to adjust the set to achieve brighter picture. Color temp. Smart picture Gamma curve shift Brilliant color TM Black level White peaking 10 Expert Color Reset Medium Normal On Low MENU Prev. Color temp. Press the W.PEAK button on input mode. Press the , button to select On or Off. White peaking 10 Exit G The default value may change depending on the remote control. 2. Adjust to exit the menu screen. G Press the MENU button twice...
... the screen condition you to adjust the set to achieve brighter picture. Color temp. Smart picture Gamma curve shift Brilliant color TM Black level White peaking 10 Expert Color Reset Medium Normal On Low MENU Prev. Color temp. Press the W.PEAK button on input mode. Press the , button to select On or Off. White peaking 10 Exit G The default value may change depending on the remote control. 2. Adjust to exit the menu screen. G Press the MENU button twice...
Owners Manual
Page 26
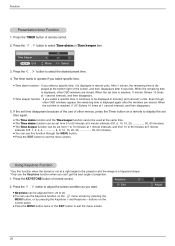
... KEYSTONE button of projection. 1. When the set time is reached. 0' 00" flickers 10 times at 1 second intervals, and then disappears. Even though other menus, press the Timer button on the control panel. G You can be used at a right angle to operate if you want. Adjust 26 The timer starts to the projector and the image is displayed again after 5 seconds. G Press the EXIT button to exit the menu screen. Keystone 0 Exit 2. G Press the MENU button...
... KEYSTONE button of projection. 1. When the set time is reached. 0' 00" flickers 10 times at 1 second intervals, and then disappears. Even though other menus, press the Timer button on the control panel. G You can be used at a right angle to operate if you want. Adjust 26 The timer starts to the projector and the image is displayed again after 5 seconds. G Press the EXIT button to exit the menu screen. Keystone 0 Exit 2. G Press the MENU button...

Owners Manual
Page 27
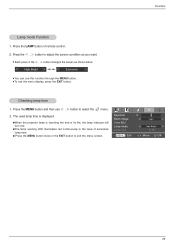
... Blank function color. Press any button to a background color. To exit STILL, press any objects when the projector is under operation as this could cause the objects to select Blank image item. 3. Keystone Blank Image Color ADJ Lamp mode Lamp time MENU Prev. 0 Logo High Bright 11 Hr Move Select 27 Using the Still Function 1. Selecting Blank image color 1. G The screen turns off the lamp, press BLANK on the remote control. G You can...
... Blank function color. Press any button to a background color. To exit STILL, press any objects when the projector is under operation as this could cause the objects to select Blank image item. 3. Keystone Blank Image Color ADJ Lamp mode Lamp time MENU Prev. 0 Logo High Bright 11 Hr Move Select 27 Using the Still Function 1. Selecting Blank image color 1. G The screen turns off the lamp, press BLANK on the remote control. G You can...
Owners Manual
Page 29
... lamp indicator will Color ADJ turn red. Checking lamp time 1. Lamp mode Lamp time MENU Exit High Bright 11 Hr Move OK 29 GThe lamp warning LED illuminates red continuously in the case of remote control. 2. Press the , button to adjust the screen condition as shown below. High Bright Economic G You can use , button to exit the menu screen. Press the MENU button and then use this function through the MENU button. The used lamp time is reaching the end of the , button changes the screen as you want. Keystone...
... lamp indicator will Color ADJ turn red. Checking lamp time 1. Lamp mode Lamp time MENU Exit High Bright 11 Hr Move OK 29 GThe lamp warning LED illuminates red continuously in the case of remote control. 2. Press the , button to adjust the screen condition as shown below. High Bright Economic G You can use , button to exit the menu screen. Press the MENU button and then use this function through the MENU button. The used lamp time is reaching the end of the , button changes the screen as you want. Keystone...

Owners Manual
Page 32
... , button to an external control device (such as a computer) and control the Projector's functions externally. G The adjustment range of the PC to connect external control equipment • Connect the serial port of Set ID is not supplied with the specified ID number will operate from the remote control. Language ARC Overscan Flip horizontal Flip vertical Sleep time Auto off Set ID Presentation timer MENU Prev. RS-232C External Control Device Setup * Connect the RS-232C input jack...
... , button to an external control device (such as a computer) and control the Projector's functions externally. G The adjustment range of the PC to connect external control equipment • Connect the serial port of Set ID is not supplied with the specified ID number will operate from the remote control. Language ARC Overscan Flip horizontal Flip vertical Sleep time Auto off Set ID Presentation timer MENU Prev. RS-232C External Control Device Setup * Connect the RS-232C input jack...

Owners Manual
Page 33
Aspect Ratio k 04. Color Temperature k 13. Green ADC gain adjustment j 15. Low Power j 17. Command Reference List Command1 01. Screen Mute k 05. Auto configuration j 18. Input Select k 03. Brightness k 07. OSD Select k 11. Color k 08. Input Select x 19. Power k 02. Sharpness k 10. Remote Control Lock / Key Lock k 12. Blue ADC gain adjustment j 16. Contrast k 06. Tint k 09. Key m Command2 a b c d g h i j k l m u w y z q u b c Data (Hexadecimal) 0 ~ 1 * 1 ~ 2 0 ~ 1 0 ~ 64 0 ~ 64 0 ~ 64 0 ~ 64 0 ~ 64 0 ~ 1 0 ~ 1 0 ~ 2,4 0 ~ 64...
Aspect Ratio k 04. Color Temperature k 13. Green ADC gain adjustment j 15. Low Power j 17. Command Reference List Command1 01. Screen Mute k 05. Auto configuration j 18. Input Select k 03. Brightness k 07. OSD Select k 11. Color k 08. Input Select x 19. Power k 02. Sharpness k 10. Remote Control Lock / Key Lock k 12. Blue ADC gain adjustment j 16. Contrast k 06. Tint k 09. Key m Command2 a b c d g h i j k l m u w y z q u b c Data (Hexadecimal) 0 ~ 1 * 1 ~ 2 0 ~ 1 0 ~ 64 0 ~ 64 0 ~ 64 0 ~ 64 0 ~ 64 0 ~ 1 0 ~ 1 0 ~ 2,4 0 ~ 64...

Owners Manual
Page 38
... not, the image may cause damage to the projector. Check the lamp model and then purchase it . - Lamp unit disposal Dispose of the used lamp time in the CHECKING LAMP TIME section of the Menu (page.29). Using another manufacturers lamp may be an increased risk of children. G The message "Replace the lamp" appears on the screen when turning the projector on. Replace only with screws. If the operation indicator LED is orange and blinking, do not expose...
... not, the image may cause damage to the projector. Check the lamp model and then purchase it . - Lamp unit disposal Dispose of the used lamp time in the CHECKING LAMP TIME section of the Menu (page.29). Using another manufacturers lamp may be an increased risk of children. G The message "Replace the lamp" appears on the screen when turning the projector on. Replace only with screws. If the operation indicator LED is orange and blinking, do not expose...
Owners Manual
Page 40
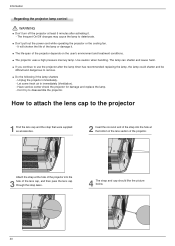
... service center check the projector for damage and replace the lamp. - G The life-span of the lamp or damage it . - Let some fresh air in immediately (Ventilation). - G The projector uses a high pressure mercury lamp. G Don't pull out the power cord while operating the projector or the cooling fan. - Use caution when handling. How to attach the lens cap to the projector 1 Find the lens cap and the strap that were supplied as...
... service center check the projector for damage and replace the lamp. - G The life-span of the lamp or damage it . - Let some fresh air in immediately (Ventilation). - G The projector uses a high pressure mercury lamp. G Don't pull out the power cord while operating the projector or the cooling fan. - Use caution when handling. How to attach the lens cap to the projector 1 Find the lens cap and the strap that were supplied as...
Owners Manual
Page 43
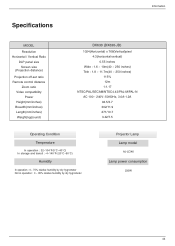
Specifications Information MODEL Resolution Horizontal / Vertical Ratio DLP panel size Screen size (Projection distance) Projection off-set ratio Remote control distance Zoom ratio Video compatibility Power Height(mm/inches) Breadth(mm/inches) Length(mm/inches) Weight(kg/pound) DX630 (DX630-JD) 1024(Horizontal) x 768(Vertical)pixel 4:3(horizontal:vertical) 0.55 inches Wide : 1.6 ~ 10m(40 ~ 250 inches) Tele : 1.8 ~ 11.7m(40 ~ 250 inches) 115% 12m 1:1.17 NTSC/...
Specifications Information MODEL Resolution Horizontal / Vertical Ratio DLP panel size Screen size (Projection distance) Projection off-set ratio Remote control distance Zoom ratio Video compatibility Power Height(mm/inches) Breadth(mm/inches) Length(mm/inches) Weight(kg/pound) DX630 (DX630-JD) 1024(Horizontal) x 768(Vertical)pixel 4:3(horizontal:vertical) 0.55 inches Wide : 1.6 ~ 10m(40 ~ 250 inches) Tele : 1.8 ~ 11.7m(40 ~ 250 inches) 115% 12m 1:1.17 NTSC/...


