Brochure
Page 2
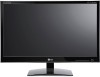
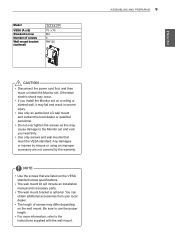
D2342P 23" Class 1080p LCD LED 3D Monitor PANEL SPECIFICATIONS Screen Size Panel Type Aspect Ratio Resolution Brightness Contrast Ratio (DFC) Response Time Viewing Angle (CR>10) Display Colors Panel Surface FREQUENCY (H/V) Analog Digital FEATURES PC Video DDC/CI HDCP Auto Resolution Plug & Play VESA Mountable AV INPUTS/OUTPUTS Inputs Outputs STAND Base Detachable Tilt (Angle) STANDARDS UL(cUL) TUV-GS SEMKO FCC-B. CE EPA/ENERGY STAR® Vista Certification POWER ENERGY STAR® Qualified Type/Input Consumption (On) Consumption (Sleep) DC Off...
D2342P 23" Class 1080p LCD LED 3D Monitor PANEL SPECIFICATIONS Screen Size Panel Type Aspect Ratio Resolution Brightness Contrast Ratio (DFC) Response Time Viewing Angle (CR>10) Display Colors Panel Surface FREQUENCY (H/V) Analog Digital FEATURES PC Video DDC/CI HDCP Auto Resolution Plug & Play VESA Mountable AV INPUTS/OUTPUTS Inputs Outputs STAND Base Detachable Tilt (Angle) STANDARDS UL(cUL) TUV-GS SEMKO FCC-B. CE EPA/ENERGY STAR® Vista Certification POWER ENERGY STAR® Qualified Type/Input Consumption (On) Consumption (Sleep) DC Off...
User Manual
Page 2
Attaching the Stand Base 6 - Mounting on a table 8 - Menu Settings 14 - 3D Settings(Only 3D mode) 14 - HDMI connection 12 CUSTOMIZING SETTINGS 12 Accessing The Main Menus 13 Customizing Settings 13 - Volume Settings (Only supported in HDMI) 15 - DVI-D connection 10 - 2 TABLE OF CONTENTS ENEGNLGISH CONTENTS 3 ASSEMBLING AND PREPARING 3 Unpacking 4 Parts and buttons 6 Setting up the Monitor set . 22 Precautions to a PC 10 - ages 18 TROUBLESHOOTING WHEN USING 3D MODE 19 SPECIFICATIONS 20 Preset Modes (Resolution) 20 HDMI 3D TIMING 20 Indicator...
Attaching the Stand Base 6 - Mounting on a table 8 - Menu Settings 14 - 3D Settings(Only 3D mode) 14 - HDMI connection 12 CUSTOMIZING SETTINGS 12 Accessing The Main Menus 13 Customizing Settings 13 - Volume Settings (Only supported in HDMI) 15 - DVI-D connection 10 - 2 TABLE OF CONTENTS ENEGNLGISH CONTENTS 3 ASSEMBLING AND PREPARING 3 Unpacking 4 Parts and buttons 6 Setting up the Monitor set . 22 Precautions to a PC 10 - ages 18 TROUBLESHOOTING WHEN USING 3D MODE 19 SPECIFICATIONS 20 Preset Modes (Resolution) 20 HDMI 3D TIMING 20 Indicator...
User Manual
Page 3
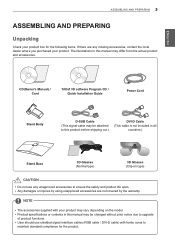
... ASSEMBLING AND PREPARING 3 ASSEMBLING AND PREPARING Unpacking Check your product. yyAny damages or injuries by using unapproved accessories are any unapproved accessories to maintain standard compliance for the product. CD(Owner's Manual) / Card TriDef 3D software Program CD / Quick Installation Guide Power Cord Stand Body D-SUB Cable (This signal cable may be changed without prior notice due to upgrade of product functions. yyProduct specifications or contents in all countries.) Stand Base 3D...
... ASSEMBLING AND PREPARING 3 ASSEMBLING AND PREPARING Unpacking Check your product. yyAny damages or injuries by using unapproved accessories are any unapproved accessories to maintain standard compliance for the product. CD(Owner's Manual) / Card TriDef 3D software Program CD / Quick Installation Guide Power Cord Stand Body D-SUB Cable (This signal cable may be changed without prior notice due to upgrade of product functions. yyProduct specifications or contents in all countries.) Stand Base 3D...
User Manual
Page 4
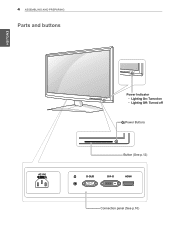
4 ASSEMBLING AND PREPARING Parts and buttons ENEGNLGISH AC-IN Power Indicator yyLighting On: Turned on yyLighting Off: Turned off (Power Button) Button (See p.12) D-SUB DVI-D HDMI Connection panel (See p.10)
4 ASSEMBLING AND PREPARING Parts and buttons ENEGNLGISH AC-IN Power Indicator yyLighting On: Turned on yyLighting Off: Turned off (Power Button) Button (See p.12) D-SUB DVI-D HDMI Connection panel (See p.10)
User Manual
Page 5
... the MENU button for several seconds. The message "OSD UNLOCKED" should appear. The default setting is in Analog Mode) The best display mode 1920 x 1080 VOLUME (Only HDMI mode) Adjust the volume of the Monitor set.(See p.14) INPUT You can select the input signal (D-SUB/DVI/HDMI) you to enter SUPER ENERGY SAVING menu.For more information.(See p.15) 3D 3D display settings.(See p.14) AUTO When adjusting your display settings, always press the AUTO button on or off. The message "OSD LOCKED" should...
... the MENU button for several seconds. The message "OSD UNLOCKED" should appear. The default setting is in Analog Mode) The best display mode 1920 x 1080 VOLUME (Only HDMI mode) Adjust the volume of the Monitor set.(See p.14) INPUT You can select the input signal (D-SUB/DVI/HDMI) you to enter SUPER ENERGY SAVING menu.For more information.(See p.15) 3D 3D display settings.(See p.14) AUTO When adjusting your display settings, always press the AUTO button on or off. The message "OSD LOCKED" should...
User Manual
Page 7
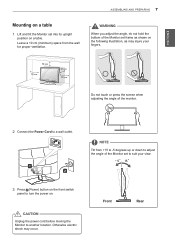
... (Power) button on the front switch panel to turn the power on the following illustration, as shown on . Front Rear Leave a 10 cm (minimum) space from +15 to -5 degrees up or down to adjust the angle of the monitor. 2 Connect the Power Cord to a wall outlet. NOTE Tilt from the wall for proper ventilation. CAUTION Unplug the power cord before moving the Monitor to another location. ENEGNLGISH ASSEMBLING...
... (Power) button on the front switch panel to turn the power on the following illustration, as shown on . Front Rear Leave a 10 cm (minimum) space from +15 to -5 degrees up or down to adjust the angle of the monitor. 2 Connect the Power Cord to a wall outlet. NOTE Tilt from the wall for proper ventilation. CAUTION Unplug the power cord before moving the Monitor to another location. ENEGNLGISH ASSEMBLING...
User Manual
Page 8
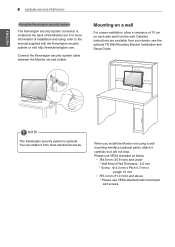
... install the Monitor set using , refer to the manual supplied with the Kensington security system or visit http://www.kensington.com. Detailed instructions are available from most electronics stores. yy784.8 mm (30.9 inch) and under * Wall Mount Pad Thickness : 2.6 mm * Screw : Φ 4.0 mm x Pitch 0.7 mm x Length 10 mm yy787.4 mm (31.0 inch) and above * Please use VESA standard as below. Connect the Kensington security system cable...
... install the Monitor set using , refer to the manual supplied with the Kensington security system or visit http://www.kensington.com. Detailed instructions are available from most electronics stores. yy784.8 mm (30.9 inch) and under * Wall Mount Pad Thickness : 2.6 mm * Screw : Φ 4.0 mm x Pitch 0.7 mm x Length 10 mm yy787.4 mm (31.0 inch) and above * Please use VESA standard as below. Connect the Kensington security system cable...
User Manual
Page 9
... wall, it may occur. yyThe wall mount kit will include an installation manual and necessary parts. yyThe wall mount bracket is optional. You can obtain additional accessories from your warranty. yyThe length of screws Wall mount bracket (optional) D2342P 75 x 75 M4 4 RW120 ASSEMBLING AND PREPARING 9 ENEGNLGISH CAUTION yyDisconnect the power cord first, and then move or install the Monitor set. Be sure to the Monitor set on the VESA standard screw specifications...
... wall, it may occur. yyThe wall mount kit will include an installation manual and necessary parts. yyThe wall mount bracket is optional. You can obtain additional accessories from your warranty. yyThe length of screws Wall mount bracket (optional) D2342P 75 x 75 M4 4 RW120 ASSEMBLING AND PREPARING 9 ENEGNLGISH CAUTION yyDisconnect the power cord first, and then move or install the Monitor set. Be sure to the Monitor set on the VESA standard screw specifications...
User Manual
Page 10
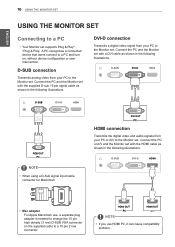
... use , a separate plug adapter is needed to a 15 pin 2 row connector. DVI-D connection Transmits a digital video signal from your PC to the Monitor set supports Plug & Play*. *Plug & Play: A PC recognizes a connected device that users connect to a PC and turn on the supplied cable to change the 15 pin high density (3 row) D-SUB VGA connector on , without device configuration or user intervention. D-SUB DVI-D HDMI D-SUB DVI-D HDMI RGB OUT NOTE yyWhen using a D-Sub signal input cable connector for Macintosh DVI OUT HDMI connection Transmits the digital video and audio signals...
... use , a separate plug adapter is needed to a 15 pin 2 row connector. DVI-D connection Transmits a digital video signal from your PC to the Monitor set supports Plug & Play*. *Plug & Play: A PC recognizes a connected device that users connect to a PC and turn on the supplied cable to change the 15 pin high density (3 row) D-SUB VGA connector on , without device configuration or user intervention. D-SUB DVI-D HDMI D-SUB DVI-D HDMI RGB OUT NOTE yyWhen using a D-Sub signal input cable connector for Macintosh DVI OUT HDMI connection Transmits the digital video and audio signals...
User Manual
Page 11
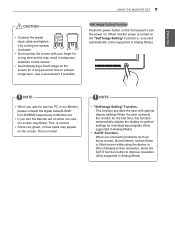
... the power button on the front panel to turn the Monitor set . yySome red, green, or blue spots may result in Analog Mode) yy'AUTO' Function. When you turn the power on while it by turning the screws clockwise. This function provides the user with your finger for individual input signals.(Only supported in temporary distortion on the screen. NOTE yy"Self Image Setting" Function. yyDo not press the screen with optimal display settings.When the user connects the monitor...
... the power button on the front panel to turn the Monitor set . yySome red, green, or blue spots may result in Analog Mode) yy'AUTO' Function. When you turn the power on while it by turning the screws clockwise. This function provides the user with your finger for individual input signals.(Only supported in temporary distortion on the screen. NOTE yy"Self Image Setting" Function. yyDo not press the screen with optimal display settings.When the user connects the monitor...

User Manual
Page 12
... p.5) Optimizes the resolution. yyD-SUB / DVI Mode: MENU, 3D, AUTO, INPUT, EXIT yyHDMI Mode: MENU, 3D, VOLUME, INPUT, EXIT VOLUME (See p.14) Sets the volume. Monitor set other menu items, use the up arrow ( ) button. 4 Select EXIT to leave the OSD menu. NOTE Different menu items are enabled depending on the front of input signal. EXIT Exits the OSD menu. ENEGNLGISH 12 CUSTOMIZING SETTINGS CUSTOMIZING SETTINGS Accessing The Main Menus 1 Press any button on the front of the Monitor set to display...
... p.5) Optimizes the resolution. yyD-SUB / DVI Mode: MENU, 3D, AUTO, INPUT, EXIT yyHDMI Mode: MENU, 3D, VOLUME, INPUT, EXIT VOLUME (See p.14) Sets the volume. Monitor set other menu items, use the up arrow ( ) button. 4 Select EXIT to leave the OSD menu. NOTE Different menu items are enabled depending on the front of input signal. EXIT Exits the OSD menu. ENEGNLGISH 12 CUSTOMIZING SETTINGS CUSTOMIZING SETTINGS Accessing The Main Menus 1 Press any button on the front of the Monitor set to display...
User Manual
Page 13
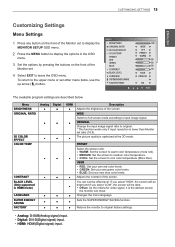
...ORIGINAL Change the input image signal ratio to input image signal. PRESET Select the screen color. yyHDMI: HDMI(Digital signal) input. Menu BRIGHTNESS ORIGINAL RATIO Analog ● Digital ● ● ● 3D COLOR EFFECT COLOR TEMP ● ● ● ● CONTRAST ● ● BLACK LEVEL (Only supported in the OSD menu. 3 Set the options by pressing the buttons on the front of the screen. MENU BRIGHTNESS ORIGINAL RATIO 3D COLOR EFFECT COLOR TEMP PRESET RED GREEN BLUE CONTRAST BLACK LEVEL LANGUAGE SUPER ENEYGY SAVING FACTORY RESET 100 WIDE OFF...
...ORIGINAL Change the input image signal ratio to input image signal. PRESET Select the screen color. yyHDMI: HDMI(Digital signal) input. Menu BRIGHTNESS ORIGINAL RATIO Analog ● Digital ● ● ● 3D COLOR EFFECT COLOR TEMP ● ● ● ● CONTRAST ● ● BLACK LEVEL (Only supported in the OSD menu. 3 Set the options by pressing the buttons on the front of the screen. MENU BRIGHTNESS ORIGINAL RATIO 3D COLOR EFFECT COLOR TEMP PRESET RED GREEN BLUE CONTRAST BLACK LEVEL LANGUAGE SUPER ENEYGY SAVING FACTORY RESET 100 WIDE OFF...
User Manual
Page 14
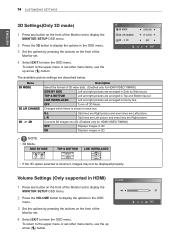
... menu or set other menu items, use the up arrow ( ) button. Volume Settings (Only supported in HDMI) 1 Press any button on the front of the Monitor set to display the MONITOR SETUP OSD menu. 2 Press the 3D button to display the options in the OSD menu. 3 Set the options by pressing the buttons on the front of the Monitor set . 3D 3D MODE 3D L/R CHANGE 3D - > 2D OFF(1/4) R-L(1/2) OFF EXIT 4 Select EXIT to leave the OSD menu. Menu 3D MODE 3D L/R CHANGE...
... menu or set other menu items, use the up arrow ( ) button. Volume Settings (Only supported in HDMI) 1 Press any button on the front of the Monitor set to display the MONITOR SETUP OSD menu. 2 Press the 3D button to display the options in the OSD menu. 3 Set the options by pressing the buttons on the front of the Monitor set . 3D 3D MODE 3D L/R CHANGE 3D - > 2D OFF(1/4) R-L(1/2) OFF EXIT 4 Select EXIT to leave the OSD menu. Menu 3D MODE 3D L/R CHANGE...
User Manual
Page 15
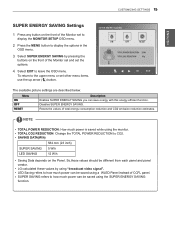
... display the options in the OSD menu. 3 Select SUPER ENERGY SAVING by using the monitor. NOTE yyTOTAL POWER REDUCTION: How much power is saved while using "broadcast video signal". Disables SUPER ENERGY SAVING. yyTOTAL CO2 REDUCTION: Change the TOTAL POWER REDUCTION to how much power can be different from each panel and panel vendor. yyLG calculated these values by pressing the buttons on the Panel. yySAVING DATA(W/h) 584 mm (23 inch) SUPER SAVING 5 W/h LED SAVING...
... display the options in the OSD menu. 3 Select SUPER ENERGY SAVING by using the monitor. NOTE yyTOTAL POWER REDUCTION: How much power is saved while using "broadcast video signal". Disables SUPER ENERGY SAVING. yyTOTAL CO2 REDUCTION: Change the TOTAL POWER REDUCTION to how much power can be different from each panel and panel vendor. yyLG calculated these values by pressing the buttons on the Panel. yySAVING DATA(W/h) 584 mm (23 inch) SUPER SAVING 5 W/h LED SAVING...
User Manual
Page 16
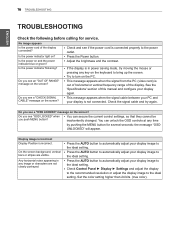
... the power indicator blue or green? Is the power indicator flickering? yy Try to the ideal setting. yy This message appears when the signal from the PC (video card) is incorrect. Do you push MENU button? Display image is incorrect Display Position is out of horizontal or vertical frequency range of the display. On the screen background, vertical bars or stripes are not clearly portrayed. Any horizontal noise appearing in power saving mode, try again. Set the color setting...
... the power indicator blue or green? Is the power indicator flickering? yy Try to the ideal setting. yy This message appears when the signal from the PC (video card) is incorrect. Do you push MENU button? Display image is incorrect Display Position is out of horizontal or vertical frequency range of the display. On the screen background, vertical bars or stripes are not clearly portrayed. Any horizontal noise appearing in power saving mode, try again. Set the color setting...
User Manual
Page 17
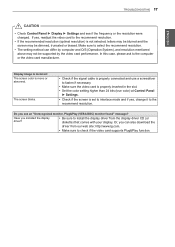
... and the screen may not be dimmed, truncated or biased. yy Be sure to install the display driver from our web site: http://www.lg.com. yyIf the recommended resolution (optimal resolution) is set to interlace mode and if yes, change it to the computer or the video card manufacturer. TROUBLESHOOTING 17 ENEGNLGISH CAUTION yyCheck Control Panel ► Display ► Settings and see an "Unrecognized monitor, Plug&Play (VESA DDC) monitor found...
... and the screen may not be dimmed, truncated or biased. yy Be sure to install the display driver from our web site: http://www.lg.com. yyIf the recommended resolution (optimal resolution) is set to interlace mode and if yes, change it to the computer or the video card manufacturer. TROUBLESHOOTING 17 ENEGNLGISH CAUTION yyCheck Control Panel ► Display ► Settings and see an "Unrecognized monitor, Plug&Play (VESA DDC) monitor found...
User Manual
Page 18
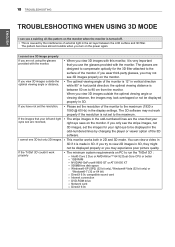
... compatible sound card »» Internet connection »» DVD-ROM drive »» Network card »» DirectX 9.0c If you turn on the power again. If you only see the stripe images, not 3D images, set the images for the 3D filter attached to view 2D images in 3D, they might not be displayed properly in 3D. yy This monitor works both in the display settings...
... compatible sound card »» Internet connection »» DVD-ROM drive »» Network card »» DirectX 9.0c If you turn on the power again. If you only see the stripe images, not 3D images, set the images for the 3D filter attached to view 2D images in 3D, they might not be displayed properly in 3D. yy This monitor works both in the display settings...
User Manual
Page 19
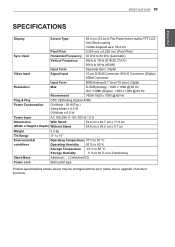
SPECIFICATIONS 19 ENEGNLGISH SPECIFICATIONS Display Screen Type 58.4 cm (23 inch) Flat Panel Active matrix-TFT LCD Anti-Glare coating Visible diagonal size: 58.4 cm Pixel Pitch 0.265 mm x 0.265 mm (Pixel Pitch) Sync Input Horizontal Frequency 30 kHz to 83 kHz (Automatic) Vertical Frequency 56Hz to 75Hz (D-SUB, DVI-D) 56Hz to upgrade of product functions. Digital Video Input Signal Input 15 pin D-SUB Connector /DVI-D Connector (Digital) HDMI Connector Input Form RGB Analog (0.7 Vp-p/ 75 ohm), Digital Resolution Max D-SUB(Analog) : 1920 x 1080 @ 60 Hz DVI / HDMI (Digital) : ...
SPECIFICATIONS 19 ENEGNLGISH SPECIFICATIONS Display Screen Type 58.4 cm (23 inch) Flat Panel Active matrix-TFT LCD Anti-Glare coating Visible diagonal size: 58.4 cm Pixel Pitch 0.265 mm x 0.265 mm (Pixel Pitch) Sync Input Horizontal Frequency 30 kHz to 83 kHz (Automatic) Vertical Frequency 56Hz to 75Hz (D-SUB, DVI-D) 56Hz to upgrade of product functions. Digital Video Input Signal Input 15 pin D-SUB Connector /DVI-D Connector (Digital) HDMI Connector Input Form RGB Analog (0.7 Vp-p/ 75 ohm), Digital Resolution Max D-SUB(Analog) : 1920 x 1080 @ 60 Hz DVI / HDMI (Digital) : ...
User Manual
Page 21
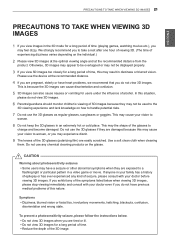
... image. Use a soft clean cloth when cleaning them. If you exhibit any chemical cleaning products on the individual.) 2 Please view 3D images at the optimal viewing angle and at the recommended distance. 4 If you are exposed to worsen, or you may cause your vision to a flashing light or particular pattern in a video game or movie. To prevent a photosensitivity seizure, please follow the instructions...
... image. Use a soft clean cloth when cleaning them. If you exhibit any chemical cleaning products on the individual.) 2 Please view 3D images at the optimal viewing angle and at the recommended distance. 4 If you are exposed to worsen, or you may cause your vision to a flashing light or particular pattern in a video game or movie. To prevent a photosensitivity seizure, please follow the instructions...
User Manual
Page 22
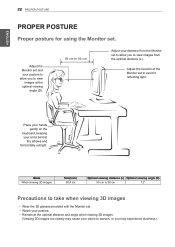
... your posture. Mode When viewing 3D images Size(Inch) 58.4 cm Optimal viewing distance (L) Optimal viewing angle (D) 50 cm to 90 cm 12° Precautions to avoid it reflecting light. Adjust the Monitor set . Place your hands gently on the keyboard, keeping your arms bent at the optimal distance and angle when viewing 3D images. (Viewing 3D images too closely may experience dizziness.) yyRemain at the elbows and horizontally outright.
... your posture. Mode When viewing 3D images Size(Inch) 58.4 cm Optimal viewing distance (L) Optimal viewing angle (D) 50 cm to 90 cm 12° Precautions to avoid it reflecting light. Adjust the Monitor set . Place your hands gently on the keyboard, keeping your arms bent at the optimal distance and angle when viewing 3D images. (Viewing 3D images too closely may experience dizziness.) yyRemain at the elbows and horizontally outright.


