Owner's Manual (English)
Page 6
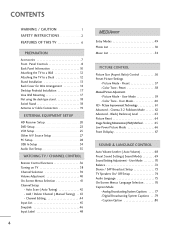
... 14 Desktop Pedestal Installation 17 Vesa Wall Mounting 17 Not using the desk-type stand 18 Swivel Stand 18 Antenna or Cable Connection 19 EXTERNAL EQUIPMENT SETUP HD Receiver Setup 20 DVD Setup 23 VCR Setup 25 Other A/V Source Setup 27 PC Setup 28 USB In Setup 34 Audio Out Setup 35 WATCHING TV / CHANNEL CONTROL Remote Control Functions 36 Turning on TV 38 Channel Selection 39 Volume Adjustment 40 On-Screen Menus Selection 41 Channel Setup - Add / Delete Channel ( Manual Tuning) . . 43 - User Mode 59 - Auto Scan ( Auto Tuning 42 - Picture Improvement Technology...
... 14 Desktop Pedestal Installation 17 Vesa Wall Mounting 17 Not using the desk-type stand 18 Swivel Stand 18 Antenna or Cable Connection 19 EXTERNAL EQUIPMENT SETUP HD Receiver Setup 20 DVD Setup 23 VCR Setup 25 Other A/V Source Setup 27 PC Setup 28 USB In Setup 34 Audio Out Setup 35 WATCHING TV / CHANNEL CONTROL Remote Control Functions 36 Turning on TV 38 Channel Selection 39 Volume Adjustment 40 On-Screen Menus Selection 41 Channel Setup - Add / Delete Channel ( Manual Tuning) . . 43 - User Mode 59 - Auto Scan ( Auto Tuning 42 - Picture Improvement Technology...
Owner's Manual (English)
Page 8
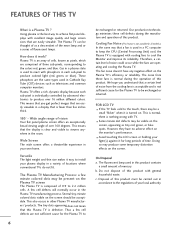
... Plasma TV to viewers anywhere in a display that the display is turned on the screen, appearing as a descendant of the neon lamp and or a series of your local authority. 6 These phosphors are easily viewable in the room. The noise from the cooling fans is acceptable and is individually controlled by advanced electronics to produce colored light (red, green, or blue). FOR LCD TV I If the TV...
... Plasma TV to viewers anywhere in a display that the display is turned on the screen, appearing as a descendant of the neon lamp and or a series of your local authority. 6 These phosphors are easily viewable in the room. The noise from the cooling fans is acceptable and is individually controlled by advanced electronics to produce colored light (red, green, or blue). FOR LCD TV I If the TV...
Owner's Manual (English)
Page 9
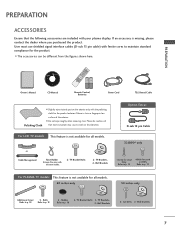
... all models. Wall Brackets 2- eye-bolts 2- Wall brackets 7 I Do not wipe roughly when removing stain. I The accessories can be cautions of the exterior. Wall Brackets Option Extras D-sub 15 pin Cable 32LB9D* only 1-Screw for stand fixing Refer to p. 12 4-Bolts for all models. 60 inches only 50 inches only Additional Cover 3 - TV Brackets, 2- If an accessory is not available for stand assembly Refer to p. 18 2- TV Bracket Bolts 2- Owner's Manual LCD TV PLASMA TV Owner's Manual http://www.lgusa.com www.lg...
... all models. Wall Brackets 2- eye-bolts 2- Wall brackets 7 I Do not wipe roughly when removing stain. I The accessories can be cautions of the exterior. Wall Brackets Option Extras D-sub 15 pin Cable 32LB9D* only 1-Screw for stand fixing Refer to p. 12 4-Bolts for all models. 60 inches only 50 inches only Additional Cover 3 - TV Brackets, 2- If an accessory is not available for stand assembly Refer to p. 18 2- TV Bracket Bolts 2- Owner's Manual LCD TV PLASMA TV Owner's Manual http://www.lgusa.com www.lg...
Owner's Manual (English)
Page 13
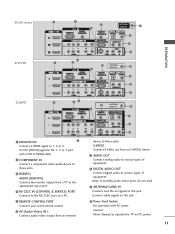
... 50/60 inches RGB /DVI 47LC7DF RGB /DVI VIDEO L/MONO AUDIO R USB IN S-VIDEO ANTENNA/ CABLE IN AV IN 2 ANTENNA/ CABLE IN 32LB9D* RGB /DVI ANTENNA/ CABLE IN HDMI/DVI IN Connect a HDMI signal to HDMI cable. Or DVI (VIDEO)signal to the 1, 2 or 3 port with AC power. COMPONENT IN Connect a component video/audio device to various types of equipment. RGB(PC) AUDIO (RGB/DVI) Connect the monitor output from an S-VIDEO device. REMOTE CONTROL PORT Connect your wired remote control. AUDIO OUT Connect analog audio to these jacks. AV (Audio/Video) IN 1 Connect audio/video output from...
... 50/60 inches RGB /DVI 47LC7DF RGB /DVI VIDEO L/MONO AUDIO R USB IN S-VIDEO ANTENNA/ CABLE IN AV IN 2 ANTENNA/ CABLE IN 32LB9D* RGB /DVI ANTENNA/ CABLE IN HDMI/DVI IN Connect a HDMI signal to HDMI cable. Or DVI (VIDEO)signal to the 1, 2 or 3 port with AC power. COMPONENT IN Connect a component video/audio device to various types of equipment. RGB(PC) AUDIO (RGB/DVI) Connect the monitor output from an S-VIDEO device. REMOTE CONTROL PORT Connect your wired remote control. AUDIO OUT Connect analog audio to these jacks. AV (Audio/Video) IN 1 Connect audio/video output from...
Owner's Manual (English)
Page 22
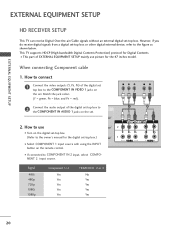
... connecting Component cable 1. Signal 480i 480p 720p 1080i 1080p Component 1/2 Yes Yes Yes Yes Yes HDMI/DVI1, 2 or 3 No Yes Yes Yes Yes 20 I Turn on the remote control. Y PB PR L R 1 2 2. I Select COMPONENT 1 input source with using the INPUT button on the digital set . However, if you do receive digital signals from a digital set -top box. Match the jack colors (Y = green, PB = blue, and PR = red). 2 Connect the audio output of EXTERNAL EQUIPMENT SETUP mainly use I This part of the digital set-top box...
... connecting Component cable 1. Signal 480i 480p 720p 1080i 1080p Component 1/2 Yes Yes Yes Yes Yes HDMI/DVI1, 2 or 3 No Yes Yes Yes Yes 20 I Turn on the remote control. Y PB PR L R 1 2 2. I Select COMPONENT 1 input source with using the INPUT button on the digital set . However, if you do receive digital signals from a digital set -top box. Match the jack colors (Y = green, PB = blue, and PR = red). 2 Connect the audio output of EXTERNAL EQUIPMENT SETUP mainly use I This part of the digital set-top box...
Owner's Manual (English)
Page 23
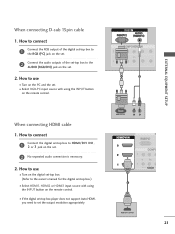
... on the set. 2 Connect the audio outputs of the set-top box to HDMI/DVI IN1, 2 or 3 jack on the PC and the set the output resolution appropriately. I Select HDMI1, HDMI2 or HDMI3 input source with using the INPUT button on the remote control. EXTERNAL EQUIPMENT SETUP When connecting D-sub 15pin cable 1. RGB 1 2 When connecting HDMI cable 1. How to connect 1 Connect the digital set-top box to the AUDIO (RGB/DVI) jack on the set -top box.) I Select RGB-PC input source with using the INPUT button on the remote control.
... on the set. 2 Connect the audio outputs of the set-top box to HDMI/DVI IN1, 2 or 3 jack on the PC and the set the output resolution appropriately. I Select HDMI1, HDMI2 or HDMI3 input source with using the INPUT button on the remote control. EXTERNAL EQUIPMENT SETUP When connecting D-sub 15pin cable 1. RGB 1 2 When connecting HDMI cable 1. How to connect 1 Connect the digital set-top box to the AUDIO (RGB/DVI) jack on the set -top box.) I Select RGB-PC input source with using the INPUT button on the remote control.
Owner's Manual (English)
Page 24
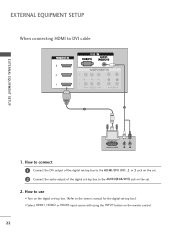
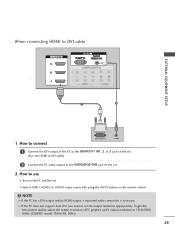
How to use I Select HDMI1, HDMI2 or HDMI3 input source with using the INPUT button on the set -top box. (Refer to the AUDIO(RGB/DVI) jack on the remote control. 22 How to connect 1 Connect the DVI output of the digital set-top box to the HDMI/DVI IN1, 2 or 3 jack on the set. 2 Connect the audio output of the digital set-top box to the owner's manual for the digital set-top box.) I Turn on the digital set . 2. EXTERNAL EQUIPMENT SETUP When connecting HDMI to DVI cable RGB 3 EXTERNAL EQUIPMENT SETUP 2 1 DVI-DTV OUTPUT L R 1.
How to use I Select HDMI1, HDMI2 or HDMI3 input source with using the INPUT button on the set -top box. (Refer to the AUDIO(RGB/DVI) jack on the remote control. 22 How to connect 1 Connect the DVI output of the digital set-top box to the HDMI/DVI IN1, 2 or 3 jack on the set. 2 Connect the audio output of the digital set-top box to the owner's manual for the digital set-top box.) I Turn on the digital set . 2. EXTERNAL EQUIPMENT SETUP When connecting HDMI to DVI cable RGB 3 EXTERNAL EQUIPMENT SETUP 2 1 DVI-DTV OUTPUT L R 1.
Owner's Manual (English)
Page 26
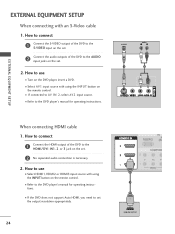
... support Auto HDMI, you need to set . 2 Connect the audio outputs of the DVD to the HDMI/DVI IN1, 2 or 3 jack on the remote control. How to AV IN 2, select A V 2 input source. I Select HDMI1, HDMI2 or HDMI3 input source with using the INPUT button on the DVD player, insert a DVD. I If connected to use I Select A V 1 input source with an S-Video cable 1. S-VIDEO AUDIO L R 1 2 EXTERNAL EQUIPMENT SETUP When connecting HDMI cable 1. I Refer to the AUDIO input jacks on the set . 2 No separated audio connection is necessary. 2. How to connect 1 Connect the HDMI output...
... support Auto HDMI, you need to set . 2 Connect the audio outputs of the DVD to the HDMI/DVI IN1, 2 or 3 jack on the remote control. How to AV IN 2, select A V 2 input source. I Select HDMI1, HDMI2 or HDMI3 input source with using the INPUT button on the DVD player, insert a DVD. I If connected to use I Select A V 1 input source with an S-Video cable 1. S-VIDEO AUDIO L R 1 2 EXTERNAL EQUIPMENT SETUP When connecting HDMI cable 1. I Refer to the AUDIO input jacks on the set . 2 No separated audio connection is necessary. 2. How to connect 1 Connect the HDMI output...
Owner's Manual (English)
Page 27
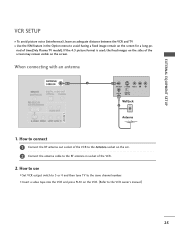
... menu to the VCR owner's manual.) 25 EXTERNAL EQUIPMENT SETUP VCR SETUP I To avoid picture noise (interference), leave an adequate distance between the VCR and TV I Use the ISM feature in socket of the VCR to the Antenna socket on the set. 2 Connect the antenna cable to the same channel number. If the 4:3 picture format is used; the fixed images on the sides of time(Only Plasma TV model). When connecting with an antenna ANTENNA/ CABLE IN 1 ANT OUT S-VIDEO VIDEO...
... menu to the VCR owner's manual.) 25 EXTERNAL EQUIPMENT SETUP VCR SETUP I To avoid picture noise (interference), leave an adequate distance between the VCR and TV I Use the ISM feature in socket of the VCR to the Antenna socket on the set. 2 Connect the antenna cable to the same channel number. If the 4:3 picture format is used; the fixed images on the sides of time(Only Plasma TV model). When connecting with an antenna ANTENNA/ CABLE IN 1 ANT OUT S-VIDEO VIDEO...
Owner's Manual (English)
Page 28
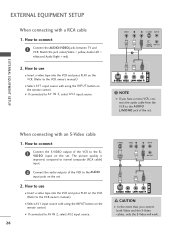
... to the VCR owner's manual.) I Insert a video tape into the VCR and press PLAY on the remote control. I If connected to the S V I If connected to the AUDIO input jacks on the set . 2. I D E O input on the set . compared to normal composite (RCA cable) input. 2 Connect the audio outputs of the set. Match the jack colors(Video = yellow, Audio Left = white,and Audio Right = red) 2. The picture quality is improved; How to use I Select AV1 input source with using the INPUT button on the...
... to the VCR owner's manual.) I Insert a video tape into the VCR and press PLAY on the remote control. I If connected to the S V I If connected to the AUDIO input jacks on the set . 2. I D E O input on the set . compared to normal composite (RCA cable) input. 2 Connect the audio outputs of the set. Match the jack colors(Video = yellow, Audio Left = white,and Audio Right = red) 2. The picture quality is improved; How to use I Select AV1 input source with using the INPUT button on the...
Owner's Manual (English)
Page 30
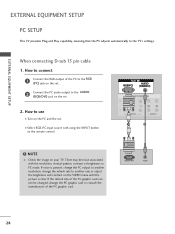
... cable 1. How to another rate or adjust the brightness and contrast on the VIDEO menu until the picture is present, change the PC output to use I Select RGB-PC input source with the resolution, vertical pattern, contrast or brightness in PC mode. RGB OUTPUT AUDIO 28 How to connect 1 Connect the RGB output of the PC graphic card. RGB 1 2 NOTE G Check the image on your TV. EXTERNAL EQUIPMENT SETUP EXTERNAL EQUIPMENT SETUP PC SETUP This TV provides Plug and Play...
... cable 1. How to another rate or adjust the brightness and contrast on the VIDEO menu until the picture is present, change the PC output to use I Select RGB-PC input source with the resolution, vertical pattern, contrast or brightness in PC mode. RGB OUTPUT AUDIO 28 How to connect 1 Connect the RGB output of the PC graphic card. RGB 1 2 NOTE G Check the image on your TV. EXTERNAL EQUIPMENT SETUP EXTERNAL EQUIPMENT SETUP PC SETUP This TV provides Plug and Play...
Owner's Manual (English)
Page 31
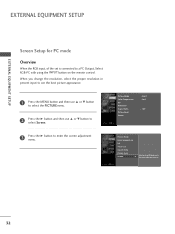
... support Auto DVI, you need to set . (Use the HDMI to DVI cable) 2 Connect the PC audio output to the AUDIO(RGB/DVI) jack on the remote control. How to connect DVI-PC OUTPUT AUDIO 1 Connect the DVI output of PC graphics card's output resolution to use I Turn on the PC and the set I Select HDMI1, HDMI2 or HDMI3 input source with using the INPUT button on the set. 2. How to 1920x1080, 60Hz. (32LB9D* model: 1360x768, 60Hz) 29 NOTE G If the PC has a DVI output and no HDMI output, a separated audio connection...
... support Auto DVI, you need to set . (Use the HDMI to DVI cable) 2 Connect the PC audio output to the AUDIO(RGB/DVI) jack on the remote control. How to connect DVI-PC OUTPUT AUDIO 1 Connect the DVI output of PC graphics card's output resolution to use I Turn on the PC and the set I Select HDMI1, HDMI2 or HDMI3 input source with using the INPUT button on the set. 2. How to 1920x1080, 60Hz. (32LB9D* model: 1360x768, 60Hz) 29 NOTE G If the PC has a DVI output and no HDMI output, a separated audio connection...

Owner's Manual (English)
Page 33
EXTERNAL EQUIPMENT SETUP Supported Display Specifications (RGB/HDMI-PC) Resolution Horizontal Vertical Frequency(KHz) Frequency(Hz) 640x350 31.468 70.09 720x400 31.469 70.08 640x480 31.469 37.861 37.500 59.94 72.80 75.00 800x600 35.156 37.879 48.077 46.875 56.25 60.31 72.18 75.00 ...23.94 30.00 29.97 Supported Display Specifications (Y, CB /PB, CR /PR) Resolution Horizontal Vertical Frequency(KHz) Frequency(Hz) 720x480 15.73 15.73 31.47 31.47 60.00 59.94 59.94 60.00 1280x720 45.00 44.96 60.00 59.94 * RGB-PC mode only: 1280x768(H-60.289, V-74.893) 1920x1080 33...
EXTERNAL EQUIPMENT SETUP Supported Display Specifications (RGB/HDMI-PC) Resolution Horizontal Vertical Frequency(KHz) Frequency(Hz) 640x350 31.468 70.09 720x400 31.469 70.08 640x480 31.469 37.861 37.500 59.94 72.80 75.00 800x600 35.156 37.879 48.077 46.875 56.25 60.31 72.18 75.00 ...23.94 30.00 29.97 Supported Display Specifications (Y, CB /PB, CR /PR) Resolution Horizontal Vertical Frequency(KHz) Frequency(Hz) 720x480 15.73 15.73 31.47 31.47 60.00 59.94 59.94 60.00 1280x720 45.00 44.96 60.00 59.94 * RGB-PC mode only: 1280x768(H-60.289, V-74.893) 1920x1080 33...
Owner's Manual (English)
Page 34
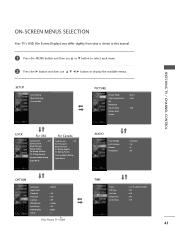
... Ratio Picture Reset Screen : User1 : Cool : 16:9 Picture Mode Color Temperature XD Advanced Aspect Ratio Picture Reset Screen G Selection ( G or ) leads you change the resolution, select the proper resolution in present input to see the best picture appearance. 1 Press the MENU button and then use D or E button to select the PICTURE menu. 2 Press the G button and then use D or E button to select Screen. 3 Press the G button to the screen adjustment menu. 32 When you to enter the screen adjustment menu. EXTERNAL EQUIPMENT SETUP EXTERNAL EQUIPMENT SETUP Screen Setup...
... Ratio Picture Reset Screen : User1 : Cool : 16:9 Picture Mode Color Temperature XD Advanced Aspect Ratio Picture Reset Screen G Selection ( G or ) leads you change the resolution, select the proper resolution in present input to see the best picture appearance. 1 Press the MENU button and then use D or E button to select the PICTURE menu. 2 Press the G button and then use D or E button to select Screen. 3 Press the G button to the screen adjustment menu. 32 When you to enter the screen adjustment menu. EXTERNAL EQUIPMENT SETUP EXTERNAL EQUIPMENT SETUP Screen Setup...
Owner's Manual (English)
Page 39
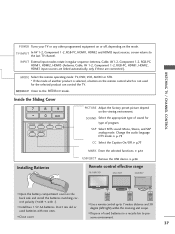
... MEDIA HOST WATCHING TV / CHANNEL CONTROL POWER Turns your TV or any other programmed equipment on or off, depending on the viewing environment. MODE Select the remote operating mode: TV, DVD, VCR, AUDIO or STB. * If the mode of program. SOUND Select the appropriate type of sound for type of another product is selected, a button on the back side and install the batteries matching correct polarity (+with +,-with new ones. Change the audio...
... MEDIA HOST WATCHING TV / CHANNEL CONTROL POWER Turns your TV or any other programmed equipment on or off, depending on the viewing environment. MODE Select the remote operating mode: TV, DVD, VCR, AUDIO or STB. * If the mode of program. SOUND Select the appropriate type of sound for type of another product is selected, a button on the back side and install the batteries matching correct polarity (+with +,-with new ones. Change the audio...
Owner's Manual (English)
Page 43
... Ratio Picture Reset Screen : User1 : Cool : 16:9 LOCK For USA Lock System : Off Set Password Block Channel Movie Rating TV Rating-Children TV Rating-General Downloadable Rating Input Block For Canada Lock System Set Password Block Channel TV Rating-English TV Rating-French : Off Downloadable Rating Input Block AUDIO Sound Mode Auto Volume Balance TV Speaker : Standard : On : 0 : On OPTION Language Input Label SimpLink Key Lock Caption ISM Method Low Power Front Display Set ID : English : Off : Off : Off : Orbiter : Off : Bright : 1 Only Plasma TV model TIME...
... Ratio Picture Reset Screen : User1 : Cool : 16:9 LOCK For USA Lock System : Off Set Password Block Channel Movie Rating TV Rating-Children TV Rating-General Downloadable Rating Input Block For Canada Lock System Set Password Block Channel TV Rating-English TV Rating-French : Off Downloadable Rating Input Block AUDIO Sound Mode Auto Volume Balance TV Speaker : Standard : On : 0 : On OPTION Language Input Label SimpLink Key Lock Caption ISM Method Low Power Front Display Set ID : English : Off : Off : Off : Orbiter : Off : Bright : 1 Only Plasma TV model TIME...
Owner's Manual (English)
Page 48
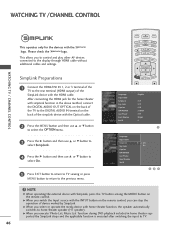
... the media device with home theater function, the speaker automatically switches to home theater speaker (HT speaker). After connecting the HDMI jack for the devices with the logo. G When you switch the Input source with the INPUT button on the remote control, you execute 'Photo List, Music List 'function during DVD playback included in the above method, connect the DIGITAL AUDIO OUT OPTICAL on the back of device worked by SimpLink. WATCHING TV /CHANNEL CONTROL...
... the media device with home theater function, the speaker automatically switches to home theater speaker (HT speaker). After connecting the HDMI jack for the devices with the logo. G When you switch the Input source with the INPUT button on the remote control, you execute 'Photo List, Music List 'function during DVD playback included in the above method, connect the DIGITAL AUDIO OUT OPTICAL on the back of device worked by SimpLink. WATCHING TV /CHANNEL CONTROL...
Owner's Manual (English)
Page 51
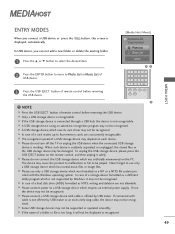
.... [Media Host Menu] MEDIA HOST 2 Press the ENTER button to move to Photo List or Music List of USB device. 3 Press the USB EJECT button of remote control before removing the USB device. The recognition speed of a folder or file is not recognizable. When such device is displayed, automatically. Please do not turn off the TV or unplug the USB device when the connected USB storage device is working. Never...
.... [Media Host Menu] MEDIA HOST 2 Press the ENTER button to move to Photo List or Music List of USB device. 3 Press the USB EJECT button of remote control before removing the USB device. The recognition speed of a folder or file is not recognizable. When such device is displayed, automatically. Please do not turn off the TV or unplug the USB device when the connected USB storage device is working. Never...
Owner's Manual (English)
Page 88
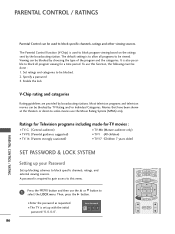
... specific channels, ratings, and external viewing sources. The default setting is used to be blocked by choosing the type of the program and the categories. The Parental Control Function (V-Chip) is to block program viewing based on the ratings sent by broadcasting stations. I Enter the password as requested. Specify a password 3. Ratings for Television programs including made-for a time period. Then, press the G button. Enter Password 86 BACK PICTURE SOUND SAP CC BACK TV INPUT...
... specific channels, ratings, and external viewing sources. The default setting is used to be blocked by choosing the type of the program and the categories. The Parental Control Function (V-Chip) is to block program viewing based on the ratings sent by broadcasting stations. I Enter the password as requested. Specify a password 3. Ratings for Television programs including made-for a time period. Then, press the G button. Enter Password 86 BACK PICTURE SOUND SAP CC BACK TV INPUT...
Owner's Manual (English)
Page 111
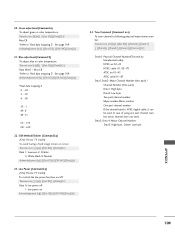
...][Data][x] 23. In case of using one part channel number, minor channel does not need. Acknowledgement [w][ ][Set ID][ ][OK/NG][Data][x] 21. Blue adjustment(Command:$) To adjust blue in color temperature. Transmission [k][$][ ][Set ID][][Data][Cr] Data Min:0 ~ Max:C8 *Refer to following physical/major/minor num ber. ISM Method/Orbiter (Command2:p) (Only Plasma TV model) To avoid having a fixed image remain on Acknowledgement [q][ ][Set ID][ ][OK/NG][Data...
...][Data][x] 23. In case of using one part channel number, minor channel does not need. Acknowledgement [w][ ][Set ID][ ][OK/NG][Data][x] 21. Blue adjustment(Command:$) To adjust blue in color temperature. Transmission [k][$][ ][Set ID][][Data][Cr] Data Min:0 ~ Max:C8 *Refer to following physical/major/minor num ber. ISM Method/Orbiter (Command2:p) (Only Plasma TV model) To avoid having a fixed image remain on Acknowledgement [q][ ][Set ID][ ][OK/NG][Data...


