

Owners Manual
Page 1
See the label attached on the back cover and relate this information to your TV. Model Number : Serial Number : LG Electronics U.S.A., Inc. PLASMA TV OWNER'S MANUAL MODELS: 50PY2DR 50PY2DRH 60PY2DR 60PY2DRH 50PX4DR 50PX4DRH 50PY2DR-UA 50PY2DRH-UA 60PY2DR-UA 60PY2DRH-UA 50PX4DR-UA 50PX4DRH-UA R TruSurround XT TM Please read this manual carefully and completely before operating your dealer if you require service. Retain this manual for future reference. Record model number and serial number of the TV in the spaces provided below.
See the label attached on the back cover and relate this information to your TV. Model Number : Serial Number : LG Electronics U.S.A., Inc. PLASMA TV OWNER'S MANUAL MODELS: 50PY2DR 50PY2DRH 60PY2DR 60PY2DRH 50PX4DR 50PX4DRH 50PY2DR-UA 50PY2DRH-UA 60PY2DR-UA 60PY2DRH-UA 50PX4DR-UA 50PX4DRH-UA R TruSurround XT TM Please read this manual carefully and completely before operating your dealer if you require service. Retain this manual for future reference. Record model number and serial number of the TV in the spaces provided below.

Owners Manual
Page 2
...to operate the equipment. Increase the separation between the equipment and receiver. - Consult the dealer or an experienced radio/TV technician for help. • Any changes or modifications not expressly approved by one or more of the FCC Rules...The lightning flash with the instructions, may be determined by turning the equipment off and on a circuit different from LG Electronics. Warning/Caution Warning/Caution WARNING/CAUTION RISK OF ELECTRIC SHOCK DO NOT OPEN WARNING/CAUTION: TO REDUCE THE ...FIRE AND ELECTRIC SHOCK, DO NOT EXPOSE THIS PRODUCT TO RAIN OR MOISTURE. 2 Plasma TV
...to operate the equipment. Increase the separation between the equipment and receiver. - Consult the dealer or an experienced radio/TV technician for help. • Any changes or modifications not expressly approved by one or more of the FCC Rules...The lightning flash with the instructions, may be determined by turning the equipment off and on a circuit different from LG Electronics. Warning/Caution Warning/Caution WARNING/CAUTION RISK OF ELECTRIC SHOCK DO NOT OPEN WARNING/CAUTION: TO REDUCE THE ...FIRE AND ELECTRIC SHOCK, DO NOT EXPOSE THIS PRODUCT TO RAIN OR MOISTURE. 2 Plasma TV

Owners Manual
Page 4
... power cord from being walked on or pinched particularly at plugs, convenience receptacles, and the point where they exit from tip-over. PORTABLE CART WARNING 4 Plasma TV Read these instructions. 3. A polarized plug has two blades with each apparatus. This information shall be given in a separate booklet or sheet, or be included by...
... power cord from being walked on or pinched particularly at plugs, convenience receptacles, and the point where they exit from tip-over. PORTABLE CART WARNING 4 Plasma TV Read these instructions. 3. A polarized plug has two blades with each apparatus. This information shall be given in a separate booklet or sheet, or be included by...
Owners Manual
Page 6
...Introduction Controls/Connection Options 8~11 Remote Control Key Functions 12~13 Installation Accessories 14 Installation Instructions Joining the TV assembly to the wall to protect the set tumbling 14 Install the RING SPACER with the bolts on the...Sleep Timer / Auto Off 47 Option Menu Features Advanced 48 Cinema 3:2 Mode Setup 48 Low Power 48 LG Logo 49 Aspect Ratio Control 50 Caption 51 Caption / Text 51 Caption Option 52 ISM Method 53 ... 128 Maintenance 129 Product Specifications 130 Warranty 131~132 6 Plasma TV After reading this manual, keep it handy for future reference.
...Introduction Controls/Connection Options 8~11 Remote Control Key Functions 12~13 Installation Accessories 14 Installation Instructions Joining the TV assembly to the wall to protect the set tumbling 14 Install the RING SPACER with the bolts on the...Sleep Timer / Auto Off 47 Option Menu Features Advanced 48 Cinema 3:2 Mode Setup 48 Low Power 48 LG Logo 49 Aspect Ratio Control 50 Caption 51 Caption / Text 51 Caption Option 52 ISM Method 53 ... 128 Maintenance 129 Product Specifications 130 Warranty 131~132 6 Plasma TV After reading this manual, keep it handy for future reference.

Owners Manual
Page 8
... for 3-4 seconds before the picture is turned on the 50PY2DR, 50PY2DRH, 60PY2DR, 60PY2DRH series TVs. Program Display RGB-PC(or RGB-DTV) mode IEEE1394 mode HDMI1/DVI or HDMI2 mode Component1 or 2 mode Antenna or Cable mode Video or Front Video mode 8 Plasma TV Power Standby Indicator Illuminates orange in standby mode. When the...
... for 3-4 seconds before the picture is turned on the 50PY2DR, 50PY2DRH, 60PY2DR, 60PY2DRH series TVs. Program Display RGB-PC(or RGB-DTV) mode IEEE1394 mode HDMI1/DVI or HDMI2 mode Component1 or 2 mode Antenna or Cable mode Video or Front Video mode 8 Plasma TV Power Standby Indicator Illuminates orange in standby mode. When the...

Owners Manual
Page 10
Here shown may be somewhat different from your TV. This is a front panel of front panel. Front Panel Controls INDEX Switches LED TV GUIDE Display on , the indicator will blink green for 3-4 seconds before the picture is turned on or off. When the TV is seen. 10 Plasma TV Introduction Controls W This is a simplified representation of 50PX4DR, 50PX4DRH series TVs. - TV GUIDE CHANNEL (E, D) Buttons VOLUME (F,G) Buttons MENU Button TV/VIDEO Button TV GUIDE Button Remote Control Sensor POWER Button Power Standby Indicator Illuminates orange in standby mode.
Here shown may be somewhat different from your TV. This is a front panel of front panel. Front Panel Controls INDEX Switches LED TV GUIDE Display on , the indicator will blink green for 3-4 seconds before the picture is turned on or off. When the TV is seen. 10 Plasma TV Introduction Controls W This is a simplified representation of 50PX4DR, 50PX4DRH series TVs. - TV GUIDE CHANNEL (E, D) Buttons VOLUME (F,G) Buttons MENU Button TV/VIDEO Button TV GUIDE Button Remote Control Sensor POWER Button Power Standby Indicator Illuminates orange in standby mode.

Owners Manual
Page 12
...Text1~4. DAY+/DAYMoves the Listings Grid forward or backward in DTV mode. PAGE UP/PAGE DOWN Moves from one full set of selected mode. 12 Plasma TV Change the audio language in 24 hour increments. SAP Selects MTS sound: Mono, Stereo, and SAP in • IEEE 1394 mode. • ...video cassette • recorders or DVD players when you to navigate the on-screen menus and adjust the system settings to the next one. TV INPUT TV/VIDEO MODE DAY - RATIO Changes the aspect ratio. M/C EJECT Remove the Memory Card. Bring up the HOME menu to the last channel ...
...Text1~4. DAY+/DAYMoves the Listings Grid forward or backward in DTV mode. PAGE UP/PAGE DOWN Moves from one full set of selected mode. 12 Plasma TV Change the audio language in 24 hour increments. SAP Selects MTS sound: Mono, Stereo, and SAP in • IEEE 1394 mode. • ...video cassette • recorders or DVD players when you to navigate the on-screen menus and adjust the system settings to the next one. TV INPUT TV/VIDEO MODE DAY - RATIO Changes the aspect ratio. M/C EJECT Remove the Memory Card. Bring up the HOME menu to the last channel ...

Owners Manual
Page 14
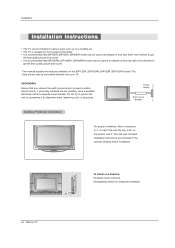
... G-LINK Cable 6-RING SPACER (Only 60PY2DR/60PY2DRH series) 6- Here shown may be sure the eye-bolts and the brackets are included with the product), as shown. Secure the TV assembly by joining it to be somewhat different from your plasma display. Match the height of the ... contact the dealer where you purchased the product. Check to a wall by using the TV/Wall brackets. - Installation Installation Accessories Ensure that the following accessories are tightened securely. 14 Plasma TV Install the wall brackets on a desk top, insert the 2 eye-bolts and tighten them...
... G-LINK Cable 6-RING SPACER (Only 60PY2DR/60PY2DRH series) 6- Here shown may be sure the eye-bolts and the brackets are included with the product), as shown. Secure the TV assembly by joining it to be somewhat different from your plasma display. Match the height of the ... contact the dealer where you purchased the product. Check to a wall by using the TV/Wall brackets. - Installation Installation Accessories Ensure that the following accessories are tightened securely. 14 Plasma TV Install the wall brackets on a desk top, insert the 2 eye-bolts and tighten them...
Owners Manual
Page 16
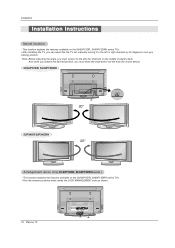
... side and the top, 2.36" on the 50PY2DR, 50PY2DRH, 60PY2DR, 60PY2DRH series TVs. - If grounding methods are included in various ways such as on a desktop etc. • The TV is designed to prevent possible electric shock. This manual explains the ...pipes. Installation Installation Instructions • The TV can be installed in the optional Desktop Stand Installation. 4 inches 4 inches 4 inches 2.36 inches 2 inches To Install on a Desktop Pedestal mount minimum allowableclearances for adequate ventilation. 16 Plasma TV Detailed installation instructions are not possible, have...
... side and the top, 2.36" on the 50PY2DR, 50PY2DRH, 60PY2DR, 60PY2DRH series TVs. - If grounding methods are included in various ways such as on a desktop etc. • The TV is designed to prevent possible electric shock. This manual explains the ...pipes. Installation Installation Instructions • The TV can be installed in the optional Desktop Stand Installation. 4 inches 4 inches 4 inches 2.36 inches 2 inches To Install on a Desktop Pedestal mount minimum allowableclearances for adequate ventilation. 16 Plasma TV Detailed installation instructions are not possible, have...
Owners Manual
Page 18
... back. This function explains the features available on the 50/60PY2DR, 50/60PY2DRH series TVs. • After installing the TV, you can adjust the the TV set manually turning it to set the hole.(As shown below) 50/60PY2DR, 50/60PY2DRH 50PX4DR/50PX4DRH 20° 20° Arrangement...20 degrees to suit your viewing position. This function explains the features available on the 50/60PY2DR, 50/60PY2DRH series TVs. • Run the accessory device wires inside the JACK MANAGEMENT pole as shown. 18 Plasma TV RS-232C INPUT (CONTROL/SERVICE) VIDEO INPUT AUDIO INPUT L R VIDEO L AUDIO R ...
... back. This function explains the features available on the 50/60PY2DR, 50/60PY2DRH series TVs. • After installing the TV, you can adjust the the TV set manually turning it to set the hole.(As shown below) 50/60PY2DR, 50/60PY2DRH 50PX4DR/50PX4DRH 20° 20° Arrangement...20 degrees to suit your viewing position. This function explains the features available on the 50/60PY2DR, 50/60PY2DRH series TVs. • Run the accessory device wires inside the JACK MANAGEMENT pole as shown. 18 Plasma TV RS-232C INPUT (CONTROL/SERVICE) VIDEO INPUT AUDIO INPUT L R VIDEO L AUDIO R ...
Owners Manual
Page 20
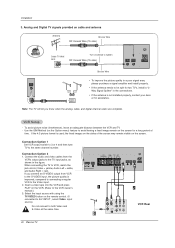
.... Signal Amplifier • If the antenna is improved; Connection Option 1 Set VCR output switch to 3 or 4 and then tune TV to be split for two TV's, install a "2Way Signal Splitter" in a poor signal area, ANTENNA please purchase a signal amplifier and install properly. • If...REMOTE CABLE CONTROL ANTENNA S-VIDEO AC INPUT 1 2 ANT OUT ANT IN S-VIDEO OUT OUTPUT (R) AUDIO (L) SWITCH 3 4 IN VIDEO VCR Rear 20 Plasma TV Analog and Digital TV signals provided on the screen. VCR Setup - To avoid picture noise (interference), leave an adequate distance between the VCR and...
.... Signal Amplifier • If the antenna is improved; Connection Option 1 Set VCR output switch to 3 or 4 and then tune TV to be split for two TV's, install a "2Way Signal Splitter" in a poor signal area, ANTENNA please purchase a signal amplifier and install properly. • If...REMOTE CABLE CONTROL ANTENNA S-VIDEO AC INPUT 1 2 ANT OUT ANT IN S-VIDEO OUT OUTPUT (R) AUDIO (L) SWITCH 3 4 IN VIDEO VCR Rear 20 Plasma TV Analog and Digital TV signals provided on the screen. VCR Setup - To avoid picture noise (interference), leave an adequate distance between the VCR and...
Owners Manual
Page 22
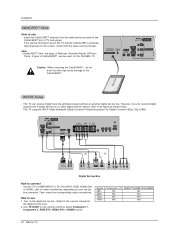
...DTV OUTPUT HDMI-DTV OUTPUT DIGITAL AUDIO OPTICAL (R) AUDIO (L) B R Digital Set-top Box How to connect Use the TV's COMPONENT (Y, PB, PR) INPUT, RGB, HDMI1/DVI or HDMI2 jack for this PLASMA TV. Signal 480i 480p 720p 1080i Component 1/2 Yes Yes Yes Yes RGB-DTV,HDMI1/DVI,HDMI2 No Yes Yes Yes... 22 Plasma TV If the pairing information about this may cause damage to the CableCARDTTMM slot of TV back panel. IEEE-1394 HDMI 2 HDMI1 /DVI RS-232C INPUT (CONTROL/SERVICE) OUTPUT COMPONENT2 INPUT DVI ...
...DTV OUTPUT HDMI-DTV OUTPUT DIGITAL AUDIO OPTICAL (R) AUDIO (L) B R Digital Set-top Box How to connect Use the TV's COMPONENT (Y, PB, PR) INPUT, RGB, HDMI1/DVI or HDMI2 jack for this PLASMA TV. Signal 480i 480p 720p 1080i Component 1/2 Yes Yes Yes Yes RGB-DTV,HDMI1/DVI,HDMI2 No Yes Yes Yes... 22 Plasma TV If the pairing information about this may cause damage to the CableCARDTTMM slot of TV back panel. IEEE-1394 HDMI 2 HDMI1 /DVI RS-232C INPUT (CONTROL/SERVICE) OUTPUT COMPONENT2 INPUT DVI ...

Owners Manual
Page 26
...or PC) supporting Auto HDMI/DVI function, the output resolution of SETUP menu.(Refer to P.41) TV/VIDEO button is necessary. 3. A separated audio connection is also available for this purpose. 26 Plasma TV If the source device has a fiber optic digital audio output, connect the audio output to AUDIO... INPUT port located on the SETUP menu. (Refer to P.41) TV/VIDEO button is necessary because HDMI-to HDMI1/DVI or HDMI2...
...or PC) supporting Auto HDMI/DVI function, the output resolution of SETUP menu.(Refer to P.41) TV/VIDEO button is necessary. 3. A separated audio connection is also available for this purpose. 26 Plasma TV If the source device has a fiber optic digital audio output, connect the audio output to AUDIO... INPUT port located on the SETUP menu. (Refer to P.41) TV/VIDEO button is necessary because HDMI-to HDMI1/DVI or HDMI2...
Owners Manual
Page 28
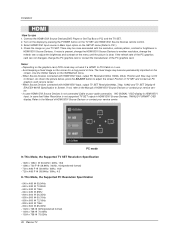
... Source Devices or contact your service center. As shown the picture below, press the ADJUST button to Screen. PC mode In This Mode, the Supported TV SET Resolution Specification - 1920 x 1080 I @ 59.94Hz / 60Hz, 16:9 - 1280 x 720 P @ 59.94Hz / 60Hz, 16:9(preferred format) - 720 x 480 P @ 59.94Hz / 60Hz, 16....06Hz - 1024 x 768 @ 60Hz(preferred format) - 1024 x 768 @ 70.06Hz - 1024 x 768 @ 75.02Hz 28 Plasma TV Connect the HDMI1/DVI Source Devices(DVD Player or Set Top Box or PC) and the TV SET. 2. Notes: - The fixed image may not fit to adjust the screen Position of time. When Source...
... Source Devices or contact your service center. As shown the picture below, press the ADJUST button to Screen. PC mode In This Mode, the Supported TV SET Resolution Specification - 1920 x 1080 I @ 59.94Hz / 60Hz, 16:9 - 1280 x 720 P @ 59.94Hz / 60Hz, 16:9(preferred format) - 720 x 480 P @ 59.94Hz / 60Hz, 16....06Hz - 1024 x 768 @ 60Hz(preferred format) - 1024 x 768 @ 70.06Hz - 1024 x 768 @ 75.02Hz 28 Plasma TV Connect the HDMI1/DVI Source Devices(DVD Player or Set Top Box or PC) and the TV SET. 2. Notes: - The fixed image may not fit to adjust the screen Position of time. When Source...
Owners Manual
Page 30
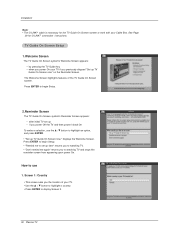
...Country • This screen asks you power Off the TV and then power it back On To make a selection, use 1. if you the location of the TV Guide On Screen system. How to display Screen 2. 30 Plasma TV after initial TV set up TV Guide On Screen now" on the Reminder Screen. ...Press ENTER to begin Setup. 2.Reminder Screen The TV Guide On Screen system's Reminder Screen appears: -- when ...
...Country • This screen asks you power Off the TV and then power it back On To make a selection, use 1. if you the location of the TV Guide On Screen system. How to display Screen 2. 30 Plasma TV after initial TV set up TV Guide On Screen now" on the Reminder Screen. ...Press ENTER to begin Setup. 2.Reminder Screen The TV Guide On Screen system's Reminder Screen appears: -- when ...
Owners Manual
Page 32
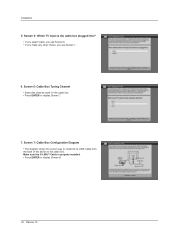
Make sure the G-LINKTM Cable is the cable box plugged into? • If you select Cable, you see Screen 6. • If you make any other choice, you see Screen 7 . 6. Screen 5: Which TV input is properly installed. • Press ENTER to display Screen 8. 32 Plasma TV Screen 7: Cable Box Configuration Diagram • The diagram shows the correct way to install the G-LINK Cable from the back of the device to display Screen 7. 7. Installation 5. Screen 6: Cable Box Tuning Channel • Select the channel used for the cable box. • Press ENTER to the cable box.
Make sure the G-LINKTM Cable is the cable box plugged into? • If you select Cable, you see Screen 6. • If you make any other choice, you see Screen 7 . 6. Screen 5: Which TV input is properly installed. • Press ENTER to display Screen 8. 32 Plasma TV Screen 7: Cable Box Configuration Diagram • The diagram shows the correct way to install the G-LINK Cable from the back of the device to display Screen 7. 7. Installation 5. Screen 6: Cable Box Tuning Channel • Select the channel used for the cable box. • Press ENTER to the cable box.

Owners Manual
Page 34
Screen 12: Do you have an antenna connected? •If you select Yes, you see Screen 1. 14. Screen 13: Are your basic settings correct? •If you select Yes, you see Screen 14. •If you select No, you see Screen 13. 13. Screen 14: Congratulations •Press ENTER to receive a channel lineup and listings. •If you select No, you see Screen 13. Installation 12. Note: •If you selected No in Screen 3 then you must select Yes in this screen to display Screen 15. 34 Plasma TV
Screen 12: Do you have an antenna connected? •If you select Yes, you see Screen 1. 14. Screen 13: Are your basic settings correct? •If you select Yes, you see Screen 14. •If you select No, you see Screen 13. 13. Screen 14: Congratulations •Press ENTER to receive a channel lineup and listings. •If you select No, you see Screen 13. Installation 12. Note: •If you selected No in Screen 3 then you must select Yes in this screen to display Screen 15. 34 Plasma TV

Owners Manual
Page 36
... to, even if you turn TV on, press the ,TV/VIDEO , CH (D / E) button on the TV or press the POWER, TV/VIDEO, TV INPUT, CH (D/E), Number (0 ~ 9) button on the remote control. 2. When finished using TV/VIDEO, TV INPUT button on the TV, it was unplugged and then powered On. 36 Plasma TV Operation Operation Turning the TV On 1. The screen may...
... to, even if you turn TV on, press the ,TV/VIDEO , CH (D / E) button on the TV or press the POWER, TV/VIDEO, TV INPUT, CH (D/E), Number (0 ~ 9) button on the remote control. 2. When finished using TV/VIDEO, TV INPUT button on the TV, it was unplugged and then powered On. 36 Plasma TV Operation Operation Turning the TV On 1. The screen may...

Owners Manual
Page 38
Press the G button and then use D / E button to select your language. 1. The menus can be shown in the selected language. From this point on, the on-screen menus will be shown on the screen in the selected language. 4. Press the MENU button and then use D / E button to select the OPTION menu. 2. First select your desired language. Press EXIT button to return to TV viewing or press MENU button to return to select Language. 3. Press the G button and then use D / E button to the previous menu. 38 Plasma TV Operation TV Setup On-screen Menus Language Selection -
Press the G button and then use D / E button to select your language. 1. The menus can be shown in the selected language. From this point on, the on-screen menus will be shown on the screen in the selected language. 4. Press the MENU button and then use D / E button to select the OPTION menu. 2. First select your desired language. Press EXIT button to return to TV viewing or press MENU button to return to select Language. 3. Press the G button and then use D / E button to the previous menu. 38 Plasma TV Operation TV Setup On-screen Menus Language Selection -

Owners Manual
Page 40
... deleted from the Custom List are received to your antenna or digital cable input. DTV Signal Strength - Press EXIT button to return to TV viewing or press MENU button to return to select the SETUP menu. 2. Once a channel is highlighted you are to select the SETUP ... delete the channel by referring to see a screen filled with ENTER button. Press the MENU button and then use D / E button to the previous menu. 40 Plasma TV Use D / E / F / G button to select a channel and then use D / E button to the previous menu. Press the G button. A custom list can ...
... deleted from the Custom List are received to your antenna or digital cable input. DTV Signal Strength - Press EXIT button to return to TV viewing or press MENU button to return to select the SETUP menu. 2. Once a channel is highlighted you are to select the SETUP ... delete the channel by referring to see a screen filled with ENTER button. Press the MENU button and then use D / E button to the previous menu. 40 Plasma TV Use D / E / F / G button to select a channel and then use D / E button to the previous menu. Press the G button. A custom list can ...


