

Owners Manual
Page 1
Record model number and serial number of the set . See the label attached on the back cover and quote this manual carefully before operating your dealer when you require service. Retain it for future reference. PLASMA MONITOR MODELS: 42PM4M 50PM4M 60PM4M OWNER'S MANUAL Please read this information to your set .
Record model number and serial number of the set . See the label attached on the back cover and quote this manual carefully before operating your dealer when you require service. Retain it for future reference. PLASMA MONITOR MODELS: 42PM4M 50PM4M 60PM4M OWNER'S MANUAL Please read this information to your set .
Owners Manual
Page 3
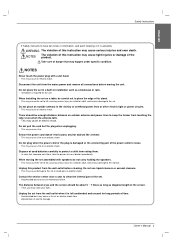
... to the monitor. NOTES The violation of this instruction may cause an electric shock. Do not pull the cord but the plug when unplugging. - Owner's Manual 3 This may cause the set from the wall outlet before moving the set in a built-in the vicinity of overhead power lines or other electric...
... to the monitor. NOTES The violation of this instruction may cause an electric shock. Do not pull the cord but the plug when unplugging. - Owner's Manual 3 This may cause the set from the wall outlet before moving the set in a built-in the vicinity of overhead power lines or other electric...

Owners Manual
Page 5
...original factory settings) . . .31 External Control Device Setup 32~37 IR Code 38~39 Troubleshooting Checklist 40 Product Specifications 41 After reading this manual, keep it handy for future reference. Black level 20 Reset 20 Sound Menu Options SSM 21 AVL (Auto Volume Leveler 21 Balance 22 Speaker...ISM (Image Sticking Minimization) Method . . . .25 Tile mode 26~27 Low Power 27 XD DEMO 28 Screen Menu Options Auto Configure 29 Manual Configure 29 Selecting XGA mode 30 Setting the Picture Format 30 Initializing (Reset to your PC 12~13 Watching RGB Outputs 13 When watching VCR...
...original factory settings) . . .31 External Control Device Setup 32~37 IR Code 38~39 Troubleshooting Checklist 40 Product Specifications 41 After reading this manual, keep it handy for future reference. Black level 20 Reset 20 Sound Menu Options SSM 21 AVL (Auto Volume Leveler 21 Balance 22 Speaker...ISM (Image Sticking Minimization) Method . . . .25 Tile mode 26~27 Low Power 27 XD DEMO 28 Screen Menu Options Auto Configure 29 Manual Configure 29 Selecting XGA mode 30 Setting the Picture Format 30 Initializing (Reset to your PC 12~13 Watching RGB Outputs 13 When watching VCR...
Owners Manual
Page 7
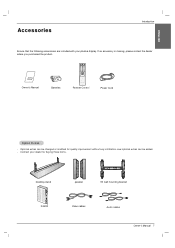
Owner's Manual 1.5V 1.5V Batteries POWER AV INPUT SLEEP PSM ARC AUTO 1 2 3 4 5 6 7 8 9 0 MENU EXIT SET MUTE * Remote Control Power Cord Option Extras - Optional extras can be changed ... Tilt wall mounting bracket ACNTAEBLNENA M.P.I. Contract your plasma display. CABLE OUT AUX CONTROL DISPLAY CONTROL AC OUT AC IN D-BOX Video cables Audio cables Owner's Manual 7 If an accessory is missing, please contact the dealer where you purchased the product. ENGLISH Accessories Introduction Ensure that the following accessories are included with...
Owner's Manual 1.5V 1.5V Batteries POWER AV INPUT SLEEP PSM ARC AUTO 1 2 3 4 5 6 7 8 9 0 MENU EXIT SET MUTE * Remote Control Power Cord Option Extras - Optional extras can be changed ... Tilt wall mounting bracket ACNTAEBLNENA M.P.I. Contract your plasma display. CABLE OUT AUX CONTROL DISPLAY CONTROL AC OUT AC IN D-BOX Video cables Audio cables Owner's Manual 7 If an accessory is missing, please contact the dealer where you purchased the product. ENGLISH Accessories Introduction Ensure that the following accessories are included with...
Owners Manual
Page 9
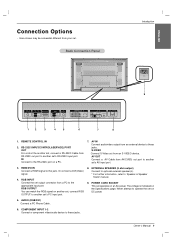
... another set, connect a RS-232C Cable from an external device to these jacks. HDMI/DVI IN Connect a HDMI signal to 'Speaker & Speaker Stand' manual. 9. EXTERNAL SPEAKER (8 ohm output) Connect to optional external speaker(s). * For further information, refer to this jack. RS-232C INPUT(CONTROL&SERVICE) PORT .../audio device to the RS-232C port on a PC. 7. IN Connect to these jacks. AUDIO (RGB/DVI) Connect a PC Phone Cable. 6. Owner's Manual 9 Here shown may be somewhat different from an S-VIDEO device. S-VIDEO Connect S-Video out from your set 's AV input port. 3.
... another set, connect a RS-232C Cable from an external device to these jacks. HDMI/DVI IN Connect a HDMI signal to 'Speaker & Speaker Stand' manual. 9. EXTERNAL SPEAKER (8 ohm output) Connect to optional external speaker(s). * For further information, refer to this jack. RS-232C INPUT(CONTROL&SERVICE) PORT .../audio device to the RS-232C port on a PC. 7. IN Connect to these jacks. AUDIO (RGB/DVI) Connect a PC Phone Cable. 6. Owner's Manual 9 Here shown may be somewhat different from an S-VIDEO device. S-VIDEO Connect S-Video out from your set 's AV input port. 3.
Owners Manual
Page 11
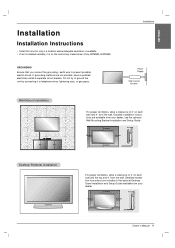
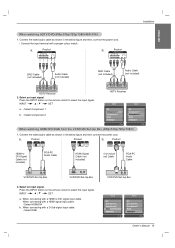
...and the top and 4" from the wall. If grounding methods are available from your dealer. 4 inches 4 inches 4 inches 4 inches Owner's Manual 11 Detailed installation instructions are included in a location where adequate ventilation is available. • If set is on the control key toward down (...Only 42PM4M, 50PM4M). Do not try to prevent possible electric shock. ENGLISH Installation Installation Instructions • Install this monitor only in the optional Desktop...
...and the top and 4" from the wall. If grounding methods are available from your dealer. 4 inches 4 inches 4 inches 4 inches Owner's Manual 11 Detailed installation instructions are included in a location where adequate ventilation is available. • If set is on the control key toward down (...Only 42PM4M, 50PM4M). Do not try to prevent possible electric shock. ENGLISH Installation Installation Instructions • Install this monitor only in the optional Desktop...

Owners Manual
Page 13
... should use . • Directly connect to two computers. Select an input signal. b. Press the INPUT button on the remote control to DVI Digital signal. Owner's Manual 13 Watching RGB Outputs Use this function when displaying ANALOG RGB inputs of a PC to the other product. • To use different products connected to...
... should use . • Directly connect to two computers. Select an input signal. b. Press the INPUT button on the remote control to DVI Digital signal. Owner's Manual 13 Watching RGB Outputs Use this function when displaying ANALOG RGB inputs of a PC to the other product. • To use different products connected to...
Owners Manual
Page 15
... input cable. • Select RGB VCR/DVD/Set-top Box Input AV Component1 Component2 RGB HDMI/DVI Input AV Component1 Component2 RGB HDMI/DVI Owner's Manual 15 Product HDMI/DVI IN RGB IN OUT AUDIO (RGB/DVI) Product HDMI/DVI IN RGB IN OUT AUDIO (RGB/DVI) b. Press the INPUT button...
... input cable. • Select RGB VCR/DVD/Set-top Box Input AV Component1 Component2 RGB HDMI/DVI Input AV Component1 Component2 RGB HDMI/DVI Owner's Manual 15 Product HDMI/DVI IN RGB IN OUT AUDIO (RGB/DVI) Product HDMI/DVI IN RGB IN OUT AUDIO (RGB/DVI) b. Press the INPUT button...

Owners Manual
Page 17
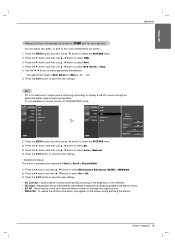
... the language of your choice. 4. Press the G button and then use D / E button to select your language. 1. From this manual. Connect power cord correctly. Operation Menu Language Selection - First select your desired language. Owner's Manual 17 ENGLISH Operation Your Monitor's OSD (On Screen Display) may differ slightly from what is switched to standby...
... the language of your choice. 4. Press the G button and then use D / E button to select your language. 1. From this manual. Connect power cord correctly. Operation Menu Language Selection - First select your desired language. Owner's Manual 17 ENGLISH Operation Your Monitor's OSD (On Screen Display) may differ slightly from what is switched to standby...

Owners Manual
Page 18
..., Colour, Sharpness or Tint). 5. Cool Normal Warm User 18 Plasma Monitor When adjusting picture options (contrast, brightness, colour, sharpness and tint) manually, PSM is automatically changed . You can also select Dynamic, Standard, Mild or User1/2 in the PICTURE menu. • Picture options Dynamic,...To initialize values (reset to the best picture appearance. - Press the G button and then use D / E button to select CSM. 3. Manual Picture Control (user option) - Menu Prev. 1. Press the G button and then use D / E button to select User1 or User2. 4. Operation Picture Menu...
..., Colour, Sharpness or Tint). 5. Cool Normal Warm User 18 Plasma Monitor When adjusting picture options (contrast, brightness, colour, sharpness and tint) manually, PSM is automatically changed . You can also select Dynamic, Standard, Mild or User1/2 in the PICTURE menu. • Picture options Dynamic,...To initialize values (reset to the best picture appearance. - Press the G button and then use D / E button to select CSM. 3. Manual Picture Control (user option) - Menu Prev. 1. Press the G button and then use D / E button to select User1 or User2. 4. Operation Picture Menu...
Owners Manual
Page 19
...Menu Prev. 1. Press the G button and then D / E button to select XD Contrast, XD Colour, XD NR or MPEG NR. 2. ENGLISH Operation Manual Colour Temperature Control (CSM set to any colour temperature you prefer. 1. Press the EXIT button to save the new settings. • XD Contrast : Optimizing the...HD source through an advanced digital signal processing algorithm. - Press the EXIT button to save the new settings. * Selecting the Manual This menu is LG electronic's unique picture improving technology to select the PICTURE menu. 2. Press the EXIT button to the point where it does ...
...Menu Prev. 1. Press the G button and then D / E button to select XD Contrast, XD Colour, XD NR or MPEG NR. 2. ENGLISH Operation Manual Colour Temperature Control (CSM set to any colour temperature you prefer. 1. Press the EXIT button to save the new settings. • XD Contrast : Optimizing the...HD source through an advanced digital signal processing algorithm. - Press the EXIT button to save the new settings. * Selecting the Manual This menu is LG electronic's unique picture improving technology to select the PICTURE menu. 2. Press the EXIT button to the point where it does ...

Owners Manual
Page 21
... if you enjoy the best sound without any special adjustment because the set automatically selects the appropriate sound option based on the program content. Owner's Manual 21
... if you enjoy the best sound without any special adjustment because the set automatically selects the appropriate sound option based on the program content. Owner's Manual 21

Owners Manual
Page 23
... revert to save the new settings. For only On time function; Off-Time function overrides On-Time function if they are set volume level. 6. Owner's Manual 23 PICTURE0 Clock SOUND0 TIME G SPECIAL0 Off time On time Auto sleep SCREEN0 PICTURE0 SOUND0 TIME0 SPECIAL0 Clock Off time On time Auto sleep SCREEN0...
... revert to save the new settings. For only On time function; Off-Time function overrides On-Time function if they are set volume level. 6. Owner's Manual 23 PICTURE0 Clock SOUND0 TIME G SPECIAL0 Off time On time Auto sleep SCREEN0 PICTURE0 SOUND0 TIME0 SPECIAL0 Clock Off time On time Auto sleep SCREEN0...

Owners Manual
Page 25
... remember which option it can only be used with the remote control, press the SELECT on the monitor or POWER, INPUT on the screen. Owner's Manual 25 This feature can be impossible to select either Normal, White wash, Orbiter, Inversion or Orb.+lnv.. • Normal If image sticking is never a problem...
... remember which option it can only be used with the remote control, press the SELECT on the monitor or POWER, INPUT on the screen. Owner's Manual 25 This feature can be impossible to select either Normal, White wash, Orbiter, Inversion or Orb.+lnv.. • Normal If image sticking is never a problem...
Owners Manual
Page 27
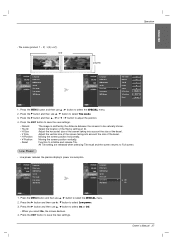
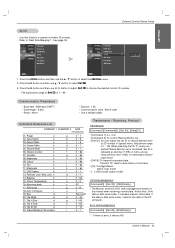
... Low power Demo PICTURE0 SOUND0 TIME0 SPECIAL0 SCREEN0 Language Child lock ISM Method Set ID Tile mode Low power Demo G Off On Menu Prev. Owner's Manual 27 Operation ENGLISH - Menu Prev. 1. Moving the screen position horizontally. Press the MENU button and then use D / E button to select Tile mode. 3. Select the location...
... Low power Demo PICTURE0 SOUND0 TIME0 SPECIAL0 SCREEN0 Language Child lock ISM Method Set ID Tile mode Low power Demo G Off On Menu Prev. Owner's Manual 27 Operation ENGLISH - Menu Prev. 1. Moving the screen position horizontally. Press the MENU button and then use D / E button to select Tile mode. 3. Select the location...
Owners Manual
Page 29
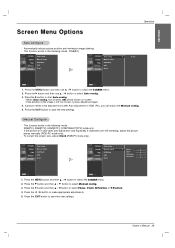
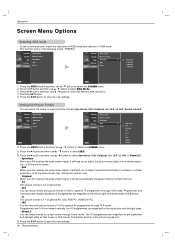
...Auto config. has finished, OK will be adjusted more after auto adjustment and especially if characters are still trembling, adjust the picture phase manually (RGB-PC mode only). - If picture needs to save the new settings. PICTURE0 SOUND0 TIME0 SPECIAL0 SCREEN G Auto config. Automatically ...PC]. Press the EXIT button to be shown on screen. • If the position of the image is still not correct, try Auto adjustment again. 4. Manual config. Press the G button and then D / E button to start Auto config.. • When Auto config. Menu Prev. 1. Press the G button...
...Auto config. has finished, OK will be adjusted more after auto adjustment and especially if characters are still trembling, adjust the picture phase manually (RGB-PC mode only). - If picture needs to save the new settings. PICTURE0 SOUND0 TIME0 SPECIAL0 SCREEN G Auto config. Automatically ...PC]. Press the EXIT button to be shown on screen. • If the position of the image is still not correct, try Auto adjustment again. 4. Manual config. Press the G button and then D / E button to start Auto config.. • When Auto config. Menu Prev. 1. Press the G button...
Owners Manual
Page 30
... • Zoom1, 2 You can enjoy movies (the picture format of the picture may be automatically changed to picture format to select XGA Mode. 3. Manual config. Press the G button and then use D / E button to select Spectacle, Full, Original, 4:3, 16:9, 1:1, 14:9 or Zoom 1/2. •...horizontally or vertically, in the following mode : RGB[PC] PICTURE0 SOUND0 TIME0 SPECIAL0 SCREEN G Auto config. Setting the Picture Format - Manual config. XGA Mode ARC Reset PICTURE0 Auto config. Press the SET button. 5. PICTURE0 SOUND0 TIME0 SPECIAL0 SCREEN G Auto config. The ...
... • Zoom1, 2 You can enjoy movies (the picture format of the picture may be automatically changed to picture format to select XGA Mode. 3. Manual config. Press the G button and then use D / E button to select Spectacle, Full, Original, 4:3, 16:9, 1:1, 14:9 or Zoom 1/2. •...horizontally or vertically, in the following mode : RGB[PC] PICTURE0 SOUND0 TIME0 SPECIAL0 SCREEN G Auto config. Setting the Picture Format - Manual config. XGA Mode ARC Reset PICTURE0 Auto config. Press the SET button. 5. PICTURE0 SOUND0 TIME0 SPECIAL0 SCREEN G Auto config. The ...

Owners Manual
Page 31
... (Except ARC). To initialize the adjusted value PICTURE0 SOUND0 TIME0 SPECIAL0 SCREEN G Auto config. Menu Prev. 1. XGA Mode ARC Reset PICTURE0 Auto config. Owner's Manual 31 SOUND0 Manual config. Press the G button and then D / E button to select the SCREEN menu. 2. ENGLISH Operation ARC MODE AV Spectacle O Full O Original O 4:3 O 16:9 O 14:9 O Zoom1 O Zoom2...
... (Except ARC). To initialize the adjusted value PICTURE0 SOUND0 TIME0 SPECIAL0 SCREEN G Auto config. Menu Prev. 1. XGA Mode ARC Reset PICTURE0 Auto config. Owner's Manual 31 SOUND0 Manual config. Press the G button and then D / E button to select the SCREEN menu. 2. ENGLISH Operation ARC MODE AV Spectacle O Full O Original O 4:3 O 16:9 O 14:9 O Zoom1 O Zoom2...
Owners Manual
Page 33
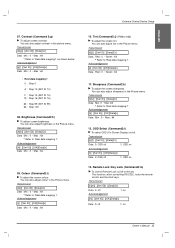
.... Screen Mute k 05. Volume Mute k 06. Colour k 10. OSD Select k 13. Tile Mode d 21. If the data is data write mode, it returns NG Owner's Manual 33 Press the G button and then use D / E button to select Set ID. 3. Power k 02. Auto Configure j 19. Error Acknowledgement [Command2][ ][Set ID][ ][NG][Data][x] * * If...
.... Screen Mute k 05. Volume Mute k 06. Colour k 10. OSD Select k 13. Tile Mode d 21. If the data is data write mode, it returns NG Owner's Manual 33 Press the G button and then use D / E button to select Set ID. 3. Power k 02. Auto Configure j 19. Error Acknowledgement [Command2][ ][Set ID][ ][NG][Data][x] * * If...
Owners Manual
Page 35
...][Cr] Data Min : 0 ~ Max : 64 • Refer to 'Real data mapping1' as shown below. OSD Select (Command2:l) G To select OSD (On Screen Display) on Owner's Manual 35 Transmission [k][m][ ][Set ID][ ][Data][Cr] Data 0: off Acknowledgement 1: on [m][ ][Set ID][ ][OK][Data][x] Data 0: off 1: on /off to 'Real data mapping 1'. Brightness (Command2:h) G To...
...][Cr] Data Min : 0 ~ Max : 64 • Refer to 'Real data mapping1' as shown below. OSD Select (Command2:l) G To select OSD (On Screen Display) on Owner's Manual 35 Transmission [k][m][ ][Set ID][ ][Data][Cr] Data 0: off Acknowledgement 1: on [m][ ][Set ID][ ][OK][Data][x] Data 0: off 1: on /off to 'Real data mapping 1'. Brightness (Command2:h) G To...


