

Owners Manual
Page 1
Retain it for future reference. Record model number and serial number of the set . See the label attached on the back cover and quote this manual carefully before operating your dealer when you require service. PLASMA MONITOR MODELS: 42PM4M 50PM4M 60PM4M OWNER'S MANUAL Please read this information to your set .
Retain it for future reference. Record model number and serial number of the set . See the label attached on the back cover and quote this manual carefully before operating your dealer when you require service. PLASMA MONITOR MODELS: 42PM4M 50PM4M 60PM4M OWNER'S MANUAL Please read this information to your set .
Owners Manual
Page 2
... attempt to a child or adult. WARNING/CAUTION TO REDUCE THE RISK OF FIRE AND ELECTRIC SHOCK, DO NOT EXPOSE THIS PRODUCT TO RAIN OR MOISTURE. 2 Plasma Monitor If grounding methods are not possible, a separate circuit breaker should be employed and installed by the leakage current. - This may cause serious injury to service...
... attempt to a child or adult. WARNING/CAUTION TO REDUCE THE RISK OF FIRE AND ELECTRIC SHOCK, DO NOT EXPOSE THIS PRODUCT TO RAIN OR MOISTURE. 2 Plasma Monitor If grounding methods are not possible, a separate circuit breaker should be employed and installed by the leakage current. - This may cause serious injury to service...
Owners Manual
Page 4
.... - WARNING - Protect the power cord from physical or mechanical abuse, such as vases, shall be placed on the power cord. Do not install the monitor near any sharp edge to plugs, wall outlets, and the point where the cord exits the appliance. - To Reduce The Risk Of Fire Or Electric... twisted, kinked, pinched, closed in electric shock or fire. Do not over bend the power cord and do not place anything on the apparatus. 4 Plasma Monitor Do not modify or extend the power cord. - Safety Instructions Safety Instructions continued CAUTION concerning the Power Cord : -
.... - WARNING - Protect the power cord from physical or mechanical abuse, such as vases, shall be placed on the power cord. Do not install the monitor near any sharp edge to plugs, wall outlets, and the point where the cord exits the appliance. - To Reduce The Risk Of Fire Or Electric... twisted, kinked, pinched, closed in electric shock or fire. Do not over bend the power cord and do not place anything on the apparatus. 4 Plasma Monitor Do not modify or extend the power cord. - Safety Instructions Safety Instructions continued CAUTION concerning the Power Cord : -
Owners Manual
Page 6
... fluorescent substance. Versatile The light weight and thin size makes it easy to 2.2 million cells. Several minute colored dots visible on the Plasma Monitor's efficiency or reliability. The noise from these fans is 42",50" or 60" so wide that a certain level of noise from ...exceptionally broad viewing angle -- The fan noise doesn't have any negative effect on the screen should be exchanged or returned. 6 Plasma Monitor At that this Plasma Monitor is a Plasma Display Panel? Thus a few cell defects will normally occur in the room. A few cell defects are produced and fused ...
... fluorescent substance. Versatile The light weight and thin size makes it easy to 2.2 million cells. Several minute colored dots visible on the Plasma Monitor's efficiency or reliability. The noise from these fans is 42",50" or 60" so wide that a certain level of noise from ...exceptionally broad viewing angle -- The fan noise doesn't have any negative effect on the screen should be exchanged or returned. 6 Plasma Monitor At that this Plasma Monitor is a Plasma Display Panel? Thus a few cell defects will normally occur in the room. A few cell defects are produced and fused ...

Owners Manual
Page 8
... INPUT SELECT Button 3. Here shown may be somewhat different from your set on from standby or off to standby. 60PM4M VOLUME (F,G) Buttons INPUT SELECT Button 8 Plasma Monitor INPUT SELECT VOLUME INPUT SELECT VOLUME Remote Control Sensor Power Standby Indicator Illuminates red in standby mode, Illuminates green when the Set is turned on...
... INPUT SELECT Button 3. Here shown may be somewhat different from your set on from standby or off to standby. 60PM4M VOLUME (F,G) Buttons INPUT SELECT Button 8 Plasma Monitor INPUT SELECT VOLUME INPUT SELECT VOLUME Remote Control Sensor Power Standby Indicator Illuminates red in standby mode, Illuminates green when the Set is turned on...
Owners Manual
Page 10
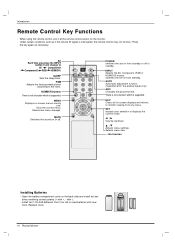
...will change to the room. AV Each time you press the INPUT button it at the remote control sensor on the monitor. - Exits the current menu. INPUT Selects the AV, Component, RGB or HDMI/DVI modes. AUTO Automatic adjustment .... Selects menu item. * : No function Installing Batteries • Open the battery compartment cover on or off to monitor viewing from standby or off . SET accepts your selection or displays the current mode. Under certain conditions such as necessary... back side and install the batteries matching correct polarity (+ with +, - Replace cover. 10 Plasma Monitor
...will change to the room. AV Each time you press the INPUT button it at the remote control sensor on the monitor. - Exits the current menu. INPUT Selects the AV, Component, RGB or HDMI/DVI modes. AUTO Automatic adjustment .... Selects menu item. * : No function Installing Batteries • Open the battery compartment cover on or off to monitor viewing from standby or off . SET accepts your selection or displays the current mode. Under certain conditions such as necessary... back side and install the batteries matching correct polarity (+ with +, - Replace cover. 10 Plasma Monitor
Owners Manual
Page 12
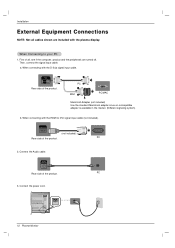
Then, connect the signal input cable. a. When connecting with the HDMI to your PC 1. AC IN 12 Plasma Monitor First of the product. AUDIO (RGB/DVI) Rear side of the product. When connecting with the plasma display. PC 2. PC 3. HDMI/DVI IN (not included) Rear side of the product. PC MAC PC/MAC Macintosh...
Then, connect the signal input cable. a. When connecting with the HDMI to your PC 1. AC IN 12 Plasma Monitor First of the product. AUDIO (RGB/DVI) Rear side of the product. When connecting with the plasma display. PC 2. PC 3. HDMI/DVI IN (not included) Rear side of the product. PC MAC PC/MAC Macintosh...
Owners Manual
Page 14
... cord. Product AV IN VIDEO L-AUDIO-R S-VIDEO AV OUT b. Input AV Component1 Component2 RGB HDMI/DVI NOTES: • When the BNC cable is first. 14 Plasma Monitor When connecting with a BNC cable. • Connect the input terminal with S-Video cable, S-Video cable is connected simultaneously with a proper colour match. When connecting with...
... cord. Product AV IN VIDEO L-AUDIO-R S-VIDEO AV OUT b. Input AV Component1 Component2 RGB HDMI/DVI NOTES: • When the BNC cable is first. 14 Plasma Monitor When connecting with a BNC cable. • Connect the input terminal with S-Video cable, S-Video cable is connected simultaneously with a proper colour match. When connecting with...
Owners Manual
Page 16
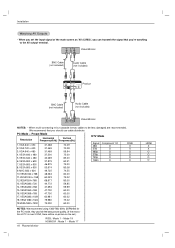
...00 16. VESA 1280 x 1024 79.980 75.02 19.VESA 1600 x 1200 75.000 60.00 NOTES: We recommend using 1360*768, 60Hz (50PM4M) for the PC mode, they provide the best picture quality. (If the resolution of the main screen as 'AV (CVBS)', you can transmit the signal... there will be less damaged are recommended. Installation Watching AV Outputs • When you set .) RGB : Mode 1 ~ Mode 19 HDMI/DVI : Mode 1 ~ Mode 17 16 Plasma Monitor HDMI X X O O O O PC Mode - Preset Mode Resolution Horizontal Vertical Frequency(kHz) Frequency(Hz) 1. VGA 640 x 480 31.468 31.469 31.469 70.09 70...
...00 16. VESA 1280 x 1024 79.980 75.02 19.VESA 1600 x 1200 75.000 60.00 NOTES: We recommend using 1360*768, 60Hz (50PM4M) for the PC mode, they provide the best picture quality. (If the resolution of the main screen as 'AV (CVBS)', you can transmit the signal... there will be less damaged are recommended. Installation Watching AV Outputs • When you set .) RGB : Mode 1 ~ Mode 19 HDMI/DVI : Mode 1 ~ Mode 17 16 Plasma Monitor HDMI X X O O O O PC Mode - Preset Mode Resolution Horizontal Vertical Frequency(kHz) Frequency(Hz) 1. VGA 640 x 480 31.468 31.469 31.469 70.09 70...

Owners Manual
Page 18
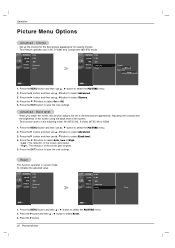
... the G button and then use D / E button to select the desired picture option (Contrast, Brightness, Colour, Sharpness or Tint). 5. Menu Prev. 1. Cool Normal Warm User 18 Plasma Monitor PSM (Picture Status Memory) - You can also select Dynamic, Standard, Mild or User1/2 in the PICTURE menu. • Picture options Dynamic, Standard and Mild are...
... the G button and then use D / E button to select the desired picture option (Contrast, Brightness, Colour, Sharpness or Tint). 5. Menu Prev. 1. Cool Normal Warm User 18 Plasma Monitor PSM (Picture Status Memory) - You can also select Dynamic, Standard, Mild or User1/2 in the PICTURE menu. • Picture options Dynamic, Standard and Mild are...
Owners Manual
Page 20
... button to save the new settings. Press the MENU button and then D / E button to select On or Off. 5. Press the G button. 20 Plasma Monitor This function works in AV, S-Video and Component 480i/576i mode. Press the EXIT button to select Auto, Low or High. • Low : The ...D / E button to save the new settings. Menu Prev. 1. Press the EXIT button to select the PICTURE menu. 2. Advanced - Set up the monitor for the best picture appearance for viewing movies. - Press the MENU button and then use D / E button to select Advanced. 3. Reset This function ...
... button to save the new settings. Press the MENU button and then D / E button to select On or Off. 5. Press the G button. 20 Plasma Monitor This function works in AV, S-Video and Component 480i/576i mode. Press the EXIT button to select Auto, Low or High. • Low : The ...D / E button to save the new settings. Menu Prev. 1. Press the EXIT button to select the PICTURE menu. 2. Advanced - Set up the monitor for the best picture appearance for viewing movies. - Press the MENU button and then use D / E button to select Advanced. 3. Reset This function ...
Owners Manual
Page 22
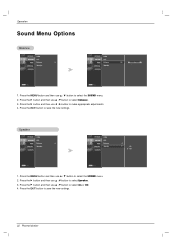
... or Off. 4. Press the G button and then use D / E button to make appropriate adjustments. 4. Menu Prev. 1. Press the EXIT button to save the new settings. 22 Plasma Monitor Operation Sound Menu Options Balance PICTURE0 SSM SOUND G AVL TIME0 Balance 0 SPECIAL0 Speaker SCREEN0 PICTURE0 SSM SOUND0 AVL TIME0 Balance 0G L R SPECIAL0 Speaker SCREEN0 Menu...
... or Off. 4. Press the G button and then use D / E button to make appropriate adjustments. 4. Menu Prev. 1. Press the EXIT button to save the new settings. 22 Plasma Monitor Operation Sound Menu Options Balance PICTURE0 SSM SOUND G AVL TIME0 Balance 0 SPECIAL0 Speaker SCREEN0 PICTURE0 SSM SOUND0 AVL TIME0 Balance 0G L R SPECIAL0 Speaker SCREEN0 Menu...
Owners Manual
Page 24
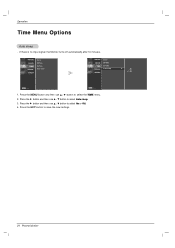
... the MENU button and then use D / E button to select On or Off. 4. Press the G button and then use D / E button to save the new settings. 24 Plasma Monitor Menu Prev. 1. PICTURE0 Clock SOUND0 TIME G SPECIAL0 Off time On time Auto sleep SCREEN0 PICTURE0 SOUND0 TIME0 SPECIAL0 Clock Off time On time Auto sleep... SCREEN0 G On Off Menu Prev. Press the EXIT button to select Auto sleep. 3. If there is no input signal, the Monitor turns off automatically after 10 minutes. Press the G button and then use D / E button to select the TIME menu. 2.
... the MENU button and then use D / E button to select On or Off. 4. Press the G button and then use D / E button to save the new settings. 24 Plasma Monitor Menu Prev. 1. PICTURE0 Clock SOUND0 TIME G SPECIAL0 Off time On time Auto sleep SCREEN0 PICTURE0 SOUND0 TIME0 SPECIAL0 Clock Off time On time Auto sleep... SCREEN0 G On Off Menu Prev. Press the EXIT button to select Auto sleep. 3. If there is no input signal, the Monitor turns off automatically after 10 minutes. Press the G button and then use D / E button to select the TIME menu. 2.
Owners Manual
Page 26
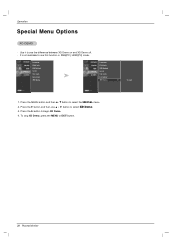
... to the settings will be saved. - Tile mode (product 1 ~ 9) : r(3) x c(3) row column column - Menu Prev. Tile mode (product 1 ~ 4) : r(2) x c(2) row - Tile mode (product 1 ~16) : r(4) x c(4) row column 26 Plasma Monitor Tile mode : row x column ( r = 1, 2, 3, 4 c = 1, 2, 3, 4) - 4 x 4 available. - PICTURE0 SOUND0 TIME0 SPECIAL G SCREEN0 Language Child lock ISM Method Set ID Tile mode Low power Demo PICTURE0 SOUND0 TIME0...
... to the settings will be saved. - Tile mode (product 1 ~ 9) : r(3) x c(3) row column column - Menu Prev. Tile mode (product 1 ~ 4) : r(2) x c(2) row - Tile mode (product 1 ~16) : r(4) x c(4) row column 26 Plasma Monitor Tile mode : row x column ( r = 1, 2, 3, 4 c = 1, 2, 3, 4) - 4 x 4 available. - PICTURE0 SOUND0 TIME0 SPECIAL G SCREEN0 Language Child lock ISM Method Set ID Tile mode Low power Demo PICTURE0 SOUND0 TIME0...
Owners Manual
Page 28
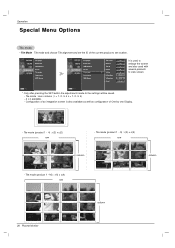
...'s not available to see the difference between XD Demo on and XD Demo off. - To stop XD Demo, press the MENU or EXIT button. 28 Plasma Monitor Use it to use D / E button to select XD Demo. 3. Press the G button to select the SPECIAL menu. 2. PICTURE0 SOUND0 TIME0 SPECIAL G SCREEN0 Language Child lock...
...'s not available to see the difference between XD Demo on and XD Demo off. - To stop XD Demo, press the MENU or EXIT button. 28 Plasma Monitor Use it to use D / E button to select XD Demo. 3. Press the G button to select the SPECIAL menu. 2. PICTURE0 SOUND0 TIME0 SPECIAL G SCREEN0 Language Child lock...
Owners Manual
Page 30
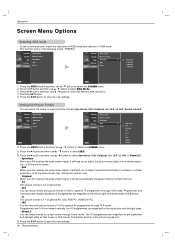
... TV programmes thorough 16:9 mode. XGA Mode ARC Reset PICTURE0 Auto config. Press the G button and then use D / E button to save the new settings. 30 Plasma Monitor PICTURE0 SOUND0 TIME0 SPECIAL0 SCREEN0 Auto config. Press the MENU button and then use D / E button to save the new settings. Press the G button and then...
... TV programmes thorough 16:9 mode. XGA Mode ARC Reset PICTURE0 Auto config. Press the G button and then use D / E button to save the new settings. 30 Plasma Monitor PICTURE0 SOUND0 TIME0 SPECIAL0 SCREEN0 Auto config. Press the MENU button and then use D / E button to save the new settings. Press the G button and then...
Owners Manual
Page 32
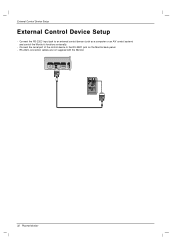
...VIDEO AV IN L-AUDIO-R AV OUT S-VIDEO EXTERNAL SPEAKER R L 32 Plasma Monitor Connect the RS-232C input jack to the RS-232C jack on the Monitor back panel. - RS-232C connection cables are not supplied with the Monitor. Connect the serial port of the control device to an external control ...device (such as a computer or an A/V control system) and control the Monitor's functions externally. - External ...
...VIDEO AV IN L-AUDIO-R AV OUT S-VIDEO EXTERNAL SPEAKER R L 32 Plasma Monitor Connect the RS-232C input jack to the RS-232C jack on the Monitor back panel. - RS-232C connection cables are not supplied with the Monitor. Connect the serial port of the control device to an external control ...device (such as a computer or an A/V control system) and control the Monitor's functions externally. - External ...
Owners Manual
Page 33
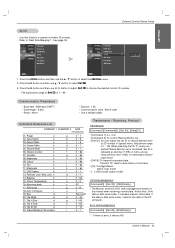
... ~ 8 u 1 c Key Code d 0 ~ 44 g 0 ~ 64 h 0 ~ 64 i 0 ~ 10 j 0 ~ 1 Transmission / Receiving Protocol Transmission [Command1][Command2][ ][Set ID][ ][Data][Cr] * [Command 1]: k, j, m,d * [Command 2]: To control Plasma Monitor set. * [Set ID]: You can adjust the set is 1 ~ 99. If the data is error, it returns the data of command. * [Cr]: Carriage Return ASCII... data. Power k 02. Input Select k 03. When selecting Set ID '0', every connected Plasma Monitor set ID to read mode, it indicates present status data. Communication Parameters • Baud rate...
... ~ 8 u 1 c Key Code d 0 ~ 44 g 0 ~ 64 h 0 ~ 64 i 0 ~ 10 j 0 ~ 1 Transmission / Receiving Protocol Transmission [Command1][Command2][ ][Set ID][ ][Data][Cr] * [Command 1]: k, j, m,d * [Command 2]: To control Plasma Monitor set. * [Set ID]: You can adjust the set is 1 ~ 99. If the data is error, it returns the data of command. * [Cr]: Carriage Return ASCII... data. Power k 02. Input Select k 03. When selecting Set ID '0', every connected Plasma Monitor set ID to read mode, it indicates present status data. Communication Parameters • Baud rate...
Owners Manual
Page 34
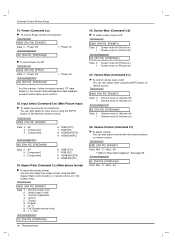
...Spectacle) 4 : Zoom1 5 : Zoom2 6 : Original 7 : 14 : 9 8 : Full (Europe version only) 9 : 1 : 1 (PC) Acknowledgement [c][ ][Set ID][ ][OK][Data][x] 34 Plasma Monitor 04. Transmission [k][d][ ][Set ID][ ][Data][Cr] Data 0 : Screen mute off (Picture on) 1 : Screen mute on (Picture off) Acknowledgement [d][ ][Set ID][ ][OK][Data][x] Data 0 : ...also adjust the screen format using the INPUT button on remote control. Power (Command 2:a) G To control Power On/Off of the Monitor. Transmission [k][a][ ][Set ID][ ][Data][Cr] Data 0 : Power Off 1 : Power On Acknowledgement [a][ ][Set ID][ ][...
...Spectacle) 4 : Zoom1 5 : Zoom2 6 : Original 7 : 14 : 9 8 : Full (Europe version only) 9 : 1 : 1 (PC) Acknowledgement [c][ ][Set ID][ ][OK][Data][x] 34 Plasma Monitor 04. Transmission [k][d][ ][Set ID][ ][Data][Cr] Data 0 : Screen mute off (Picture on) 1 : Screen mute on (Picture off) Acknowledgement [d][ ][Set ID][ ][OK][Data][x] Data 0 : ...also adjust the screen format using the INPUT button on remote control. Power (Command 2:a) G To control Power On/Off of the Monitor. Transmission [k][a][ ][Set ID][ ][Data][Cr] Data 0 : Power Off 1 : Power On Acknowledgement [a][ ][Set ID][ ][...
Owners Manual
Page 36
...][x] 20. Balance (Command2:t) G To adjust balance. Transmission [j][p][ ][Set ID][ ][Data][Cr] Data 1 : Inversion 2 : Orbiter 3 : Orb.+Inv. 4 : White Wash 8 : Normal Acknowledgement [p][ ][Set ID][ ][OK][Data][x] 36 Plasma Monitor 18. Acknowledgement [d][ ][Set ID][ ][OK][Data][x] ISM mode(Command: j p) G Used to 'Real data mapping 1'. Transmission [j][u][ ][Set ID][ ][Data][Cr] Data 1: To set to See page...
...][x] 20. Balance (Command2:t) G To adjust balance. Transmission [j][p][ ][Set ID][ ][Data][Cr] Data 1 : Inversion 2 : Orbiter 3 : Orb.+Inv. 4 : White Wash 8 : Normal Acknowledgement [p][ ][Set ID][ ][OK][Data][x] 36 Plasma Monitor 18. Acknowledgement [d][ ][Set ID][ ][OK][Data][x] ISM mode(Command: j p) G Used to 'Real data mapping 1'. Transmission [j][u][ ][Set ID][ ][Data][Cr] Data 1: To set to See page...


