Owner's Manual
Page 8
... Entry Modes 74 Photo List 75 Music List 79 Movie List 81 DivX Registration Code 84 Deactivation 85 PICTURE CONTROL Picture Size (Aspect Ratio) Control 86 Preset Picture Settings - Picture Mode 88 Manual Picture Adjustment - User Mode 89 Picture Improvement Technology 90 Expert Picture control 91 Energy Saving 94 Picture Reset 95 LED Local Dimming 95 Power Indicator 96 Demo Mode 97 Initial Setting (Factory Reset 98 FEATURE OF THIS TV 8 PREPARATION Accessories 8 Front Panel Information 10 Back Panel Information 15 Stand Instruction 19 VESA Wall Mounting 27 Cable...
... Entry Modes 74 Photo List 75 Music List 79 Movie List 81 DivX Registration Code 84 Deactivation 85 PICTURE CONTROL Picture Size (Aspect Ratio) Control 86 Preset Picture Settings - Picture Mode 88 Manual Picture Adjustment - User Mode 89 Picture Improvement Technology 90 Expert Picture control 91 Energy Saving 94 Picture Reset 95 LED Local Dimming 95 Power Indicator 96 Demo Mode 97 Initial Setting (Factory Reset 98 FEATURE OF THIS TV 8 PREPARATION Accessories 8 Front Panel Information 10 Back Panel Information 15 Stand Instruction 19 VESA Wall Mounting 27 Cable...

Owner's Manual
Page 10
...-IN" ON YOUR TV SCREEN I When a fixed image (e.g. Image burn is missing, please contact the dealer where you use the 4:3 aspect ratio setting for an extended period, it to play DivX video, including premium content" ABOUT DIVX VIDEO: DivX® is a digital video format created by combining advanced 120Hz technology with your files into DivX video. MENU Power Cord 1.5V 1.5V Batteries (Some models) RF Adapter (Some models) You must be...
...-IN" ON YOUR TV SCREEN I When a fixed image (e.g. Image burn is missing, please contact the dealer where you use the 4:3 aspect ratio setting for an extended period, it to play DivX video, including premium content" ABOUT DIVX VIDEO: DivX® is a digital video format created by combining advanced 120Hz technology with your files into DivX video. MENU Power Cord 1.5V 1.5V Batteries (Some models) RF Adapter (Some models) You must be...

Owner's Manual
Page 29
... wall mount is used . NOTE G Screw length needed depends on a ceiling or slanted wall, it on the wall. It may result in the table. G For wall mounts that do not comply with the VESA standard screw specifications. CAUTION G Do not install your Wall Mount Bracket while your nearest installer. With guide spacer Without guide spacer 12mm 12mm 27 Model VESA (A * B) A Standard Screw Quantity B Wall Mount Bracket (sold separately). G When purchasing our wall mount kit, a detailed installation manual and all parts...
... wall mount is used . NOTE G Screw length needed depends on a ceiling or slanted wall, it on the wall. It may result in the table. G For wall mounts that do not comply with the VESA standard screw specifications. CAUTION G Do not install your Wall Mount Bracket while your nearest installer. With guide spacer Without guide spacer 12mm 12mm 27 Model VESA (A * B) A Standard Screw Quantity B Wall Mount Bracket (sold separately). G When purchasing our wall mount kit, a detailed installation manual and all parts...
Owner's Manual
Page 37
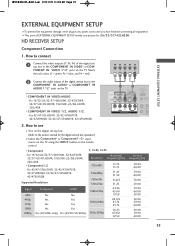
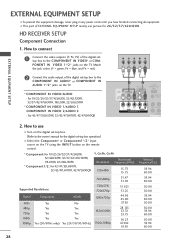
... PR L R 2 Connect the audio output of the digital set -top box operation.) I Turn on the digital set-top box. (Refer to the owner's manual for 26/32/37/42LH20R. How to the COMPONENT IN VIDEO* or COM- HD RECEIVER SETUP Component Connection 1. PONENT IN VIDEO 1*/2* jacks on the TV. How to connect 1 Connect the video outputs (Y, PB, PR) of the digital settop box to use picture for the digital set -top box to the COMPONENT IN AUDIO* or COMPONENT IN AUDIO 1*/2* jacks on the remote control. * Component : For 19...
... PR L R 2 Connect the audio output of the digital set -top box operation.) I Turn on the digital set-top box. (Refer to the owner's manual for 26/32/37/42LH20R. How to the COMPONENT IN VIDEO* or COM- HD RECEIVER SETUP Component Connection 1. PONENT IN VIDEO 1*/2* jacks on the TV. How to connect 1 Connect the video outputs (Y, PB, PR) of the digital settop box to use picture for the digital set -top box to the COMPONENT IN AUDIO* or COMPONENT IN AUDIO 1*/2* jacks on the remote control. * Component : For 19...
Owner's Manual
Page 38
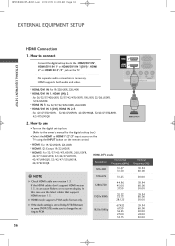
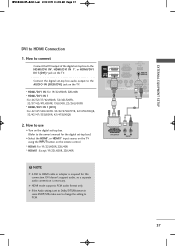
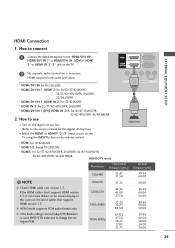
....72 33.75 28.125 G If the Audio setting is necessary. In this case use I Turn on the digital set -top box.) I Select the HDMI* or HDMI1*/2*/3* input source on the TV using the INPUT button on the TV. If the HDMI cables don't support HDMI version 1.3, it can cause flickers or no screen display. VIDEO AUDIO COMPONENT IN * HDMI/DVI IN: For 19/22LH20R, 22LU40R * HDMI/DVI IN 1, HDMI (IN) 2 : For 26/32/37/42LH20R, 32...
....72 33.75 28.125 G If the Audio setting is necessary. In this case use I Turn on the digital set -top box.) I Select the HDMI* or HDMI1*/2*/3* input source on the TV using the INPUT button on the TV. If the HDMI cables don't support HDMI version 1.3, it can cause flickers or no screen display. VIDEO AUDIO COMPONENT IN * HDMI/DVI IN: For 19/22LH20R, 22LU40R * HDMI/DVI IN 1, HDMI (IN) 2 : For 26/32/37/42LH20R, 32...
Owner's Manual
Page 39
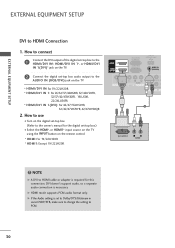
... to connect Connect the DVI output of the digital set -top box.) I Select the HDMI*, or HDMI1* input source on the TV using the INPUT button on the remote control. * H D M I: For 19/22LH20R, 22LU40R * H D M I Turn on the digital set-top box. (Refer to the AUDIO IN (RGB/DVI) jack on the TV. DVI doesn't support audio, so a separate audio connection is set -top box audio output to the owner's manual for this connection. How to PCM. 37 G HDMI mode supports PCM audio format only. G If the Audio setting is necessary. Connect the digital set...
... to connect Connect the DVI output of the digital set -top box.) I Select the HDMI*, or HDMI1* input source on the TV using the INPUT button on the remote control. * H D M I: For 19/22LH20R, 22LU40R * H D M I Turn on the digital set-top box. (Refer to the AUDIO IN (RGB/DVI) jack on the TV. DVI doesn't support audio, so a separate audio connection is set -top box audio output to the owner's manual for this connection. How to PCM. 37 G HDMI mode supports PCM audio format only. G If the Audio setting is necessary. Connect the digital set...
Owner's Manual
Page 41
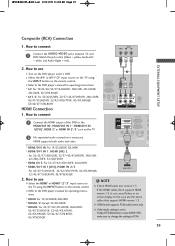
... HDMI OUTPUT 2. How to connect 1 Connect the HDMI output of the DVD to connect 1 Connect the AUDIO/VIDEO jacks between TV and DVD. I Refer to PCM. 39 Match the jack colors (Video = yellow, Audio Left = white, and Audio Right = red). VIDEO AUDIO L R EXTERNAL EQUIPMENT SETUP 2. G If the Audio setting is necessary. MFL58486305-Edit1-en 10/21/09 11:08 AM Page 39 Composite (RCA) Connection 1. If the HDMI cables don't support HDMI version 1.3, it can cause flickers or no screen display. G HDMI mode supports PCM audio format...
... HDMI OUTPUT 2. How to connect 1 Connect the HDMI output of the DVD to connect 1 Connect the AUDIO/VIDEO jacks between TV and DVD. I Refer to PCM. 39 Match the jack colors (Video = yellow, Audio Left = white, and Audio Right = red). VIDEO AUDIO L R EXTERNAL EQUIPMENT SETUP 2. G If the Audio setting is necessary. MFL58486305-Edit1-en 10/21/09 11:08 AM Page 39 Composite (RCA) Connection 1. If the HDMI cables don't support HDMI version 1.3, it can cause flickers or no screen display. G HDMI mode supports PCM audio format...
Owner's Manual
Page 44
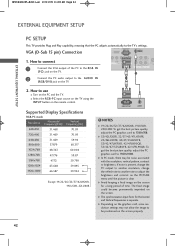
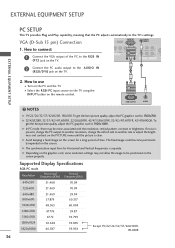
... using the INPUT button on the screen. How to the AUDIO IN (RGB/DVI) jack on the PICTURE menu until the picture is clear. G Avoid keeping a fixed image on the PC and the TV. NOTES G 19/22/26/32/37/42LH20R, 19LU50R, 22LU40R: To get the best picture quality, adjust the PC graphics card to 1360x768. The fixed image could become permanently imprinted on the remote control. Supported Display Specifications RGB-PC mode Resolution...
... using the INPUT button on the screen. How to the AUDIO IN (RGB/DVI) jack on the PICTURE menu until the picture is clear. G Avoid keeping a fixed image on the PC and the TV. NOTES G 19/22/26/32/37/42LH20R, 19LU50R, 22LU40R: To get the best picture quality, adjust the PC graphics card to 1360x768. The fixed image could become permanently imprinted on the remote control. Supported Display Specifications RGB-PC mode Resolution...
Owner's Manual
Page 48
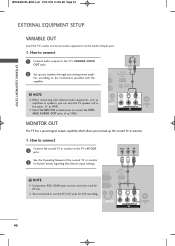
S-232C IN ONTROL) ! USB IN C IN SERVICE ONLY OL) 1 (PC) AUDIO IN (RGB/DVI) ! How to connect 1 Connect the second TV or monitor to external audio equipment via the Audio Output port. 1. NOTE G Component, RGB, HDMI input sources cannot be used for VCR recording. GB IN (PC) AUDIO T IN USB IN SERVICE ONLY1 AUDIO IN (RGB/DVI) IN VIDEO L(MONO) AUDIO R OUT ANTENNA IN VARIABLE AUDIO OUT AV 46 G We recommend to use the AV OUT jacks for AV...
S-232C IN ONTROL) ! USB IN C IN SERVICE ONLY OL) 1 (PC) AUDIO IN (RGB/DVI) ! How to connect 1 Connect the second TV or monitor to external audio equipment via the Audio Output port. 1. NOTE G Component, RGB, HDMI input sources cannot be used for VCR recording. GB IN (PC) AUDIO T IN USB IN SERVICE ONLY1 AUDIO IN (RGB/DVI) IN VIDEO L(MONO) AUDIO R OUT ANTENNA IN VARIABLE AUDIO OUT AV 46 G We recommend to use the AV OUT jacks for AV...
Owner's Manual
Page 51
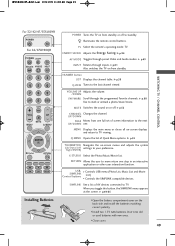
... TV / CHANNEL CONTROL For 32/42/47/55SL80YR POWER TV For 42/47LH90QR POWER ON/OFF TV ENERGY SAVING AV MODE INPUT 123 456 789 LIST 0 Q.VIEW VOL MARK FAV P CH A G E MUTE MENU Q. I Close cover. 49 Illuminates the remote control buttons. RETURN Allows the user to standby. TV Select the remote's operating mode: TV. VOLUME UP Adjusts the volume. /DOWN FAV/MARK Scroll through the programmed Favorite channels. Don't mix old or used batteries with...
... TV / CHANNEL CONTROL For 32/42/47/55SL80YR POWER TV For 42/47LH90QR POWER ON/OFF TV ENERGY SAVING AV MODE INPUT 123 456 789 LIST 0 Q.VIEW VOL MARK FAV P CH A G E MUTE MENU Q. I Close cover. 49 Illuminates the remote control buttons. RETURN Allows the user to standby. TV Select the remote's operating mode: TV. VOLUME UP Adjusts the volume. /DOWN FAV/MARK Scroll through the programmed Favorite channels. Don't mix old or used batteries with...

Owner's Manual
Page 65
... front panel controls. Off Cinema Game Sport 1 AV MODE Press the AV MODE button repeatedly to select the desired source. 2 RETURN Return to the previous menu. I In Key Lock 'O n', if the TV is programmed to remember which option it can only be used with the remote control. I O f f: Disables the AV MODE. Picture Mode" and "AUDIO menu - Sound Mode" respectively. OPTION Move Enter Menu Language Input Label SIMPLINK Key Lock Caption/Text Set ID Power Indicator Demo Mode E : English : On...
... front panel controls. Off Cinema Game Sport 1 AV MODE Press the AV MODE button repeatedly to select the desired source. 2 RETURN Return to the previous menu. I In Key Lock 'O n', if the TV is programmed to remember which option it can only be used with the remote control. I O f f: Disables the AV MODE. Picture Mode" and "AUDIO menu - Sound Mode" respectively. OPTION Move Enter Menu Language Input Label SIMPLINK Key Lock Caption/Text Set ID Power Indicator Demo Mode E : English : On...
Owner's Manual
Page 110
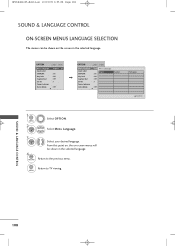
... the selected language. MENU SOUND & LANGUAGE CONTROL 108 From this point on, the on-screen menus will be shown on the screen in the selected language. Select Menu Language. 3 ENTER 4 RETURN Select your desired language. Return to the previous menu. Return to TV viewing. OPTION Move Enter Menu Language : English Input Label SIMPLINK : On Key Lock : Off Caption/Text : Off Set ID : 1 Power Indicator Demo Mode : Off E OPTION Move Enter Menu Language...
... the selected language. MENU SOUND & LANGUAGE CONTROL 108 From this point on, the on-screen menus will be shown on the screen in the selected language. Select Menu Language. 3 ENTER 4 RETURN Select your desired language. Return to the previous menu. Return to TV viewing. OPTION Move Enter Menu Language : English Input Label SIMPLINK : On Key Lock : Off Caption/Text : Off Set ID : 1 Power Indicator Demo Mode : Off E OPTION Move Enter Menu Language...
Owner's Manual
Page 115
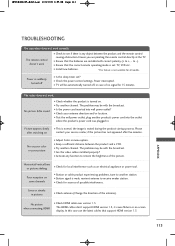
... I Try another channel. I This is normal, the image is suddenly turned off , in menu option. No picture when connecting HDMI I Check for all models. Power interrupted. Please after five minutes. Horizontal/vertical bars or picture shaking I Check HDMI cable over version 1.3. In this case use the latest cables that the batteries are pointing the remote control directly at the TV. The remote control doesn't work I Is the power cord inserted into the...
... I Try another channel. I This is normal, the image is suddenly turned off , in menu option. No picture when connecting HDMI I Check for all models. Power interrupted. Please after five minutes. Horizontal/vertical bars or picture shaking I Check HDMI cable over version 1.3. In this case use the latest cables that the batteries are pointing the remote control directly at the TV. The remote control doesn't work I Is the power cord inserted into the...
Owner's Manual
Page 8
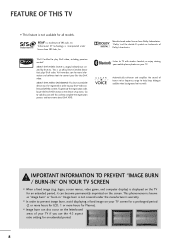
... you use the 4:3 aspect ratio setting for Plasma). Go to vod.divx.com with wireless headset, or enjoy viewing your mobile phone photos on the letterboxed areas of your TV. ABOUT DIVX VIDEO-ON-DEMAND: This DivX Certified® device must be registered in order to complete the registration process and learn more about DivX VOD. logos, screen menus, video game...
... you use the 4:3 aspect ratio setting for Plasma). Go to vod.divx.com with wireless headset, or enjoy viewing your mobile phone photos on the letterboxed areas of your TV. ABOUT DIVX VIDEO-ON-DEMAND: This DivX Certified® device must be registered in order to complete the registration process and learn more about DivX VOD. logos, screen menus, video game...
Owner's Manual
Page 28
... 1 HDMI 2 HDMI /DVI IN 1 2 RS-232C IN (CONTROL) USB IN SERVICE ONLY RGB IN (PC) AUDIO IN (RGB/DVI VIDEO AUDIO COMPONENT IN VIDEO L(MONO VARIABLE A AV 2. Match the jack colors (Y = green, PB = blue, and PR = red). How to use picture for the digital set -top box to the COMPONENT IN VIDEO* or COM- HD RECEIVER SETUP Component Connection 1. Y PB PR L R 2 Connect the audio output of the digital set -top box operation.) I Select the Component* or Component1*/2* input source on the TV using the INPUT button on the remote control. * Component...
... 1 HDMI 2 HDMI /DVI IN 1 2 RS-232C IN (CONTROL) USB IN SERVICE ONLY RGB IN (PC) AUDIO IN (RGB/DVI VIDEO AUDIO COMPONENT IN VIDEO L(MONO VARIABLE A AV 2. Match the jack colors (Y = green, PB = blue, and PR = red). How to use picture for the digital set -top box to the COMPONENT IN VIDEO* or COM- HD RECEIVER SETUP Component Connection 1. Y PB PR L R 2 Connect the audio output of the digital set -top box operation.) I Select the Component* or Component1*/2* input source on the TV using the INPUT button on the remote control. * Component...
Owner's Manual
Page 29
....94 60.00 50.00 G If the Audio setting is necessary. HDMI 2 HDMI /DVI IN 1 (CONTROL) RGB IN (PC) 2 No separate audio connection is set -top box.) I Turn on the digital set-top box. (Refer to the owner's manual for the digital set to Dolby/DTS/Bitstream in some DVDP/STB, make sure to change the setting to use the latest cables that support HDMI version 1.3. VIDEO AUDIO COMPONENT IN 1 HDMI OUTPUT * HDMI: For 19/22LH20R * HDMI1/2: Except 19/22LH20R...
....94 60.00 50.00 G If the Audio setting is necessary. HDMI 2 HDMI /DVI IN 1 (CONTROL) RGB IN (PC) 2 No separate audio connection is set -top box.) I Turn on the digital set-top box. (Refer to the owner's manual for the digital set to Dolby/DTS/Bitstream in some DVDP/STB, make sure to change the setting to use the latest cables that support HDMI version 1.3. VIDEO AUDIO COMPONENT IN 1 HDMI OUTPUT * HDMI: For 19/22LH20R * HDMI1/2: Except 19/22LH20R...
Owner's Manual
Page 30
... SETUP EXTERNAL EQUIPMENT SETUP DVI to HDMI cable or adapter is necessary. How to use I Turn on the digital set-top box. (Refer to PCM. 30 DVI doesn't support audio, so a separate audio connection is required for the digital set to Dolby/DTS/Bitstream in some DVDP/STB, make sure to change the setting to the owner's manual for this connection. G If the Audio setting is set -top box.) I 1: Except 19/22LH20R HDMI 2 HDMI /DVI IN 1 RS-232C IN (CONTROL) USB IN SERVICE...
... SETUP EXTERNAL EQUIPMENT SETUP DVI to HDMI cable or adapter is necessary. How to use I Turn on the digital set-top box. (Refer to PCM. 30 DVI doesn't support audio, so a separate audio connection is required for the digital set to Dolby/DTS/Bitstream in some DVDP/STB, make sure to change the setting to the owner's manual for this connection. G If the Audio setting is set -top box.) I 1: Except 19/22LH20R HDMI 2 HDMI /DVI IN 1 RS-232C IN (CONTROL) USB IN SERVICE...
Owner's Manual
Page 36
... provides Plug and Play capability, meaning that the PC adjusts automatically to connect 1 Connect the VGA output of time. VGA (D-Sub 15 pin) Connection RGB IN (PC) AUDIO IN 1 (RGB/DVI) 1. VIDEO AUDIO COMPONENT IN IN VIDEO L(MONO) AUDIO R OUT ANTE IN VARIABLE AUDIO OUT AV 2 1 EXTERNAL EQUIPMENT SETUP 2. RGB OUTPUT AUDIO ! If noise is present, change the PC output to another resolution, change the refresh rate to the AUDIO IN (RGB/DVI) jack on the remote control. G The synchronization input form...
... provides Plug and Play capability, meaning that the PC adjusts automatically to connect 1 Connect the VGA output of time. VGA (D-Sub 15 pin) Connection RGB IN (PC) AUDIO IN 1 (RGB/DVI) 1. VIDEO AUDIO COMPONENT IN IN VIDEO L(MONO) AUDIO R OUT ANTE IN VARIABLE AUDIO OUT AV 2 1 EXTERNAL EQUIPMENT SETUP 2. RGB OUTPUT AUDIO ! If noise is present, change the PC output to another resolution, change the refresh rate to the AUDIO IN (RGB/DVI) jack on the remote control. G The synchronization input form...

Owner's Manual
Page 59
... be used with the remote control. This TV is turned off . MENU I With the Key Lock On, the display ' X Key Lock' appears on the screen if any button on the remote control. OPTION Move Enter Menu Language Input Label SIMPLINK Key Lock Caption/Text Set ID Power Indicator Demo Mode E : English : On : Off : Off : 1 : Off OPTION Move Enter Menu Language : English Input Label SIMPLINK : On Key Lock Caption/Text Set ID : OnOff : OfOf n : 1 Power Indicator Demo Mode : Off E 1 MENU 2 ENTER Select OPTION...
... be used with the remote control. This TV is turned off . MENU I With the Key Lock On, the display ' X Key Lock' appears on the screen if any button on the remote control. OPTION Move Enter Menu Language Input Label SIMPLINK Key Lock Caption/Text Set ID Power Indicator Demo Mode E : English : On : Off : Off : 1 : Off OPTION Move Enter Menu Language : English Input Label SIMPLINK : On Key Lock Caption/Text Set ID : OnOff : OfOf n : 1 Power Indicator Demo Mode : Off E 1 MENU 2 ENTER Select OPTION...

Owner's Manual
Page 109
.... APPENDIX TROUBLESHOOTING The operation does not work . to +, - I Try another product's power cord into wall power outlet? Picture appears slowly I Is the sleep timer set : TV, VCR etc. I Test the wall power outlet, plug another channel. Poor reception on contact your antenna direction and/or location. I Station or cable product experiencing problems, tune to receive weaker station. In this case use the latest cables that the batteries are pointing the remote control directly at the...
.... APPENDIX TROUBLESHOOTING The operation does not work . to +, - I Try another product's power cord into wall power outlet? Picture appears slowly I Is the sleep timer set : TV, VCR etc. I Test the wall power outlet, plug another channel. Poor reception on contact your antenna direction and/or location. I Station or cable product experiencing problems, tune to receive weaker station. In this case use the latest cables that the batteries are pointing the remote control directly at the...


