Owner's Manual (English)
Page 1
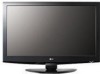
...) www.lgusa.com / www.lg.ca / www.lgcommercial.com The model and serial number of the TV is located on the back and one side of the TV. Record it for future reference. LCD TV OWNER'S MANUAL 19LH20 22LH20 26LH20 32LH20 37LH20 42LH20 22LH200C 32LH30 37LH30 42LH30 47LH30 32LF11 37LF11 42LF11 47LF11 19LU55 22LU55 26LU55 32CL10...
...) www.lgusa.com / www.lg.ca / www.lgcommercial.com The model and serial number of the TV is located on the back and one side of the TV. Record it for future reference. LCD TV OWNER'S MANUAL 19LH20 22LH20 26LH20 32LH20 37LH20 42LH20 22LH200C 32LH30 37LH30 42LH30 47LH30 32LF11 37LF11 42LF11 47LF11 19LU55 22LU55 26LU55 32CL10...

Owner's Manual (English)
Page 2
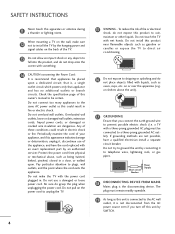
...an equilateral triangle, is encouraged to try to correct the interference by turning the equipment off and on a circuit different from LG Electronics. REFER TO QUALIFIED SERVICE PERSONNEL. Increase the separation between the equipment and receiver. - The lightning flash with the instructions... The exclamation point within the product's enclosure that the cable ground shall be of sufficient magnitude to persons. NOTE TO CABLE/TV INSTALLER This reminder is subject to the point of important operating and maintenance (servicing) instructions in a residential installation. To prevent...
...an equilateral triangle, is encouraged to try to correct the interference by turning the equipment off and on a circuit different from LG Electronics. REFER TO QUALIFIED SERVICE PERSONNEL. Increase the separation between the equipment and receiver. - The lightning flash with the instructions... The exclamation point within the product's enclosure that the cable ground shall be of sufficient magnitude to persons. NOTE TO CABLE/TV INSTALLER This reminder is subject to the point of important operating and maintenance (servicing) instructions in a residential installation. To prevent...
Owner's Manual (English)
Page 4
... the same AC power outlet as this product to rain, moisture or other liquids. Do not make sure 12 not to install the TV by SWITCH. a TV with an exact replacement part by connecting it , discontinue use a damaged or loose power cord. that appliances be certain. Periodically examine ...during a thunder or lighting storm. SAFETY INSTRUCTIONS 11 Never touch this product near flammable objects such as gasoline or candles or expose the TV to direct air conditioning. 16 Do not expose to dripping or splashing and do not place objects filled with wet hands. Do not touch...
... the same AC power outlet as this product to rain, moisture or other liquids. Do not make sure 12 not to install the TV by SWITCH. a TV with an exact replacement part by connecting it , discontinue use a damaged or loose power cord. that appliances be certain. Periodically examine ...during a thunder or lighting storm. SAFETY INSTRUCTIONS 11 Never touch this product near flammable objects such as gasoline or candles or expose the TV to direct air conditioning. 16 Do not expose to dripping or splashing and do not place objects filled with wet hands. Do not touch...
Owner's Manual (English)
Page 5
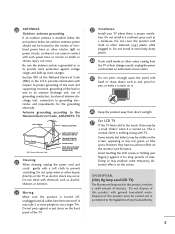
... of this product contains a small amount of overhead power lines or other odors coming from direct sunlight. 27 For LCD TV If the TV feels cold to carry larger TVs. Do not spray water or other materials (e.g.) plastic while plugged in wire to grounding electrodes and requirements for long periods...in a confined space such as death or serious injury can occur. Avoid touching the LCD screen or holding your local authority. 5 However, they have been removed. ON DISPOSAL (Only Hg lamp used LCD TV) The fluorescent lamp used in the vicinity of mercury. Do not clean with such ...
... of this product contains a small amount of overhead power lines or other odors coming from direct sunlight. 27 For LCD TV If the TV feels cold to carry larger TVs. Do not spray water or other materials (e.g.) plastic while plugged in wire to grounding electrodes and requirements for long periods...in a confined space such as death or serious injury can occur. Avoid touching the LCD screen or holding your local authority. 5 However, they have been removed. ON DISPOSAL (Only Hg lamp used LCD TV) The fluorescent lamp used in the vicinity of mercury. Do not clean with such ...
Owner's Manual (English)
Page 6
...73 Energy Saving 76 Picture Reset 77 Power Indicator 78 Demo Mode 79 CONTENTS WARNING / CAUTION 2 SAFETY INSTRUCTIONS 3 FEATURE OF THIS TV 8 PREPARATION Accessories 9 Front Panel Information 10 Back Panel Information 13 Stand Instructions 16 VESA Wall Mounting 24 Cable Management 25 Desktop Pedestal...DVD Setup 35 VCR Setup 37 Other A/V Source Setup 39 Audio out Connection 40 PC Setup 41 WATCHING TV / CHANNEL CONTROL Remote Control Functions 48 Turning On TV 50 Channel Selection 50 Volume Adjustment 50 Initial Setting 51 On-Screen Menus Selection 52 Quick Menu 53 6...
...73 Energy Saving 76 Picture Reset 77 Power Indicator 78 Demo Mode 79 CONTENTS WARNING / CAUTION 2 SAFETY INSTRUCTIONS 3 FEATURE OF THIS TV 8 PREPARATION Accessories 9 Front Panel Information 10 Back Panel Information 13 Stand Instructions 16 VESA Wall Mounting 24 Cable Management 25 Desktop Pedestal...DVD Setup 35 VCR Setup 37 Other A/V Source Setup 39 Audio out Connection 40 PC Setup 41 WATCHING TV / CHANNEL CONTROL Remote Control Functions 48 Turning On TV 50 Channel Selection 50 Volume Adjustment 50 Initial Setting 51 On-Screen Menus Selection 52 Quick Menu 53 6...
Owner's Manual (English)
Page 7
...On/Off Time Setting 95 Sleep Timer Setting 96 PARENTAL CONTROL / RATINGS Set Password & Lock System 97 Channel Blocking 100 Movie & TV Rating 101 Downloadable Rating 106 External Input Blocking 107 APPENDIX Troubleshooting 108 Maintenance 110 Product Specifications 111 IR Codes 115 External Control Through ...RS-232C 116 Open Source License 120 7 Caption Option 92 TIME SETTING Clock Setting - User Mode 83 Balance 84 TV Speakers On/Off Setup 85 Audio Reset 86 Stereo/SAP Broadcasts Setup 87 Audio Language 88 On-Screen Menus Language Selection 89 Caption ...
...On/Off Time Setting 95 Sleep Timer Setting 96 PARENTAL CONTROL / RATINGS Set Password & Lock System 97 Channel Blocking 100 Movie & TV Rating 101 Downloadable Rating 106 External Input Blocking 107 APPENDIX Troubleshooting 108 Maintenance 110 Product Specifications 111 IR Codes 115 External Control Through ...RS-232C 116 Open Source License 120 7 Caption Option 92 TIME SETTING Clock Setting - User Mode 83 Balance 84 TV Speakers On/Off Setup 85 Audio Reset 86 Stereo/SAP Broadcasts Setup 87 Audio Language 88 On-Screen Menus Language Selection 89 Caption ...
Owner's Manual (English)
Page 8
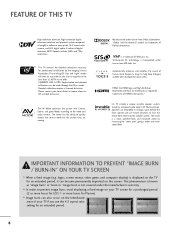
Please contact your TV screen for a prolonged period (2 or more hours for LCD, 1 or more pixels, 16:9 aspect-ratio screens, and AC3 digital audio. This phenomenon is a trademark of SRS Labs, Inc. The resulting ISF "day" and ...-D symbol are trademarks or registered trademarks of Dolby Laboratories. HDMI, the HDMI logo and High-Definition Multimedia Interface are trademarks of HDMI Licensing LLC." LG TV include a unique invisible speaker system, tuned by the Imaging Science Foundation. The AV Mode optimizes the picture into the speaker system. Automatically enhances and...
Please contact your TV screen for a prolonged period (2 or more hours for LCD, 1 or more pixels, 16:9 aspect-ratio screens, and AC3 digital audio. This phenomenon is a trademark of SRS Labs, Inc. The resulting ISF "day" and ...-D symbol are trademarks or registered trademarks of Dolby Laboratories. HDMI, the HDMI logo and High-Definition Multimedia Interface are trademarks of HDMI Licensing LLC." LG TV include a unique invisible speaker system, tuned by the Imaging Science Foundation. The AV Mode optimizes the picture into the speaker system. Automatically enhances and...
Owner's Manual (English)
Page 9
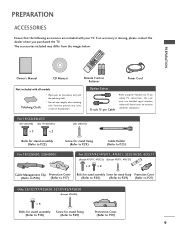
... D-sub 15 pin Cable When using the VGA (D-sub 15 pin cable) PC connection, the user must use shielded signal interface cables with your TV. PREPARATION PREPARATION ACCESSORIES Ensure that the following accessories are included with ferrite cores to P.19) 9 LIST 0 9 VOL MUTE FLASHBK ENTER CH P... (Refer to P.29) Cable Holder (Refer to P.25) For 19/22LH20, 22LH200C For 32/37/42/47LF11, 47LF21, 32CL10/20, 42CL11 (Except 47LF11, 47LF21) (Except 47LF11, 47LF21) x4 x4 or Cable Management Clip Protection Cover Bolts for stand assembly Screw for stand fixing Protection Cover...
... D-sub 15 pin Cable When using the VGA (D-sub 15 pin cable) PC connection, the user must use shielded signal interface cables with your TV. PREPARATION PREPARATION ACCESSORIES Ensure that the following accessories are included with ferrite cores to P.19) 9 LIST 0 9 VOL MUTE FLASHBK ENTER CH P... (Refer to P.29) Cable Holder (Refer to P.25) For 19/22LH20, 22LH200C For 32/37/42/47LF11, 47LF21, 32CL10/20, 42CL11 (Except 47LF11, 47LF21) (Except 47LF11, 47LF21) x4 x4 or Cable Management Clip Protection Cover Bolts for stand assembly Screw for stand fixing Protection Cover...

Owner's Manual (English)
Page 10
Illuminates blue when the TV is switched on. (Can be adjusted Power Indicator in standby mode. G p.78) CH VOL ENTER MENU INPUT CHANNEL (D,E) Buttons VOLUME (+, -) Buttons ENTER Button MENU Button ... Button POWER Button ON OFF AC power control switch (Except 19/22LH20, 22LH200C) 10 PREPARATION PREPARATION FRONT PANEL INFORMATION I Image shown may differ from your TV. 19/22/26LH20, 22LH200C INPUT Button POWER Button MENU Button ENTER Button VOLUME CHANNEL (-, +) Buttons (E,D) Buttons INPUT MENU ENTER VOL CH 32/37/42LH20, 32...
Illuminates blue when the TV is switched on. (Can be adjusted Power Indicator in standby mode. G p.78) CH VOL ENTER MENU INPUT CHANNEL (D,E) Buttons VOLUME (+, -) Buttons ENTER Button MENU Button ... Button POWER Button ON OFF AC power control switch (Except 19/22LH20, 22LH200C) 10 PREPARATION PREPARATION FRONT PANEL INFORMATION I Image shown may differ from your TV. 19/22/26LH20, 22LH200C INPUT Button POWER Button MENU Button ENTER Button VOLUME CHANNEL (-, +) Buttons (E,D) Buttons INPUT MENU ENTER VOL CH 32/37/42LH20, 32...

Owner's Manual (English)
Page 12
PREPARATION PREPARATION I Image shown may differ from your TV. 19/22LU55 INPUT Button POWER Button MENU Button ENTER Button VOLUME CHANNEL (-, +) Buttons ( , ) Buttons INPUT MENU ENTER VOL CH SPEAKER 26LU55 CH VOL ENTER MENU INPUT CHANNEL ( , ) Buttons VOLUME (+, -) Buttons ENTER Button MENU Button INPUT Button POWER Button Remote Control Sensor Power/Standby Indicator Illuminates red in standby mode. Illuminates white when the TV is switched on. 12 ❖x AC power control ❖❋❋ switch
PREPARATION PREPARATION I Image shown may differ from your TV. 19/22LU55 INPUT Button POWER Button MENU Button ENTER Button VOLUME CHANNEL (-, +) Buttons ( , ) Buttons INPUT MENU ENTER VOL CH SPEAKER 26LU55 CH VOL ENTER MENU INPUT CHANNEL ( , ) Buttons VOLUME (+, -) Buttons ENTER Button MENU Button INPUT Button POWER Button Remote Control Sensor Power/Standby Indicator Illuminates red in standby mode. Illuminates white when the TV is switched on. 12 ❖x AC power control ❖❋❋ switch
Owner's Manual (English)
Page 15
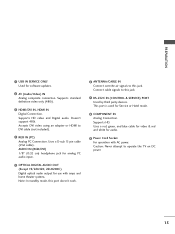
... with amps and home theater systems. Note: In standby mode, this port doesn't work. 6 ANTENNA/CABLE IN Connect over-the air signals to operate the TV on DC power. 15 AUDIO IN (RGB/DVI) 1/8" (0.32 cm) headphone jack for analog PC audio input. 5 OPTICAL DIGITAL AUDIO OUT (Except 19/22LH20, 22LH200C...
... with amps and home theater systems. Note: In standby mode, this port doesn't work. 6 ANTENNA/CABLE IN Connect over-the air signals to operate the TV on DC power. 15 AUDIO IN (RGB/DVI) 1/8" (0.32 cm) headphone jack for analog PC audio input. 5 OPTICAL DIGITAL AUDIO OUT (Except 19/22LH20, 22LH200C...
Owner's Manual (English)
Page 16
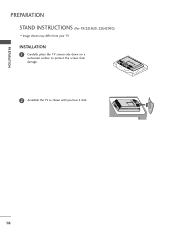
INSTALLATION 1 Carefully place the TV screen side down on a cushioned surface to protect the screen from your TV. PREPARATION PREPARATION STAND INSTRUCTIONS (For 19/22LH20, 22LH200C) I Image shown may differ from damage. 2 Assemble the TV as shown until you hear it click. 16
INSTALLATION 1 Carefully place the TV screen side down on a cushioned surface to protect the screen from your TV. PREPARATION PREPARATION STAND INSTRUCTIONS (For 19/22LH20, 22LH200C) I Image shown may differ from damage. 2 Assemble the TV as shown until you hear it click. 16
Owner's Manual (English)
Page 17
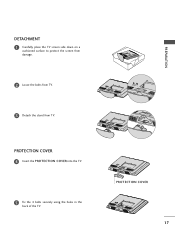
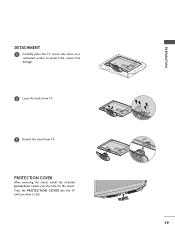
PROTECTION COVER 17 PREPARATION DETACHMENT 1 Carefully place the TV screen side down on a cushioned surface to protect the screen from damage. 2 Loose the bolts from TV. 3 Detach the stand from TV. PROTECTION COVER 4 Insert the PROTECTION COVER into the TV. 5 Fix the 4 bolts securely using the holes in the back of the TV.
PROTECTION COVER 17 PREPARATION DETACHMENT 1 Carefully place the TV screen side down on a cushioned surface to protect the screen from damage. 2 Loose the bolts from TV. 3 Detach the stand from TV. PROTECTION COVER 4 Insert the PROTECTION COVER into the TV. 5 Fix the 4 bolts securely using the holes in the back of the TV.
Owner's Manual (English)
Page 18
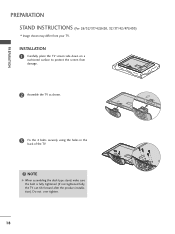
Do not over tighten. 18 INSTALLATION 1 Carefully place the TV screen side down on a cushioned surface to protect the screen from your TV. NOTE G When assembling the desk type stand, make sure the bolt is fully tightened (If not tightened fully, the TV can tilt forward after the product installation). PREPARATION PREPARATION STAND INSTRUCTIONS (For 26/32/37/42LH20, 32/37/42/47LH30) I Image shown may differ from damage. 2 Assemble the TV as shown. 3 Fix the 4 bolts securely using the holes in the back of the TV. !
Do not over tighten. 18 INSTALLATION 1 Carefully place the TV screen side down on a cushioned surface to protect the screen from your TV. NOTE G When assembling the desk type stand, make sure the bolt is fully tightened (If not tightened fully, the TV can tilt forward after the product installation). PREPARATION PREPARATION STAND INSTRUCTIONS (For 26/32/37/42LH20, 32/37/42/47LH30) I Image shown may differ from damage. 2 Assemble the TV as shown. 3 Fix the 4 bolts securely using the holes in the back of the TV. !
Owner's Manual (English)
Page 19
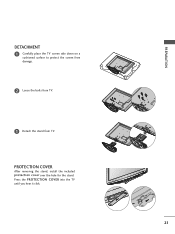
PROTECTION COVER After removing the stand, install the included protection cover over the hole for the stand. PREPARATION DETACHMENT 1 Carefully place the TV screen side down on a cushioned surface to protect the screen from damage. 2 Loose the bolts from TV. 3 Detach the stand from TV. Press the PROTECTION COVER into the TV until you hear it click. 19
PROTECTION COVER After removing the stand, install the included protection cover over the hole for the stand. PREPARATION DETACHMENT 1 Carefully place the TV screen side down on a cushioned surface to protect the screen from damage. 2 Loose the bolts from TV. 3 Detach the stand from TV. Press the PROTECTION COVER into the TV until you hear it click. 19

Owner's Manual (English)
Page 20
... tilt forward after the product installation). INSTALLATION (For 32/37/42LF11, 32CL10, 32CL20, 42CL11) 1 If your TV. Do not over tighten. 20 PREPARATION PREPARATION STAND INSTRUCTIONS (For 32/37/42/47LF11, 47LF21, 32CL10, 32CL20, 42CL11) I Image shown may differ from damage. 2 Assemble the parts of the ...STAND BODY with COVER BASE of the TV by using the holes in the back of the TV. ! STAND BODY COVER BASE 4 Fix the ...
... tilt forward after the product installation). INSTALLATION (For 32/37/42LF11, 32CL10, 32CL20, 42CL11) 1 If your TV. Do not over tighten. 20 PREPARATION PREPARATION STAND INSTRUCTIONS (For 32/37/42/47LF11, 47LF21, 32CL10, 32CL20, 42CL11) I Image shown may differ from damage. 2 Assemble the parts of the ...STAND BODY with COVER BASE of the TV by using the holes in the back of the TV. ! STAND BODY COVER BASE 4 Fix the ...
Owner's Manual (English)
Page 21
PROTECTION COVER After removing the stand, install the included protection cover over the hole for the stand. Press the PROTECTION COVER into the TV until you hear it click. 21 PREPARATION DETACHMENT 1 Carefully place the TV screen side down on a cushioned surface to protect the screen from damage. 2 Loose the bolts from TV. 3 Detach the stand from TV.
PROTECTION COVER After removing the stand, install the included protection cover over the hole for the stand. Press the PROTECTION COVER into the TV until you hear it click. 21 PREPARATION DETACHMENT 1 Carefully place the TV screen side down on a cushioned surface to protect the screen from damage. 2 Loose the bolts from TV. 3 Detach the stand from TV.
Owner's Manual (English)
Page 22
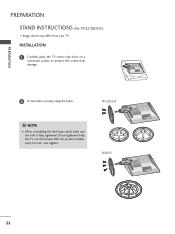
INSTALLATION 1 Carefully place the TV screen side down on a cushioned surface to protect the screen from your TV. Do not over tighten. 19" 22" 19/22LU55 19" 22" 26LU55 26" 22 NOTE G When assembling the desk type stand, make sure the bolt is fully tightened (If not tightened fully, the TV can tilt forward after the product installation). PREPARATION PREPARATION STAND INSTRUCTIONS (For 19/22/26LU55) I Image shown may differ from damage. 2 Fix the bolts securely using the holes. !
INSTALLATION 1 Carefully place the TV screen side down on a cushioned surface to protect the screen from your TV. Do not over tighten. 19" 22" 19/22LU55 19" 22" 26LU55 26" 22 NOTE G When assembling the desk type stand, make sure the bolt is fully tightened (If not tightened fully, the TV can tilt forward after the product installation). PREPARATION PREPARATION STAND INSTRUCTIONS (For 19/22/26LU55) I Image shown may differ from damage. 2 Fix the bolts securely using the holes. !

Owner's Manual (English)
Page 23
COVER BASE 4 Detach the STAND BODY from TV. PREPARATION DETACHMENT 1 Carefully place the TV screen side down on a cushioned surface to protect the screen from damage. 2 Loose the bolts and then detach the stand from TV. 19" 19/22LU55 19" 22" 22" 26LU55 26" 26" 3 Loose the bolts from TV. 19/22LU55 26LU55 STAND BODY 23 And detach the COVER BASE from TV.
COVER BASE 4 Detach the STAND BODY from TV. PREPARATION DETACHMENT 1 Carefully place the TV screen side down on a cushioned surface to protect the screen from damage. 2 Loose the bolts and then detach the stand from TV. 19" 19/22LU55 19" 22" 22" 26LU55 26" 26" 3 Loose the bolts from TV. 19/22LU55 26LU55 STAND BODY 23 And detach the COVER BASE from TV.
Owner's Manual (English)
Page 24
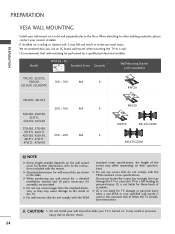
..., 42CL11 42LH20, 42LH30, 200 * 200 M6 4 42LF11, 47LF11, 47LF21, 47LH30 RW230 RW230 AW-47LG30M AW-47LG30M ! G Do not use an LG brand wall mount when mounting the TV to a wall. NOTE G Screw length needed depends on a solid wall perpendicular to the TV. G LG is not liable for TV damage or personal injury when a non-VESA or...
..., 42CL11 42LH20, 42LH30, 200 * 200 M6 4 42LF11, 47LF11, 47LF21, 47LH30 RW230 RW230 AW-47LG30M AW-47LG30M ! G Do not use an LG brand wall mount when mounting the TV to a wall. NOTE G Screw length needed depends on a solid wall perpendicular to the TV. G LG is not liable for TV damage or personal injury when a non-VESA or...


