Owners Manual
Page 11
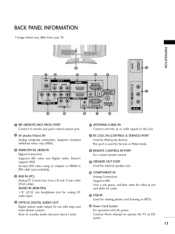
... with AC power. AUDIO IN (RGB/DVI) Uses a D-sub 15 pin cable @ SPEAKEROUT PORT Used for Service or Hotel mode. @ HDMI/DVI IN, HDMI IN Digital Connection. @ REMOTE CONTROL IN PORT For a wired remote control. OPTICAL DIGITAL AUDIO OUT Digital optical audio output for use with amps...home theater systems. @ USB IN Used for audio. Caution: Never attempt to DVl cable (not included). @ RGB IN (PC) Analog PC Connection. (VGA cable). Supports standard @ RS-232C IN (CONTROL & SERVICE) PORT Used by third party devices. Uses a red, green, and blue cable for video & red and white for...
... with AC power. AUDIO IN (RGB/DVI) Uses a D-sub 15 pin cable @ SPEAKEROUT PORT Used for Service or Hotel mode. @ HDMI/DVI IN, HDMI IN Digital Connection. @ REMOTE CONTROL IN PORT For a wired remote control. OPTICAL DIGITAL AUDIO OUT Digital optical audio output for use with amps...home theater systems. @ USB IN Used for audio. Caution: Never attempt to DVl cable (not included). @ RGB IN (PC) Analog PC Connection. (VGA cable). Supports standard @ RS-232C IN (CONTROL & SERVICE) PORT Used by third party devices. Uses a red, green, and blue cable for video & red and white for...

Owners Manual
Page 20
... on the TV using the INPUT button on the digital set-top box. (Refer to connect z m O Connect the video outputs (Y, PB, PR) of the digital set-top box to the COMPONENT IN VIDEO jacks on the TV. 2. Supported Resolutions Y, CB/PB, CR/PR Yes No Yes Yes Yes Yes Yes Yes Yes...
... on the TV using the INPUT button on the digital set-top box. (Refer to connect z m O Connect the video outputs (Y, PB, PR) of the digital set-top box to the COMPONENT IN VIDEO jacks on the TV. 2. Supported Resolutions Y, CB/PB, CR/PR Yes No Yes Yes Yes Yes Yes Yes Yes...

Owners Manual
Page 21
the HDMI/DVI m X m O No separate audio connection is necessary. m z (Refer to the owner's manual for the digital set-top box.) 01S_elect the HDMI1 or HDMI2 input source on the TV using m the INPUT button on the digital set-top box. C HDMI-DTV 26.97 2ZOO 33.71 33.75 6Z432 6Z50 23.976 24.00 29.97 30.00 59.94 60.00 21 How to connect O INon1noerct HtDheMIdig2itajal csketo-tnoptheboTxVto. m _D C 2. z HDMI supports both audio and video. HDMI Connection 1. How to use 01T_urn on the remote control.
the HDMI/DVI m X m O No separate audio connection is necessary. m z (Refer to the owner's manual for the digital set-top box.) 01S_elect the HDMI1 or HDMI2 input source on the TV using m the INPUT button on the digital set-top box. C HDMI-DTV 26.97 2ZOO 33.71 33.75 6Z432 6Z50 23.976 24.00 29.97 30.00 59.94 60.00 21 How to connect O INon1noerct HtDheMIdig2itajal csketo-tnoptheboTxVto. m _D C 2. z HDMI supports both audio and video. HDMI Connection 1. How to use 01T_urn on the remote control.

Owners Manual
Page 23
.... How to connect O tCheonnCeOcMt PtOheNEvNidTeo ouINtpuVtsIDE(YO, PjBac, kPsRo)n otfhetheTVD. MVDatctho x -t the jack colors (Y = green, PB = blue, and PR = red). Component ports on the TV Video output ports on the TV. _0 c z -t 2. z O Connect the audio outputs of the DVD to the DVD player's manual for operating instructions. c 0_Select the Component input...
.... How to connect O tCheonnCeOcMt PtOheNEvNidTeo ouINtpuVtsIDE(YO, PjBac, kPsRo)n otfhetheTVD. MVDatctho x -t the jack colors (Y = green, PB = blue, and PR = red). Component ports on the TV Video output ports on the TV. _0 c z -t 2. z O Connect the audio outputs of the DVD to the DVD player's manual for operating instructions. c 0_Select the Component input...

Owners Manual
Page 24
...Audio Left m x = white, and Audio Right = red). HDMI supports both audio and video. 2. O No separated audio connection is necessary. How to connect O CHoDnMneI/cDtVI the HINDM1IorouHtpDuMt I of2thjeackDVoDn tthoe thTeV. m z 01_Refer to the DVD player's manual for operating instructions. 24 m c -O HDMI Connection 1. How to the DVD player's manual for operating instructions... using the INPUT button on the remote control. m _o z 2. EXTERNALEQUIPMENT SETUP Composite (RCA) Connection 1. How to connect O Connect the AUDIO/VIDEO jacks between TV and DVD.
...Audio Left m x = white, and Audio Right = red). HDMI supports both audio and video. 2. O No separated audio connection is necessary. How to connect O CHoDnMneI/cDtVI the HINDM1IorouHtpDuMt I of2thjeackDVoDn tthoe thTeV. m z 01_Refer to the DVD player's manual for operating instructions. 24 m c -O HDMI Connection 1. How to the DVD player's manual for operating instructions... using the INPUT button on the remote control. m _o z 2. EXTERNALEQUIPMENT SETUP Composite (RCA) Connection 1. How to connect O Connect the AUDIO/VIDEO jacks between TV and DVD.

Owners Manual
Page 25
How to connect O Connect the RF antenna out socket of the VCR to the RF antenna in socket of the VCR. 2. O Connect the antenna cable to the ANTENNA/CABLE IN sock- VCR SETUP Antenna Connection 1. How to use 01S_et VCR output switch to 3 or 4 and then tune TV to the same channel number. 01_Insert a video tape into the VCR and press PLAY on the TV. et on the VCR. (Refer to the VCR owner's manual.) m x m _o z m XD c "O m z m c Wall Jack "O Antenna 25
How to connect O Connect the RF antenna out socket of the VCR to the RF antenna in socket of the VCR. 2. O Connect the antenna cable to the ANTENNA/CABLE IN sock- VCR SETUP Antenna Connection 1. How to use 01S_et VCR output switch to 3 or 4 and then tune TV to the same channel number. 01_Insert a video tape into the VCR and press PLAY on the TV. et on the VCR. (Refer to the VCR owner's manual.) m x m _o z m XD c "O m z m c Wall Jack "O Antenna 25

Owners Manual
Page 26
How to use 01I_nsert a video tape into the VCR and press PLAY on the VCR. (Refer to connect © z O Connect the AUDIO/VIDEO jacks between TV and VCR. PREPARATION Composite (RCA) Connection m 1. Match the jack colors (Video = yellow, Audio Left = white, and Audio Right = red). 2. How to the VCR owner's manual.) 01S0e1l_ect the AV 1 or AV2 input source on the TV using the INPUT button on the remote control. 26
How to use 01I_nsert a video tape into the VCR and press PLAY on the VCR. (Refer to connect © z O Connect the AUDIO/VIDEO jacks between TV and VCR. PREPARATION Composite (RCA) Connection m 1. Match the jack colors (Video = yellow, Audio Left = white, and Audio Right = red). 2. How to the VCR owner's manual.) 01S0e1l_ect the AV 1 or AV2 input source on the TV using the INPUT button on the remote control. 26

Owners Manual
Page 27
OTHERA/V SOURCESETUP 1. How to use 01_Select the AV I or AV2 input source on the TV using the IN PUT button on the remote control. 01_Operate the corresponding external equipment. Camcorder Video Game Set -O _o m _o © z 27 How to connect 0 Connect the AUDIO/VIDEO jacks between TV and external equipment. Match the jack colors. (Video = yellow, Audio Left = white, and Audio Right = red) 2.
OTHERA/V SOURCESETUP 1. How to use 01_Select the AV I or AV2 input source on the TV using the IN PUT button on the remote control. 01_Operate the corresponding external equipment. Camcorder Video Game Set -O _o m _o © z 27 How to connect 0 Connect the AUDIO/VIDEO jacks between TV and external equipment. Match the jack colors. (Video = yellow, Audio Left = white, and Audio Right = red) 2.

Owners Manual
Page 36
... program channels such as 2-1,2-2, etc. INFO Displays channel information at the top of the screen. _ p.47 AV MODE Toggles through inputs. INPUT Rotates through preset Video and Audio modes. _ p.50 POWER Turns the TV on -screen displays and return to the last channel viewed. z LIST Displays the channel table. _ p.45 < FLASHBK...
... program channels such as 2-1,2-2, etc. INFO Displays channel information at the top of the screen. _ p.47 AV MODE Toggles through inputs. INPUT Rotates through preset Video and Audio modes. _ p.50 POWER Turns the TV on -screen displays and return to the last channel viewed. z LIST Displays the channel table. _ p.45 < FLASHBK...

Owners Manual
Page 47
... signal in TV and HDMI input source. @ Program finish time @ Present time @ Banner information The original aspect ratio of the video is 4:3 The original aspect ratio of the video is 16:9 (wide) The video resolution is 720x480i The video resolution is 720x480p The video resolution is 1280x720p The video resolution is 1920x1080i The video resolution is 1920x1080p V-Chip...
... signal in TV and HDMI input source. @ Program finish time @ Present time @ Banner information The original aspect ratio of the video is 4:3 The original aspect ratio of the video is 16:9 (wide) The video resolution is 720x480i The video resolution is 720x480p The video resolution is 1280x720p The video resolution is 1920x1080i The video resolution is 1920x1080p V-Chip...

Owners Manual
Page 50
... Mode" fT1 return to select the desired source. N © H Off: Disables the AV MODE. Z 01C_inema: Optimizes video and audio for watching movies. © 01S_port: Optimizes video and audio for watching sports events. 01G_ ame: Optimizes video and audio for "PICTURE menu - Cinema will be selected both for playing games. 50 N -r" z 0_,If you...
... Mode" fT1 return to select the desired source. N © H Off: Disables the AV MODE. Z 01C_inema: Optimizes video and audio for watching movies. © 01S_port: Optimizes video and audio for watching sports events. 01G_ ame: Optimizes video and audio for "PICTURE menu - Cinema will be selected both for playing games. 50 N -r" z 0_,If you...

Owners Manual
Page 63
.... Just Scan operates only in correct proportion. However, the top and bottom portions of Zoom. Just Scan turns off this cropping and shows the complete video. Zoom Choose Zoom when you want to view a picture with cinemascope aspect ratio (2.35:1) without any alteration. 16:9 Adjust the picture horizontally, in ...the screen. 63 to match (4:3-_ 4:3) (16:9 -_ 16:9) Cinema Zoom Choose Cinema Zoom when you want to enlarge the picture in DTV/CADTV/Component/HDMI-DTV/DVI-DTV (720p/1080i/1080p) input source. This enlarges an image with an original 4:3 aspect ratio.
.... Just Scan operates only in correct proportion. However, the top and bottom portions of Zoom. Just Scan turns off this cropping and shows the complete video. Zoom Choose Zoom when you want to view a picture with cinemascope aspect ratio (2.35:1) without any alteration. 16:9 Adjust the picture horizontally, in ...the screen. 63 to match (4:3-_ 4:3) (16:9 -_ 16:9) Cinema Zoom Choose Cinema Zoom when you want to enlarge the picture in DTV/CADTV/Component/HDMI-DTV/DVI-DTV (720p/1080i/1080p) input source. This enlarges an image with an original 4:3 aspect ratio.

Owners Manual
Page 66
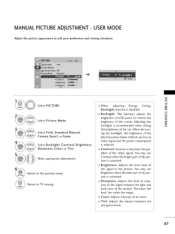
... the contrast, brightness, color and sharpness for vivid picture. 01S_tandard: This is the mode to realize Return to adjust the video in detail for video quality expert and general user. 01Y_ou can use a preset, change each setting manually. optimum viewing condition for the general user... available in the retail store. You can also adjust Picture the Q.MENU. "O N C _D Select PICTURE. Return to maximize the effect of the video in the user menus. N © Z _D Select Picture Mode. © 01_Vivid, Standard, Natural, Cinema, Sport, and Game Settings are factory...
... the contrast, brightness, color and sharpness for vivid picture. 01S_tandard: This is the mode to realize Return to adjust the video in detail for video quality expert and general user. 01Y_ou can use a preset, change each setting manually. optimum viewing condition for the general user... available in the retail store. You can also adjust Picture the Q.MENU. "O N C _D Select PICTURE. Return to maximize the effect of the video in the user menus. N © Z _D Select Picture Mode. © 01_Vivid, Standard, Natural, Cinema, Sport, and Game Settings are factory...
Owners Manual
Page 67
Select Picture Mode. Adjusting the _D O backlight is disabled. "O N Select PICTURE. the brightness of the video signal. dient of the set. You may use Brightness when the dark part of the picture is saturated. Color: Adjusts intensity...: Increase or decrease the gra- Contrast when the bright part of the signal in Select Backlight, Contrast, Brightness, video signal and the power consumption is saturated. Return to control the Z brightness of LCD panel, to the previous menu. m N Backlight: This function adjusts the O brightness of the screen. Sharpness: ...
Select Picture Mode. Adjusting the _D O backlight is disabled. "O N Select PICTURE. the brightness of the video signal. dient of the set. You may use Brightness when the dark part of the picture is saturated. Color: Adjusts intensity...: Increase or decrease the gra- Contrast when the bright part of the signal in Select Backlight, Contrast, Brightness, video signal and the power consumption is saturated. Return to control the Z brightness of LCD panel, to the previous menu. m N Backlight: This function adjusts the O brightness of the screen. Sharpness: ...

Owners Manual
Page 68
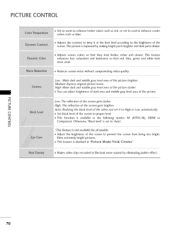
PICTURE CONTROL PICTURE IMPROVEMENT TECHNOLOGY You can set the video value according to the special video screen. O Select Advanced Control. Reset "O N C m N O Z Select PICTURE. Return to TV viewing. 68 Select your desired options. Return to the previous menu. To reset to the factory default after making adjustments to each input source, execute the Picture function for each Picture Mode or set the video seeing differently for each Picture Mode. Make appropriate adjustments. You can calibrate the screen for each input.
PICTURE CONTROL PICTURE IMPROVEMENT TECHNOLOGY You can set the video value according to the special video screen. O Select Advanced Control. Reset "O N C m N O Z Select PICTURE. Return to TV viewing. 68 Select your desired options. Return to the previous menu. To reset to the factory default after making adjustments to each input source, execute the Picture function for each Picture Mode or set the video seeing differently for each Picture Mode. Make appropriate adjustments. You can calibrate the screen for each input.
Owners Manual
Page 70
.... Otherwise, 'Black level' is set to cool to High or Low automatically. mmAld_just the brightness of the screen. Makes video clips recorded in film look more natural by making bright parts brighter and dark parts darker. miAnidjusts the contrast to keep it to ...black level of the picture. n_This feature is available in "Picture Mode-Vivid, Cinema". Z This function is disabled in the following modes: AV (NTSC-M), HDMI or _D Component. miAnidjusts screen colors so that red, blue, green and white look more vivid. nHYou can adjust brightness of dark area and middle...
.... Otherwise, 'Black level' is set to cool to High or Low automatically. mmAld_just the brightness of the screen. Makes video clips recorded in film look more natural by making bright parts brighter and dark parts darker. miAnidjusts the contrast to keep it to ...black level of the picture. n_This feature is available in "Picture Mode-Vivid, Cinema". Z This function is disabled in the following modes: AV (NTSC-M), HDMI or _D Component. miAnidjusts screen colors so that red, blue, green and white look more vivid. nHYou can adjust brightness of dark area and middle...

Owners Manual
Page 71
... Red/Green/Blue/Yellow/Cya n/Magenta. Red/Green/Blue/Yellow/Cyan, Magenta Tint: The adjustment range is inputted through HDMI. Maximize the utilization of a different video to selectively adjust the 6 color areas (Red/Green/Blue/Yellow/Cya n/M agenta). Show clearer and distinctive yet natural... edges in RGB-PC and HDMI-PC mode. You can adjust Red, Green or Blue accord- Cinema, Expert" when xvYCC signal is -3;0 - +3;0. - O ...
... Red/Green/Blue/Yellow/Cya n/Magenta. Red/Green/Blue/Yellow/Cyan, Magenta Tint: The adjustment range is inputted through HDMI. Maximize the utilization of a different video to selectively adjust the 6 color areas (Red/Green/Blue/Yellow/Cya n/M agenta). Show clearer and distinctive yet natural... edges in RGB-PC and HDMI-PC mode. You can adjust Red, Green or Blue accord- Cinema, Expert" when xvYCC signal is -3;0 - +3;0. - O ...

Owners Manual
Page 82
SOUND & LANGUAGE CONTROL TV SPEAKERSON/OFF SETUP Turn the TV speakers off if using external audio equipment. In AV, Component, RGB and HDMI with HDMI to the previous menu. c l'rl N Select On or Off. 0 Z .-I 0 Return to DVl cable, the TV speaker can be operational when there is no video signal. If you wish to TV viewing. 82 even O c Z Select AUDIO. Return to use an external Hi-Fi system or a SRS System, turn offthe TV's internal speakers. z Select TV Speaker.
SOUND & LANGUAGE CONTROL TV SPEAKERSON/OFF SETUP Turn the TV speakers off if using external audio equipment. In AV, Component, RGB and HDMI with HDMI to the previous menu. c l'rl N Select On or Off. 0 Z .-I 0 Return to DVl cable, the TV speaker can be operational when there is no video signal. If you wish to TV viewing. 82 even O c Z Select AUDIO. Return to use an external Hi-Fi system or a SRS System, turn offthe TV's internal speakers. z Select TV Speaker.

Owners Manual
Page 104
... another channel. APPENDIX TROUBLESHOOTING Check to -). i,i,Iis the power cord inserted into the outlet where the product's power cord was plugged in. i,i,Ai re the video cables installed properly? -O -O m i,i,Affctivate any object between the product and the VCR. i,i,Si tation signal is set ? Ensure that the correct remote operating mode is...
... another channel. APPENDIX TROUBLESHOOTING Check to -). i,i,Iis the power cord inserted into the outlet where the product's power cord was plugged in. i,i,Ai re the video cables installed properly? -O -O m i,i,Affctivate any object between the product and the VCR. i,i,Si tation signal is set ? Ensure that the correct remote operating mode is...

Owners Manual
Page 105
...source. Press MUTE button. The problem may result in an unusual noise when the product is not available for the video card in menu option. miCniheck HDMI cable over version 2.0. mmUls_e normal MP3 file. *This feature is turned on the PC. miAni change in ambient... humidity or temperature may be with the product. x Check the manual for all models. mmArme the audio cables installed properly? miCniheck USB cable over ...
...source. Press MUTE button. The problem may result in an unusual noise when the product is not available for the video card in menu option. miCniheck HDMI cable over version 2.0. mmUls_e normal MP3 file. *This feature is turned on the PC. miAni change in ambient... humidity or temperature may be with the product. x Check the manual for all models. mmArme the audio cables installed properly? miCniheck USB cable over ...


