Owner's Manual (English)
Page 2
... Class B digital device This equipment has been tested and found to comply with the instructions, may be determined by turning the equipment off and on a circuit different from LG Electronics. This equipment generates, uses and can be of sufficient magnitude to an outlet on , the user is connected...product in any way without written authorization from that interference will not occur in the literature accompanying the appliance. NOTE TO CABLE/TV INSTALLER This reminder is no guarantee that to which can radiate radio frequency energy and, if not installed and used in accordance...
... Class B digital device This equipment has been tested and found to comply with the instructions, may be determined by turning the equipment off and on a circuit different from LG Electronics. This equipment generates, uses and can be of sufficient magnitude to an outlet on , the user is connected...product in any way without written authorization from that interference will not occur in the literature accompanying the appliance. NOTE TO CABLE/TV INSTALLER This reminder is no guarantee that to which can radiate radio frequency energy and, if not installed and used in accordance...

Owner's Manual (English)
Page 5
...If you smell smoke or other electric light or power circuits, or where it . 20 ANTENNAS Outdoor antenna grounding If an outdoor antenna is turned off, unplugged and all cables have been removed. Do not clean with a soft cloth to grounding electrodes and requirements for the grounding electrode.... and built-up static charges. Ground Clamp Electric Service Equipment NEC: National Electrical Code Antenna Lead in . Antenna grounding according to carry larger TVs. Do not press against or put stress on the front panel of the National Electrical Code (NEC) in the U.S.A. Do not cover the...
...If you smell smoke or other electric light or power circuits, or where it . 20 ANTENNAS Outdoor antenna grounding If an outdoor antenna is turned off, unplugged and all cables have been removed. Do not clean with a soft cloth to grounding electrodes and requirements for the grounding electrode.... and built-up static charges. Ground Clamp Electric Service Equipment NEC: National Electrical Code Antenna Lead in . Antenna grounding according to carry larger TVs. Do not press against or put stress on the front panel of the National Electrical Code (NEC) in the U.S.A. Do not cover the...

Owner's Manual (English)
Page 6
... VESA Wall Mounting 13 Cable Management 14 Desktop Pedestal Installation 15 Swivel Stand 15 Attaching the TV to a Desk 15 Securing the TV to the wall to prevent falling when the TV is used on a stand 16 Antenna or Cable Connection 17 EXTERNAL EQUIPMENT SETUP HD Receiver...Source Setup 25 PC Setup 26 USB Connection 32 Audio Out Connection 33 WATCHING TV / CHANNEL CONTROL Remote Control Functions 34 Turning On the TV 36 Channel Selection 36 Volume Adjustment 36 Quick Menu / Favorite Channel Setup 37 Initial Setting 38 On-Screen Menus Selection 39 Channel Setup - Picture Mode -...
... VESA Wall Mounting 13 Cable Management 14 Desktop Pedestal Installation 15 Swivel Stand 15 Attaching the TV to a Desk 15 Securing the TV to the wall to prevent falling when the TV is used on a stand 16 Antenna or Cable Connection 17 EXTERNAL EQUIPMENT SETUP HD Receiver...Source Setup 25 PC Setup 26 USB Connection 32 Audio Out Connection 33 WATCHING TV / CHANNEL CONTROL Remote Control Functions 34 Turning On the TV 36 Channel Selection 36 Volume Adjustment 36 Quick Menu / Favorite Channel Setup 37 Initial Setting 38 On-Screen Menus Selection 39 Channel Setup - Picture Mode -...
Owner's Manual (English)
Page 8
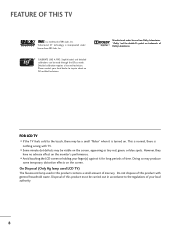
...may produce some temporary distortion effects on . Disposal of your finger(s) against it is turned on the screen. FEATURE OF THIS TV is a trademark of this product with TV. FOR LCD TV I Avoid touching the LCD screen or holding your local authority. 8 Do not dispose of SRS Labs, Inc. ...TruSurround XT technology is nothing wrong with general household waste. On Disposal (Only Hg lamp used LCD TV) The fluorescent lamp used in accordance to inquire about an ISF certified technician. Doing so may be visible on the monitor's performance. ...
...may produce some temporary distortion effects on . Disposal of your finger(s) against it is turned on the screen. FEATURE OF THIS TV is a trademark of this product with TV. FOR LCD TV I Avoid touching the LCD screen or holding your local authority. 8 Do not dispose of SRS Labs, Inc. ...TruSurround XT technology is nothing wrong with general household waste. On Disposal (Only Hg lamp used LCD TV) The fluorescent lamp used in accordance to inquire about an ISF certified technician. Doing so may be visible on the monitor's performance. ...

Owner's Manual (English)
Page 13
...the TV installation instructions. G LG is not liable for these kinds of the screws may differ depending on their specifications. If installed on a ceiling or slanted wall, it may result in personal injury due to other building materials, please contact your nearest dealer. A B Product LCD TV Model ...to the instructions included with the VESA standard screw specifications. It may fall , leading to the TV. Do not use screws that do not comply with the mount. LG is turned on. G For wall mounts that do not comply with the VESA standard screw specifications, the...
...the TV installation instructions. G LG is not liable for these kinds of the screws may differ depending on their specifications. If installed on a ceiling or slanted wall, it may result in personal injury due to other building materials, please contact your nearest dealer. A B Product LCD TV Model ...to the instructions included with the VESA standard screw specifications. It may fall , leading to the TV. Do not use screws that do not comply with the mount. LG is turned on. G For wall mounts that do not comply with the VESA standard screw specifications, the...

Owner's Manual (English)
Page 18
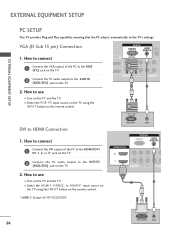
EXTERNAL EQUIPMENT SETUP EXTERNAL EQUIPMENT SETUP I To prevent the equipment damage, never plug in any power cords until you do receive digital signals from your TV. Y PB PR L R 1 2 RGB IN RGB(PC) AUDIO REMOTE (RGB/DVI) CONTROL DVI IN (C 2 Y 1 PB PR L R VIDEO AUDIO COMPONENT IN...jacks on the remote control. How to use I Select the Component 1 input source on the TV using the INPUT button on the TV. 2. operation) I Turn on the TV. HD RECEIVER SETUP This TV can receive digital over-the-air/digital cable signals without an external digital set -top box to...
EXTERNAL EQUIPMENT SETUP EXTERNAL EQUIPMENT SETUP I To prevent the equipment damage, never plug in any power cords until you do receive digital signals from your TV. Y PB PR L R 1 2 RGB IN RGB(PC) AUDIO REMOTE (RGB/DVI) CONTROL DVI IN (C 2 Y 1 PB PR L R VIDEO AUDIO COMPONENT IN...jacks on the remote control. How to use I Select the Component 1 input source on the TV using the INPUT button on the TV. 2. operation) I Turn on the TV. HD RECEIVER SETUP This TV can receive digital over-the-air/digital cable signals without an external digital set -top box to...

Owner's Manual (English)
Page 19
... video. 2. How to use I Turn on the digital set-top box. (Refer to the owner's manual for the digital set -top box to connect 1 Connect the digital set -top box.) I Select the HDMI1, HDMI2, or HDMI3* input source on the TV using the INPUT button on the TV. 2 No separate audio connection is...
... video. 2. How to use I Turn on the digital set-top box. (Refer to the owner's manual for the digital set -top box to connect 1 Connect the digital set -top box.) I Select the HDMI1, HDMI2, or HDMI3* input source on the TV using the INPUT button on the TV. 2 No separate audio connection is...
Owner's Manual (English)
Page 20
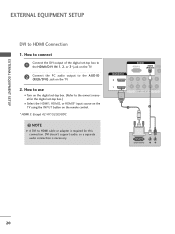
... DVI doesn't support audio, so a separate audio connection is required for the digital set -top box to the HDMI/DVI IN 1, 2, or 3* jack on the TV. 2 Connect the PC audio output to HDMI Connection 1. NOTE G A DVI to connect 1 Connect the DVI output of the digital set -top box.) I O (RGB/...cable or adapter is necessary. EXTERNAL EQUIPMENT SETUP EXTERNAL EQUIPMENT SETUP DVI to the A U D I Select the HDMI1, HDMI2, or HDMI3* input source on the TV using the INPUT button on the TV. 2. How to use I Turn on the digital set-top box. (Refer to the owner's manual for this connection.
... DVI doesn't support audio, so a separate audio connection is required for the digital set -top box to the HDMI/DVI IN 1, 2, or 3* jack on the TV. 2 Connect the PC audio output to HDMI Connection 1. NOTE G A DVI to connect 1 Connect the DVI output of the digital set -top box.) I O (RGB/...cable or adapter is necessary. EXTERNAL EQUIPMENT SETUP EXTERNAL EQUIPMENT SETUP DVI to the A U D I Select the HDMI1, HDMI2, or HDMI3* input source on the TV using the INPUT button on the TV. 2. How to use I Turn on the digital set-top box. (Refer to the owner's manual for this connection.

Owner's Manual (English)
Page 21
... ports Y on the remote control. How to connect 1 Connect the video outputs (Y, PB, PR) of the DVD to the COMPONENT IN VIDEO1 jacks on the TV. 2. Match the jack colors (Y = green, PB = blue, and PR = red). EXTERNAL EQUIPMENT SETUP DVD SETUP Component Connection 1. Y PB PR L R... 2 Connect the audio outputs of the DVD to the COMPONENT IN AUDIO1 jacks on the TV. I If connected to use I Turn on the TV. How to COMPONENT IN 2 input, select the Component 2 input source on the DVD player, insert a DVD. I Select the ...
... ports Y on the remote control. How to connect 1 Connect the video outputs (Y, PB, PR) of the DVD to the COMPONENT IN VIDEO1 jacks on the TV. 2. Match the jack colors (Y = green, PB = blue, and PR = red). EXTERNAL EQUIPMENT SETUP DVD SETUP Component Connection 1. Y PB PR L R... 2 Connect the audio outputs of the DVD to the COMPONENT IN AUDIO1 jacks on the TV. I If connected to use I Turn on the TV. How to COMPONENT IN 2 input, select the Component 2 input source on the DVD player, insert a DVD. I Select the ...

Owner's Manual (English)
Page 22
EXTERNAL EQUIPMENT SETUP EXTERNAL EQUIPMENT SETUP S-Video Connection 1. How to use I Turn on the TV. 2. S-VIDEO AUDIO L R ANTENNA/ CABLE IN 1 2 DIGITAL AUDIO OUT DIO REMOTE B/DVI) CONTROL IN OPTICAL COAXIAL RS-232C IN AUDIO OUT (CONTROL & SERVICE) L R AUDIO N AV IN 1...COMPONENT IN 1 HDMI-DVD OUTPUT 22 HDMI supports both audio and video. 2. I Select the HDMI1, HDMI2, or HDMI3* input source on the TV using the INPUT button on the TV. 2 No separate audio connection is necessary. How to connect 1 Connect the S-VIDEO output of the DVD to the S -VIDEO input on the...
EXTERNAL EQUIPMENT SETUP EXTERNAL EQUIPMENT SETUP S-Video Connection 1. How to use I Turn on the TV. 2. S-VIDEO AUDIO L R ANTENNA/ CABLE IN 1 2 DIGITAL AUDIO OUT DIO REMOTE B/DVI) CONTROL IN OPTICAL COAXIAL RS-232C IN AUDIO OUT (CONTROL & SERVICE) L R AUDIO N AV IN 1...COMPONENT IN 1 HDMI-DVD OUTPUT 22 HDMI supports both audio and video. 2. I Select the HDMI1, HDMI2, or HDMI3* input source on the TV using the INPUT button on the TV. 2 No separate audio connection is necessary. How to connect 1 Connect the S-VIDEO output of the DVD to the S -VIDEO input on the...
Owner's Manual (English)
Page 26
... and Play capability, meaning that the PC adjusts automatically to the AUDIO (RGB/DVI) jack on the TV. 2. How to use I Turn on the PC and the TV. How to use I Turn on the PC and the TV. How to connect 1 Connect the VGA output of the PC to the HDMI/DVI I O (RGB/DVI) jack... on the TV. 2 Connect the PC audio output to HDMI Connection 1. I Select the HDMI1, HDMI2, or HDMI3* input source on the TV using the...
... and Play capability, meaning that the PC adjusts automatically to the AUDIO (RGB/DVI) jack on the TV. 2. How to use I Turn on the PC and the TV. How to use I Turn on the PC and the TV. How to connect 1 Connect the VGA output of the PC to the HDMI/DVI I O (RGB/DVI) jack... on the TV. 2 Connect the PC audio output to HDMI Connection 1. I Select the HDMI1, HDMI2, or HDMI3* input source on the TV using the...
Owner's Manual (English)
Page 33
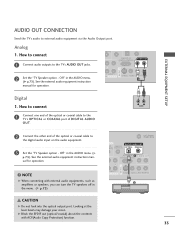
... or COAXIAL port of DIGITAL AUDIO O U T. 2 Connect the other end of the optical or coaxial cable to the TV's AUDIO OUT jacks. AUDIO IN S-VIDEO VIDEO L(MONO) AUDIO R 1 Digital L R 1. Off" in the AUDIO menu. (G p.73). See the external audio equipment instruction manual for ... beam may damage your vision. G Block the SPDIF out (optical/coaxial) about the contents with external audio equipments, such as amplifiers or speakers, you can turn the TV speakers off in the menu. (G p.73) CAUTION G Do not look into the optical output port. Off" in the AUDIO menu. (G p.73). See...
... or COAXIAL port of DIGITAL AUDIO O U T. 2 Connect the other end of the optical or coaxial cable to the TV's AUDIO OUT jacks. AUDIO IN S-VIDEO VIDEO L(MONO) AUDIO R 1 Digital L R 1. Off" in the AUDIO menu. (G p.73). See the external audio equipment instruction manual for ... beam may damage your vision. G Block the SPDIF out (optical/coaxial) about the contents with external audio equipments, such as amplifiers or speakers, you can turn the TV speakers off in the menu. (G p.73) CAUTION G Do not look into the optical output port. Off" in the AUDIO menu. (G p.73). See...

Owner's Manual (English)
Page 34
... control sensor on or off . INPUT External input modes rotate in regular sequence. TV POWER DVD STB VCR Q. POWER Turns your TV or any menu. G p.37 MUTE Switch the sound on or off , depending on -screen displays and return to TV viewing from one full set of screen information to the next one. Control USB...
... control sensor on or off . INPUT External input modes rotate in regular sequence. TV POWER DVD STB VCR Q. POWER Turns your TV or any menu. G p.37 MUTE Switch the sound on or off , depending on -screen displays and return to TV viewing from one full set of screen information to the next one. Control USB...

Owner's Manual (English)
Page 36
.... I In standby mode to , even if the power cord is programmed to remember which power state it was last set to turn TV on, press the , INPUT, CH ( ) button on the TV or press the POWER, INPUT, CH( or ), Number (0~9) button on the remote control. 2 Select the viewing source by pressing the MUTE... VOL (+ or -) button to adjust the volume. 2 If you intend to be away on the remote control. NOTE G If you want to standby mode. ! WATCHING TV / CHANNEL CONTROL WATCHING TV / CHANNEL CONTROL TURNING ON THE TV 1 First, connect power cord correctly.
.... I In standby mode to , even if the power cord is programmed to remember which power state it was last set to turn TV on, press the , INPUT, CH ( ) button on the TV or press the POWER, INPUT, CH( or ), Number (0~9) button on the remote control. 2 Select the viewing source by pressing the MUTE... VOL (+ or -) button to adjust the volume. 2 If you intend to be away on the remote control. NOTE G If you want to standby mode. ! WATCHING TV / CHANNEL CONTROL WATCHING TV / CHANNEL CONTROL TURNING ON THE TV 1 First, connect power cord correctly.

Owner's Manual (English)
Page 37
... the human sound range from what is a menu of program. I To tune to control the brightness of time before your TV turns off . I Backlight: Adjust the brightness of LCD panel to a favorite channel, press the F A V (Favorite) button repeatedly. MENU 2 Display each menu. I Del/... the viewing environment. I Sleep Timer: Select the amount of the screen. SAP: Selects MTS sound (Analog signal). MENU Return to TV viewing. 37 Make appropriate adjustments. 3 Q. Q.Menu Aspect Ratio Backlight Clear Voice Picture Mode Sound Mode Caption Multi Audio Sleep Timer CH Del/Add/...
... the human sound range from what is a menu of program. I To tune to control the brightness of time before your TV turns off . I Backlight: Adjust the brightness of LCD panel to a favorite channel, press the F A V (Favorite) button repeatedly. MENU 2 Display each menu. I Del/... the viewing environment. I Sleep Timer: Select the amount of the screen. SAP: Selects MTS sound (Analog signal). MENU Return to TV viewing. 37 Make appropriate adjustments. 3 Q. Q.Menu Aspect Ratio Backlight Clear Voice Picture Mode Sound Mode Caption Multi Audio Sleep Timer CH Del/Add/...

Owner's Manual (English)
Page 38
.... Mode Setting Step1. In Store Home Enter RETURN Exit 1 Select H o me Mode. 2 ENTER Step2. Option Setting 1. We recommend setting the TV to preset in the OPTION menu. Option Setting Step3. Do you want to easily set the essential items for viewing the...mode after 5 minutes. I You can also be displayed on the screen when turning the TV on for the first time when purchasing the TV. I "In-store" Mode is "H o m e". Picture mode" manually while inspecting the TV, but the TV will be activated from the user menus. Mode Setting ! OSD Language Setting 2....
.... Mode Setting Step1. In Store Home Enter RETURN Exit 1 Select H o me Mode. 2 ENTER Step2. Option Setting 1. We recommend setting the TV to preset in the OPTION menu. Option Setting Step3. Do you want to easily set the essential items for viewing the...mode after 5 minutes. I You can also be displayed on the screen when turning the TV on for the first time when purchasing the TV. I "In-store" Mode is "H o m e". Picture mode" manually while inspecting the TV, but the TV will be activated from the user menus. Mode Setting ! OSD Language Setting 2....

Owner's Manual (English)
Page 40
... changes. CHANNEL Auto Tuning Manual Tuning Channel Edit Move Enter CHANNEL Auto Tuning Manual Tuning Channel Edit Move Enter Press 'Yes' button to TV viewing. WATCHING TV / CHANNEL CONTROL WATCHING TV / CHANNEL CONTROL CHANNEL SETUP Auto Scan (Auto Tuning) Automatically finds all channels available through antenna or cable inputs, and stores them in... No 1 MENU Select CHANNEL. 2 ENTER Select Auto Tuning. 3 ENTER Select Y e s. 4 ENTER Run Auto tuning. 5 RETURN Return to Auto Tuning menu if the Lock System is turned on the channel list.
... changes. CHANNEL Auto Tuning Manual Tuning Channel Edit Move Enter CHANNEL Auto Tuning Manual Tuning Channel Edit Move Enter Press 'Yes' button to TV viewing. WATCHING TV / CHANNEL CONTROL WATCHING TV / CHANNEL CONTROL CHANNEL SETUP Auto Scan (Auto Tuning) Automatically finds all channels available through antenna or cable inputs, and stores them in... No 1 MENU Select CHANNEL. 2 ENTER Select Auto Tuning. 3 ENTER Select Y e s. 4 ENTER Run Auto tuning. 5 RETURN Return to Auto Tuning menu if the Lock System is turned on the channel list.

Owner's Manual (English)
Page 41
... CHANNEL. Select Manual Tuning. Select D T V, T V, CADTV, or C A T V. I A password is required to gain access to Manual Tuning menu if the Lock System is turned on -screen signal strength monitor to add or delete. MENU Return to the previous menu. ENTER Select A d d or D e l e t e. 6 RETURN Return to... TV viewing. Select channel you can view the on . 41 CHANNEL Auto Tuning Manual Tuning Channel Edit Move Enter CHANNEL Auto Tuning Manual Tuning Channel ...
... CHANNEL. Select Manual Tuning. Select D T V, T V, CADTV, or C A T V. I A password is required to gain access to Manual Tuning menu if the Lock System is turned on -screen signal strength monitor to add or delete. MENU Return to the previous menu. ENTER Select A d d or D e l e t e. 6 RETURN Return to... TV viewing. Select channel you can view the on . 41 CHANNEL Auto Tuning Manual Tuning Channel Edit Move Enter CHANNEL Auto Tuning Manual Tuning Channel ...

Owner's Manual (English)
Page 46
...the Input source with HDMI cable without additional cables and settings. To start using it on the remote control, the SIMPLINK device will stop. WATCHING TV / CHANNEL CONTROL This function operates only with devices with the HDMI cable. MENU Return to the previous menu. NOTE G Connect the HDMI/DVI ...control and play the audio from the TV, connect the DIGITAL AUDIO OUT terminal on the back of the TV to the DIGITAL AUDIO IN terminal on the back of the SIMPLINK device with the logo. The TV might not function properly when using SIMPLINK, turn it with other AV devices connected with...
...the Input source with HDMI cable without additional cables and settings. To start using it on the remote control, the SIMPLINK device will stop. WATCHING TV / CHANNEL CONTROL This function operates only with devices with the HDMI cable. MENU Return to the previous menu. NOTE G Connect the HDMI/DVI ...control and play the audio from the TV, connect the DIGITAL AUDIO OUT terminal on the back of the TV to the DIGITAL AUDIO IN terminal on the back of the SIMPLINK device with the logo. The TV might not function properly when using SIMPLINK, turn it with other AV devices connected with...

Owner's Manual (English)
Page 47
... When multiple discs are available, the titles 1 of discs are turned off the TV, all connected devices are conveniently displayed at the 2 bottom of the current mode. 2 DISC playback: Select and play discs. WATCHING TV / CHANNEL CONTROL SIMPLINK Functions I Sync Power on: When you play... the connected AV device, TV will automatically turn on. (A device, which is connected (displayed in HDD. 5 Audio Out to Home Theater ...
... When multiple discs are available, the titles 1 of discs are turned off the TV, all connected devices are conveniently displayed at the 2 bottom of the current mode. 2 DISC playback: Select and play discs. WATCHING TV / CHANNEL CONTROL SIMPLINK Functions I Sync Power on: When you play... the connected AV device, TV will automatically turn on. (A device, which is connected (displayed in HDD. 5 Audio Out to Home Theater ...


