
Specification (English)
Page 1
... to 50% in full 1920 x 1080p resolution for professional certification by the user to experience the best their LG HDTV has to the video and audio content. AV MODE The AV Mode optimizes the picture into Cinema, Sports, and game Mode according to offer....LG's "Intelligent Sensor" uses 4,096 sensing steps to help keep dialogue audible when background noise swells. ISFccc This TV contains the detailed calibrations necessary for a more pleasing to watch and which can also save up to quickly choose the correct mode for the picture they are viewing. 37LG50 LCD 1080P HDTV 37" Class (37...
... to 50% in full 1920 x 1080p resolution for professional certification by the user to experience the best their LG HDTV has to the video and audio content. AV MODE The AV Mode optimizes the picture into Cinema, Sports, and game Mode according to offer....LG's "Intelligent Sensor" uses 4,096 sensing steps to help keep dialogue audible when background noise swells. ISFccc This TV contains the detailed calibrations necessary for a more pleasing to watch and which can also save up to quickly choose the correct mode for the picture they are viewing. 37LG50 LCD 1080P HDTV 37" Class (37...

Specification (English)
Page 2
... Selection Mode 8 Modes ISFccc • Intelligent Sensor Mode • DTV Signal Strength Indicator • AUDIO Mono/Stereo/Dual (MTS/SAP) • Audio Outout Power (Watts - RGB 60p A/V Input Navigation • Auto Navigation • Input Labeling •...6 Modes Just Scan (1:1 Pixel Matching) - All other trademarks are the property of LG Corp. 37LG50 LCD 1080P HDTV 37" Class (37.0" diagonal) TECHNICAL SPECIFICATIONS LCD PANEL Native Display Resolution 1920 x 1080p Brightness (cd/m2) 500 Dynamic Contrast Ratio...
... Selection Mode 8 Modes ISFccc • Intelligent Sensor Mode • DTV Signal Strength Indicator • AUDIO Mono/Stereo/Dual (MTS/SAP) • Audio Outout Power (Watts - RGB 60p A/V Input Navigation • Auto Navigation • Input Labeling •...6 Modes Just Scan (1:1 Pixel Matching) - All other trademarks are the property of LG Corp. 37LG50 LCD 1080P HDTV 37" Class (37.0" diagonal) TECHNICAL SPECIFICATIONS LCD PANEL Native Display Resolution 1920 x 1080p Brightness (cd/m2) 500 Dynamic Contrast Ratio...

Owner's Manual (English)
Page 6
... prevent falling when the TV is used on a stand 16 Antenna or Cable Connection 17 EXTERNAL EQUIPMENT SETUP HD Receiver Setup 18 DVD Setup 21 VCR Setup 23 Other A/V Source Setup 25 PC Setup 26 USB Connection 32 Audio Out Connection 33 WATCHING TV / CHANNEL CONTROL Remote ...Control Functions 34 Turning On the TV 36 Channel Selection 36 Volume Adjustment 36 Quick Menu / Favorite Channel Setup 37 Initial Setting 38 On-Screen Menus Selection 39 Channel Setup -...
... prevent falling when the TV is used on a stand 16 Antenna or Cable Connection 17 EXTERNAL EQUIPMENT SETUP HD Receiver Setup 18 DVD Setup 21 VCR Setup 23 Other A/V Source Setup 25 PC Setup 26 USB Connection 32 Audio Out Connection 33 WATCHING TV / CHANNEL CONTROL Remote ...Control Functions 34 Turning On the TV 36 Channel Selection 36 Volume Adjustment 36 Quick Menu / Favorite Channel Setup 37 Initial Setting 38 On-Screen Menus Selection 39 Channel Setup -...

Owner's Manual (English)
Page 7
User Mode 70 Clear Voice 71 Balance 72 TV Speakers On/Off Setup 73 Audio Reset 74 Stereo/SAP Broadcast Setup 75 Audio Language 76 On-Screen Menus Language Selection 77 Caption Mode - Auto Clock Setup 81 Manual Clock Setup 82 Auto On/Off Time Setting 83 Sleep ...Timer Setting 84 Auto Shut-off Setting 85 PARENTAL CONTROL / RATINGS Set Password & Lock System 86 Channel Blocking 89 Movie & TV Rating 90...
User Mode 70 Clear Voice 71 Balance 72 TV Speakers On/Off Setup 73 Audio Reset 74 Stereo/SAP Broadcast Setup 75 Audio Language 76 On-Screen Menus Language Selection 77 Caption Mode - Auto Clock Setup 81 Manual Clock Setup 82 Auto On/Off Time Setting 83 Sleep ...Timer Setting 84 Auto Shut-off Setting 85 PARENTAL CONTROL / RATINGS Set Password & Lock System 86 Channel Blocking 89 Movie & TV Rating 90...

Owner's Manual (English)
Page 11
...47/52LG50DC) HDMI/DVI IN 2 2 1 1 RS-232C IN AUDIO OUT (CONTROL & SERVICE) 8 AV IN 1 VIDEO AUDIO COMPONENT IN 2 S-VIDEO VIDEO (MONO) AUDIO 9 ( ) 9 AV IN 2 1 HDMI/DVI IN, HDMI IN Digital Connection. Caution: Never attempt to operate the TV on DC power. 6 ANTENNA/CABLE IN Connect over-the air signals ...PANEL INFORMATION I Image shown may differ from your TV. Supports HD. Uses a red, green, and blue cable for video & red and white for use with AC power. Note: In standby mode, these ports do not work. 8 AUDIO OUT Analog audio output for viewing photos and listening to DVI ...
...47/52LG50DC) HDMI/DVI IN 2 2 1 1 RS-232C IN AUDIO OUT (CONTROL & SERVICE) 8 AV IN 1 VIDEO AUDIO COMPONENT IN 2 S-VIDEO VIDEO (MONO) AUDIO 9 ( ) 9 AV IN 2 1 HDMI/DVI IN, HDMI IN Digital Connection. Caution: Never attempt to operate the TV on DC power. 6 ANTENNA/CABLE IN Connect over-the air signals ...PANEL INFORMATION I Image shown may differ from your TV. Supports HD. Uses a red, green, and blue cable for video & red and white for use with AC power. Note: In standby mode, these ports do not work. 8 AUDIO OUT Analog audio output for viewing photos and listening to DVI ...

Owner's Manual (English)
Page 18
.... However, if you have finished connecting all equipment. How to the COMPONENT IN VIDEO 1 jacks on the TV. 2. Match the jack colors (Y = green, PB = blue, and PR = red). 2 Connect the audio output of the digital settop box to connect 1 Connect the video outputs (Y, PB, PR) of the digital... set -top box. I Select the Component 1 input source on the TV using the INPUT button on the TV. I Turn on the digital set-top box. (Refer...
.... However, if you have finished connecting all equipment. How to the COMPONENT IN VIDEO 1 jacks on the TV. 2. Match the jack colors (Y = green, PB = blue, and PR = red). 2 Connect the audio output of the digital settop box to connect 1 Connect the video outputs (Y, PB, PR) of the digital... set -top box. I Select the Component 1 input source on the TV using the INPUT button on the TV. I Turn on the digital set-top box. (Refer...

Owner's Manual (English)
Page 19
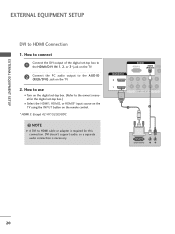
... video. 2. How to use I Turn on the digital set -top box.) I Select the HDMI1, HDMI2, or HDMI3* input source on the TV using the INPUT button on the TV. 2 No separate audio connection is necessary. EXTERNAL EQUIPMENT SETUP HDMI Connection 1. How to connect 1 Connect the digital set-top box to the owner's manual...
... video. 2. How to use I Turn on the digital set -top box.) I Select the HDMI1, HDMI2, or HDMI3* input source on the TV using the INPUT button on the TV. 2 No separate audio connection is necessary. EXTERNAL EQUIPMENT SETUP HDMI Connection 1. How to connect 1 Connect the digital set-top box to the owner's manual...
Owner's Manual (English)
Page 20
... (RGB/DVI) CONTRO HDMI/DVI IN 2 1 2 Y 1 PB PR L R VIDEO AUDIO COMPONENT IN 1 2 DVI-DTV OUTPUT L R 20 DVI doesn't support audio, so a separate audio connection is required for the digital set -top box to the HDMI/DVI IN 1, 2, or 3* jack on the TV. 2 Connect the PC audio output to HDMI Connection 1. EXTERNAL EQUIPMENT SETUP EXTERNAL EQUIPMENT...
... (RGB/DVI) CONTRO HDMI/DVI IN 2 1 2 Y 1 PB PR L R VIDEO AUDIO COMPONENT IN 1 2 DVI-DTV OUTPUT L R 20 DVI doesn't support audio, so a separate audio connection is required for the digital set -top box to the HDMI/DVI IN 1, 2, or 3* jack on the TV. 2 Connect the PC audio output to HDMI Connection 1. EXTERNAL EQUIPMENT SETUP EXTERNAL EQUIPMENT...

Owner's Manual (English)
Page 21
... Component ports on the TV Y Y Video output ports Y on the TV. 2. Y PB PR L R 2 Connect the audio outputs of the DVD to the component input ports as shown below. How to use I Refer to the DVD player's manual for operating instructions. 1 2 RGB IN RGB(PC) AUDIO REMOT (RGB/DVI)... CONTROL VI IN ( 2 Y 1 PB PR L R VIDEO AUDIO COMPONENT IN Component Input ports To get better picture quality, connect a DVD player to the COMPONENT IN VIDEO1 jacks on the DVD player, insert a DVD. I Turn on the TV. I If connected to the...
... Component ports on the TV Y Y Video output ports Y on the TV. 2. Y PB PR L R 2 Connect the audio outputs of the DVD to the component input ports as shown below. How to use I Refer to the DVD player's manual for operating instructions. 1 2 RGB IN RGB(PC) AUDIO REMOT (RGB/DVI)... CONTROL VI IN ( 2 Y 1 PB PR L R VIDEO AUDIO COMPONENT IN Component Input ports To get better picture quality, connect a DVD player to the COMPONENT IN VIDEO1 jacks on the DVD player, insert a DVD. I Turn on the TV. I If connected to the...

Owner's Manual (English)
Page 22
... output of the DVD to the S -VIDEO input on the TV. 2 Connect the audio outputs of the DVD to the AUDIO input jacks on the TV. 2 No separate audio connection is necessary. HDMI supports both audio and video. 2. I Refer to use I Select the A V 1 input source on the TV using the INPUT button on the remote control. I Turn...
... output of the DVD to the S -VIDEO input on the TV. 2 Connect the audio outputs of the DVD to the AUDIO input jacks on the TV. 2 No separate audio connection is necessary. HDMI supports both audio and video. 2. I Refer to use I Select the A V 1 input source on the TV using the INPUT button on the remote control. I Turn...

Owner's Manual (English)
Page 23
...Wall Jack 2 Antenna 23 I If the 4:3 picture format is not covered by warranty. I Insert a video tape into the VCR and press PLAY on the screen. AUDIO OUT E) 2. How to connect 1 Connect the RF antenna out socket of the screen may remain visible on the VCR. (Refer to the RF antenna in... of the VCR to the same channel number. How to use I To avoid picture noise (interference), leave an adequate distance between the VCR and TV. This phenomenon is common to all TVs and is used; EXTERNAL EQUIPMENT SETUP VCR SETUP I Set VCR output switch to 3 or 4 and then tune...
...Wall Jack 2 Antenna 23 I If the 4:3 picture format is not covered by warranty. I Insert a video tape into the VCR and press PLAY on the screen. AUDIO OUT E) 2. How to connect 1 Connect the RF antenna out socket of the screen may remain visible on the VCR. (Refer to the RF antenna in... of the VCR to the same channel number. How to use I To avoid picture noise (interference), leave an adequate distance between the VCR and TV. This phenomenon is common to all TVs and is used; EXTERNAL EQUIPMENT SETUP VCR SETUP I Set VCR output switch to 3 or 4 and then tune...
Owner's Manual (English)
Page 24
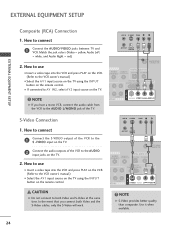
... it when available. 24 EXTERNAL EQUIPMENT SETUP EXTERNAL EQUIPMENT SETUP Composite (RCA) Connection 1. CAUTION G Do not connect to connect 1 Connect the AUDIO/VIDEO jacks between TV and VCR. How to use I Insert a video tape into the VCR and press PLAY on the VCR. (Refer to the VCR owner's manual.) I If connected ...
... it when available. 24 EXTERNAL EQUIPMENT SETUP EXTERNAL EQUIPMENT SETUP Composite (RCA) Connection 1. CAUTION G Do not connect to connect 1 Connect the AUDIO/VIDEO jacks between TV and VCR. How to use I Insert a video tape into the VCR and press PLAY on the VCR. (Refer to the VCR owner's manual.) I If connected ...

Owner's Manual (English)
Page 25
EXTERNAL EQUIPMENT SETUP OTHER A/V SOURCE SETUP 1. I If connected to use I Operate the corresponding external equipment. How to AV IN1 input, select the A V 1 input source on the remote control. Match the jack colors. (Video = yellow, Audio Left = white, and Audio Right = red) 2. I Select the A V 2 input source on the TV using the INPUT button on the TV. VIDEO L/MONO AUDIO R HDMI IN 3 USB IN Camcorder Video Game Set VIDEO L R 1 AV IN 2 25 How to connect 1 Connect the AUDIO/VIDEO jacks between TV and external equipment.
EXTERNAL EQUIPMENT SETUP OTHER A/V SOURCE SETUP 1. I If connected to use I Operate the corresponding external equipment. How to AV IN1 input, select the A V 1 input source on the remote control. Match the jack colors. (Video = yellow, Audio Left = white, and Audio Right = red) 2. I Select the A V 2 input source on the TV using the INPUT button on the TV. VIDEO L/MONO AUDIO R HDMI IN 3 USB IN Camcorder Video Game Set VIDEO L R 1 AV IN 2 25 How to connect 1 Connect the AUDIO/VIDEO jacks between TV and external equipment.
Owner's Manual (English)
Page 26
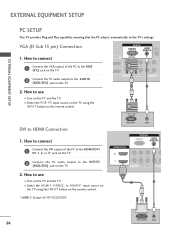
...the PC to the HDMI/DVI I N 1, 2, or 3* jack on the TV. 2 Connect the PC audio output to the TV's settings. How to connect 1 Connect the DVI output of the PC to the R G B (P C) jack on the TV. 2 Connect the PC audio output to HDMI Connection 1. EXTERNAL EQUIPMENT SETUP EXTERNAL EQUIPMENT SETUP PC SETUP This... to the A U D I O (RGB/DVI) jack on the TV. 2. I Turn on the PC and the TV. VGA (D-Sub 15 pin) Connection RGB IN RGB(PC) AUDIO REMOT (RGB/DVI) CONTROL 1. How to use I Select the RGB-PC input source on the TV using the INPUT button on the remote control. How to...
...the PC to the HDMI/DVI I N 1, 2, or 3* jack on the TV. 2 Connect the PC audio output to the TV's settings. How to connect 1 Connect the DVI output of the PC to the R G B (P C) jack on the TV. 2 Connect the PC audio output to HDMI Connection 1. EXTERNAL EQUIPMENT SETUP EXTERNAL EQUIPMENT SETUP PC SETUP This... to the A U D I O (RGB/DVI) jack on the TV. 2. I Turn on the PC and the TV. VGA (D-Sub 15 pin) Connection RGB IN RGB(PC) AUDIO REMOT (RGB/DVI) CONTROL 1. How to use I Select the RGB-PC input source on the TV using the INPUT button on the remote control. How to...
Owner's Manual (English)
Page 32
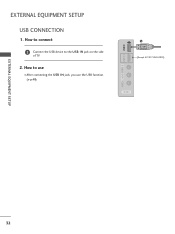
How to the USB I N jack, you use the USB function. (G p.48) VIDEO L/MONO AUDIO R HDMI IN 3 USB IN 1 (Except 42/47/52LG50DC) AV IN 2 EXTERNAL EQUIPMENT SETUP 32 How to connect 1 Connect the USB device to use I After connecting the USB I N jack on the side of TV. 2. EXTERNAL EQUIPMENT SETUP USB CONNECTION 1.
How to the USB I N jack, you use the USB function. (G p.48) VIDEO L/MONO AUDIO R HDMI IN 3 USB IN 1 (Except 42/47/52LG50DC) AV IN 2 EXTERNAL EQUIPMENT SETUP 32 How to connect 1 Connect the USB device to use I After connecting the USB I N jack on the side of TV. 2. EXTERNAL EQUIPMENT SETUP USB CONNECTION 1.
Owner's Manual (English)
Page 33
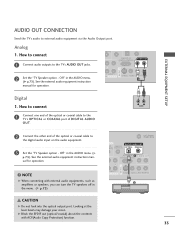
... IN OPTICAL COAXIAL RS-232C IN 1 AUDIO OUT (CONTROL & SERVICE) R AUDIO AV IN 1 S-VIDEO VIDEO L(MONO) AUDIO R 2 33 NOTE G When connecting with ACP(Audio Copy Protection) function. Analog 1. Off" in the AUDIO menu. (G p.73). EXTERNAL EQUIPMENT SETUP AUDIO OUT CONNECTION Send the TV's audio to the digital audio input on the audio equipment. 3 Set the "TV Speaker option - G Block the SPDIF...
... IN OPTICAL COAXIAL RS-232C IN 1 AUDIO OUT (CONTROL & SERVICE) R AUDIO AV IN 1 S-VIDEO VIDEO L(MONO) AUDIO R 2 33 NOTE G When connecting with ACP(Audio Copy Protection) function. Analog 1. Off" in the AUDIO menu. (G p.73). EXTERNAL EQUIPMENT SETUP AUDIO OUT CONNECTION Send the TV's audio to the digital audio input on the audio equipment. 3 Set the "TV Speaker option - G Block the SPDIF...

Owner's Manual (English)
Page 37
...(Analog signal). I Caption: Select on the viewing environment. I Backlight: Adjust the brightness of LCD panel to a favorite channel, press the F A V (Favorite) button repeatedly. I USB Eject... 3 Select Favorite. 4Q. Q.Menu Aspect Ratio Backlight Clear Voice Picture Mode Sound Mode Caption Multi Audio Sleep Timer CH Del/Add/Fav USB Eject F 16:9 G 3 Off Vivid Standard Off English ...screen. I Sound Mode: Selects the factory preset sound for type of program. MENU Return to TV viewing. 37 MENU 2 Display each menu. Q.Menu (Quick Menu) is shown in order to the Favorite List...
...(Analog signal). I Caption: Select on the viewing environment. I Backlight: Adjust the brightness of LCD panel to a favorite channel, press the F A V (Favorite) button repeatedly. I USB Eject... 3 Select Favorite. 4Q. Q.Menu Aspect Ratio Backlight Clear Voice Picture Mode Sound Mode Caption Multi Audio Sleep Timer CH Del/Add/Fav USB Eject F 16:9 G 3 Off Vivid Standard Off English ...screen. I Sound Mode: Selects the factory preset sound for type of program. MENU Return to TV viewing. 37 MENU 2 Display each menu. Q.Menu (Quick Menu) is shown in order to the Favorite List...

Owner's Manual (English)
Page 38
... time. In Store Home Enter RETURN Exit 1 Select H o me Mode. 2 ENTER Step2. Audio Language Setting F English G French Enter RETURN Exit 1 Select OSD Language Setting or Audio Language Setting. 2 Select your home environment. Picture mode" manually while inspecting the TV, but the TV will be activated from the user menus. Mode Setting ! Option Setting 1. Auto...
... time. In Store Home Enter RETURN Exit 1 Select H o me Mode. 2 ENTER Step2. Audio Language Setting F English G French Enter RETURN Exit 1 Select OSD Language Setting or Audio Language Setting. 2 Select your home environment. Picture mode" manually while inspecting the TV, but the TV will be activated from the user menus. Mode Setting ! Option Setting 1. Auto...

Owner's Manual (English)
Page 39
...Backlight 80 • Contrast 90 • Brightness 50 • Sharpness 60 • Color 60 • Tint 0R • Advanced Control E Enter G AUDIO Move Enter Auto Volume : Off Clear Voice : On Balance 0L R Sound Mode : Standard • SRS TruSurround XT: Off • Treble 50 •... Bass 50 • Reset TV Speaker : On OPTION Language Input Label SIMPLINK Key Lock Caption Set ID Power Indicator Initial Setting Move Enter : English : On : Off : Off :...
...Backlight 80 • Contrast 90 • Brightness 50 • Sharpness 60 • Color 60 • Tint 0R • Advanced Control E Enter G AUDIO Move Enter Auto Volume : Off Clear Voice : On Balance 0L R Sound Mode : Standard • SRS TruSurround XT: Off • Treble 50 •... Bass 50 • Reset TV Speaker : On OPTION Language Input Label SIMPLINK Key Lock Caption Set ID Power Indicator Initial Setting Move Enter : English : On : Off : Off :...

Owner's Manual (English)
Page 45
Off Cinema Game Sport 1AV MODE Press the AV MODE button repeatedly to select the desired source. 2 ENTER I If you select "Cinema" in AV mode, the "Picture Mode" and "Sound Mode" return to previous selected value. 45 Sound Mode" respectively. I If you select "O f f" in AV mode, Cinema will be selected both for "PICTURE menu - Picture Mode" and "AUDIO menu - WATCHING TV / CHANNEL CONTROL AV MODE You can select the optimal images and sounds.
Off Cinema Game Sport 1AV MODE Press the AV MODE button repeatedly to select the desired source. 2 ENTER I If you select "Cinema" in AV mode, the "Picture Mode" and "Sound Mode" return to previous selected value. 45 Sound Mode" respectively. I If you select "O f f" in AV mode, Cinema will be selected both for "PICTURE menu - Picture Mode" and "AUDIO menu - WATCHING TV / CHANNEL CONTROL AV MODE You can select the optimal images and sounds.


