
Owner's Manual
Page 1
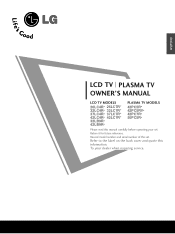
Retain it for future reference. To your set . ENGLISH LCD TV PLASMA TV OWNER'S MANUAL LCD TV MODELS PLASMA TV MODELS 26LC4R* 26LC7R* 32LC4R* 32LC7R* 37LC4R* 37LC7R* 42LC4R* 42LC7R* 32LB9R* 42LB9R* 42PC5R* 42PC5RV* 42PC7R* 50PC5R* Please read this information. Record model number and serial number of the set . Refer to the label on the back cover and quote this manual carefully before operating your dealer when requiring service.
Retain it for future reference. To your set . ENGLISH LCD TV PLASMA TV OWNER'S MANUAL LCD TV MODELS PLASMA TV MODELS 26LC4R* 26LC7R* 32LC4R* 32LC7R* 37LC4R* 37LC7R* 42LC4R* 42LC7R* 32LB9R* 42LB9R* 42PC5R* 42PC5RV* 42PC7R* 50PC5R* Please read this information. Record model number and serial number of the set . Refer to the label on the back cover and quote this manual carefully before operating your dealer when requiring service.
Owner's Manual
Page 3
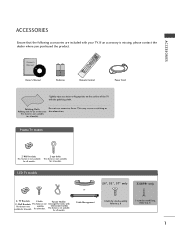
... This feature is not available for use excessive force. Wall Brackets This feature is not This feature is not available for all models. Owner's Manual Owner's manual Owner's Manual Batteries EXIT LIST OK MENU RATIO PIP PSRIM-PLINK PIP PIP PR+ INPUTTINVPUT POWER DVD TEXT STB TMVODE Q.VIEW SLEEP PIP I /II INPUT OK...
... This feature is not available for use excessive force. Wall Brackets This feature is not This feature is not available for all models. Owner's Manual Owner's manual Owner's Manual Batteries EXIT LIST OK MENU RATIO PIP PSRIM-PLINK PIP PIP PR+ INPUTTINVPUT POWER DVD TEXT STB TMVODE Q.VIEW SLEEP PIP I /II INPUT OK...
Owner's Manual
Page 4
...50 - Colour Tone - Speaker Sound Output Selection 67 On-Screen Menu Language Selection 68 Auto Colour Tone Control(Warm/Medium/Cool) 51 Manual Picture Adjustment - User Option 53 - Cinema 56 Advanced - Screen Setup for Wire Arrangement 10 Desktop Pedestal Installation 12 Wall Mount: Horizontal... on the TV 34 Programme Selection 34 Volume Adjustment 34 On Screen Menus Selection and Adjustment ......35 Auto Programme Tuning 36 Manual Programme Tuning 37 Fine Tuning 38 Assigning a Station Name 39 Programme Edit 40 Favourite Programme 41 Selecting the Programme Table 42...
...50 - Colour Tone - Speaker Sound Output Selection 67 On-Screen Menu Language Selection 68 Auto Colour Tone Control(Warm/Medium/Cool) 51 Manual Picture Adjustment - User Option 53 - Cinema 56 Advanced - Screen Setup for Wire Arrangement 10 Desktop Pedestal Installation 12 Wall Mount: Horizontal... on the TV 34 Programme Selection 34 Volume Adjustment 34 On Screen Menus Selection and Adjustment ......35 Auto Programme Tuning 36 Manual Programme Tuning 37 Fine Tuning 38 Assigning a Station Name 39 Programme Edit 40 Favourite Programme 41 Selecting the Programme Table 42...
Owner's Manual
Page 12
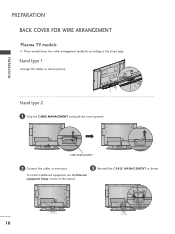
CABLE MANAGEMENT 2 Connect the cables as shown picture. Stand type 1 Arrange the cables as necessary. To connect additional equipment, see the External equipment Setup section of the manual. 3 Reinstall the CABLE MANAGEMENT as shown. 10 PREPARATION PREPARATION BACK COVER FOR WIRE ARRANGEMENT Plasma TV models ■ These models have two cable arrangement methods according to the stand type. Stand type 2 1 Grip the CABLE MANAGEMENT and push the cover upwards.
CABLE MANAGEMENT 2 Connect the cables as shown picture. Stand type 1 Arrange the cables as necessary. To connect additional equipment, see the External equipment Setup section of the manual. 3 Reinstall the CABLE MANAGEMENT as shown. 10 PREPARATION PREPARATION BACK COVER FOR WIRE ARRANGEMENT Plasma TV models ■ These models have two cable arrangement methods according to the stand type. Stand type 2 1 Grip the CABLE MANAGEMENT and push the cover upwards.
Owner's Manual
Page 17
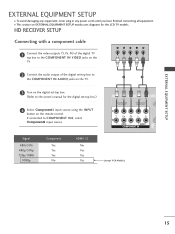
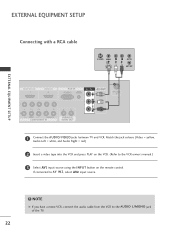
If connected to the owner's manual for the LCD TV models. HD RECEIVER SETUP Connecting with a component cable 1 Connect the video outputs (Y, PB, PR) of the digital TV top box to ...
If connected to the owner's manual for the LCD TV models. HD RECEIVER SETUP Connecting with a component cable 1 Connect the video outputs (Y, PB, PR) of the digital TV top box to ...
Owner's Manual
Page 18
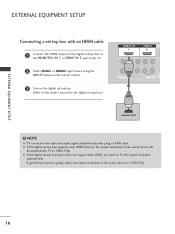
... IN Connecting a set-top box with using the INPUT button on the remote control. 3 Turn on the digital set-top box. (Refer to the owner's manual for the digital set-top box.) HHDDMMI DI/DVVI ININ 1 HHDDMMII IINN 2 1 ! To get the best picture quality, adjust the output resolution of the source...
... IN Connecting a set-top box with using the INPUT button on the remote control. 3 Turn on the digital set-top box. (Refer to the owner's manual for the digital set-top box.) HHDDMMI DI/DVVI ININ 1 HHDDMMII IINN 2 1 ! To get the best picture quality, adjust the output resolution of the source...
Owner's Manual
Page 19
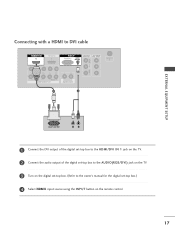
Connecting with a HDMI to DVI cable HHDDMMI DI/DVVI ININ 1 HDMI IN RGB IN RGB(PC) AUDIO (RGB/DVI) RGB(PC) AUDIO (RGB/DVI) AV IN 1 AV OUT L/MONO 1 2 EXTERNAL EQUIPMENT SETUP 1 Connect the DVI output of the digital set-top box to the HDMI/DVI IN 1 jack on the TV. 2 Connect the audio output of the digital set-top box to the AUDIO(RGB/DVI) jack on the TV. 3 Turn on the digital set-top box. (Refer to the owner's manual for the digital set-top box.) 4 Select HDMI1 input source using the INPUT button on the remote control. 17
Connecting with a HDMI to DVI cable HHDDMMI DI/DVVI ININ 1 HDMI IN RGB IN RGB(PC) AUDIO (RGB/DVI) RGB(PC) AUDIO (RGB/DVI) AV IN 1 AV OUT L/MONO 1 2 EXTERNAL EQUIPMENT SETUP 1 Connect the DVI output of the digital set-top box to the HDMI/DVI IN 1 jack on the TV. 2 Connect the audio output of the digital set-top box to the AUDIO(RGB/DVI) jack on the TV. 3 Turn on the digital set-top box. (Refer to the owner's manual for the digital set-top box.) 4 Select HDMI1 input source using the INPUT button on the remote control. 17
Owner's Manual
Page 20
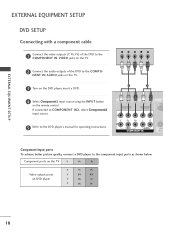
.../DVVI ININ 1 HHDDMMII IINN 2 18 HDMI DVI IN HDMI IN RG If connected to COMPONENT IN2, select Component2 input source. 1 5 Refer to the DVD player's manual for operating instructions. 2 VIDEO AUDIO COMPONENT IN Component Input ports To achieve better picture quality, connect a DVD player to the COMPO- Component ports on the...
.../DVVI ININ 1 HHDDMMII IINN 2 18 HDMI DVI IN HDMI IN RG If connected to COMPONENT IN2, select Component2 input source. 1 5 Refer to the DVD player's manual for operating instructions. 2 VIDEO AUDIO COMPONENT IN Component Input ports To achieve better picture quality, connect a DVD player to the COMPO- Component ports on the...
Owner's Manual
Page 21
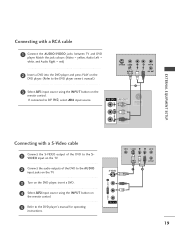
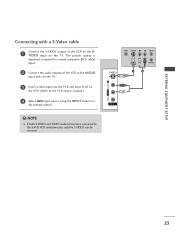
... Right = red) S-VIDEO VIDEO L R ANT IN 2 Insert a DVD into the DVD player and press PLAY on the DVD player. (Refer to the DVD player owner's manual.) OUTPUT SWITCH ANT OUT 3 Select AV1 input source using the INPUT button on the remote control. 5 Refer to the DVD player...'s manual for operating instructions. HHDDMMII IINN VIDEO L/MONO AUDIO R VIDEO S-VIDEO L R ANT IN S-VIDEO OUTPUT SWITCH 1 ANT OUT 2 AV IN 2 19 VIDEO L/MONO AUDIO R AV IN 2 ...
... Right = red) S-VIDEO VIDEO L R ANT IN 2 Insert a DVD into the DVD player and press PLAY on the DVD player. (Refer to the DVD player owner's manual.) OUTPUT SWITCH ANT OUT 3 Select AV1 input source using the INPUT button on the remote control. 5 Refer to the DVD player...'s manual for operating instructions. HHDDMMII IINN VIDEO L/MONO AUDIO R VIDEO S-VIDEO L R ANT IN S-VIDEO OUTPUT SWITCH 1 ANT OUT 2 AV IN 2 19 VIDEO L/MONO AUDIO R AV IN 2 ...
Owner's Manual
Page 22
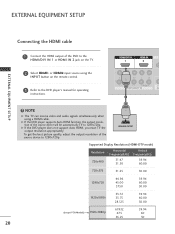
... will be automatically TV to 1280x720p. G If the DVD player supports Auto HDMI function, the output resolution of the source device to the DVD player's manual for operating instructions. 1 ! Supported Display Resolution (HDMI-DTV mode) Resolution 720x480 Horizontal Frequency(kHz) 31.47 31.50 Vertical Frequency(Hz) 59.94 60.00...
... will be automatically TV to 1280x720p. G If the DVD player supports Auto HDMI function, the output resolution of the source device to the DVD player's manual for operating instructions. 1 ! Supported Display Resolution (HDMI-DTV mode) Resolution 720x480 Horizontal Frequency(kHz) 31.47 31.50 Vertical Frequency(Hz) 59.94 60.00...
Owner's Manual
Page 24
... VCR and press PLAY on the remote control. NOTE G If you have a mono VCR, connect the audio cable from the VCR to the VCR owner's manual.) 3 Select AV1 input source using the INPUT button on the VCR. (Refer to the AUDIO L/MONO jack of the TV. 22 If connected to AV...
... VCR and press PLAY on the remote control. NOTE G If you have a mono VCR, connect the audio cable from the VCR to the VCR owner's manual.) 3 Select AV1 input source using the INPUT button on the VCR. (Refer to the AUDIO L/MONO jack of the TV. 22 If connected to AV...
Owner's Manual
Page 25
... to the AUDIO input jacks on the TV. 3 Insert a video tape into the VCR and press PLAY on the VCR. (Refer to the VCR owner's manual.) 4 Select AV2 input source using the INPUT button on the TV. The picture quality is improved;
... to the AUDIO input jacks on the TV. 3 Insert a video tape into the VCR and press PLAY on the VCR. (Refer to the VCR owner's manual.) 4 Select AV2 input source using the INPUT button on the TV. The picture quality is improved;
Owner's Manual
Page 30
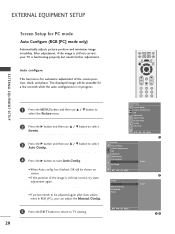
... then use D / E button to select Screen. 3 Press the G button and then use D / E button to select Auto Config.. 4 Press the G button to TV viewing. 34 28 Manual Config. Auto configure This function is for automatic adjustment of the image is still not correct, try Auto adjustment again. • If picture needs to... further adjustment. EXTERNAL EQUIPMENT SETUP EXTERNAL EQUIPMENT SETUP Screen Setup for a few seconds while the auto configuration is in RGB (PC), you can adjust the Manual Config..
... then use D / E button to select Screen. 3 Press the G button and then use D / E button to select Auto Config.. 4 Press the G button to TV viewing. 34 28 Manual Config. Auto configure This function is for automatic adjustment of the image is still not correct, try Auto adjustment again. • If picture needs to... further adjustment. EXTERNAL EQUIPMENT SETUP EXTERNAL EQUIPMENT SETUP Screen Setup for a few seconds while the auto configuration is in RGB (PC), you can adjust the Manual Config..
Owner's Manual
Page 31
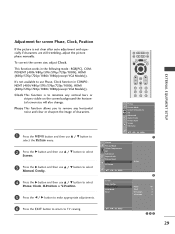
... Picture Mode Colour Temperature XD Advanced Aspect Ratio Picture Reset Screen XD Demo DE F G OK MENU G To Set Screen Auto Config. Manual Config. Clock This function is not clear after auto adjustment and especially if characters are still trembling, adjust the picture phase...button to select Phase, Clock, H-Position or V-Position. 5 Press the F / G button to make appropriate adjustments. 6 Press the EXIT button to return to select Manual Config.. 4 Press the G button and then use Phase, Clock function in the following mode : RGB[PC], COMPONENT (480i/480p/576i/576p/720p/1080i), HDMI (...
... Picture Mode Colour Temperature XD Advanced Aspect Ratio Picture Reset Screen XD Demo DE F G OK MENU G To Set Screen Auto Config. Manual Config. Clock This function is not clear after auto adjustment and especially if characters are still trembling, adjust the picture phase...button to select Phase, Clock, H-Position or V-Position. 5 Press the F / G button to make appropriate adjustments. 6 Press the EXIT button to return to select Manual Config.. 4 Press the G button and then use Phase, Clock function in the following mode : RGB[PC], COMPONENT (480i/480p/576i/576p/720p/1080i), HDMI (...
Owner's Manual
Page 32
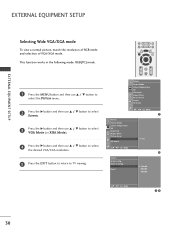
... Ratio Picture Reset Screen XD Demo G To Set DE F G OK MENU 2 Screen Auto Config. VGA Mode Reset G 640x480 848x480 852x480 DE F G OK MENU 34 30 Manual Config. EXTERNAL EQUIPMENT SETUP EXTERNAL EQUIPMENT SETUP Selecting Wide VGA/XGA mode To view a normal picture, match the resolution of RGB mode and selection of...
... Ratio Picture Reset Screen XD Demo G To Set DE F G OK MENU 2 Screen Auto Config. VGA Mode Reset G 640x480 848x480 852x480 DE F G OK MENU 34 30 Manual Config. EXTERNAL EQUIPMENT SETUP EXTERNAL EQUIPMENT SETUP Selecting Wide VGA/XGA mode To view a normal picture, match the resolution of RGB mode and selection of...
Owner's Manual
Page 33
... Screen XD Demo 1 Picture Picture Mode Colour Temperature XD Advanced Aspect Ratio Picture Reset Screen XD Demo G To Set DE F G OK MENU 2 Screen Auto Config. Manual Config. To initialize the adjusted value 1 Press the MENU button and then use D / E button to select the Picture menu. 2 Press the G button and then use...
... Screen XD Demo 1 Picture Picture Mode Colour Temperature XD Advanced Aspect Ratio Picture Reset Screen XD Demo G To Set DE F G OK MENU 2 Screen Auto Config. Manual Config. To initialize the adjusted value 1 Press the MENU button and then use D / E button to select the Picture menu. 2 Press the G button and then use...
Owner's Manual
Page 37
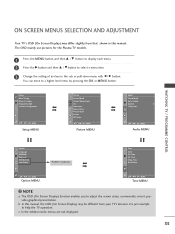
b. Setup Auto Tuning Manual Tuning Programme Edit Favourite Programme DE F G OK MENU Setup MENU Picture Picture Mode Colour Temperature... higher level menu by pressing the O K or MENU button. In the teletext mode, menus are not displayed. 35 In this manual. ON SCREEN MENUS SELECTION AND ADJUSTMENT Your TV's OSD (On Screen Display) may differ slightly from that shown in the sub or ...button. You can move to select a menu item. 3 Change the setting of an item in this manual, the OSD (On Screen Display) may be different from your TV's because it provides graphical presentation.
b. Setup Auto Tuning Manual Tuning Programme Edit Favourite Programme DE F G OK MENU Setup MENU Picture Picture Mode Colour Temperature... higher level menu by pressing the O K or MENU button. In the teletext mode, menus are not displayed. 35 In this manual. ON SCREEN MENUS SELECTION AND ADJUSTMENT Your TV's OSD (On Screen Display) may differ slightly from that shown in the sub or ...button. You can move to select a menu item. 3 Change the setting of an item in this manual, the OSD (On Screen Display) may be different from your TV's because it provides graphical presentation.
Owner's Manual
Page 38
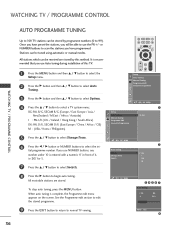
... 5 BG 35% MENU Stop 8 36 LIST MENU Q.VIEW EXIT SLEEP OK FAV VOL PR MUTE Setup Auto Tuning Manual Tuning Programme Edit Favourite Programme DE F G OK MENU 1 Setup Auto Tuning Manual Tuning Programme Edit Favourite Programme G To Set DE F G OK MENU 2 Auto Tuning System Storage From Search G ... 4 Press the D / E button to begin auto tuning. or NUMBER buttons to scan the stations you will be tuned using automatic or manual modes. All receivable stations are stored by programme numbers (0 to use NUMBER buttons, any number under 10 is complete, the Programme edit menu ...
... 5 BG 35% MENU Stop 8 36 LIST MENU Q.VIEW EXIT SLEEP OK FAV VOL PR MUTE Setup Auto Tuning Manual Tuning Programme Edit Favourite Programme DE F G OK MENU 1 Setup Auto Tuning Manual Tuning Programme Edit Favourite Programme G To Set DE F G OK MENU 2 Auto Tuning System Storage From Search G ... 4 Press the D / E button to begin auto tuning. or NUMBER buttons to scan the stations you will be tuned using automatic or manual modes. All receivable stations are stored by programme numbers (0 to use NUMBER buttons, any number under 10 is complete, the Programme edit menu ...

Owner's Manual
Page 39
...desire. 1 Press the MENU button and then D / E button to select the Setup menu. 2 Press the G button and then D / E button to select Manual Tuning. 3 Press the G button and then D / E button to select Storage. 4 Press the F / G button or NUMBER buttons to select the desired programme ...it, i.e. '0 5' for 5. 5 Press the D / E button to select System. 6 Press the D / E button to normal TV viewing. MANUAL PROGRAMME TUNING Manual programme lets you manually tune and arrange the stations in whatever order you use NUMBER buttons, any number under 10 is entered with a numeric '0' in front of...
...desire. 1 Press the MENU button and then D / E button to select the Setup menu. 2 Press the G button and then D / E button to select Manual Tuning. 3 Press the G button and then D / E button to select Storage. 4 Press the F / G button or NUMBER buttons to select the desired programme ...it, i.e. '0 5' for 5. 5 Press the D / E button to select System. 6 Press the D / E button to normal TV viewing. MANUAL PROGRAMME TUNING Manual programme lets you manually tune and arrange the stations in whatever order you use NUMBER buttons, any number under 10 is entered with a numeric '0' in front of...

Owner's Manual
Page 40
... Storage System Band Channel Fine Search Name G F/G DE F G OK MENU 345 38 LIST MENU Q.VIEW EXIT SLEEP OK FAV VOL PR MUTE 1 2 3 4 5 6 7 8 9 Setup Auto Tuning Manual Tuning Programme Edit Favourite Programme 4 Press the G button and then F / G button to fine tune for the best picture and sound. 5 Press the O K button to store... necessary if reception is poor. 1 Press the MENU button and then D / E button to select the Setup menu. 2 Press the G button and then D / E button to select Manual Tuning. 3 Press the G button and then D / E button to normal TV viewing.
... Storage System Band Channel Fine Search Name G F/G DE F G OK MENU 345 38 LIST MENU Q.VIEW EXIT SLEEP OK FAV VOL PR MUTE 1 2 3 4 5 6 7 8 9 Setup Auto Tuning Manual Tuning Programme Edit Favourite Programme 4 Press the G button and then F / G button to fine tune for the best picture and sound. 5 Press the O K button to store... necessary if reception is poor. 1 Press the MENU button and then D / E button to select the Setup menu. 2 Press the G button and then D / E button to select Manual Tuning. 3 Press the G button and then D / E button to normal TV viewing.


