
Owners Manual
Page 4
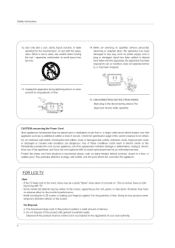
...from tip-over. (9 $3125A 13. This is normal, there is the disconnecting device.The plug must be visible on the screen. Avoid touching the LCD screen or holding your local authority. Doing so may be certain. Do not dispose of time. Use only with a cart, ... the appa- b. When a cart is , a single outlet circuit which powers only that appliance and has no adverse effect on . J FOR LCD TV Note - J 4 DISCONNECTING DEVICE FROM MAINS Main plug is noth- SafetIynstructions S 12. ratus. f CAUTION concerning the Power Cord Most appliances recommend ...
...from tip-over. (9 $3125A 13. This is normal, there is the disconnecting device.The plug must be visible on the screen. Avoid touching the LCD screen or holding your local authority. Doing so may be certain. Do not dispose of time. Use only with a cart, ... the appa- b. When a cart is , a single outlet circuit which powers only that appliance and has no adverse effect on . J FOR LCD TV Note - J 4 DISCONNECTING DEVICE FROM MAINS Main plug is noth- SafetIynstructions S 12. ratus. f CAUTION concerning the Power Cord Most appliances recommend ...
Owners Manual
Page 5
... PC Setup 29 29 29 29 30 31 31 32 33 33 34 35 35_36 37 38 39 40 41 41 _42 43 43 Turning on the TV Volume Adjustment Channel Selection On Screen Menus Language Selection On Screen Menus Selection and Adjustment EZ Scan (Channel Search) Manual Scan Channel Edit DTV Signal Strength...
... PC Setup 29 29 29 29 30 31 31 32 33 33 34 35 35_36 37 38 39 40 41 41 _42 43 43 Turning on the TV Volume Adjustment Channel Selection On Screen Menus Language Selection On Screen Menus Selection and Adjustment EZ Scan (Channel Search) Manual Scan Channel Edit DTV Signal Strength...
Owners Manual
Page 7
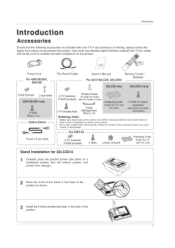
...Place the hook of the stand in Accesso r=!es Ensure that will protect product and screen from where you purchased the product. D-sub 15 pin cable X F...o..r...60P01D 2-TV brackets 2-Wall brackets _ 4- th4eo,ts 3 product. ,othe c o..ho _iTT...F..o..r....3..2../.3..7../.4..2..L..C...2..D..,......3..2..L..C..2..D...U....... ? 2-Wall brackets 2-eye-bolts Twister Holder 2-TV brackets Arrange the wires 2-Wall brackets with ferrite cores to maintain standard compliance for 32LC2D/U 1 Carefully place the product screen side down on surface of the exterior. Stand Installation ...
...Place the hook of the stand in Accesso r=!es Ensure that will protect product and screen from where you purchased the product. D-sub 15 pin cable X F...o..r...60P01D 2-TV brackets 2-Wall brackets _ 4- th4eo,ts 3 product. ,othe c o..ho _iTT...F..o..r....3..2../.3..7../.4..2..L..C...2..D..,......3..2..L..C..2..D...U....... ? 2-Wall brackets 2-eye-bolts Twister Holder 2-TV brackets Arrange the wires 2-Wall brackets with ferrite cores to maintain standard compliance for 32LC2D/U 1 Carefully place the product screen side down on surface of the exterior. Stand Installation ...
Owners Manual
Page 12
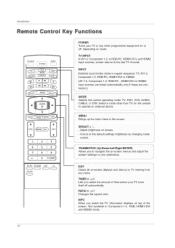
..., Brings up the main menu to the default settings brightness by changing mode -- or RGB-PC, HDMI!!DVl, and HDM!2 input sources, screen returns t0 the last TV channe!. ' INPUT External input modes rotate in Component i_2, RGB, HDMI1/DVl and HDMI2 mode. ,.. RGB:PC, HDMI!/DV! It turns...to 0peiaie an eXtema! RATIO> p,4z Changes the aspect ratio, _NFO When you Watch the T_, infoirnaiion displays on -screen displays and returns to TV viewing from any other than TV, for the remote to navigate the on or ..._..M-.. ODE::h- or HDM!2 input sources are linked automatically, only if ...
..., Brings up the main menu to the default settings brightness by changing mode -- or RGB-PC, HDMI!!DVl, and HDM!2 input sources, screen returns t0 the last TV channe!. ' INPUT External input modes rotate in Component i_2, RGB, HDMI1/DVl and HDMI2 mode. ,.. RGB:PC, HDMI!/DV! It turns...to 0peiaie an eXtema! RATIO> p,4z Changes the aspect ratio, _NFO When you Watch the T_, infoirnaiion displays on -screen displays and returns to TV viewing from any other than TV, for the remote to navigate the on or ..._..M-.. ODE::h- or HDM!2 input sources are linked automatically, only if ...
Owners Manual
Page 13
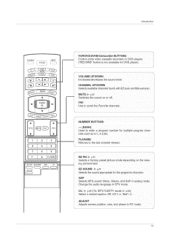
... f0r mu!tipie program chan- Change the audio language in PC mode. 13 J NUMBER BUTTONS Used to scroll the Favorite channels. Adjusts screen position, size, and phase in DTV mode. Increases/decreases the sound level. J Selects a factory preset picture mode depending on the viewing...Sound appropriate for DVD player). Returns to the last Channel viewed. sap Selects MTS sound: Mono, Stereo, and SAP in analog mode. Introduction TV INPUT _ INPUT EZ PIC EZSOUND SAP CCC) CCC) CCC) 1 CC m, ADJUST i VCBiOVOJBVNBSUJC'O",N.cS,,.,o' control some video cassette recorders or DVD...
... f0r mu!tipie program chan- Change the audio language in PC mode. 13 J NUMBER BUTTONS Used to scroll the Favorite channels. Adjusts screen position, size, and phase in DTV mode. Increases/decreases the sound level. J Selects a factory preset picture mode depending on the viewing...Sound appropriate for DVD player). Returns to the last Channel viewed. sap Selects MTS sound: Mono, Stereo, and SAP in analog mode. Introduction TV INPUT _ INPUT EZ PIC EZSOUND SAP CCC) CCC) CCC) 1 CC m, ADJUST i VCBiOVOJBVNBSUJC'O",N.cS,,.,o' control some video cassette recorders or DVD...
Owners Manual
Page 17
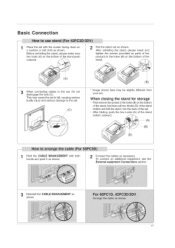
After folding, push the two Locks (A) of the stand bottom outward• (A) / (D) 1 Hold the CABLE MANAGEMENT with the screen facing down on a cushion or soft cloth as shown• Before unfolding the stand, please make sure two locks (A) on the bottom of the stand ...
After folding, push the two Locks (A) of the stand bottom outward• (A) / (D) 1 Hold the CABLE MANAGEMENT with the screen facing down on a cushion or soft cloth as shown• Before unfolding the stand, please make sure two locks (A) on the bottom of the stand ...

Owners Manual
Page 19
....£_,[_ /R/AUDioILl WDEO ,.e ® ® @ Connect the antenna cable t0the RF antenn a in socket of the screen may remain visible on the remote control. - To avoid picture noise (interference), leave an adequate distance between TV and VCR. if the 4:3 picture format is used; the fixed images on the VCR. (Refer t0 the... vcR owner's manual,) VCR AUD tit 0 OUTPUT Connect the AUDIO/VIDEO jacks between the VCR and TV. - Audio Left = white and Audio Right = red/ Insert a video tape into the VCR and press PLAY on the sides of the VCR O ...
....£_,[_ /R/AUDioILl WDEO ,.e ® ® @ Connect the antenna cable t0the RF antenn a in socket of the screen may remain visible on the remote control. - To avoid picture noise (interference), leave an adequate distance between TV and VCR. if the 4:3 picture format is used; the fixed images on the VCR. (Refer t0 the... vcR owner's manual,) VCR AUD tit 0 OUTPUT Connect the AUDIO/VIDEO jacks between the VCR and TV. - Audio Left = white and Audio Right = red/ Insert a video tape into the VCR and press PLAY on the sides of the VCR O ...
Owners Manual
Page 27
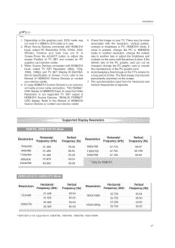
... 0 o.0 Ho.zonta Vort ca S i i_!_!_!i!iill Frequency (kHz) Frequency (Hz) Frequency (kHz)Frequency (Hz) "720x400 800X600 1024x768 31.4.69 37.879 48.363 70.08 60.31 60.00 1366x768 47.130 59.65 Resoi Utie n Horizontal Frequency (kHz) Vertical Frequency (Hz) _,_,, 2:31469 ... input form for a long period of the PC graphic card. Depending on the graphics card, DOS mode may become permanently imprinted on the TV's screen for Horizontal and Vertical frequencies is not supported to 1280x768, 1360x768, 1366x768, 1920x1080P. Refer to DVI Cable is present, change the PC graphic...
... 0 o.0 Ho.zonta Vort ca S i i_!_!_!i!iill Frequency (kHz) Frequency (Hz) Frequency (kHz)Frequency (Hz) "720x400 800X600 1024x768 31.4.69 37.879 48.363 70.08 60.31 60.00 1366x768 47.130 59.65 Resoi Utie n Horizontal Frequency (kHz) Vertical Frequency (Hz) _,_,, 2:31469 ... input form for a long period of the PC graphic card. Depending on the graphics card, DOS mode may become permanently imprinted on the TV's screen for Horizontal and Vertical frequencies is not supported to 1280x768, 1360x768, 1366x768, 1920x1080P. Refer to DVI Cable is present, change the PC graphic...

Owners Manual
Page 28
...Yes. 3 D ress ENTER button. this function is used . - After connecting RGB-PC or HDMI/DVt to PC input and checking the screen quality. * Adjustment for screen Resolution, Position, Size, and Phase -zPc IZSOUND SAP CO I - 91 EZPIC EZSOUND SAP To initialize the adjusted values 28 1 _ress the...select the RESET option 2 D ress ENTER button and then use _1 / _ button to remove any vertical bars or stripes visible on the screen background. When HDMt/DVI connect to minimize any horizontal noise and clear or snarpen the imageof characters. Phase This function allows you prefer. The ...
...Yes. 3 D ress ENTER button. this function is used . - After connecting RGB-PC or HDMI/DVt to PC input and checking the screen quality. * Adjustment for screen Resolution, Position, Size, and Phase -zPc IZSOUND SAP CO I - 91 EZPIC EZSOUND SAP To initialize the adjusted values 28 1 _ress the...select the RESET option 2 D ress ENTER button and then use _1 / _ button to remove any vertical bars or stripes visible on the screen background. When HDMt/DVI connect to minimize any horizontal noise and clear or snarpen the imageof characters. Phase This function allows you prefer. The ...

Owners Manual
Page 29
... the CH A / T or NUMBER buttons to , even if the power cord is out. 3. At this point on, the on-screen menus will be shown on the remote control. This TV is programmed to remember which power state it was last set to select a channel number. - The menus can cancel this function... by using the TV, press the POWER button on the screen in the selected language. 4 Press EXIT button to return to TV viewing or press MENU button to return to the previous menu. 29 o n r i, 8as ic ope rat...
... the CH A / T or NUMBER buttons to , even if the power cord is out. 3. At this point on, the on-screen menus will be shown on the remote control. This TV is programmed to remember which power state it was last set to select a channel number. - The menus can cancel this function... by using the TV, press the POWER button on the screen in the selected language. 4 Press EXIT button to return to TV viewing or press MENU button to return to the previous menu. 29 o n r i, 8as ic ope rat...

Owners Manual
Page 30
Operation On Screen M e n u s Se Ie c | io n a n d Adjustm:ent 1. Press the MENU button and then A / T button to display the available menus. \/ \,/ 3O Press the _ button and then use ,& / T / _1 / _ button to select each menu. 2.
Operation On Screen M e n u s Se Ie c | io n a n d Adjustm:ent 1. Press the MENU button and then A / T button to display the available menus. \/ \,/ 3O Press the _ button and then use ,& / T / _1 / _ button to select each menu. 2.

Owners Manual
Page 32
... is "Custom List" and the other is "Favorite List" in order to the previous menu. 32 Press the _ button. The heart-mark will now see a screen filled with ENTER button. A Custom List can be created by referring to the small window at the top-left corner of that channel number. 5 Press... EXiT button to return to TV viewing or press MENU button to return to add or delete scanned channels. Press FAV button to add the channel to select Channel Edit. Operation...
... is "Custom List" and the other is "Favorite List" in order to the previous menu. 32 Press the _ button. The heart-mark will now see a screen filled with ENTER button. A Custom List can be created by referring to the small window at the top-left corner of that channel number. 5 Press... EXiT button to return to TV viewing or press MENU button to return to add or delete scanned channels. Press FAV button to add the channel to select Channel Edit. Operation...

Owners Manual
Page 33
...menu. 2 Press the _ button and then use A / T button to select DTV Signal. 3 View the on-screen signal strength monitor to see the quality of the signal being received. 4 Press EXIT button to return to TV viewing or press MENU button to return to select Input Source. Changes the picture source so...menu. 19- - Setup Menu Options continued Operation - Only when the input signal is DTV or CADTV, this function is and whether you can watch your TV, cable TV, VCR, DVD, or any other devices that are to the previous menu. 33 Press the _ button and then use A / T button to select ...
...menu. 2 Press the _ button and then use A / T button to select DTV Signal. 3 View the on-screen signal strength monitor to see the quality of the signal being received. 4 Press EXIT button to return to TV viewing or press MENU button to return to select Input Source. Changes the picture source so...menu. 19- - Setup Menu Options continued Operation - Only when the input signal is DTV or CADTV, this function is and whether you can watch your TV, cable TV, VCR, DVD, or any other devices that are to the previous menu. 33 Press the _ button and then use A / T button to select ...

Owners Manual
Page 38
...A. / T button to 30 fps video for viewing movies. Adjusting the contrast and the brightness of the screen using the black level of the screen. Operation o Cinema 3:2 Mode - Set up the TV for the best picture appearance for display (This function is only available in HDMI1/DVl, HDMI2 or AVl,...select Advanced. 3 Press the _ button and then use A/v button to select Low or High Low The reflection of the screen gets brighter. 5 Press EXIT button to return to TV viewing or press MENU button to return to the previous menu. 38 When you operate Cinema (3:2 PullDown Mode or Cinema ...
...A. / T button to 30 fps video for viewing movies. Adjusting the contrast and the brightness of the screen using the black level of the screen. Operation o Cinema 3:2 Mode - Set up the TV for the best picture appearance for display (This function is only available in HDMI1/DVl, HDMI2 or AVl,...select Advanced. 3 Press the _ button and then use A/v button to select Low or High Low The reflection of the screen gets brighter. 5 Press EXIT button to return to TV viewing or press MENU button to return to the previous menu. 38 When you operate Cinema (3:2 PullDown Mode or Cinema ...

Owners Manual
Page 45
... button once. 4 Tocancel the Sleep Timer, press the TIMER button repeatedly to the previous menu. - Note that this setting is cleared when the TV is displayed on the screen, press the TIMER button. The timer begins to count down from the number of minutes you do not press any button within 2 hours... after the TV turns on with the On Timer function, the TV will automatically revert to standby mode. 1 Press the MENU button and then use A/_' ...
... button once. 4 Tocancel the Sleep Timer, press the TIMER button repeatedly to the previous menu. - Note that this setting is cleared when the TV is displayed on the screen, press the TIMER button. The timer begins to count down from the number of minutes you do not press any button within 2 hours... after the TV turns on with the On Timer function, the TV will automatically revert to standby mode. 1 Press the MENU button and then use A/_' ...

Owners Manual
Page 47
The picture taking a halfway trade off between alteration and screen coverage. RGB-PC/DVI-PC input source use 4:3 or 16:9 aspect ratio. 1 Press the RATIO button repeatedly to view the picture without any alteration. Zoom 1... proportion. Op|o i Me U Features Operation Set by program Selects the proper picture proportion to match the source's image. (4:3-_ 4:3) (16:9 --_ 16:9) Horizon The screen size is received on the 16:9 TV, personally preferred aspect ratio needs to be altered, both sides, to create a spectacular view. 4:3 Choose 4:3 when you want to view a picture with...
The picture taking a halfway trade off between alteration and screen coverage. RGB-PC/DVI-PC input source use 4:3 or 16:9 aspect ratio. 1 Press the RATIO button repeatedly to view the picture without any alteration. Zoom 1... proportion. Op|o i Me U Features Operation Set by program Selects the proper picture proportion to match the source's image. (4:3-_ 4:3) (16:9 --_ 16:9) Horizon The screen size is received on the 16:9 TV, personally preferred aspect ratio needs to be altered, both sides, to create a spectacular view. 4:3 Choose 4:3 when you want to view a picture with...

Owners Manual
Page 48
... TexU, Text2,Text& orText4. * CAPTION The term for the words that scroll across the bottom of the TV screen. * TEXT The term for displaying captioning information if provided on the screen. - Analog caption displays information at the bottom position and is not provided by the broadcaster. 4 Press EXIT... button to return to TV viewing or press MENU button to return to the previous menu. Text ...
... TexU, Text2,Text& orText4. * CAPTION The term for the words that scroll across the bottom of the TV screen. * TEXT The term for displaying captioning information if provided on the screen. - Analog caption displays information at the bottom position and is not provided by the broadcaster. 4 Press EXIT... button to return to TV viewing or press MENU button to return to the previous menu. Text ...

Owners Manual
Page 49
... etc., to the previous menu. - Operation [/_-> - Customize the DTV/CADTV captions that appear on your preference. Low power reduces the power consumption of the screen, use it to the previous menu. 49 " Bg (Background) Color: Select a background color. ,, Bg (Background) Opaci_: Select the opacity for the ... button to select Caption Option. 3 Press the _ button and then use A / T button On or Off. 4 Press EXIT button to return to TV viewing or press MENU button to return to see the caption language. , Size: Set the size the words will appear in. ,, Font: Select a typeface...
... etc., to the previous menu. - Operation [/_-> - Customize the DTV/CADTV captions that appear on your preference. Low power reduces the power consumption of the screen, use it to the previous menu. 49 " Bg (Background) Color: Select a background color. ,, Bg (Background) Opaci_: Select the opacity for the ... button to select Caption Option. 3 Press the _ button and then use A / T button On or Off. 4 Press EXIT button to return to TV viewing or press MENU button to return to see the caption language. , Size: Set the size the words will appear in. ,, Font: Select a typeface...

Owners Manual
Page 50
..., it is changed. A frozen still picture from the screen. To avoid a permanent image on the screen for prolonged periods will automatically invert the plasma display panel color every 30 minutes. 4. Press EXiT button to return to TV viewing or press MENU button to return to Normal. * White ...Wash White Wash removes permanent images from a PC/video game displayed on the screen, the image will move once per 2 minutes: Left -e Right --> Upside -e ...
..., it is changed. A frozen still picture from the screen. To avoid a permanent image on the screen for prolonged periods will automatically invert the plasma display panel color every 30 minutes. 4. Press EXiT button to return to TV viewing or press MENU button to return to Normal. * White ...Wash White Wash removes permanent images from a PC/video game displayed on the screen, the image will move once per 2 minutes: Left -e Right --> Upside -e ...

Owners Manual
Page 54
Reference - Press the D,,button and then use A / _' button to select Set ID. 3. Power k a 0~1 02. Screen Mute k c * (Refer to 'Real Data Mapping'. Tint k 11. OSD Select k 13. Set ID is 1 ~ 99. If the data is data write mode, it indicates present ... x) * [Command 2]: Second command to control the set. * [Set ID]: You can adjust the set ID to p.55) 03. When selecting Set ID '0', every connected the TV is 1 ~ 99. 4. Transmit 'FF' data to read mode, it returns the data of Set is controlled. Data 1: Illegal Code 2: Not supported function 3: Wait more time...
Reference - Press the D,,button and then use A / _' button to select Set ID. 3. Power k a 0~1 02. Screen Mute k c * (Refer to 'Real Data Mapping'. Tint k 11. OSD Select k 13. Set ID is 1 ~ 99. If the data is data write mode, it indicates present ... x) * [Command 2]: Second command to control the set. * [Set ID]: You can adjust the set ID to p.55) 03. When selecting Set ID '0', every connected the TV is 1 ~ 99. 4. Transmit 'FF' data to read mode, it returns the data of Set is controlled. Data 1: Illegal Code 2: Not supported function 3: Wait more time...

