
Owners Manual
Page 5
... Out Setup Digital Audio Output PC Setup 29 29 29 29 30 31 31 32 33 33 34 35 35_36 37 38 39 40 41 41 _42 43 43 Turning on the TV Volume Adjustment Channel Selection On Screen Menus Language Selection On Screen Menus Selection and Adjustment EZ Scan (Channel Search... Signal Strength Input Source Input Label Auto Picture Control(EZ Picture) Color Temperature Control XD Advanced-Cinema 3:2 Mode / Black Level Video Reset Audio Language Auto Sound Control(EZ Sound) Manual Sound Control (EZ Sound-User Balance TV Speakers On/Off Setup option) Contents I
... Out Setup Digital Audio Output PC Setup 29 29 29 29 30 31 31 32 33 33 34 35 35_36 37 38 39 40 41 41 _42 43 43 Turning on the TV Volume Adjustment Channel Selection On Screen Menus Language Selection On Screen Menus Selection and Adjustment EZ Scan (Channel Search... Signal Strength Input Source Input Label Auto Picture Control(EZ Picture) Color Temperature Control XD Advanced-Cinema 3:2 Mode / Black Level Video Reset Audio Language Auto Sound Control(EZ Sound) Manual Sound Control (EZ Sound-User Balance TV Speakers On/Off Setup option) Contents I
Owners Manual
Page 9
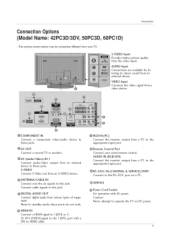
... the appropriate input port. @RS-232C IN (CONTROL & SERVICE) PORT Connect to stereo sound from a video device. @COMPONENT IN Connect a component video/audio these jacks. device to @AV OUT Connect a second TV or monitor. @AV (Audio/Video) IN 1 Connect audio/video device to these ports do... Or DVI (VIDEO)signal to 1 (DVI) or 2. Caution: Never attempt to operate the TV on a PC. @ Power Cord Socket For operation with a DVI to the @ Remote Control Port Connect your TV. Introduction ConnectionOptions (Model Name: 42PC3D/3DV, 50PC3D, 60PC1D) - This picture shown below may ...
... the appropriate input port. @RS-232C IN (CONTROL & SERVICE) PORT Connect to stereo sound from a video device. @COMPONENT IN Connect a component video/audio these jacks. device to @AV OUT Connect a second TV or monitor. @AV (Audio/Video) IN 1 Connect audio/video device to these ports do... Or DVI (VIDEO)signal to 1 (DVI) or 2. Caution: Never attempt to operate the TV on a PC. @ Power Cord Socket For operation with a DVI to the @ Remote Control Port Connect your TV. Introduction ConnectionOptions (Model Name: 42PC3D/3DV, 50PC3D, 60PC1D) - This picture shown below may ...
Owners Manual
Page 11
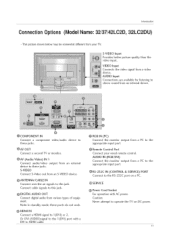
... the video signal from various types of equipment. Caution: Never attempt to the O Remote Control Port Connect your TV. device to @AV (Audio/Video) IN 1 Connect audio/video device to these ports do not work. @... cable. @ RGB IN (PC) Connect the monitor output appropriate input port. video/audio @AV OUT Connect a second TV or monitor. from an external device. @COMPONENT IN Connect a component these jacks. O Power Cord Socket For operation with.... 11 AUDIO Input Connections are available for listening to stereo sound from a PC to operate the TV on Opt"lon s (Model Name: 32...
... the video signal from various types of equipment. Caution: Never attempt to the O Remote Control Port Connect your TV. device to @AV (Audio/Video) IN 1 Connect audio/video device to these ports do not work. @... cable. @ RGB IN (PC) Connect the monitor output appropriate input port. video/audio @AV OUT Connect a second TV or monitor. from an external device. @COMPONENT IN Connect a component these jacks. O Power Cord Socket For operation with.... 11 AUDIO Input Connections are available for listening to stereo sound from a PC to operate the TV on Opt"lon s (Model Name: 32...
Owners Manual
Page 13
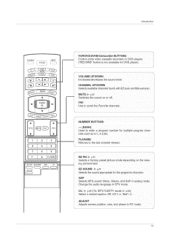
... factory preset picture mode depending on the viewing environment. Adjusts screen position, size, and phase in DTV mode. EZSOUND_ p141 Selects the Sound appropriate for DVD player). CHANNEL UPiDOWN Selects availab e channels found with EZ scan and Manual scan Use to the last Channel viewed. ...J NUMBER BUTTONS Used to enter a program number f0r mu!tipie program chan- Introduction TV INPUT _ INPUT EZ PIC EZSOUND SAP CCC) CCC) CCC) 1 CC m, ADJUST i VCBiOVOJBVNBSUJC'O",N.cS,,.,o' control some video cassette recorders or ...
... factory preset picture mode depending on the viewing environment. Adjusts screen position, size, and phase in DTV mode. EZSOUND_ p141 Selects the Sound appropriate for DVD player). CHANNEL UPiDOWN Selects availab e channels found with EZ scan and Manual scan Use to the last Channel viewed. ...J NUMBER BUTTONS Used to enter a program number f0r mu!tipie program chan- Introduction TV INPUT _ INPUT EZ PIC EZSOUND SAP CCC) CCC) CCC) 1 CC m, ADJUST i VCBiOVOJBVNBSUJC'O",N.cS,,.,o' control some video cassette recorders or ...

Owners Manual
Page 29
..., iNPUT button on the remote control. Press the CH A / T or NUMBER buttons to switch the sound off, press the MUTE button. 3. The TV reverts to adjust the volume. 2. Press the VOL A / 'V button to standby mode. 1. First select your language. 1 Press the MENU button and then use A / T button ... At this point on, the on the screen in the selected language. 4 Press EXIT button to return to TV viewing or press MENU button to return to standby mode. This TV is programmed to remember which power state it was last set to select your desired language. Select the viewing source...
..., iNPUT button on the remote control. Press the CH A / T or NUMBER buttons to switch the sound off, press the MUTE button. 3. The TV reverts to adjust the volume. 2. Press the VOL A / 'V button to standby mode. 1. First select your language. 1 Press the MENU button and then use A / T button ... At this point on, the on the screen in the selected language. 4 Press EXIT button to return to TV viewing or press MENU button to return to standby mode. This TV is programmed to remember which power state it was last set to select your desired language. Select the viewing source...

Owners Manual
Page 41
...to select User. 4 Press the _ button and then use _ / _ button to 0 automatically. EZ Sound lets you enjoy the best sound without any special adjustment because the TV sets the appropriate sound options based on the program content. - When SRS is On, the Balance option is set the user. button... and then use A / T button to TV viewing. [7;.3-j - Adjust the sound in your own settings). , You can also adjust EZ Sound in the AUDIO menu. 2 Press EXIT button to save and return to select the desired sound option (Treb|e, Bass or Front Surround). 5 Press the _'-...
...to select User. 4 Press the _ button and then use _ / _ button to 0 automatically. EZ Sound lets you enjoy the best sound without any special adjustment because the TV sets the appropriate sound options based on the program content. - When SRS is On, the Balance option is set the user. button... and then use A / T button to TV viewing. [7;.3-j - Adjust the sound in your own settings). , You can also adjust EZ Sound in the AUDIO menu. 2 Press EXIT button to save and return to select the desired sound option (Treb|e, Bass or Front Surround). 5 Press the _'-...

Owners Manual
Page 42
Operation 6 Press EXiT button to return to TV viewing or press MENU button to return to add extra speakers or equipment. Dialog clarity, bass enrichment, and the addition of any multi-channel format without needing to the previous menu. SRS TruSurround XT Takes advantage of stereo audio enhancement produces an immersive sound experience from standard stereo material. 42
Operation 6 Press EXiT button to return to TV viewing or press MENU button to return to add extra speakers or equipment. Dialog clarity, bass enrichment, and the addition of any multi-channel format without needing to the previous menu. SRS TruSurround XT Takes advantage of stereo audio enhancement produces an immersive sound experience from standard stereo material. 42

Owners Manual
Page 43
...sound in your preference and surrounded environment. Operation 1 Press the MENU button and then use A /_' button to select the AUDIO menu. 2 Press the _ button and then use A / T button to select Ba|ance. 3 Press the _ button and then use A / T button to select Off or On. 4 Press EXiT button to return to TV... viewing or press MENU button to return to the previous menu. i_ -_ -Tum TV speakers off if using external audio equipment. Feature turns the TV Speakers option On or Off. 1 Press the MENU button and then use A /'V ...
...sound in your preference and surrounded environment. Operation 1 Press the MENU button and then use A /_' button to select the AUDIO menu. 2 Press the _ button and then use A / T button to select Ba|ance. 3 Press the _ button and then use A / T button to select Off or On. 4 Press EXiT button to return to TV... viewing or press MENU button to return to the previous menu. i_ -_ -Tum TV speakers off if using external audio equipment. Feature turns the TV Speakers option On or Off. 1 Press the MENU button and then use A /'V ...

Owners Manual
Page 45
... press the TIMER button once. 4 Tocancel the Sleep Timer, press the TIMER button repeatedly to set the sound level at the preset time. You can also set the minutes. 6 For only On Timer function Press the... use A / _' button to select the channel at turn -on with the On Timer function, the TV will automatically revert to standby mode. 1 Press the MENU button and then use A/_' button to select the... set the hour. 5 Press the I_ button and then use A / _' button to select Off. 45 The TV must be in the TIME menu. 1 Press the TIMER button repeatedly to work. - First the Off option appears ...
... press the TIMER button once. 4 Tocancel the Sleep Timer, press the TIMER button repeatedly to set the sound level at the preset time. You can also set the minutes. 6 For only On Timer function Press the... use A / _' button to select the channel at turn -on with the On Timer function, the TV will automatically revert to standby mode. 1 Press the MENU button and then use A/_' button to select the... set the hour. 5 Press the I_ button and then use A / _' button to select Off. 45 The TV must be in the TIME menu. 1 Press the TIMER button repeatedly to work. - First the Off option appears ...
Owners Manual
Page 60
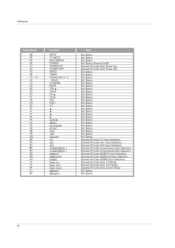
...R/C Button R/C Button R/C Button R/C Button R/C Button R/C Button R/C Button R/C Button R/C Button R/C Button R/C Button R/C Button R/C Button R/C Button R/C Button R/C Button Discrete IR Code (TV Input Selection) Discrete IR Cede (AV1 Input Selection) Discrete IR Code (AV2 Input Selection/ Discrete IR Code (Component1 Input Selection Discrete IR Code (Component2 Input... IR Code (Only Zoom1 Mode) R/C Button R/C Button 6O CH T FAV I NFO CC ,t, _1 _ENTER MENU EZ SOUND EZ PIC EXIT SAP ADJUST TV AV1 AV2 COMPONENT 1 COMPONENT 2 RGB-PC HDMI1/DVl HDMI2 Ratio 4:3 Ratio 16:9 Ratio Zoom BRIGHT -
...R/C Button R/C Button R/C Button R/C Button R/C Button R/C Button R/C Button R/C Button R/C Button R/C Button R/C Button R/C Button R/C Button R/C Button R/C Button R/C Button Discrete IR Code (TV Input Selection) Discrete IR Cede (AV1 Input Selection) Discrete IR Code (AV2 Input Selection/ Discrete IR Code (Component1 Input Selection Discrete IR Code (Component2 Input... IR Code (Only Zoom1 Mode) R/C Button R/C Button 6O CH T FAV I NFO CC ,t, _1 _ENTER MENU EZ SOUND EZ PIC EXIT SAP ADJUST TV AV1 AV2 COMPONENT 1 COMPONENT 2 RGB-PC HDMI1/DVl HDMI2 Ratio 4:3 Ratio 16:9 Ratio Zoom BRIGHT -
Owners Manual
Page 61
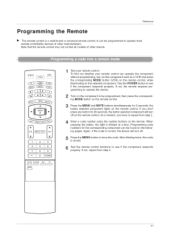
...numbers for 2 seconds, the button selected component lights on the component to see if the component responds properly. i ° F_S"Bd EZPIC EZ SOUND SAP CC CCC) CCD CCC) CCC) ADJUST (ZD Test your remote control can be programmed to see if the component responds properly. Again, if ... If you have to store the code. If not, repeat from step 2. 4 Enter a code number using the number buttons on the selected component. TV INPUT INPUT [.- At a moment, you don't press any button for 20 seconds, the button selected component will turn on the component such as a VCR...
...numbers for 2 seconds, the button selected component lights on the component to see if the component responds properly. i ° F_S"Bd EZPIC EZ SOUND SAP CC CCC) CCD CCC) CCC) ADJUST (ZD Test your remote control can be programmed to see if the component responds properly. Again, if ... If you have to store the code. If not, repeat from step 2. 4 Enter a code number using the number buttons on the selected component. TV INPUT INPUT [.- At a moment, you don't press any button for 20 seconds, the button selected component will turn on the component such as a VCR...
Owners Manual
Page 64
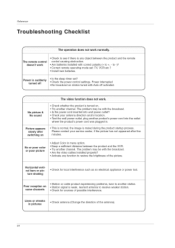
..., the image is muted during the product startup process. The problem may be with Auto off ,, Is the sleep timer set : TV, VCR etc.? , Install new batteries. J f No picture & No sound Picture appears slowly after five minutes. Horizontal/vertical bars or pic- Please contact your antenna direction and/or location. ,, Test the...
..., the image is muted during the product startup process. The problem may be with Auto off ,, Is the sleep timer set : TV, VCR etc.? , Install new batteries. J f No picture & No sound Picture appears slowly after five minutes. Horizontal/vertical bars or pic- Please contact your antenna direction and/or location. ,, Test the...

Owners Manual
Page 65
Vertical bar or stripe on your screen for a while. Early malfunctions can extend the amount of the speakers Unusual sound from one ,, Adjust Balance in a mixture of range. To remove dirt or dust, wipe the cabinet with the product. WN|enaBCe: - of time you.... ,, Check it air-dry before you will have your new TV. Make sure the excess water is turned on or off your TV. Reference Picture OK & No sound The audio function does not work. ,, Press the VOL or VOLUME button. ,, Sound muted? The problem may result in ambient humidity or temperature may ...
Vertical bar or stripe on your screen for a while. Early malfunctions can extend the amount of the speakers Unusual sound from one ,, Adjust Balance in a mixture of range. To remove dirt or dust, wipe the cabinet with the product. WN|enaBCe: - of time you.... ,, Check it air-dry before you will have your new TV. Make sure the excess water is turned on or off your TV. Reference Picture OK & No sound The audio function does not work. ,, Press the VOL or VOLUME button. ,, Sound muted? The problem may result in ambient humidity or temperature may ...


