Owners Manual
Page 3
.... If the provided plug does not fit into your outlet, consult an electrician for your safety. Only use and supplied with each apparatus. This information shall be given in an instruction for installation for use attachments/accessories by adding statements after the end of a specific safety instruction may be entitled "Important Safety Instructions". The following safety instruction list. Heed all warnings...
.... If the provided plug does not fit into your outlet, consult an electrician for your safety. Only use and supplied with each apparatus. This information shall be given in an instruction for installation for use attachments/accessories by adding statements after the end of a specific safety instruction may be entitled "Important Safety Instructions". The following safety instruction list. Heed all warnings...
Owners Manual
Page 5
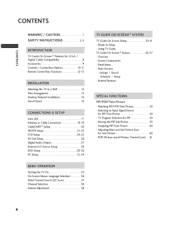
Panel Menu o Main Services Listings ! Selecting an Input Signal Source for PIP 59 - TV Program Selection for PIP/Twin Picture 59 - Adjusting Main and Sub Pi_ure Sizes for U.S.A. / m z Digital Cable Compatibility 8 -4 Accessories 9 Controls / Connection Options 0-|1 Remote Control Key Functions 2 o]3 Attaching the TV to a Wall |4 Wire Arrangement |5 Desktop Pedestal Installation ]6 Swivel Stand ]6 Auto Link ]7 Antenna or CaNe Connection 18-19 CableCARD _ Setup 20 HDSTB Setup 21-23 VCR Setup 24-25 AV Out Setup 26 Digital Audio Output...
Panel Menu o Main Services Listings ! Selecting an Input Signal Source for PIP 59 - TV Program Selection for PIP/Twin Picture 59 - Adjusting Main and Sub Pi_ure Sizes for U.S.A. / m z Digital Cable Compatibility 8 -4 Accessories 9 Controls / Connection Options 0-|1 Remote Control Key Functions 2 o]3 Attaching the TV to a Wall |4 Wire Arrangement |5 Desktop Pedestal Installation ]6 Swivel Stand ]6 Auto Link ]7 Antenna or CaNe Connection 18-19 CableCARD _ Setup 20 HDSTB Setup 21-23 VCR Setup 24-25 AV Out Setup 26 Digital Audio Output...
Owners Manual
Page 6
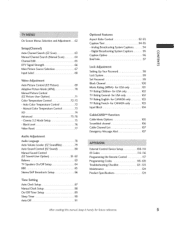
...On Screen Menus Selection and Adjustment .... 62 Setup(Channel) Auto Channel Search (EZ Scan 63 Manual Channel Search (Manual Scan) ........ 64 Channel Edit 65 DTV Signal Strength 66 Main Picture Source Selection 67 Input Label 68 Video Adiustment Auto Picture Control (EZ Picture) 69 Adaptive Picture Mode (APM 70 Manual Picture Control (EZ Picture-User Option) 7] Color Temperature Control 72-73 o Auto Color Temperature Control 72 - Cinema 3:2 Mode Setup 75 - Analog Broadcasting System Captions 94 - for USA only 101 TV Rating Children- Black Level...
...On Screen Menus Selection and Adjustment .... 62 Setup(Channel) Auto Channel Search (EZ Scan 63 Manual Channel Search (Manual Scan) ........ 64 Channel Edit 65 DTV Signal Strength 66 Main Picture Source Selection 67 Input Label 68 Video Adiustment Auto Picture Control (EZ Picture) 69 Adaptive Picture Mode (APM 70 Manual Picture Control (EZ Picture-User Option) 7] Color Temperature Control 72-73 o Auto Color Temperature Control 72 - Cinema 3:2 Mode Setup 75 - Analog Broadcasting System Captions 94 - for USA only 101 TV Rating Children- Black Level...

Owners Manual
Page 12
... monitor output appropriate input port. DIGITAL AUDIO OUT Connect dig_l audio from various types of equipment Note: in standby mode, these ports do not work. @ RS-232C IN (CONTROL & SERVICE) PORT Connect to the RS-232C port on DC power, 11 Connect a component video/audio jacks. O-- S-VIDEO Input Provides better picture video input. Z Connect a second TV or monitor, _AV (Audio/Video) IN I Connect audio/video device to these HDMI IN Connect a HDMI signal to this jack. from an external device. Or DVl(VlDEO)signal tothe "! (DVI) port with a DVl to the @ Remote...
... monitor output appropriate input port. DIGITAL AUDIO OUT Connect dig_l audio from various types of equipment Note: in standby mode, these ports do not work. @ RS-232C IN (CONTROL & SERVICE) PORT Connect to the RS-232C port on DC power, 11 Connect a component video/audio jacks. O-- S-VIDEO Input Provides better picture video input. Z Connect a second TV or monitor, _AV (Audio/Video) IN I Connect audio/video device to these HDMI IN Connect a HDMI signal to this jack. from an external device. Or DVl(VlDEO)signal tothe "! (DVI) port with a DVl to the @ Remote...
Owners Manual
Page 14
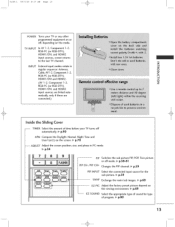
... POWER Turns your TV turns off , depending on the mode. Z INPUT External input modes rotate in PC mode. p.34 PIP Switches the sub picture PIR POR Twin picture or off mode. @ p.58-61 HP CH-/P[P C_ Changes the PIP channel _ _.59 PIP INPUT Select the connected input source for _pe of time before your TV or any other programmed equipment on or off automatically. _ p.90 APM Compare the Daylight, Normal, Night Time and User] (or2) on the screen. _ p.70 -- TV INPUT...
... POWER Turns your TV turns off , depending on the mode. Z INPUT External input modes rotate in PC mode. p.34 PIP Switches the sub picture PIR POR Twin picture or off mode. @ p.58-61 HP CH-/P[P C_ Changes the PIP channel _ _.59 PIP INPUT Select the connected input source for _pe of time before your TV or any other programmed equipment on or off automatically. _ p.90 APM Compare the Daylight, Normal, Night Time and User] (or2) on the screen. _ p.70 -- TV INPUT...
Owners Manual
Page 18
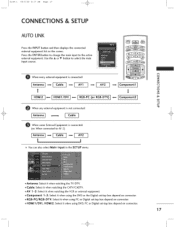
Use the A or Y button to the active external equipment. O Z {,-,,:,,],-,I AV1 ] --[ AV2 ] --i cOmpOnent1 1 -4 i ! 512F-L 06/6/29 8:A7 AM Page ]o7 CONNECTIONS & SETUP AUTO LINK Press the INPUT bu_on and then displays the connected external equipment list on the screen. Press the ENTER button to change the main input to select the main input source. @ When every external equipment is connected: N O Z Z t'l [Antenna] --[ Cable ] --I v,_.-,_.co,r.o,,-,:l>--rvIc_
Use the A or Y button to the active external equipment. O Z {,-,,:,,],-,I AV1 ] --[ AV2 ] --i cOmpOnent1 1 -4 i ! 512F-L 06/6/29 8:A7 AM Page ]o7 CONNECTIONS & SETUP AUTO LINK Press the INPUT bu_on and then displays the connected external equipment list on the screen. Press the ENTER button to change the main input to select the main input source. @ When every external equipment is connected: N O Z Z t'l [Antenna] --[ Cable ] --I v,_.-,_.co,r.o,,-,:l>--rvIc_
Owners Manual
Page 22
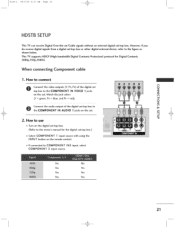
...,1080i). Digital Contents Protection) protocol for the digital set . 512F-L 06/6/29 8:A7 AM Page 2Z HDSTB SETUP This TV can receive Digital Over-the=air/Cabie do receive digital signals from a digital set -top box. m -4 C 2. How to the owner's manual for Digital Contents When connecting Component cable 1. How to connect N O Connect the video outputs (Y, P[_,PR) of the digital set-top box to the COMPONENT IN AUDIO 1 iacks on the set -top box. (Refer to use Turn on the remote control. signals without an external digital set -top...
...,1080i). Digital Contents Protection) protocol for the digital set . 512F-L 06/6/29 8:A7 AM Page 2Z HDSTB SETUP This TV can receive Digital Over-the=air/Cabie do receive digital signals from a digital set -top box. m -4 C 2. How to the owner's manual for Digital Contents When connecting Component cable 1. How to connect N O Connect the video outputs (Y, P[_,PR) of the digital set-top box to the COMPONENT IN AUDIO 1 iacks on the set -top box. (Refer to use Turn on the remote control. signals without an external digital set -top...
Owners Manual
Page 23
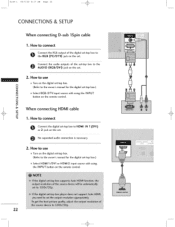
....et-top box to connect O thoennReGctB th(Pe CR/DGTBVo) utpujat ckofotnhethedigsiteatl. N O (Refer to HDMI IN 1 (DVI) or 2 jack on the remote control. How to use Turn on the digital set No separated audio connection is necessary. 2. How to the 2. Z When connecting HDMI cable L_ m -4 c 1. How to the owner's manual for the digital set-top box.) Z Z m Select RGB-DTM input source with using the INPUT -4 button on the set -top box. (Refer to use Turn on the remote control. 22
....et-top box to connect O thoennReGctB th(Pe CR/DGTBVo) utpujat ckofotnhethedigsiteatl. N O (Refer to HDMI IN 1 (DVI) or 2 jack on the remote control. How to use Turn on the digital set No separated audio connection is necessary. 2. How to the 2. Z When connecting HDMI cable L_ m -4 c 1. How to the owner's manual for the digital set-top box.) Z Z m Select RGB-DTM input source with using the INPUT -4 button on the set -top box. (Refer to use Turn on the remote control. 22
Owners Manual
Page 24
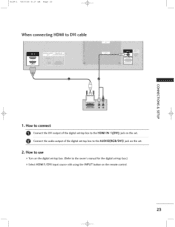
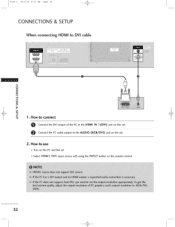
How to use Turn on the digital set-top box. (Refer to the AUDIO(RGB/DVI) jack on the remote control 23 512F-L 06/6/29 8:A7 AM Page 23 When connecti i ng HDM_ to connect O Connect the DVI output of the digital set . O Connect the audio output of the digital set-top box to the HDMI IN 1 (DVI) iack on the set =top box to the owner's manual for the digi_l set-top box.) i Se{ect HDMI1/DVI input source with using the INPUT button on the set. 2. How to DVmcable N O Z Z m t_ -4 O Z m -4 c 1.
How to use Turn on the digital set-top box. (Refer to the AUDIO(RGB/DVI) jack on the remote control 23 512F-L 06/6/29 8:A7 AM Page 23 When connecti i ng HDM_ to connect O Connect the DVI output of the digital set . O Connect the audio output of the digital set-top box to the HDMI IN 1 (DVI) iack on the set =top box to the owner's manual for the digi_l set-top box.) i Se{ect HDMI1/DVI input source with using the INPUT button on the set. 2. How to DVmcable N O Z Z m t_ -4 O Z m -4 c 1.
Owners Manual
Page 26
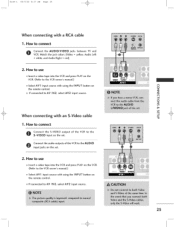
... S-Video cable c 1. m t_ -4 0 Z tam m -4 When connecting with a RCA cable 1. How to connect O S-oVnIDneEcOt thienpSut-VoInDEthOe soeut.tput of the VCR to the O onnect the audio outputs of the VCR to connect O Connect the AUDIO/VIDEO jacks between TV and VCR. How to use insert a video bpe into the VCR and press PLAY on the VCR. (Refer to the VCR owner% manual.) Select AV1 input source with using the INPUT button on the remote control...
... S-Video cable c 1. m t_ -4 0 Z tam m -4 When connecting with a RCA cable 1. How to connect O S-oVnIDneEcOt thienpSut-VoInDEthOe soeut.tput of the VCR to the O onnect the audio outputs of the VCR to connect O Connect the AUDIO/VIDEO jacks between TV and VCR. How to use insert a video bpe into the VCR and press PLAY on the VCR. (Refer to the VCR owner% manual.) Select AV1 input source with using the INPUT button on the remote control...
Owners Manual
Page 30
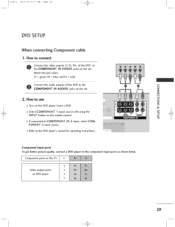
...player's manual for ope_ting instructions_ Component Input ports To get better picture quality, connect a DVD player to use -4 O z Turn on the set . Z Z m t_ 2. Component ports on the TV Video output ports on the set . How to the component input ports as shown below'. How to connect O Connect the video outputs (Y, PB, PR) of the DVD to the O COMPONENT IN AUDIO1 jacks on the DVD player, insert a DVD. Match the _ack colors (Y = green_ PB = blue, and PR = red). Select COMPONENT ] input source with using the m INPUT button on the remote control. -4 c If connected...
...player's manual for ope_ting instructions_ Component Input ports To get better picture quality, connect a DVD player to use -4 O z Turn on the set . Z Z m t_ 2. Component ports on the TV Video output ports on the set . How to the component input ports as shown below'. How to connect O Connect the video outputs (Y, PB, PR) of the DVD to the O COMPONENT IN AUDIO1 jacks on the DVD player, insert a DVD. Match the _ack colors (Y = green_ PB = blue, and PR = red). Select COMPONENT ] input source with using the m INPUT button on the remote control. -4 c If connected...

Owners Manual
Page 31
... connecting HDMI cable c 1. O Z ,i_Select AV1 input source with using the INPUT button on the remote control. How to connect O onnect the HDMI output of the DVD to the HDMI IN I (OVl) or 2 jack on the set, O No separated audio connection is necessary. 2. How to conne_ O S-oVnInDeEcOt thinepuSt -VoInDEthOe soeut.tput of the DVD to the O Cinopnunt ecjtacktsheonautdhieo soeuttputs of the DVD to the AUDIO 2. Z iiii_Refer to the DVD player's manual for operating instructions. 30 How to use...
... connecting HDMI cable c 1. O Z ,i_Select AV1 input source with using the INPUT button on the remote control. How to connect O onnect the HDMI output of the DVD to the HDMI IN I (OVl) or 2 jack on the set, O No separated audio connection is necessary. 2. How to conne_ O S-oVnInDeEcOt thinepuSt -VoInDEthOe soeut.tput of the DVD to the O Cinopnunt ecjtacktsheonautdhieo soeuttputs of the DVD to the AUDIO 2. Z iiii_Refer to the DVD player's manual for operating instructions. 30 How to use...
Owners Manual
Page 32
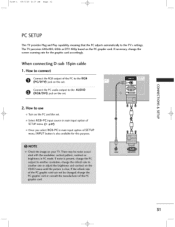
..., change the screen scanning rate for this purpose_ 31 PC SETUP This TV provides Plug and Play capability, meaning that the PC adjusts automatically to the AUDIO Z m t_ -4 O Z 2. The TV perceives 640x480, 60Hz as DTV 480p based on the PC and the set. -4 C Select RGB_PC input source in main input option of SETUP menu. (_ p.67) Once you select RGB-PC in main input option of S£TUP menu, INPUT button is...
..., change the screen scanning rate for this purpose_ 31 PC SETUP This TV provides Plug and Play capability, meaning that the PC adjusts automatically to the AUDIO Z m t_ -4 O Z 2. The TV perceives 640x480, 60Hz as DTV 480p based on the PC and the set. -4 C Select RGB_PC input source in main input option of SETUP menu. (_ p.67) Once you select RGB-PC in main input option of S£TUP menu, INPUT button is...
Owners Manual
Page 33
How to connect O onnect the DVI output of the PC to the HDMI IN 1 (DVI) jack on the set 2. 512F-L 06/6/29 8:A7 AM Page 32 CONNECTIONS & SETUP When connecting HDMI to the AUDIO (RGB/DVl) iack on the remote control, 32 How to use Turn on the PC and the set Select HDM[1/DV[ input source with using the INPUT button on the set Connect the PC audio output to Dr[ cable N O Z Z m N -4 Z m c 1.
How to connect O onnect the DVI output of the PC to the HDMI IN 1 (DVI) jack on the set 2. 512F-L 06/6/29 8:A7 AM Page 32 CONNECTIONS & SETUP When connecting HDMI to the AUDIO (RGB/DVl) iack on the remote control, 32 How to use Turn on the PC and the set Select HDM[1/DV[ input source with using the INPUT button on the set Connect the PC audio output to Dr[ cable N O Z Z m N -4 Z m c 1.
Owners Manual
Page 38
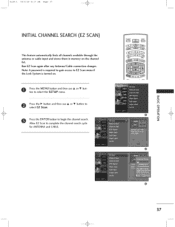
...: A password is required to gain access to EZ Scan menu if the Lock System is turned on the channel list. Z Allow EZ Scan to select the SETUP menu. ton to complete the channel search cycle for ANTENNA and CABLE. 37 O ress the MENU burn and then use A or Y button to begin the channelsearch. O Press the _ button and then use A or Y but- 512F-L 06/6/29 8:Z7 AM Page 37 INITIAL CHANNEL SEARCH(EZ SCAN...
...: A password is required to gain access to EZ Scan menu if the Lock System is turned on the channel list. Z Allow EZ Scan to select the SETUP menu. ton to complete the channel search cycle for ANTENNA and CABLE. 37 O ress the MENU burn and then use A or Y button to begin the channelsearch. O Press the _ button and then use A or Y but- 512F-L 06/6/29 8:Z7 AM Page 37 INITIAL CHANNEL SEARCH(EZ SCAN...
Owners Manual
Page 44
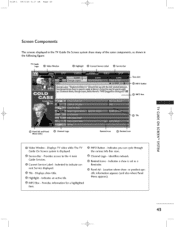
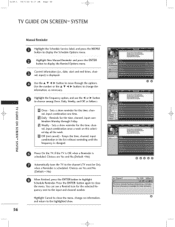
... _ Service _r Time slot INFO button INFO box O Panel Ad and Panel Menu Errtnj _ Channel Logo Ch @ Tilo c m O Z Remind icon _ Remind icon m m Z @ Video Window - Indicates you can cycle through -4 m Guide On Screen system is set as shown in the TV Guide On Screen system share many of the same components, the following figure: as a Reminder. the various Info Bo× sizes, @ Service Bar - rent Service displayed. @ Tile - Displays show is displayed. Identifies network...
... _ Service _r Time slot INFO button INFO box O Panel Ad and Panel Menu Errtnj _ Channel Logo Ch @ Tilo c m O Z Remind icon _ Remind icon m m Z @ Video Window - Indicates you can cycle through -4 m Guide On Screen system is set as shown in the TV Guide On Screen system share many of the same components, the following figure: as a Reminder. the various Info Bo× sizes, @ Service Bar - rent Service displayed. @ Tile - Displays show is displayed. Identifies network...
Owners Manual
Page 50
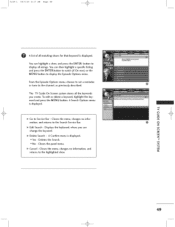
.... Closes the panel menu. Go to the Search Service Bar. A Search Options menu is displayed. Cancel o Closes the menu, changes no information, and returns to Service Bar - The TV Guide On Screen system stores all airings_ You can then highlight a specific listing and press the ENTER button to watch (if On now) or the MENU button to the channel, as previously described. From the Episode Options menu, choose to set a reminder...
.... Closes the panel menu. Go to the Search Service Bar. A Search Options menu is displayed. Cancel o Closes the menu, changes no information, and returns to Service Bar - The TV Guide On Screen system stores all airings_ You can then highlight a specific listing and press the ENTER button to watch (if On now) or the MENU button to the channel, as previously described. From the Episode Options menu, choose to set a reminder...
Owners Manual
Page 57
... number or the A Y 4 _ buttons to move through Friday. Keeps the time, channel, input combination in the list without reminding until the frequency is scheduled. No) O When finished, press the ENTER button to highlight Schedule Reminde_ Press the ENTER button again to display the Remind Options menu. Sets a show : @@ @ODe@ 512F-L06/6/298:A7AM Page56 TV GUIDE ON SCREEN SYSTEM Manual Reminder -4 c i m O Z m m Z -4 m 56 O ighlight the Schedule Service...
... number or the A Y 4 _ buttons to move through Friday. Keeps the time, channel, input combination in the list without reminding until the frequency is scheduled. No) O When finished, press the ENTER button to highlight Schedule Reminde_ Press the ENTER button again to display the Remind Options menu. Sets a show : @@ @ODe@ 512F-L06/6/298:A7AM Page56 TV GUIDE ON SCREEN SYSTEM Manual Reminder -4 c i m O Z m m Z -4 m 56 O ighlight the Schedule Service...
Owners Manual
Page 60
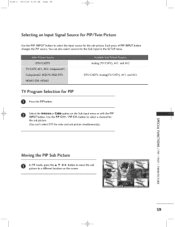
... button to select the input source for PIP O Press the PIP button. 0 Select the Antenna or Cable option on the screen. C Z t_ -4 O Z Moving the PIP Sub Picture © O In PIP mode, press the A Y _ _ button to move the sub --.t picture to a different location on the Sub input menu or with the PIP iNPUT button. Analog (TViCATV), AV1, and AV2 DTViCADTV, Analog(TViCATV), AVI, and AV2 Program Selection for the sub picture. z -4 c 59 Each press of PIP INPUT button changes the PIP source...
... button to select the input source for PIP O Press the PIP button. 0 Select the Antenna or Cable option on the screen. C Z t_ -4 O Z Moving the PIP Sub Picture © O In PIP mode, press the A Y _ _ button to move the sub --.t picture to a different location on the Sub input menu or with the PIP iNPUT button. Analog (TViCATV), AV1, and AV2 DTViCADTV, Analog(TViCATV), AVI, and AV2 Program Selection for the sub picture. z -4 c 59 Each press of PIP INPUT button changes the PIP source...
Owners Manual
Page 115
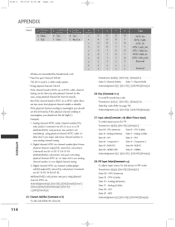
... PiP mode. Digital channel: ATSC ak channel number(don't know ph_ica[ channel, major(30), mino_(3)), sub picture Command: ma O0 ×x O0 1E OO 03 A2 attribute(O_2): sub picture, two part, not using physlcat channel, NTSC cable _x£ data: don*t care major and minor channel number in case analog channel tuning, 2. Tn,_s_,isi_._ M M [ ] [SeD] [ ][Da@ Iqs Data Key code: Refer to page 116. Tran_misdon IX) [b][ j [Set...
... PiP mode. Digital channel: ATSC ak channel number(don't know ph_ica[ channel, major(30), mino_(3)), sub picture Command: ma O0 ×x O0 1E OO 03 A2 attribute(O_2): sub picture, two part, not using physlcat channel, NTSC cable _x£ data: don*t care major and minor channel number in case analog channel tuning, 2. Tn,_s_,isi_._ M M [ ] [SeD] [ ][Da@ Iqs Data Key code: Refer to page 116. Tran_misdon IX) [b][ j [Set...


