Owners Manual
Page 5
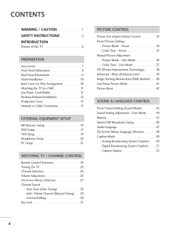
... Improvement Technology 38 Advanced - Channel Editing 30 Key Lock 31 Picture Size (Aspect Ratio) Control 32 Preset Picture Settings - CONTENTS WARNING / CAUTION 1 SAFETY INSTRUCTIONS 2 INTRODUCTION Feature of this TV 6 Accessories 7 Front Panel Information 8 Back Panel Information 9 Stand Installation 10 Back Cover for Wire... Connection 13 HD Receiver Setup 14 DVD Setup 17 VCR Setup 19 Headphone Setup 20 PC Setup 21 Remote Control Functions 24 Turning On TV 26 Channel Selection 26 Volume Adjustment 26 On-Screen Menus Selection 27 Channel Search - Black (Darkness) Level...
... Improvement Technology 38 Advanced - Channel Editing 30 Key Lock 31 Picture Size (Aspect Ratio) Control 32 Preset Picture Settings - CONTENTS WARNING / CAUTION 1 SAFETY INSTRUCTIONS 2 INTRODUCTION Feature of this TV 6 Accessories 7 Front Panel Information 8 Back Panel Information 9 Stand Installation 10 Back Cover for Wire... Connection 13 HD Receiver Setup 14 DVD Setup 17 VCR Setup 19 Headphone Setup 20 PC Setup 21 Remote Control Functions 24 Turning On TV 26 Channel Selection 26 Volume Adjustment 26 On-Screen Menus Selection 27 Channel Search - Black (Darkness) Level...

Owners Manual
Page 8
... shielded signal interface cables (D-sub 15 pin cable) with ferrite cores to maintain standard _o compliance for the product. _o © z Owner's Manual CD Manual Remote Control, Batteries Power Cord Protection Cover (Refer to p.ll ) Power Cord Holder (Refer to p.ll ) 4-Bolts for stand assembly (Refer to p.lO) 75ohm Round Cable...
... shielded signal interface cables (D-sub 15 pin cable) with ferrite cores to maintain standard _o compliance for the product. _o © z Owner's Manual CD Manual Remote Control, Batteries Power Cord Protection Cover (Refer to p.ll ) Power Cord Holder (Refer to p.ll ) 4-Bolts for stand assembly (Refer to p.lO) 75ohm Round Cable...

Owners Manual
Page 15
...PR) of the digital set-top box to the owner's manual for the digital set -top box. (Refer to -0 the COMPONENT IN (L, R) jacks on the remote control. operation) Select Component input source by using the INPUT button on the set . However, if you have finished connecting all equipment. How to use...damage, never plug in any power cords until you device, refer to the COMPONENT IN (Y, PB, PR) jacks m on the set . 2. HD RECEIVERSETUP This TV can receive Digital Over-the-air/Cable do receive digital signals from a digital set -top box. Y, CB/PB, CR/PR Yes No Yes Yes Yes...
...PR) of the digital set-top box to the owner's manual for the digital set -top box. (Refer to -0 the COMPONENT IN (L, R) jacks on the remote control. operation) Select Component input source by using the INPUT button on the set . However, if you have finished connecting all equipment. How to use...damage, never plug in any power cords until you device, refer to the COMPONENT IN (Y, PB, PR) jacks m on the set . 2. HD RECEIVERSETUP This TV can receive Digital Over-the-air/Cable do receive digital signals from a digital set -top box. Y, CB/PB, CR/PR Yes No Yes Yes Yes...
Owners Manual
Page 16
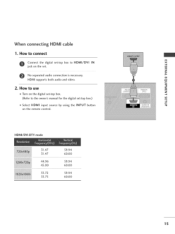
HDMI/DVI-DTV mode 31.47 31.47 44.96 45.00 33.72 33.75 59.94 60.00 59.94 60.00 59.94 60.00 15 How to connect m Connect the digital set-top box to the owner's manual for the digital set . XZ) c i "0 2. m HDMI supports both audio and video. How to use m z Turn on the digital set-top box. (Refer to HDMI/DVI IN >< jack on the set -top box.) m --4 C Select HDMI input source by using the INPUT button "0 on the remote control. When connecting HDMI cable 1. m _o z No separated audio connection is necessary.
HDMI/DVI-DTV mode 31.47 31.47 44.96 45.00 33.72 33.75 59.94 60.00 59.94 60.00 59.94 60.00 15 How to connect m Connect the digital set-top box to the owner's manual for the digital set . XZ) c i "0 2. m HDMI supports both audio and video. How to use m z Turn on the digital set-top box. (Refer to HDMI/DVI IN >< jack on the set -top box.) m --4 C Select HDMI input source by using the INPUT button "0 on the remote control. When connecting HDMI cable 1. m _o z No separated audio connection is necessary.
Owners Manual
Page 17
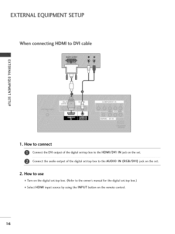
How to connect Connect the DVI output of the digital set-top box to the HDMI/DVI IN jack on the set. Connect the audio output of the digital set-top box to the AUDIO IN (RGB/DVI) jack on the set. 2. How to use 01T_urn on the digital set-top box. (Refer to DVI cable m x m _o z m _D c m z m c -0 1. EXTERNALEQUIPMENT SETUP When connecting HDM[ to the owner's manual for the digital set-top box.) 01S_elect HDMI input source by using the INPUT button on the remote control. 16
How to connect Connect the DVI output of the digital set-top box to the HDMI/DVI IN jack on the set. Connect the audio output of the digital set-top box to the AUDIO IN (RGB/DVI) jack on the set. 2. How to use 01T_urn on the digital set-top box. (Refer to DVI cable m x m _o z m _D c m z m c -0 1. EXTERNALEQUIPMENT SETUP When connecting HDM[ to the owner's manual for the digital set-top box.) 01S_elect HDMI input source by using the INPUT button on the remote control. 16
Owners Manual
Page 18
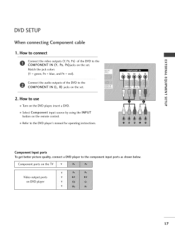
... ports as shown below. How to use m c 01_Turn on the DVD player, insert a DVD. 0_Select Component input source by using the INPUT button on the remote control. 01_Refer to the COMPONENT IN (L, R) jacks on the set . m z 2. Component Input ports To get better picture quality, connect a DVD player to the m x COMPONENT IN... video outputs (Y, PB, PR) of the DVD to the DVD player's manual for operating instructions. DVD SETUP When connecting Component cable 1. Component ports on the TV Video output ports on the set .
... ports as shown below. How to use m c 01_Turn on the DVD player, insert a DVD. 0_Select Component input source by using the INPUT button on the remote control. 01_Refer to the COMPONENT IN (L, R) jacks on the set . m z 2. Component Input ports To get better picture quality, connect a DVD player to the m x COMPONENT IN... video outputs (Y, PB, PR) of the DVD to the DVD player's manual for operating instructions. DVD SETUP When connecting Component cable 1. Component ports on the TV Video output ports on the set .
Owners Manual
Page 19
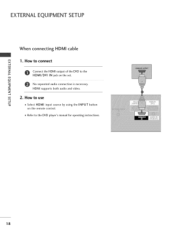
m _D c No separated audio connection is necessary. z 2. How to the DVD player's manual for operating instructions. 18 How to connect m _o z Connect the HDMI output of the DVD to the HDMI/DVI IN jack on the remote control. 01_Refer to use m c -O 01_Select HDMI input source by using the INPUT button on the set. m HDMI supports both audio and video. EXTERNALEQUIPMENT SETUP When connecting HDM[ cable m x 1.
m _D c No separated audio connection is necessary. z 2. How to the DVD player's manual for operating instructions. 18 How to connect m _o z Connect the HDMI output of the DVD to the HDMI/DVI IN jack on the remote control. 01_Refer to use m c -O 01_Select HDMI input source by using the INPUT button on the set. m HDMI supports both audio and video. EXTERNALEQUIPMENT SETUP When connecting HDM[ cable m x 1.
Owners Manual
Page 21
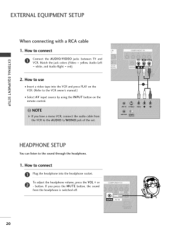
..., press the VOL + or - EXTERNALEQUIPMENT SETUP When connecting with a RCA cable 1. button. c -0 HEADPHONE SETUP You can listen to connect S} m Connect the AUDIO/VIDEO jacks between TV and x VCR. If you press the MUTE button, the sound from the headphone is switched off. 2O How to the sound through the headphone. 1. Match... (Video = yellow, Audio Left m = white, and Audio Right = red) _o z m XD 2. How to connect Plug the headphone into the VCR and press PLAY on the m remote control.
..., press the VOL + or - EXTERNALEQUIPMENT SETUP When connecting with a RCA cable 1. button. c -0 HEADPHONE SETUP You can listen to connect S} m Connect the AUDIO/VIDEO jacks between TV and x VCR. If you press the MUTE button, the sound from the headphone is switched off. 2O How to the sound through the headphone. 1. Match... (Video = yellow, Audio Left m = white, and Audio Right = red) _o z m XD 2. How to connect Plug the headphone into the VCR and press PLAY on the m remote control.

Owners Manual
Page 22
...DVI cable I . How to the HDMI/DVI I N jack on the set. PC SETUP This TV provides Plug and Play capability, meaning that the PC adjusts automatically to the AUDIO IN m (RGB... RGB output of the PC to use 01_Turn on the PC and the TV. 01_Select HDMI input source by using the INPUT button on the remote control. 21 When connecting D-sub 15pin cable I . How to the AUDIO...remote control. m c 01_Select RGB-PC input source by using the INPUT button on the set . Connect the PC audio output to use m z 01_Turn on the set. _D z Connect the PC audio output to the TV...
...DVI cable I . How to the HDMI/DVI I N jack on the set. PC SETUP This TV provides Plug and Play capability, meaning that the PC adjusts automatically to the AUDIO IN m (RGB... RGB output of the PC to use 01_Turn on the PC and the TV. 01_Select HDMI input source by using the INPUT button on the remote control. 21 When connecting D-sub 15pin cable I . How to the AUDIO...remote control. m c 01_Select RGB-PC input source by using the INPUT button on the set . Connect the PC audio output to use m z 01_Turn on the set. _D z Connect the PC audio output to the TV...
Owners Manual
Page 25
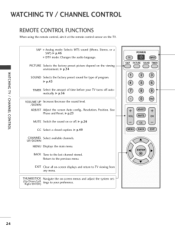
...your preference. 24 BACK Tune to the previous menu. Return to the last channel viewed. EXIT Clear all on-screen displays and return to your TV turns off auto- < matically. _ p.56 N I VOLUME UP Increase/decrease the sound level. > z /DOWN z fT1 ADJUST Adjust the ...., Resolution, Position, Size Phase and Reset. _ p.23 N © Z MUTE Switch the sound on the TV. HING TV / CHANNEL CONTROL REMOTE CONTROL FUNCTIONS When using the remote control, aim it at the remote control sensor on or off. _ p.26 © CC Select a closed caption. _ p.49 CHANNEL Select available...
...your preference. 24 BACK Tune to the previous menu. Return to the last channel viewed. EXIT Clear all on-screen displays and return to your TV turns off auto- < matically. _ p.56 N I VOLUME UP Increase/decrease the sound level. > z /DOWN z fT1 ADJUST Adjust the ...., Resolution, Position, Size Phase and Reset. _ p.23 N © Z MUTE Switch the sound on the TV. HING TV / CHANNEL CONTROL REMOTE CONTROL FUNCTIONS When using the remote control, aim it at the remote control sensor on or off. _ p.26 © CC Select a closed caption. _ p.49 CHANNEL Select available...
Owners Manual
Page 27
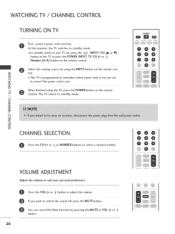
...or VOL (+ or -) button. 26 i If you want to standby mode. At this moment, the TV switches to standby mode. 01I_n standby mode to turn TV on the remote control. The TV reverts to switch the sound off, press the MUTE button. You can cancel the Mute function by using ...the TV, press the POWER button on the remote control. N I , INPUT, CH (A or V) button on the TV or press the POWER, INPUT, TV, CH (+ or -), Number (0~9) button on the remote < control. N 01T_his TV is programmed to remember which power state it was last set...
...or VOL (+ or -) button. 26 i If you want to standby mode. At this moment, the TV switches to standby mode. 01I_n standby mode to turn TV on the remote control. The TV reverts to switch the sound off, press the MUTE button. You can cancel the Mute function by using ...the TV, press the POWER button on the remote control. N I , INPUT, CH (A or V) button on the TV or press the POWER, INPUT, TV, CH (+ or -), Number (0~9) button on the remote < control. N 01T_his TV is programmed to remember which power state it was last set...

Owners Manual
Page 31
... icon will appear in order to add or delete scanned channels. Press the EXIT button to return to TV viewing or press the BACK button to return to the Favorite List. Use the FAV button on the ...SETUP menu. Press the • button and then use the ENTER button to select TV, DTV, CATV, and CADTV. Press the • button and then use • or • button to select...can be created by toggling each channel on or off with ENTER button. WATCHING TV / CHANNEL CONTROL Channel Editing There are two different ways in back of them are available after Auto Tuning...
... icon will appear in order to add or delete scanned channels. Press the EXIT button to return to TV viewing or press the BACK button to return to the Favorite List. Use the FAV button on the ...SETUP menu. Press the • button and then use the ENTER button to select TV, DTV, CATV, and CADTV. Press the • button and then use • or • button to select...can be created by toggling each channel on or off with ENTER button. WATCHING TV / CHANNEL CONTROL Channel Editing There are two different ways in back of them are available after Auto Tuning...

Owners Manual
Page 32
This TV is programmed to remember which option it can be used with the remote control. Press the MENU button and then use • or • button ...to select Key Lock. Press the • button and then use • or • button to select the OPTION menu. Press the EXIT button to return to TV...8226; button and then use • or • button to the previous menu. KEY LOCK The TV can be set up so that it was last set to even if you turn the TV off. N -r" z < N -r > z z fT1 N @ © Z ©...
This TV is programmed to remember which option it can be used with the remote control. Press the MENU button and then use • or • button ...to select Key Lock. Press the • button and then use • or • button to select the OPTION menu. Press the EXIT button to return to TV...8226; button and then use • or • button to the previous menu. KEY LOCK The TV can be set up so that it was last set to even if you turn the TV off. N -r" z < N -r > z z fT1 N @ © Z ©...
Owners Manual
Page 47
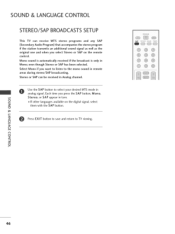
... if the broadcast is only in analog signal. even though Stereo or SAP has been selected. SOUND & LANGUAGE CONTROL STEREO/SAP BROADCASTS SETUP This TV can be received in Analog channel. z Press EXIT button to save and return to the mono sound in turn. 0 c 01I_f other languages ...available on the remote control. Each time you select Stereo or SAP on the digital signal, select z them with the SAP button. c l'rl N 0 Z .-I 0 46 Use the ...
... if the broadcast is only in analog signal. even though Stereo or SAP has been selected. SOUND & LANGUAGE CONTROL STEREO/SAP BROADCASTS SETUP This TV can be received in Analog channel. z Press EXIT button to save and return to the mono sound in turn. 0 c 01I_f other languages ...available on the remote control. Each time you select Stereo or SAP on the digital signal, select z them with the SAP button. c l'rl N 0 Z .-I 0 46 Use the ...
Owners Manual
Page 64
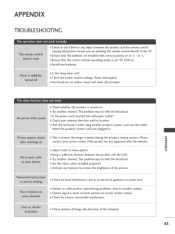
i,i,Ei nsure that the batteries are pointing the remote control directly at the TV. i,i,Ci heck the power control settings. m,N_o broadcast on . 10T1r0yff another station. i,i,Ci heck whether the product is weak, reorient antenna to another channel. m...Ci heck for sources of possible interference. i,i,Si tation or cable product experiencing problems, tune to receive weaker station. i,i,Ei nsure that the correct remote operating mode is muted during the product startup process. i,i,Ci heck your service center, if the picture has not appeared after five minutes. Please ...
i,i,Ei nsure that the batteries are pointing the remote control directly at the TV. i,i,Ci heck the power control settings. m,N_o broadcast on . 10T1r0yff another station. i,i,Ci heck whether the product is weak, reorient antenna to another channel. m...Ci heck for sources of possible interference. i,i,Si tation or cable product experiencing problems, tune to receive weaker station. i,i,Ei nsure that the correct remote operating mode is muted during the product startup process. i,i,Ci heck your service center, if the picture has not appeared after five minutes. Please ...

Owners Manual
Page 70
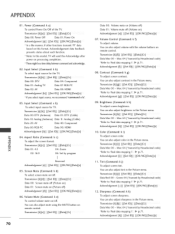
... high minor low attribute program high program low Transmission / Receiving Protocol Commandl][Command2][ ][Set ID][ ][Data][Cr] r_ Z E_ X 'Command2][ ][Set ID][ ][NG][Data][x] 69 Remote Control Lock Mode k a 00 - 01 15 e k b ( p.70) 16 Bass k b (_ p.70) 1Z Balance k c ( p.70) 18.
... high minor low attribute program high program low Transmission / Receiving Protocol Commandl][Command2][ ][Set ID][ ][Data][Cr] r_ Z E_ X 'Command2][ ][Set ID][ ][NG][Data][x] 69 Remote Control Lock Mode k a 00 - 01 15 e k b ( p.70) 16 Bass k b (_ p.70) 1Z Balance k c ( p.70) 18.
Owners Manual
Page 71
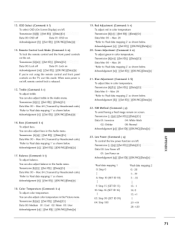
...] [Data] [x] 04. Input Select (Command: x b) To select input source for the TV. Max: 64 (*transmit by Hexadecimal code) *Refer to 'Real data mapping 1'. _ p.71. You can also adjust mute using the MUTE button on remote control. Transmission [k] [j][] [Set ID] [ ] [Data] [Cr] Data Red: 00 ... Hexadecimal code) *Refer to 'Real data mapping 1' _ p.71. You can also adjust volume with the volume buttons on remote control. Input Select (Command: k b) To select input source for TV. Z Transmission [k] [c][ ][Set ID][ ][Data] [Cr] C7 X Data 01:4:3 04: Zoom 02:16:9 06: Set...
...] [Data] [x] 04. Input Select (Command: x b) To select input source for the TV. Max: 64 (*transmit by Hexadecimal code) *Refer to 'Real data mapping 1'. _ p.71. You can also adjust mute using the MUTE button on remote control. Transmission [k] [j][] [Set ID] [ ] [Data] [Cr] Data Red: 00 ... Hexadecimal code) *Refer to 'Real data mapping 1' _ p.71. You can also adjust volume with the volume buttons on remote control. Input Select (Command: k b) To select input source for TV. Z Transmission [k] [c][ ][Set ID][ ][Data] [Cr] C7 X Data 01:4:3 04: Zoom 02:16:9 06: Set...
Owners Manual
Page 72
...remote control and the front panel controls on screen. Green Adjustment (Command: k w) To adjust green in color temperature. 1 5. Acknowledgement [r] [ ] [Set ID] [ ] [OK/NG] [Data] [x] 1 6. You can also adjust balance in the Audio menu. Balance (Command: k t) To adjust balance. 01 : Low Power on the TV... Transmission [k] [v] [] [Set ID] [] [Data] [Cr] Data Min: O0 _ Max: 28 Acknowledgement [I ][] [Set ID][] [Data] [Cr] Data O0: OSD off , remote control lock is released. 20. Transmission [k] [w] [ ] [Set ID] [ ] [Data] [Cr] Data Min: O0 _ Max: 28 *Refer to 'Real data mapping 1 ...
...remote control and the front panel controls on screen. Green Adjustment (Command: k w) To adjust green in color temperature. 1 5. Acknowledgement [r] [ ] [Set ID] [ ] [OK/NG] [Data] [x] 1 6. You can also adjust balance in the Audio menu. Balance (Command: k t) To adjust balance. 01 : Low Power on the TV... Transmission [k] [v] [] [Set ID] [] [Data] [Cr] Data Min: O0 _ Max: 28 Acknowledgement [I ][] [Set ID][] [Data] [Cr] Data O0: OSD off , remote control lock is released. 20. Transmission [k] [w] [ ] [Set ID] [ ] [Data] [Cr] Data Min: O0 _ Max: 28 *Refer to 'Real data mapping 1 ...

Owners Manual
Page 73
...[u][] [Set ID][] [OK/NG] [Data] [x] 2.5. Channel Add/Del (Command: m b) To add and delete the channels. Key (Command: m c) To send IR remote key code. Since the ATSC tuner automatically maps the channel to the Major number, the Physical number is used. Data 00: Physical Channel Number NTSC... not required when sending a command. 24. Transmission [m] [c][ ] [Set ID][ ] [Data] [Cr] Acknowledgement [c] [] [Set ID] [ ] [OK/NG] [Data] [x] OF TV 0B INPUT 08 POWER 0E TIMER 39 CC 40 • 41 • 07 _l 10-19 Number Key 0-9 06 • -O 4C - (Dash) -O CB ADJUST Z 09...
...[u][] [Set ID][] [OK/NG] [Data] [x] 2.5. Channel Add/Del (Command: m b) To add and delete the channels. Key (Command: m c) To send IR remote key code. Since the ATSC tuner automatically maps the channel to the Major number, the Physical number is used. Data 00: Physical Channel Number NTSC... not required when sending a command. 24. Transmission [m] [c][ ] [Set ID][ ] [Data] [Cr] Acknowledgement [c] [] [Set ID] [ ] [OK/NG] [Data] [x] OF TV 0B INPUT 08 POWER 0E TIMER 39 CC 40 • 41 • 07 _l 10-19 Number Key 0-9 06 • -O 4C - (Dash) -O CB ADJUST Z 09...


