
Owners Manual
Page 1
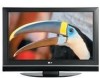
ENERGY STAR is a set of the set . See the label attached on the back cover and quote this information to your set . Environmental Protection Agency(EPA). S. PLASMA TV OWNER'S MANUAL 32PCSDVC Please read this product meets the ENERGY STAR guidelines for future reference. Retain it for energy efficiency. has determined that this manual carefully your dealer when you require service. As an ENERGY STAR Partner LGE U. A.,Inc. before operating Record model number and serial number of power-saving guidelines issued by the U.S.
ENERGY STAR is a set of the set . See the label attached on the back cover and quote this information to your set . Environmental Protection Agency(EPA). S. PLASMA TV OWNER'S MANUAL 32PCSDVC Please read this product meets the ENERGY STAR guidelines for future reference. Retain it for energy efficiency. has determined that this manual carefully your dealer when you require service. As an ENERGY STAR Partner LGE U. A.,Inc. before operating Record model number and serial number of power-saving guidelines issued by the U.S.
Owners Manual
Page 4
... or plug is the disconnecting device. Check the specification page of the appliance, and have fallen into the product, and do not expose this owner's manual to rain or moisture, does not operate normally, or has been dropped. @ CAUTION concerning the Power Cord : Most appliances recommend they be certain. To reduce...
... or plug is the disconnecting device. Check the specification page of the appliance, and have fallen into the product, and do not expose this owner's manual to rain or moisture, does not operate normally, or has been dropped. @ CAUTION concerning the Power Cord : Most appliances recommend they be certain. To reduce...
Owners Manual
Page 5
...Broadcasting System Captions ........ 51 - Caption Option 52 4 Channel Editing 30 Key Lock 31 Picture Size (Aspect Ratio) Control 32 Preset Picture Settings - Color Tone - User Mode 44 Balance 45 Stereo/SAP Broadcasts Setup 46 Audio Language 47 On-Screen... (Sound Mode 43 Sound Setting Adjustment - Preset 34 - Preset 35 Manual Picture Adjustment - Add / Delete Channel (Manual Tuning) ...... 29 - CONTENTS WARNING / CAUTION 1 SAFETY INSTRUCTIONS 2 INTRODUCTION Feature of this TV 6 Accessories 7 Front Panel Information 8 Back Panel Information 9 Stand Installation...
...Broadcasting System Captions ........ 51 - Caption Option 52 4 Channel Editing 30 Key Lock 31 Picture Size (Aspect Ratio) Control 32 Preset Picture Settings - Color Tone - User Mode 44 Balance 45 Stereo/SAP Broadcasts Setup 46 Audio Language 47 On-Screen... (Sound Mode 43 Sound Setting Adjustment - Preset 34 - Preset 35 Manual Picture Adjustment - Add / Delete Channel (Manual Tuning) ...... 29 - CONTENTS WARNING / CAUTION 1 SAFETY INSTRUCTIONS 2 INTRODUCTION Feature of this TV 6 Accessories 7 Front Panel Information 8 Back Panel Information 9 Stand Installation...
Owners Manual
Page 6
Auto Clock Setup 53 - Clock Setting - Manual Clock Setup 54 Auto On/Off Time Setting 55 Sleep Time Setting 56 Auto Shut-off Setting 57 Set Password & Lock System 58 Movie & TV Rating 60 Downloadable Rating 62 Troubleshooting 63 Maintenance 65 Product Specifications 66 External Control Through RS-232C 67 5
Auto Clock Setup 53 - Clock Setting - Manual Clock Setup 54 Auto On/Off Time Setting 55 Sleep Time Setting 56 Auto Shut-off Setting 57 Set Password & Lock System 58 Movie & TV Rating 60 Downloadable Rating 62 Troubleshooting 63 Maintenance 65 Product Specifications 66 External Control Through RS-232C 67 5

Owners Manual
Page 8
.... -O User must use shielded signal interface cables (D-sub 15 pin cable) with ferrite cores to maintain standard _o compliance for the product. _o © z Owner's Manual CD Manual Remote Control, Batteries Power Cord Protection Cover (Refer to p.ll ) Power Cord Holder (Refer to p.ll ) 4-Bolts for stand assembly (Refer to p.lO) 75ohm...
.... -O User must use shielded signal interface cables (D-sub 15 pin cable) with ferrite cores to maintain standard _o compliance for the product. _o © z Owner's Manual CD Manual Remote Control, Batteries Power Cord Protection Cover (Refer to p.ll ) Power Cord Holder (Refer to p.ll ) 4-Bolts for stand assembly (Refer to p.lO) 75ohm...

Owners Manual
Page 15
... digital set top box to the COMPONENT IN (Y, PB, PR) jacks m on the digital set-top box. (Refer to the owner's manual for the digital set . 2. HD RECEIVERSETUP This TV can receive Digital Over-the-air/Cable do receive digital signals from a digital set . However, if you have finished connecting all equipment...
... digital set top box to the COMPONENT IN (Y, PB, PR) jacks m on the digital set-top box. (Refer to the owner's manual for the digital set . 2. HD RECEIVERSETUP This TV can receive Digital Over-the-air/Cable do receive digital signals from a digital set . However, if you have finished connecting all equipment...
Owners Manual
Page 16
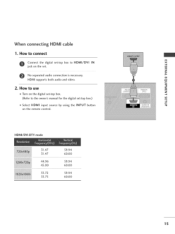
XZ) c i "0 2. m _o z No separated audio connection is necessary. m HDMI supports both audio and video. HDMI/DVI-DTV mode 31.47 31.47 44.96 45.00 33.72 33.75 59.94 60.00 59.94 60.00 59.94 60.00 15 How to use m z Turn on the digital set-top box. (Refer to HDMI/DVI IN >< jack on the set -top box.) m --4 C Select HDMI input source by using the INPUT button "0 on the remote control. When connecting HDMI cable 1. How to connect m Connect the digital set-top box to the owner's manual for the digital set .
XZ) c i "0 2. m _o z No separated audio connection is necessary. m HDMI supports both audio and video. HDMI/DVI-DTV mode 31.47 31.47 44.96 45.00 33.72 33.75 59.94 60.00 59.94 60.00 59.94 60.00 15 How to use m z Turn on the digital set-top box. (Refer to HDMI/DVI IN >< jack on the set -top box.) m --4 C Select HDMI input source by using the INPUT button "0 on the remote control. When connecting HDMI cable 1. How to connect m Connect the digital set-top box to the owner's manual for the digital set .
Owners Manual
Page 17
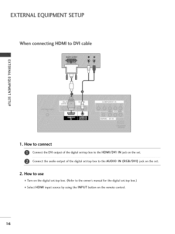
How to use 01T_urn on the digital set-top box. (Refer to the AUDIO IN (RGB/DVI) jack on the set. 2. EXTERNALEQUIPMENT SETUP When connecting HDM[ to the HDMI/DVI IN jack on the remote control. 16 How to connect Connect the DVI output of the digital set-top box to the owner's manual for the digital set-top box.) 01S_elect HDMI input source by using the INPUT button on the set -top box to DVI cable m x m _o z m _D c m z m c -0 1. Connect the audio output of the digital set .
How to use 01T_urn on the digital set-top box. (Refer to the AUDIO IN (RGB/DVI) jack on the set. 2. EXTERNALEQUIPMENT SETUP When connecting HDM[ to the HDMI/DVI IN jack on the remote control. 16 How to connect Connect the DVI output of the digital set-top box to the owner's manual for the digital set-top box.) 01S_elect HDMI input source by using the INPUT button on the set -top box to DVI cable m x m _o z m _D c m z m c -0 1. Connect the audio output of the digital set .
Owners Manual
Page 18
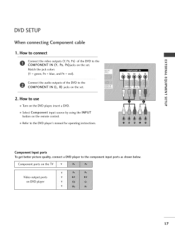
...) of the DVD to the COMPONENT IN (L, R) jacks on the set . How to the DVD player's manual for operating instructions. m Match the jack colors z (Y = green, PB = blue, and PR = red). m z 2. Component ports on the TV Video output ports on the remote control. 01_Refer to use m c 01_Turn on the DVD player, insert a DVD...
...) of the DVD to the COMPONENT IN (L, R) jacks on the set . How to the DVD player's manual for operating instructions. m Match the jack colors z (Y = green, PB = blue, and PR = red). m z 2. Component ports on the TV Video output ports on the remote control. 01_Refer to use m c 01_Turn on the DVD player, insert a DVD...
Owners Manual
Page 19
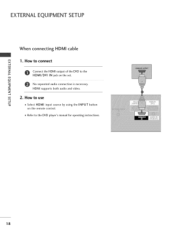
m HDMI supports both audio and video. How to connect m _o z Connect the HDMI output of the DVD to the DVD player's manual for operating instructions. 18 m _D c No separated audio connection is necessary. How to use m c -O 01_Select HDMI input source by using the INPUT button on the remote control. 01_Refer to the HDMI/DVI IN jack on the set. EXTERNALEQUIPMENT SETUP When connecting HDM[ cable m x 1. z 2.
m HDMI supports both audio and video. How to connect m _o z Connect the HDMI output of the DVD to the DVD player's manual for operating instructions. 18 m _D c No separated audio connection is necessary. How to use m c -O 01_Select HDMI input source by using the INPUT button on the remote control. 01_Refer to the HDMI/DVI IN jack on the set. EXTERNALEQUIPMENT SETUP When connecting HDM[ cable m x 1. z 2.

Owners Manual
Page 20
VCR SETUP To avoid picture noise (interference), leave an adequate distance between the VCR and TV. x When connecting with an antenna r_l _o z r_l X_ c "0 r_l z L_ r_l c "0 Wall Jack Antenna 1. IN socket on the screen. Insert a video tape into the ... press PLAY on the VCR. (Refer to the same channel number. How to use Set VCR output switch to 3 or 4 and then tune TV to the VCR owner's manual.) 19 If the 4:5 picture format is common to the RF antenna in consequence the manufactures warranty does not cover the product bearing this...
VCR SETUP To avoid picture noise (interference), leave an adequate distance between the VCR and TV. x When connecting with an antenna r_l _o z r_l X_ c "0 r_l z L_ r_l c "0 Wall Jack Antenna 1. IN socket on the screen. Insert a video tape into the ... press PLAY on the VCR. (Refer to the same channel number. How to use Set VCR output switch to 3 or 4 and then tune TV to the VCR owner's manual.) 19 If the 4:5 picture format is common to the RF antenna in consequence the manufactures warranty does not cover the product bearing this...
Owners Manual
Page 21
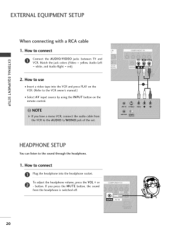
How to the VCR owner's manual.) 01S_elect AV input source by using the INPUT button on the m remote control. Match the jack colors (Video = yellow, Audio Left m = white, and Audio Right = ... the headphone socket. 0 To adjust the headphone volume, press the VOL + or - c -0 HEADPHONE SETUP You can listen to connect S} m Connect the AUDIO/VIDEO jacks between TV and x VCR. How to the sound through the headphone. 1.
How to the VCR owner's manual.) 01S_elect AV input source by using the INPUT button on the m remote control. Match the jack colors (Video = yellow, Audio Left m = white, and Audio Right = ... the headphone socket. 0 To adjust the headphone volume, press the VOL + or - c -0 HEADPHONE SETUP You can listen to connect S} m Connect the AUDIO/VIDEO jacks between TV and x VCR. How to the sound through the headphone. 1.
Owners Manual
Page 28
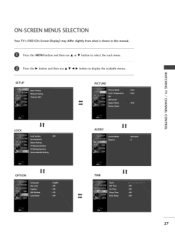
ON-SCREEN MENUS SELECTION Your TV's OSD (On Screen Display) may differ slightly from what is shown in this manual. Press the MENU button and then use • • _1 • button to select the each menu. SETUP LOCK _h PICTURE -r" Z < N I > z z fT1 N © Z © AUDIO OPTION TIME _m 27 Press the • button and then use • or • button to display the available menus.
ON-SCREEN MENUS SELECTION Your TV's OSD (On Screen Display) may differ slightly from what is shown in this manual. Press the MENU button and then use • • _1 • button to select the each menu. SETUP LOCK _h PICTURE -r" Z < N I > z z fT1 N © Z © AUDIO OPTION TIME _m 27 Press the • button and then use • or • button to display the available menus.
Owners Manual
Page 30
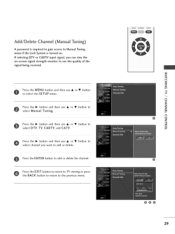
...;ualbutTtounninagn. i¸ z -r z < N I > z z fT1 N @ © Z © @ @@@ 29 Press the ENTER button to add or delete. Add/Delete Channel (Manual Tuning) A password is required to gain access to Manual Tuning menu if the Lock System is turned on -screen signal strength monitor to see the quality of the signal being... received. If selecting DTV or CADTV input signal, you want to add or delete the channel. Press the EXIT button to return to TV viewing...
...;ualbutTtounninagn. i¸ z -r z < N I > z z fT1 N @ © Z © @ @@@ 29 Press the ENTER button to add or delete. Add/Delete Channel (Manual Tuning) A password is required to gain access to Manual Tuning menu if the Lock System is turned on -screen signal strength monitor to see the quality of the signal being... received. If selecting DTV or CADTV input signal, you want to add or delete the channel. Press the EXIT button to return to TV viewing...

Owners Manual
Page 37
.... N © Z Press the • button and then use • or • button to select User. Press the EXIT button to return to TV viewing or press the BACK button to return to suit your preference and viewing situations. "0 N Press the MENU button and then use • or •... use • or • button C to make appropriate adjustments. User Mode Adjust the picture appearance to the previous menu. 36 @ @@ @ @ PICTURE CONTROL MANUAL PICTURE ADJUSTMENT Picture Mode - Press the • button and then use _1 or • button to select the PICTURE menu.
.... N © Z Press the • button and then use • or • button to select User. Press the EXIT button to return to TV viewing or press the BACK button to return to suit your preference and viewing situations. "0 N Press the MENU button and then use • or •... use • or • button C to make appropriate adjustments. User Mode Adjust the picture appearance to the previous menu. 36 @ @@ @ @ PICTURE CONTROL MANUAL PICTURE ADJUSTMENT Picture Mode - Press the • button and then use _1 or • button to select the PICTURE menu.
Owners Manual
Page 39
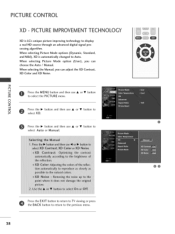
... use • or • button to select Auto or Manual. @@ Press the EXIT button to return to TV viewing or press the BACK button to return to display an advanced digital signal pro- When selecting Picture Mode options (Dynamic, Standard, and Mild), XD is LG's unique picture a real HD source through cessing algorithm...
... use • or • button to select Auto or Manual. @@ Press the EXIT button to return to TV viewing or press the BACK button to return to display an advanced digital signal pro- When selecting Picture Mode options (Dynamic, Standard, and Mild), XD is LG's unique picture a real HD source through cessing algorithm...
Owners Manual
Page 54
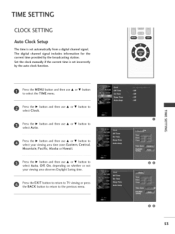
Set the clock manually if the current time is set incorrectly by the broadcasting station. Press the • button and then use • or • button to Central, Press ..., Off, On, depending on whether or not your viewing area time zone: Eastern, Mountain, Pacific, Alaska or Hawaii. Press the EXIT button to return to TV viewing or press the BACK button to return to select Clock. The digital channel signal includes information for the current time provided by the auto...
Set the clock manually if the current time is set incorrectly by the broadcasting station. Press the • button and then use • or • button to Central, Press ..., Off, On, depending on whether or not your viewing area time zone: Eastern, Mountain, Pacific, Alaska or Hawaii. Press the EXIT button to return to TV viewing or press the BACK button to return to select Clock. The digital channel signal includes information for the current time provided by the auto...

Owners Manual
Page 55
...Press the • button and then use • or • button to z select Manual. Press the MENU button and then use • or • button to select the TIME menu. Press the EXIT button to return to TV viewing or press the BACK button to return to set the year, date, and.... c_ Press the • button and then use • or • button to select either the year, date, or time option. TIME SETTING Manual Clock Setup If the current time setting is wrong, reset the clock manually. Once selected, use the • or • button to the previous menu. 54 @ @@
...Press the • button and then use • or • button to z select Manual. Press the MENU button and then use • or • button to select the TIME menu. Press the EXIT button to return to TV viewing or press the BACK button to return to set the year, date, and.... c_ Press the • button and then use • or • button to select either the year, date, or time option. TIME SETTING Manual Clock Setup If the current time setting is wrong, reset the clock manually. Once selected, use the • or • button to the previous menu. 54 @ @@
Owners Manual
Page 63
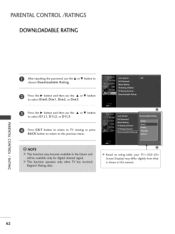
... inputting the password, use the • or • button to select D1 L1, D1 L2, or D1 L3. _D m z Press EXIT button to return to TV viewing or press BACK button to return to choose Downloadable Rating. z c_ 62 Press the • button and then use the • or • button... I, Dim2, or Dim3. @ Press the • button and then use the • or • button to the previous menu. N O z @ _D O Based on rating table, your TV's OSD (On _D Screen Display) may differ slightly from what is shown in this...
... inputting the password, use the • or • button to select D1 L1, D1 L2, or D1 L3. _D m z Press EXIT button to return to TV viewing or press BACK button to return to choose Downloadable Rating. z c_ 62 Press the • button and then use the • or • button... I, Dim2, or Dim3. @ Press the • button and then use the • or • button to the previous menu. N O z @ _D O Based on rating table, your TV's OSD (On _D Screen Display) may differ slightly from what is shown in this...

