
User Manual
Page 3
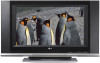
LCD TV OWNER'S MANUAL MODEL: 32LP2DC Internet Home Page : http://www.lgcommercial.com Please read this information to your set . Retain it for future reference. P/NO : 3828TUL309M (0605-REV00) Printed in Korea See the label attached on the back cover and quote this manual carefully before operating your dealer when you require service. Record model number and serial number of the set .
LCD TV OWNER'S MANUAL MODEL: 32LP2DC Internet Home Page : http://www.lgcommercial.com Please read this information to your set . Retain it for future reference. P/NO : 3828TUL309M (0605-REV00) Printed in Korea See the label attached on the back cover and quote this manual carefully before operating your dealer when you require service. Record model number and serial number of the set .

User Manual
Page 5
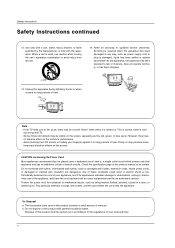
... shall not be exposed to dripping or splashing and no objects filled with one wider than the other apparatus (including amplifiers) that produce heat. 9. Owner's Manual 2.
... shall not be exposed to dripping or splashing and no objects filled with one wider than the other apparatus (including amplifiers) that produce heat. 9. Owner's Manual 2.
User Manual
Page 6
... combination to avoid injury from physical or mechanical abuse, such as tiny red, green, or blue spots. The fluorescent lamp used , use of this owner's manual to the touch, there may be a small "flicker" when when it is , a single outlet circuit which powers only that is turned on the screen, appearing...
... combination to avoid injury from physical or mechanical abuse, such as tiny red, green, or blue spots. The fluorescent lamp used , use of this owner's manual to the touch, there may be a small "flicker" when when it is , a single outlet circuit which powers only that is turned on the screen, appearing...

User Manual
Page 7
...-screen Menus Language Selection Screen Menus Selection and Adjustment EZ Scan (Channel Search) Manual Scan Channel Edit DTV Signal Strength Channel Label Setup Main Picture Source Selection EZ Picture Manual Picture Control (EZ Picture-Custom Option) Color Temperature Control Video Preset Audio Language ...EZ SoundRite EZ Sound Manual Sound Control (EZ Sound-Custom Option) Stereo/SAP Broadcasts Setup Front ...
...-screen Menus Language Selection Screen Menus Selection and Adjustment EZ Scan (Channel Search) Manual Scan Channel Edit DTV Signal Strength Channel Label Setup Main Picture Source Selection EZ Picture Manual Picture Control (EZ Picture-Custom Option) Color Temperature Control Video Preset Audio Language ...EZ SoundRite EZ Sound Manual Sound Control (EZ Sound-Custom Option) Stereo/SAP Broadcasts Setup Front ...

User Manual
Page 8
... PIP (Picture-inPicture)/ Double Window 36 36 37 37 38 39 40 40 41 42 43~44 45 45 45 46 46 Auto Clock Setup Manual Clock Setup On/Off Timer Setup Sleep Timer Auto Off Aspect Ratio Control Cinema 3:2 Mode Setup Caption Caption/Text Caption Option Parental Lock Setup Watching...
... PIP (Picture-inPicture)/ Double Window 36 36 37 37 38 39 40 40 41 42 43~44 45 45 45 46 46 Auto Clock Setup Manual Clock Setup On/Off Timer Setup Sleep Timer Auto Off Aspect Ratio Control Cinema 3:2 Mode Setup Caption Caption/Text Caption Option Parental Lock Setup Watching...

User Manual
Page 9
... PIP INPUT PLAY Power Cord D-sub 15 pin Cable 6 Shield Foams REW SKIP FF STOP RECORD PAUSE EXIT 1.5V 1.5V Remote Control / AA Batteries Owner's Manual / Commercial Interface Control Box Manual 2 Bolts (Refer to p.15) Tie Band Arrange the wires with the tie band. This is switched on. Introduction Controls -
... PIP INPUT PLAY Power Cord D-sub 15 pin Cable 6 Shield Foams REW SKIP FF STOP RECORD PAUSE EXIT 1.5V 1.5V Remote Control / AA Batteries Owner's Manual / Commercial Interface Control Box Manual 2 Bolts (Refer to p.15) Tie Band Arrange the wires with the tie band. This is switched on. Introduction Controls -

User Manual
Page 19
Refer to VIDEO1 input (the back side), select AV 1 input source. 3 Operate the corresponding external equipment. Digital Audio Output - See the external audio equipment instruction manual for operation. If connected to external equipment operating guide. Off" in the AUDIO menu. CAUTION Do not look into the optical output port. Match the ...
Refer to VIDEO1 input (the back side), select AV 1 input source. 3 Operate the corresponding external equipment. Digital Audio Output - See the external audio equipment instruction manual for operation. If connected to external equipment operating guide. Off" in the AUDIO menu. CAUTION Do not look into the optical output port. Match the ...

User Manual
Page 20
...frozen still picture from the VCR to the AUDIO L/MONO jack of the screen may remain visible on the VCR. (Refer to the VCR owner's manual.) 4 Select AV 1 input source with using the INPUT button on the remote control. - When connecting with an antenna TV Back DVI INPUT (PC/...yellow, Audio Left = white, and Audio Right = red) 2 Insert a video tape into the VCR and press PLAY on the VCR. (Refer to the VCR owner's manual.) When connecting with an S-Video cable TV Back DVI INPUT (PC/DTV INPUT) S-VIDEO R AUDIO L/MONO VIDEO VIDEO1 COMPONENT1 R L AUDIO INPUT VIDEO INPUT Antenna 1 2...
...frozen still picture from the VCR to the AUDIO L/MONO jack of the screen may remain visible on the VCR. (Refer to the VCR owner's manual.) 4 Select AV 1 input source with using the INPUT button on the remote control. - When connecting with an antenna TV Back DVI INPUT (PC/...yellow, Audio Left = white, and Audio Right = red) 2 Insert a video tape into the VCR and press PLAY on the VCR. (Refer to the VCR owner's manual.) When connecting with an S-Video cable TV Back DVI INPUT (PC/DTV INPUT) S-VIDEO R AUDIO L/MONO VIDEO VIDEO1 COMPONENT1 R L AUDIO INPUT VIDEO INPUT Antenna 1 2...

User Manual
Page 21
If connected to IN 2 input (TV front), select AV 2 input source. 5 Refer to the DVD player's manual for Component 2 input source. • Digital Audio operation has priority if Digital Audio and AUDIO L/R are connected at the same time. 19 ... Select 2-1 or 2-2 , depending on your DVD connector. • Component Input ports To get better picture quality, connect a DVD player to the DVD player's manual for operating instructions. When connecting with a component cable TV Back DIGITAL AUDIO (OPTICAL) OUTPUT DVI INPUT (PC/DTV INPUT) S-VIDEO R AUDIO L/MONO VIDEO VIDEO1 COMPONENT1...
If connected to IN 2 input (TV front), select AV 2 input source. 5 Refer to the DVD player's manual for Component 2 input source. • Digital Audio operation has priority if Digital Audio and AUDIO L/R are connected at the same time. 19 ... Select 2-1 or 2-2 , depending on your DVD connector. • Component Input ports To get better picture quality, connect a DVD player to the DVD player's manual for operating instructions. When connecting with a component cable TV Back DIGITAL AUDIO (OPTICAL) OUTPUT DVI INPUT (PC/DTV INPUT) S-VIDEO R AUDIO L/MONO VIDEO VIDEO1 COMPONENT1...

User Manual
Page 22
...-top Box (R) AUDIO (L) RGB-DTV OUTPUT When connecting with using the INPUT or MULTIMEDIA button on the digital set-top box. (Refer to the owner's manual for the digital set -top box. However, if you do receive Digital signals from a digital set -top box.) 4 Select Component 1 input source with a Component ... INPUT jacks on the set. 3 Turn on the digital set-top box. (Refer to the owner's manual for the digital set -top box or other digital external device, refer to the owner's manual for the digital set-top box.) 4 Select RGB1-DTV input source with using the INPUT or MULTIMEDIA button...
...-top Box (R) AUDIO (L) RGB-DTV OUTPUT When connecting with using the INPUT or MULTIMEDIA button on the digital set-top box. (Refer to the owner's manual for the digital set -top box. However, if you do receive Digital signals from a digital set -top box.) 4 Select Component 1 input source with a Component ... INPUT jacks on the set. 3 Turn on the digital set-top box. (Refer to the owner's manual for the digital set -top box or other digital external device, refer to the owner's manual for the digital set-top box.) 4 Select RGB1-DTV input source with using the INPUT or MULTIMEDIA button...
User Manual
Page 27
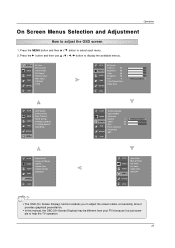
...F / G button to select each menu. 2. Press the MENU button and then D / E button to display the available menus. SETUP G VIDEO AUDIO TIME OPTION EZ Scan Manual Scan Channel Edit DTV Signal Channel Label Main Input Sub Input Set ID LOCK SETUP EZ Picture Contrast 85 VIDEO G Brightness 50 Color 50 AUDIO...SETUP VIDEO AUDIO TIME Aspect Ratio Cinema 3:2 Mode Caption Caption/Text Caption Option Language OPTION G LOCK SETUP VIDEO AUDIO TIME G Auto Clock Manual Clock Off Timer On Timer Sleep Timer Auto Off OPTION LOCK • The OSD (On Screen Display) function enables you to adjust ...
...F / G button to select each menu. 2. Press the MENU button and then D / E button to display the available menus. SETUP G VIDEO AUDIO TIME OPTION EZ Scan Manual Scan Channel Edit DTV Signal Channel Label Main Input Sub Input Set ID LOCK SETUP EZ Picture Contrast 85 VIDEO G Brightness 50 Color 50 AUDIO...SETUP VIDEO AUDIO TIME Aspect Ratio Cinema 3:2 Mode Caption Caption/Text Caption Option Language OPTION G LOCK SETUP VIDEO AUDIO TIME G Auto Clock Manual Clock Off Timer On Timer Sleep Timer Auto Off OPTION LOCK • The OSD (On Screen Display) function enables you to adjust ...

User Manual
Page 28
...Channel Edit. This channel number is a physical channel number, which is turned on the channel list. - SETUP VIDEO AUDIO TIME OPTION EZ Scan Manual Scan Channel Edit DTV Signal Channel Label Main Input Sub Input Set ID LOCK MENU Previous G Select channel type and RF-channel number. SETUP ... search. TV 2 1 Press the MENU button and then use D / E button to select the SETUP menu. 2 Press the G button and then use D / E button to select Manual Scan. 3 Press the G button and then use D / E button to select TV, DTV, CATV, and CADTV. 4 Press the G button and then use D / E button to...
...Channel Edit. This channel number is a physical channel number, which is turned on the channel list. - SETUP VIDEO AUDIO TIME OPTION EZ Scan Manual Scan Channel Edit DTV Signal Channel Label Main Input Sub Input Set ID LOCK MENU Previous G Select channel type and RF-channel number. SETUP ... search. TV 2 1 Press the MENU button and then use D / E button to select the SETUP menu. 2 Press the G button and then use D / E button to select Manual Scan. 3 Press the G button and then use D / E button to select TV, DTV, CATV, and CADTV. 4 Press the G button and then use D / E button to...

User Manual
Page 29
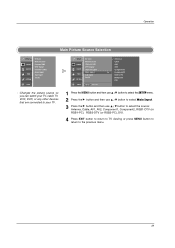
... List - Use the FAV button on the SETUP menu. - A Custom List can create your own Favorite List. Operation SETUP G VIDEO AUDIO TIME OPTION EZ Scan Manual Scan Channel Edit DTV Signal Channel Label Main Input Sub Input Set ID LOCK Channel Edit SETUP VIDEO AUDIO TIME OPTION EZ Scan...
... List - Use the FAV button on the SETUP menu. - A Custom List can create your own Favorite List. Operation SETUP G VIDEO AUDIO TIME OPTION EZ Scan Manual Scan Channel Edit DTV Signal Channel Label Main Input Sub Input Set ID LOCK Channel Edit SETUP VIDEO AUDIO TIME OPTION EZ Scan...

User Manual
Page 30
... monitor to experience picture degradation. 1. Digital DTV Signals: May not be available in all programs. Channel Label Setup SETUP VIDEO AUDIO TIME OPTION EZ Scan Manual Scan Channel Edit DTV Signal Channel Label Main Input Sub Input Set ID LOCK MENU Previous G Selection ( G or ) leads you to select Channel Label. 3 Press...
... monitor to experience picture degradation. 1. Digital DTV Signals: May not be available in all programs. Channel Label Setup SETUP VIDEO AUDIO TIME OPTION EZ Scan Manual Scan Channel Edit DTV Signal Channel Label Main Input Sub Input Set ID LOCK MENU Previous G Selection ( G or ) leads you to select Channel Label. 3 Press...
User Manual
Page 31
SETUP VIDEO AUDIO TIME OPTION EZ Scan Manual Scan Channel Edit DTV Signal Channel Label Main Input Sub Input Set ID LOCK MENU Previous Antenna Cable AV1 AV2 Component1 G Component2 RGB1-DTV RGB2-... previous menu. 29 Changes the picture source so you can watch your TV. Operation Main Picture Source Selection SETUP G VIDEO AUDIO TIME OPTION EZ Scan Manual Scan Channel Edit DTV Signal Channel Label Main Input Sub Input Set ID LOCK -
SETUP VIDEO AUDIO TIME OPTION EZ Scan Manual Scan Channel Edit DTV Signal Channel Label Main Input Sub Input Set ID LOCK MENU Previous Antenna Cable AV1 AV2 Component1 G Component2 RGB1-DTV RGB2-... previous menu. 29 Changes the picture source so you can watch your TV. Operation Main Picture Source Selection SETUP G VIDEO AUDIO TIME OPTION EZ Scan Manual Scan Channel Edit DTV Signal Channel Label Main Input Sub Input Set ID LOCK -

User Manual
Page 32
... use the VIDEO menu to the previous menu. 30 When adjusting Video menu options (contrast, brightness, color, sharpness, tint, and color temperature) manually, EZ Picture automatically changes to select the desired pic- Select the preset value in the EZ Picture menu based on the program category.... - Manual Picture Control (EZ Picture-Custom option) SETUP EZ Picture Contrast 85 VIDEO G Brightness 50 Color 50 AUDIO Sharpness 50 Tint 0 R TIME ...
... use the VIDEO menu to the previous menu. 30 When adjusting Video menu options (contrast, brightness, color, sharpness, tint, and color temperature) manually, EZ Picture automatically changes to select the desired pic- Select the preset value in the EZ Picture menu based on the program category.... - Manual Picture Control (EZ Picture-Custom option) SETUP EZ Picture Contrast 85 VIDEO G Brightness 50 Color 50 AUDIO Sharpness 50 Tint 0 R TIME ...

User Manual
Page 35
... G button to make appropriate adjustments. 4 Press EXIT button to return to TV viewing or press MENU button to return to TV viewing. - Manual Sound Control (EZ Sound-Custom option) SETUP Audio Language EZ SoundRite VIDEO EZ Sound Balance 0 L AUDIO G Treble 80 TIME Bass 80 Front Surround... factory and are not adjustable. Adjust the sound to adjust EZ Sound. 2. When adjusting sound options (treble, bass, and front surround) manually, EZ Sound automatically switches Custom 1. Press the EXIT button to save and return to the previous menu. 33 RG SETUP VIDEO AUDIO Balance...
... G button to make appropriate adjustments. 4 Press EXIT button to return to TV viewing or press MENU button to return to TV viewing. - Manual Sound Control (EZ Sound-Custom option) SETUP Audio Language EZ SoundRite VIDEO EZ Sound Balance 0 L AUDIO G Treble 80 TIME Bass 80 Front Surround... factory and are not adjustable. Adjust the sound to adjust EZ Sound. 2. When adjusting sound options (treble, bass, and front surround) manually, EZ Sound automatically switches Custom 1. Press the EXIT button to save and return to the previous menu. 33 RG SETUP VIDEO AUDIO Balance...

User Manual
Page 38
...or Hawaii. 5 Press the G button and then use the D / E button to set automatically from a digital channel signal. - Date - - / - Set the clock manually, if the current time is set incorrectly by the broadcasting station. - If current time setting is set the year, date, and time options. 4 Press EXIT... information for the current time provided by the auto clock function. The time is wrong, reset the clock manually. 36 Manual Clock Setup SETUP VIDEO AUDIO TIME Auto Clock Manual Clock Off Timer On Timer Sleep Timer Auto Off OPTION LOCK MENU Previous G Year - - - Operation ...
...or Hawaii. 5 Press the G button and then use the D / E button to set automatically from a digital channel signal. - Date - - / - Set the clock manually, if the current time is set incorrectly by the broadcasting station. - If current time setting is set the year, date, and time options. 4 Press EXIT... information for the current time provided by the auto clock function. The time is wrong, reset the clock manually. 36 Manual Clock Setup SETUP VIDEO AUDIO TIME Auto Clock Manual Clock Off Timer On Timer Sleep Timer Auto Off OPTION LOCK MENU Previous G Year - - - Operation ...

User Manual
Page 39
... the On-Timer to select the number of minutes. Sleep Timer 1 Press the TIMER button repeatedly to work. - Operation SETUP VIDEO AUDIO TIME G Auto Clock Manual Clock Off Timer On Timer Sleep Timer Auto Off OPTION LOCK - The TV must be in the TIME menu. TV 2-0 Vol 17 1 Press the MENU... any button within 2 hours after the TV turns on the screen, press the ENTER button. On/Off Timer Setup SETUP VIDEO AUDIO TIME Auto Clock Manual Clock Off Timer On Timer Sleep Timer Auto Off OPTION LOCK MENU Previous G Off On Time 6 : 30 AM Ch. The Sleep Timer turns the TV...
... the On-Timer to select the number of minutes. Sleep Timer 1 Press the TIMER button repeatedly to work. - Operation SETUP VIDEO AUDIO TIME G Auto Clock Manual Clock Off Timer On Timer Sleep Timer Auto Off OPTION LOCK - The TV must be in the TIME menu. TV 2-0 Vol 17 1 Press the MENU... any button within 2 hours after the TV turns on the screen, press the ENTER button. On/Off Timer Setup SETUP VIDEO AUDIO TIME Auto Clock Manual Clock Off Timer On Timer Sleep Timer Auto Off OPTION LOCK MENU Previous G Off On Time 6 : 30 AM Ch. The Sleep Timer turns the TV...

User Manual
Page 40
... and there is no input signal, the TV turns off automatically after 10 minutes. Operation Time Menu Options continued SETUP VIDEO AUDIO TIME G Auto Clock Manual Clock Off Timer On Timer Sleep Timer Auto Off OPTION LOCK - If set to On and there is no input signal, the TV turns off... automatically after 10 minutes. Auto Off SETUP VIDEO AUDIO TIME Auto Clock Manual Clock Off Timer On Timer Sleep Timer Auto Off OPTION LOCK MENU Previous If set to the previous menu. 38
... and there is no input signal, the TV turns off automatically after 10 minutes. Operation Time Menu Options continued SETUP VIDEO AUDIO TIME G Auto Clock Manual Clock Off Timer On Timer Sleep Timer Auto Off OPTION LOCK - If set to On and there is no input signal, the TV turns off... automatically after 10 minutes. Auto Off SETUP VIDEO AUDIO TIME Auto Clock Manual Clock Off Timer On Timer Sleep Timer Auto Off OPTION LOCK MENU Previous If set to the previous menu. 38


