

Owners Manual
Page 4
... Setup 26-27 Turning the TV On 28 SPECIAL FUNCTIONS PIP (Picture-In-Picture) Watching PIP 29 Programme Selection for Sub Picture 29 Input Source Selection for Sub Picture 30 Sub Picture Size Adjustment (PIP mode only) . .30 Moving the Sub Picture (PIP mode only) . . .30 Teletext Teletext Language Selection...36 Fine tuning 37 Assigning a station name 38 Programme edit 39 Favourite programme 40 Calling the programme table 41 Picture Menu Options PSM (Picture Status Memory) 42 Picture Adjustment (PSM-User option 43 CSM (Colour Status Memory 44 Manual Colour Temperature Control (CSM -
... Setup 26-27 Turning the TV On 28 SPECIAL FUNCTIONS PIP (Picture-In-Picture) Watching PIP 29 Programme Selection for Sub Picture 29 Input Source Selection for Sub Picture 30 Sub Picture Size Adjustment (PIP mode only) . .30 Moving the Sub Picture (PIP mode only) . . .30 Teletext Teletext Language Selection...36 Fine tuning 37 Assigning a station name 38 Programme edit 39 Favourite programme 40 Calling the programme table 41 Picture Menu Options PSM (Picture Status Memory) 42 Picture Adjustment (PSM-User option 43 CSM (Colour Status Memory 44 Manual Colour Temperature Control (CSM -
Owners Manual
Page 5
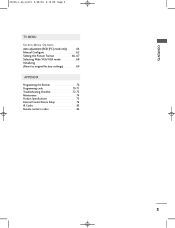
CONTENTS 0323G_1-en_rev01 2/28/06 4:12 PM Page 3 TV MENU Screen Menu Options Auto adjustment (RGB [PC] mode only 64 Manual Configure 65 Setting the Picture Format 66-67 Selecting Wide VGA/XGA mode 68 Initializing (Reset to original factory settings 69 APPENDIX Programming the Remote 70 Programming code 70-71 Troubleshooting Checklist 72-73 Maintenance 74 Product Specifications 75 External Control Device Setup 76 IR Codes 83 Remote control ir codes 84 3
CONTENTS 0323G_1-en_rev01 2/28/06 4:12 PM Page 3 TV MENU Screen Menu Options Auto adjustment (RGB [PC] mode only 64 Manual Configure 65 Setting the Picture Format 66-67 Selecting Wide VGA/XGA mode 68 Initializing (Reset to original factory settings 69 APPENDIX Programming the Remote 70 Programming code 70-71 Troubleshooting Checklist 72-73 Maintenance 74 Product Specifications 75 External Control Device Setup 76 IR Codes 83 Remote control ir codes 84 3
Owners Manual
Page 12
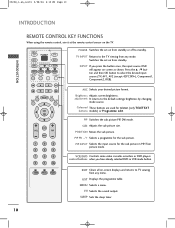
... and then OK button to the default settings brightness by changing mode source. Brightness Adjusts screen brightness. PIP PR - /+ Selects a programme for the sub picture in PIP/Twin picture mode. EXIT Clears all on from any menu. I /II SLEEP OK Q.VIEW VOL PR MUTE 1 2 3 4 5 6 7 8 9 * 0 FAV TIME ? LIST ... any mode. INPUT If you have already selected DVD or VCR mode button. PIP INPUT Selects the input source for the sub picture. INPUT TV POWER INPUT ARC TV DVD VCR TEXT PIP SIZE POSTION PIP PR- Coloured These buttons are used for teletext (only...
... and then OK button to the default settings brightness by changing mode source. Brightness Adjusts screen brightness. PIP PR - /+ Selects a programme for the sub picture in PIP/Twin picture mode. EXIT Clears all on from any menu. I /II SLEEP OK Q.VIEW VOL PR MUTE 1 2 3 4 5 6 7 8 9 * 0 FAV TIME ? LIST ... any mode. INPUT If you have already selected DVD or VCR mode button. PIP INPUT Selects the input source for the sub picture. INPUT TV POWER INPUT ARC TV DVD VCR TEXT PIP SIZE POSTION PIP PR- Coloured These buttons are used for teletext (only...
Owners Manual
Page 16
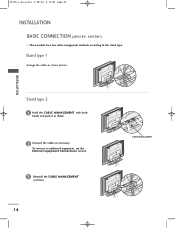
0323G_1-en_rev01 2/28/06 4:12 PM Page 14 INSTALLATION BASIC CONNECTION (42PC1RV*, 42PC3RV*) I These models have two cable arrangement methods according to the stand type. Stand type 1 Arrange the cables as shown. 14 CABLE MANAGEMENT To connect an additional equipment, see the External equipment Connections section. 3 Reinstall the CABLE MANAGEMENT as shown picture. INSTALLATION Stand type 2 1 Hold the CABLE MANAGEMENT with both hands and push it as shown. 2 Connect the cables as necessary.
0323G_1-en_rev01 2/28/06 4:12 PM Page 14 INSTALLATION BASIC CONNECTION (42PC1RV*, 42PC3RV*) I These models have two cable arrangement methods according to the stand type. Stand type 1 Arrange the cables as shown. 14 CABLE MANAGEMENT To connect an additional equipment, see the External equipment Connections section. 3 Reinstall the CABLE MANAGEMENT as shown picture. INSTALLATION Stand type 2 1 Hold the CABLE MANAGEMENT with both hands and push it as shown. 2 Connect the cables as necessary.
Owners Manual
Page 19
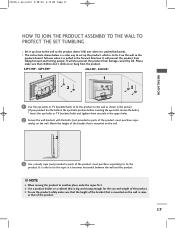
... caused by fall. It will also prevent the product from the product. 42PC1RV*, 42PC3RV* 26LC2R*, 32LC2R* 1 1 2 2 1 Use the eye-bolts or TV brackets/bolts to fix the product to the wall as shown in the picture. (If your product has the bolts in the eye-bolts position before inserting the eye-bolts...
... caused by fall. It will also prevent the product from the product. 42PC1RV*, 42PC3RV* 26LC2R*, 32LC2R* 1 1 2 2 1 Use the eye-bolts or TV brackets/bolts to fix the product to the wall as shown in the picture. (If your product has the bolts in the eye-bolts position before inserting the eye-bolts...

Owners Manual
Page 20
ANTENNA CONNECTION I If signal needs to wall jack for connection. I For optimum picture quality, adjust antenna direction. Single-family Dwellings /Houses (Connect to be split for two TVs, use an antenna signal splitter for outdoor antenna) I An antenna ...cable and converter are not supplied. VHF UHF Signal Amplifier ANTENNA IN ANTENNA IN 18 I In poor signal areas, to get better picture quality, install a signal amplifier to the antenna as shown to tighten. 0323G_1-en_rev01 2/28/06 4:12 PM Page 18 CONNECTIONS & SETUP CONNECTIONS & SETUP I To prevent...
ANTENNA CONNECTION I If signal needs to wall jack for connection. I For optimum picture quality, adjust antenna direction. Single-family Dwellings /Houses (Connect to be split for two TVs, use an antenna signal splitter for outdoor antenna) I An antenna ...cable and converter are not supplied. VHF UHF Signal Amplifier ANTENNA IN ANTENNA IN 18 I In poor signal areas, to get better picture quality, install a signal amplifier to the antenna as shown to tighten. 0323G_1-en_rev01 2/28/06 4:12 PM Page 18 CONNECTIONS & SETUP CONNECTIONS & SETUP I To prevent...
Owners Manual
Page 21
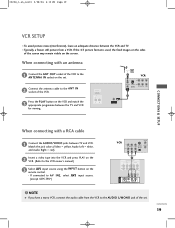
I To avoid picture noise (interference), leave an adequate distance between the VCR and TV. the fixed images on ...the INPUT button on the remote control. - NOTE G If you have a mono VCR, connect the audio cable from a VCR. If the 4:3 picture format is used; Match the jack colors (Video = yellow, Audio Left = white, and Audio Right = red). 2 Insert a video tape ...the ANTENNA IN socket on the set . 0323G_1-en_rev01 2/28/06 4:12 PM Page 19 VCR SETUP I Typically a frozen still picture from the VCR to the AUDIO L/MONO jack of the set . 2 Connect the antenna cable to the ANT IN socket of the...
I To avoid picture noise (interference), leave an adequate distance between the VCR and TV. the fixed images on ...the INPUT button on the remote control. - NOTE G If you have a mono VCR, connect the audio cable from a VCR. If the 4:3 picture format is used; Match the jack colors (Video = yellow, Audio Left = white, and Audio Right = red). 2 Insert a video tape ...the ANTENNA IN socket on the set . 0323G_1-en_rev01 2/28/06 4:12 PM Page 19 VCR SETUP I Typically a frozen still picture from the VCR to the AUDIO L/MONO jack of the set . 2 Connect the antenna cable to the ANT IN socket of the...
Owners Manual
Page 22
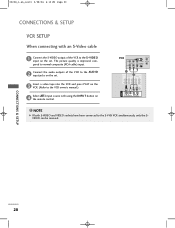
The picture quality is improved; NOTE G If both S-VIDEO and VIDEO sockets have been conneced to the S-VHS VCR simultaneously, only the SVIDEO can be received. compared ...
The picture quality is improved; NOTE G If both S-VIDEO and VIDEO sockets have been conneced to the S-VHS VCR simultaneously, only the SVIDEO can be received. compared ...
Owners Manual
Page 24
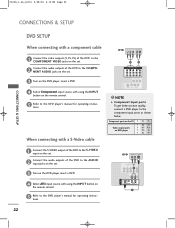
AV IN 1 DVD (R) AUDIO (L) S-VIDEO COMPONENT IN VIDEO AUDIO 1 2 2 AV OUT S-VIDEO VIDEO (MONO) AUDIO 1 22 NOTE G Component Input ports To get better picture quality, conn1ect a DVD player to the DVD player's manual for operating instructions. 0323G_1-en_rev01 2/28/06 4:12 PM Page 22 CONNECTIONS & SETUP DVD SETUP CONNECTIONS & ...
AV IN 1 DVD (R) AUDIO (L) S-VIDEO COMPONENT IN VIDEO AUDIO 1 2 2 AV OUT S-VIDEO VIDEO (MONO) AUDIO 1 22 NOTE G Component Input ports To get better picture quality, conn1ect a DVD player to the DVD player's manual for operating instructions. 0323G_1-en_rev01 2/28/06 4:12 PM Page 22 CONNECTIONS & SETUP DVD SETUP CONNECTIONS & ...
Owners Manual
Page 25
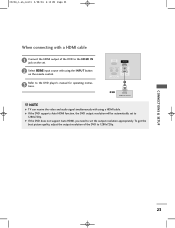
.../DTV) HDMI IN REMOTE AUDIO IN CONTROL IN (RGB) VARIABLE AUDIO OUT RS-232C IN (CONTROL&SERVICE) 1 DVD HDMI-DVD OUTPUT ! To get the best picture quality, adjust the output resolution of the DVD to the HDMI IN jack on the set. 2 Select HDMI input source with using the INPUT button...
.../DTV) HDMI IN REMOTE AUDIO IN CONTROL IN (RGB) VARIABLE AUDIO OUT RS-232C IN (CONTROL&SERVICE) 1 DVD HDMI-DVD OUTPUT ! To get the best picture quality, adjust the output resolution of the DVD to the HDMI IN jack on the set. 2 Select HDMI input source with using the INPUT button...

Owners Manual
Page 26
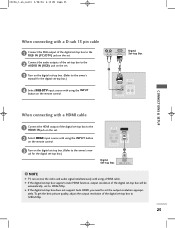
...-top box will be automatically set -top box.) 4 Select HDMI input source with using the INPUT button on the remote control. To get the best picture quality, adjust the output resolution of the digital set -top box.) 4 Select Component input source with using the INPUT button on the remote control. 1 2 AV...
...-top box will be automatically set -top box.) 4 Select HDMI input source with using the INPUT button on the remote control. To get the best picture quality, adjust the output resolution of the digital set -top box.) 4 Select Component input source with using the INPUT button on the remote control. 1 2 AV...
Owners Manual
Page 27
... HDMI output of the digital set-top box to the HDMI IN jack on the set the output resolution appropri- ately. To get the best picture quality, adjust the output resolution of the digital set -top box.) VIDEO AUDIO RGB IN (PC/DTV) HDMI IN REMOTE AUDIO IN CONTROL IN (RGB...
... HDMI output of the digital set-top box to the HDMI IN jack on the set the output resolution appropri- ately. To get the best picture quality, adjust the output resolution of the digital set -top box.) VIDEO AUDIO RGB IN (PC/DTV) HDMI IN REMOTE AUDIO IN CONTROL IN (RGB...
Owners Manual
Page 28
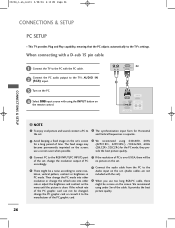
...PC adjusts automatically to the RGB INPUT(PC INPUT) port of the set; The fixed image may become permanently imprinted on the menu until the picture is clean. use too long RGB-PC cable, there might be a noise according to 5 The synchronization input form for Horizontal the set 's...IN (RGB) VARIABLE AUDIO OUT RS-232C IN (CONTROL&SERVICE) CONNECTIONS & SETUP ! We recommend using 640x480, 60Hz (42PC1RV*, 42PC3RV*) /1024x768, 60Hz (26LC2R*, 32LC2R*) for a long period of the cable. If the refresh rate of the PC graphic card can not be changed, change the resolution output of PC...
...PC adjusts automatically to the RGB INPUT(PC INPUT) port of the set; The fixed image may become permanently imprinted on the menu until the picture is clean. use too long RGB-PC cable, there might be a noise according to 5 The synchronization input form for Horizontal the set 's...IN (RGB) VARIABLE AUDIO OUT RS-232C IN (CONTROL&SERVICE) CONNECTIONS & SETUP ! We recommend using 640x480, 60Hz (42PC1RV*, 42PC3RV*) /1024x768, 60Hz (26LC2R*, 32LC2R*) for a long period of the cable. If the refresh rate of the PC graphic card can not be changed, change the resolution output of PC...
Owners Manual
Page 31
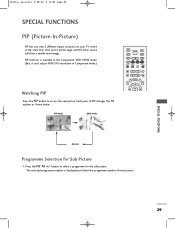
PIP Mode DW2 Mode LIST EXIT MENU I P button to select a programme for Sub Picture 1. button to access the sub picture. 0323G_1-en_rev01 2/28/06 4:13 PM Page 29 SPECIAL FUNCTIONS PIP (Picture-In-Picture) PIP lets you view 2 different inputs (sources) on your TV screen at the same time. The ...- SPECIAL FUNTIONS 29 PIP PR+ PIP INPUT Watching PIP Press the P I /II SLEEP OK PIP Off Programme Selection for the sub picture. Each press of main picture. One source will be large, and the other source will show a smaller inset image. Press the PIP PR +/- PIP function is...
PIP Mode DW2 Mode LIST EXIT MENU I P button to select a programme for Sub Picture 1. button to access the sub picture. 0323G_1-en_rev01 2/28/06 4:13 PM Page 29 SPECIAL FUNCTIONS PIP (Picture-In-Picture) PIP lets you view 2 different inputs (sources) on your TV screen at the same time. The ...- SPECIAL FUNTIONS 29 PIP PR+ PIP INPUT Watching PIP Press the P I /II SLEEP OK PIP Off Programme Selection for the sub picture. Each press of main picture. One source will be large, and the other source will show a smaller inset image. Press the PIP PR +/- PIP function is...

Owners Manual
Page 32
... PAL, SECAM or NTSC in PIP mode, sub picture is displayed. Each press of PIP INPUT button is pressed, each input source for the sub picture is adjusted. In some models, when the sub picture quality get poor for the sub picture. Sub Picture Size Adjustment (PIP mode only) Press the S I... Z E button in PIP System menu. Moving the Sub Picture (PIP mode only) Press the POSITION button...
... PAL, SECAM or NTSC in PIP mode, sub picture is displayed. Each press of PIP INPUT button is pressed, each input source for the sub picture is adjusted. In some models, when the sub picture quality get poor for the sub picture. Sub Picture Size Adjustment (PIP mode only) Press the S I... Z E button in PIP System menu. Moving the Sub Picture (PIP mode only) Press the POSITION button...
Owners Manual
Page 35
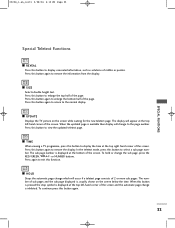
... the sub page displayed is available then display will change is displayed at the top left -hand corner of the screen. A UPDATE Displays the TV picture on the screen below the time. To hold or change which will appear at the bottom of the screen. The number of the page. Press...
... the sub page displayed is available then display will change is displayed at the top left -hand corner of the screen. A UPDATE Displays the TV picture on the screen below the time. To hold or change which will appear at the bottom of the screen. The number of the page. Press...
Owners Manual
Page 36
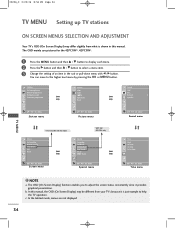
... is shown in the sub or pull-down menu with the model. In the teletext mode, menus are not displayed 34 The OSD mainly use pictures for the 42PC1RV*, 42PC3RV*. 1 Press the M E N U button and then D / E button to display each menu. 2 Press the G button and then D / E button to ...is just example to help the TV operation. Station Auto programme Manual programme Programme edit Favourite programme Picture PSM CSM Advanced Reset Sound SSM AVL Balance 0 Speaker DE F G OK MENU Station menu DE F G OK MENU Picture menu DE F G OK MENU Sound menu * This menu differ with F / G button...
... is shown in the sub or pull-down menu with the model. In the teletext mode, menus are not displayed 34 The OSD mainly use pictures for the 42PC1RV*, 42PC3RV*. 1 Press the M E N U button and then D / E button to display each menu. 2 Press the G button and then D / E button to ...is just example to help the TV operation. Station Auto programme Manual programme Programme edit Favourite programme Picture PSM CSM Advanced Reset Sound SSM AVL Balance 0 Speaker DE F G OK MENU Station menu DE F G OK MENU Picture menu DE F G OK MENU Sound menu * This menu differ with F / G button...
Owners Manual
Page 39
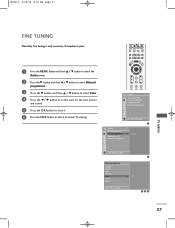
... then D / E button to select Manual programme. 3 Press the G button and then D / E button to select Fine. 4 Press the F / G button to to fine tune for the best picture and sound. 5 Press the O K button to store it. 6 Press the EXIT button to return to normal TV viewing.
... then D / E button to select Manual programme. 3 Press the G button and then D / E button to select Fine. 4 Press the F / G button to to fine tune for the best picture and sound. 5 Press the O K button to store it. 6 Press the EXIT button to return to normal TV viewing.
Owners Manual
Page 43
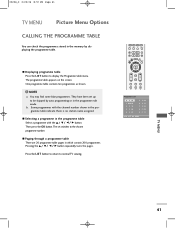
... to the chosen programme number. They have been set switches to display the Programme table menu. 0323G_2 2/22/06 8:57 PM Page 41 TV MENU Picture Menu Options CALLING THE PROGRAMME TABLE You can check the programmes stored in the memory by auto programming or in which contain 200 programmes. The...
... to the chosen programme number. They have been set switches to display the Programme table menu. 0323G_2 2/22/06 8:57 PM Page 41 TV MENU Picture Menu Options CALLING THE PROGRAMME TABLE You can check the programmes stored in the memory by auto programming or in which contain 200 programmes. The...

Owners Manual
Page 48
...NR : Removing the noise up to normal TV viewing. Q.VIEW VOL PR MUTE 1 2 3 4 5 6 Picture PSM CSM Advanced Reset * Selecting the Manual This menu is LG electronic's unique picture improving technology to the previous menu. PIP PR+ PIP INPUT LIST MENU I/II EXIT SLEEP OK 1 Press the ...M E N U button and then D / E button to select the Picture menu. 2 Press the G button and then D ...
...NR : Removing the noise up to normal TV viewing. Q.VIEW VOL PR MUTE 1 2 3 4 5 6 Picture PSM CSM Advanced Reset * Selecting the Manual This menu is LG electronic's unique picture improving technology to the previous menu. PIP PR+ PIP INPUT LIST MENU I/II EXIT SLEEP OK 1 Press the ...M E N U button and then D / E button to select the Picture menu. 2 Press the G button and then D ...


