
Owners Manual
Page 1
...See the label attached on the back cover and quote this manual carefully before operating your dealer when you require service. A.,]uc. EnvironmentaJ Protection Agency(EPA). LCD TV MODELS: 32LC2D 32LC2DC 37LC2D 42LC2D PLASMA TV MODELS: 42PC3D 42PC3DC 42PC3DV 50PC3D 50PC3DX... 42PCIDVH 42PC3DH 42PC3DVA 50PC3DH OWNER'S MANUAL o Internet Home Page • http://www.lge.com http://www.lg.ca http://www.lgcommercial.com ENERGYSTAR is a set...
...See the label attached on the back cover and quote this manual carefully before operating your dealer when you require service. A.,]uc. EnvironmentaJ Protection Agency(EPA). LCD TV MODELS: 32LC2D 32LC2DC 37LC2D 42LC2D PLASMA TV MODELS: 42PC3D 42PC3DC 42PC3DV 50PC3D 50PC3DX... 42PCIDVH 42PC3DH 42PC3DVA 50PC3DH OWNER'S MANUAL o Internet Home Page • http://www.lge.com http://www.lg.ca http://www.lgcommercial.com ENERGYSTAR is a set...
Owners Manual
Page 4
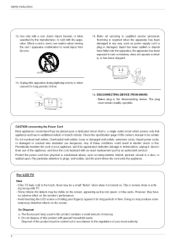
... be placed upon . Protect the power cord from tip-over. 14. Pay particular attention to the regulations of these conditions could result in this owner's manual to be certain. On Disposal a. S3125A 13. ing wrong with the apparatus. Any of your appliance, and if its appearance indicates damage or deterioration, unplug...
... be placed upon . Protect the power cord from tip-over. 14. Pay particular attention to the regulations of these conditions could result in this owner's manual to be certain. On Disposal a. S3125A 13. ing wrong with the apparatus. Any of your appliance, and if its appearance indicates damage or deterioration, unplug...

Owners Manual
Page 5
... 32 Channel Selection 32 On Screen Menus Language Selection 33 On Screen Menus Selection and Adjustment 34 EZ Scan (Channel Search) 34 Manual Scan 35 Channel Edit 36 DTV Signal Strength 36 Input Source 37 Input Label 38 EZ Picture 38 APM (Adaptive Picture Mode) 39... Manual Picture Control (EZ Picture-Custom option) 39 Color Temperature Control 39 Video Reset 40 Audio Language 40 EZ SoundRite 41 EZ Sound 41 Manual Sound Control (EZ Sound-Custom option) 42 Stereo/SAP Broadcasts Setup 42...
... 32 Channel Selection 32 On Screen Menus Language Selection 33 On Screen Menus Selection and Adjustment 34 EZ Scan (Channel Search) 34 Manual Scan 35 Channel Edit 36 DTV Signal Strength 36 Input Source 37 Input Label 38 EZ Picture 38 APM (Adaptive Picture Mode) 39... Manual Picture Control (EZ Picture-Custom option) 39 Color Temperature Control 39 Video Reset 40 Audio Language 40 EZ SoundRite 41 EZ Sound 41 Manual Sound Control (EZ Sound-Custom option) 42 Stereo/SAP Broadcasts Setup 42...

Owners Manual
Page 6
Contents 44 44 45 45 46 47 48 48 49 50 50 51 52_53 Auto Clock Setup Manual Clock Setup On/Off Timer Setup Sleep Timer Auto Off Aspect Ratio Control Cinema 3:2 Mode Setup Caption Caption/Text Caption Option Low Power (42PCl D**/42PC3D**/50PC3D** only) ISM (Image Sticking Minimization) Method (42PC1D**/42PC3D**/50PC3D** only) Parental Lock Setup 54~59 60~61 62 63~64 65~66 66 67~68 External Control Device Setup IR Codes Programming the Remote Programming Codes Troubleshooting Checklist Maintenance Product Specifications
Contents 44 44 45 45 46 47 48 48 49 50 50 51 52_53 Auto Clock Setup Manual Clock Setup On/Off Timer Setup Sleep Timer Auto Off Aspect Ratio Control Cinema 3:2 Mode Setup Caption Caption/Text Caption Option Low Power (42PCl D**/42PC3D**/50PC3D** only) ISM (Image Sticking Minimization) Method (42PC1D**/42PC3D**/50PC3D** only) Parental Lock Setup 54~59 60~61 62 63~64 65~66 66 67~68 External Control Device Setup IR Codes Programming the Remote Programming Codes Troubleshooting Checklist Maintenance Product Specifications

Owners Manual
Page 7
... shield signal interface cable (D-sub 15 pin cable) with ferrite cores to maintain the standard compliance for the product. / / /' /' / / Power Cord 75_-_Round Cable Owner's Manual Remote Control / Batteries ,For 42PC1D**,42PC3B**,50PC3D F..o..r....3..2..1..3..7..1..4..2..L..C..2..D 2-Wall brackets 2-eye-bolts 2-TV brackets 2-Wall brackets Twister Holder Arrange the wires with the twister holder. 2-TV...
... shield signal interface cable (D-sub 15 pin cable) with ferrite cores to maintain the standard compliance for the product. / / /' /' / / Power Cord 75_-_Round Cable Owner's Manual Remote Control / Batteries ,For 42PC1D**,42PC3B**,50PC3D F..o..r....3..2..1..3..7..1..4..2..L..C..2..D 2-Wall brackets 2-eye-bolts 2-TV brackets 2-Wall brackets Twister Holder Arrange the wires with the twister holder. 2-TV...

Owners Manual
Page 13
... increments. . FREEZE Freezes the currently-viewed picture. ADJUST (Refer to p.42) Selects MTS sound: Mono. APM (Refer to p.38) Concurrently, compare with EZ scan and Manual scan. PAGE iv J(_ EZ SOUND SAP FREEZE FLASHBK Returns to p.38) Selects a factory preset picture mode depending on the screen. J ! EZ PIC (Refer to the...
... increments. . FREEZE Freezes the currently-viewed picture. ADJUST (Refer to p.42) Selects MTS sound: Mono. APM (Refer to p.38) Concurrently, compare with EZ scan and Manual scan. PAGE iv J(_ EZ SOUND SAP FREEZE FLASHBK Returns to p.38) Selects a factory preset picture mode depending on the screen. J ! EZ PIC (Refer to the...

Owners Manual
Page 22
... = yellow, Audio Left = white, and Audio Right = red) Insert a video tape into the VCR and press PLAY on the VCR (Refer to the VCR owner's manual.) Select AV1 input source using the INPUT button on the sides of the set. ° This TV finds the connected input sources automatically forAV1, AV2...
... = yellow, Audio Left = white, and Audio Right = red) Insert a video tape into the VCR and press PLAY on the VCR (Refer to the VCR owner's manual.) Select AV1 input source using the INPUT button on the sides of the set. ° This TV finds the connected input sources automatically forAV1, AV2...

Owners Manual
Page 24
Refer to the DVD player's manual for opeiating instructions: HDMI!TPU_T DVD Connect the HDMI output of the DVD to the HDIVlI/DVI IN jack on the set the output resolution ... seL Turn onthe DVD p!ayei, insert a DVDI Select AV1 input source With using the INPUT button on the remote control. Refer to the DVD playerls manual for operating instructions. • TV can receive the video and audio signal simultaneously by using a HDMI cable. • If the DVD supports Auto HDMI function...
Refer to the DVD player's manual for opeiating instructions: HDMI!TPU_T DVD Connect the HDMI output of the DVD to the HDIVlI/DVI IN jack on the set the output resolution ... seL Turn onthe DVD p!ayei, insert a DVDI Select AV1 input source With using the INPUT button on the remote control. Refer to the DVD playerls manual for operating instructions. • TV can receive the video and audio signal simultaneously by using a HDMI cable. • If the DVD supports Auto HDMI function...

Owners Manual
Page 25
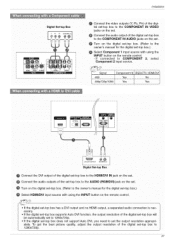
... on the set . DVD Installation 0 Connect the video outputs (Y, PB, PR) of the DVD to COMPONENT 2, select Component 2 input source. Refer to the DVD player's manual for operating instructions. • Component Input ports To get better picture quality, connect a DVD player to the COMPONENT IN VIDEO jacks on DVD player Y Y PI...
... on the set . DVD Installation 0 Connect the video outputs (Y, PB, PR) of the DVD to COMPONENT 2, select Component 2 input source. Refer to the DVD player's manual for operating instructions. • Component Input ports To get better picture quality, connect a DVD player to the COMPONENT IN VIDEO jacks on DVD player Y Y PI...

Owners Manual
Page 26
... of the digital set-top box to the RGB (PCiDTV) jack on the set -top box or other digital external device, refer to the owner's manual for the digital set-top box.) Select RGB-DTV input source with using the INPUT button on the set -top box. Installation - This TV can...
... of the digital set-top box to the RGB (PCiDTV) jack on the set -top box or other digital external device, refer to the owner's manual for the digital set-top box.) Select RGB-DTV input source with using the INPUT button on the set -top box. Installation - This TV can...
Owners Manual
Page 27
... picture quality, adjust the output resolution of the digital set4op box to the HDMI/DVl IN jack on the set -top box to the owner's manual for the digital set4op box.) O Select HDMI/DVl input source with using the INPUT button on the set the output resolution appropriately. Yes Yes DVI...
... picture quality, adjust the output resolution of the digital set4op box to the HDMI/DVl IN jack on the set -top box to the owner's manual for the digital set4op box.) O Select HDMI/DVl input source with using the INPUT button on the set the output resolution appropriately. Yes Yes DVI...
Owners Manual
Page 28
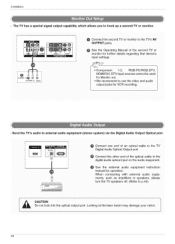
... optical input on the audio equipment! _ See the external audio equiPment instruction A CAuT!ON Do not look into the optical output port. See the Operating Manual of the second TV or monitor for VCR recording. to the TV's AV OUTPUT jacks. I , F - Looking at the laser beam may damage your vision. 28...
... optical input on the audio equipment! _ See the external audio equiPment instruction A CAuT!ON Do not look into the optical output port. See the Operating Manual of the second TV or monitor for VCR recording. to the TV's AV OUTPUT jacks. I , F - Looking at the laser beam may damage your vision. 28...

Owners Manual
Page 30
... quality, adjust the PC graphics card to another rate or adjust the brightness and contrast on the screen. 8. If not, refer to the Manual of time. Refer to the Manual of the PC graphic card. 7. When Source Devices connected with HDMI/DVl Input, output PC Resolution (VGA, SVGA, XGA), Position and Size...
... quality, adjust the PC graphics card to another rate or adjust the brightness and contrast on the screen. 8. If not, refer to the Manual of time. Refer to the Manual of the PC graphic card. 7. When Source Devices connected with HDMI/DVl Input, output PC Resolution (VGA, SVGA, XGA), Position and Size...

Owners Manual
Page 34
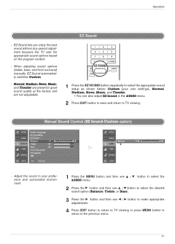
... . 1 Press the MENU button and then use •/V button to select the S£'l't_Pmenu. 2 Press the I_ button and then use •/V button to select Manual Scan. 3 Press the I_ button and then use • /• button to select TV, DTV, CATV, and CADTV. 4 Press the I_ button and then use... • / • button to select £Z Scan. 3 Press the ENTER button to begin the channel search. b> A password is required to gain access to Manual Scan menu if the Lock System is turned on. 1 Press the MENU button and then use •/V button to select the SETUP menu. 2 Press the...
... . 1 Press the MENU button and then use •/V button to select the S£'l't_Pmenu. 2 Press the I_ button and then use •/V button to select Manual Scan. 3 Press the I_ button and then use • /• button to select TV, DTV, CATV, and CADTV. 4 Press the I_ button and then use... • / • button to select £Z Scan. 3 Press the ENTER button to begin the channel search. b> A password is required to gain access to Manual Scan menu if the Lock System is turned on. 1 Press the MENU button and then use •/V button to select the SETUP menu. 2 Press the...

Owners Manual
Page 38
... and Custom) settings. EZ Picture adjusts the TV for optimum picture qual- When adjusting Video menu options (contrast, brightness, color, sharpness, tint, and color temperature) manually, EZ Picture automatically changes to navigate 4 EZ Pictures. By pressing the ENTER button, you can also adjust EZ Picture in the EZ Picture menu based...
... and Custom) settings. EZ Picture adjusts the TV for optimum picture qual- When adjusting Video menu options (contrast, brightness, color, sharpness, tint, and color temperature) manually, EZ Picture automatically changes to navigate 4 EZ Pictures. By pressing the ENTER button, you can also adjust EZ Picture in the EZ Picture menu based...
Owners Manual
Page 41
... option (Balance, Treble, or Bass). 3 Press the I_ button and then use • /• AUDIO menu. When adjusting sound options (treble, bass, and front surround) manually, EZ Sound automatically switches Custom. - EZ Sound lets you enjoy the best sound without any special adjustment because the TV sets the appropriate sound options...
... option (Balance, Treble, or Bass). 3 Press the I_ button and then use • /• AUDIO menu. When adjusting sound options (treble, bass, and front surround) manually, EZ Sound automatically switches Custom. - EZ Sound lets you enjoy the best sound without any special adjustment because the TV sets the appropriate sound options...

Owners Manual
Page 44
The current time will be set automatically from a digital channel signal. Set the clock manually, if the current time is wrong, reset the clock manually. 44 1 Press the MENU button and then use •/• button to select the TIME menu. 2 Press the I_ button and then use • /• ...button to select Manual Clock. 3 Press the I_ button and then use _1 / I_ button to select either the year, date, or time option. If current time setting is...
The current time will be set automatically from a digital channel signal. Set the clock manually, if the current time is wrong, reset the clock manually. 44 1 Press the MENU button and then use •/• button to select the TIME menu. 2 Press the I_ button and then use • /• ...button to select Manual Clock. 3 Press the I_ button and then use _1 / I_ button to select either the year, date, or time option. If current time setting is...


