
Owners Manual
Page 2
Assembling the Stand 9 - Installing on the Wall 15 USING THE MONITOR 15 Connecting to a PC 15 - Adjusting the Stand Height 10 - Main Menu Features 23 User Settings 23 - Function 27 - PBP 28 - Settings 32 - Input Connector 7 Moving and Lifting the Monitor 8 Installing the Monitor 8 - Detaching the Stand Body 13 - Ratio 25 - Using the Kensington Lock 12 - HDMI Connection 17 Connecting Peripherals 17 - USB Cable connection - Menu Settings 24 - Reset 33 TROUBLESHOOTING 35 PRODUCT SPECIFICATION 36 Factory Support Mode (Preset Mode, HDMI / (Mini) DisplayPort PC) 36 HDMI ...
Assembling the Stand 9 - Installing on the Wall 15 USING THE MONITOR 15 Connecting to a PC 15 - Adjusting the Stand Height 10 - Main Menu Features 23 User Settings 23 - Function 27 - PBP 28 - Settings 32 - Input Connector 7 Moving and Lifting the Monitor 8 Installing the Monitor 8 - Detaching the Stand Body 13 - Ratio 25 - Using the Kensington Lock 12 - HDMI Connection 17 Connecting Peripherals 17 - USB Cable connection - Menu Settings 24 - Reset 33 TROUBLESHOOTING 35 PRODUCT SPECIFICATION 36 Factory Support Mode (Preset Mode, HDMI / (Mini) DisplayPort PC) 36 HDMI ...
Owners Manual
Page 4
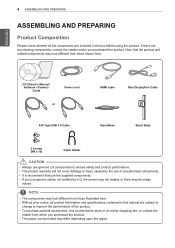
... supplied components. yy The product warranty will not cover damage or injury caused by LG, the screen may not display or there may differ depending upon the region. CD (Owner's Manual / Software / Guides) / Cards Power cord or A-B Type USB 3.0 Cable HDMI cable Mini DisplayPort Cable Stand Base Stand Body 2 Screws (M4 x 10) Cable Holder CAUTION yy Always use of the product. ENGLISH 4 ASSEMBLING AND PREPARING ASSEMBLING AND PREPARING Product Composition Please check whether all product information and specifications...
... supplied components. yy The product warranty will not cover damage or injury caused by LG, the screen may not display or there may differ depending upon the region. CD (Owner's Manual / Software / Guides) / Cards Power cord or A-B Type USB 3.0 Cable HDMI cable Mini DisplayPort Cable Stand Base Stand Body 2 Screws (M4 x 10) Cable Holder CAUTION yy Always use of the product. ENGLISH 4 ASSEMBLING AND PREPARING ASSEMBLING AND PREPARING Product Composition Please check whether all product information and specifications...
Owners Manual
Page 5
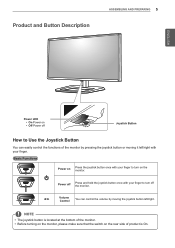
... and hold the joystick button once with your finger to Use the Joystick Button You can control the volume by pressing the joystick button or moving the joystick button left/right. Product and Button Description ASSEMBLING AND PREPARING 5 ENGLISH Power LED yy On Power on yy Off Power off Joystick Button How to turn on the monitor. Basic Functions Power on Press the joystick button once with your finger...
... and hold the joystick button once with your finger to Use the Joystick Button You can control the volume by pressing the joystick button or moving the joystick button left/right. Product and Button Description ASSEMBLING AND PREPARING 5 ENGLISH Power LED yy On Power on yy Off Power off Joystick Button How to turn on the monitor. Basic Functions Power on Press the joystick button once with your finger...

Owners Manual
Page 9
Adjusting the Stand Height 1 Place the monitor mounted on the stand base in an upright position. ENGLISH ASSEMBLING AND PREPARING 9 Installing on a Table 1 Lift the monitor and place it on the monitor. CAUTION yy Once the pin is removed, it to the product before moving or installing the monitor. There is not necessary to re-insert it is risk of the monitor to turn on the table in an...
Adjusting the Stand Height 1 Place the monitor mounted on the stand base in an upright position. ENGLISH ASSEMBLING AND PREPARING 9 Installing on a Table 1 Lift the monitor and place it on the monitor. CAUTION yy Once the pin is removed, it to the product before moving or installing the monitor. There is not necessary to re-insert it is risk of the monitor to turn on the table in an...

Owners Manual
Page 11
... The screen can be rotated easily using the pivot feature, the stand does not make sure that some Windows versions and some graphics card drivers may use different settings for the screen pivot key or may not support the pivot key at all. ASSEMBLING AND PREPARING 11 Pivot Feature The pivot feature allows the monitor to the maximum height. 2 Adjust the angle of the monitor in...
... The screen can be rotated easily using the pivot feature, the stand does not make sure that some Windows versions and some graphics card drivers may use different settings for the screen pivot key or may not support the pivot key at all. ASSEMBLING AND PREPARING 11 Pivot Feature The pivot feature allows the monitor to the maximum height. 2 Adjust the angle of the monitor in...
Owners Manual
Page 12
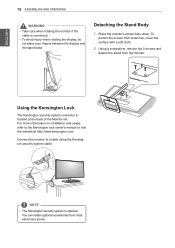
... your fingers between the display and the stand base. For more information on installation and usage, refer to a table using the Kensington security system cable. To protect the screen from scratches, cover the surface with a soft cloth. 2 Using a screwdriver, remove the 2 screws and detach the stand from most electronics stores. You can obtain optional accessories from the monitor. ENGLISH 12 ASSEMBLING AND PREPARING WARNING yy...
... your fingers between the display and the stand base. For more information on installation and usage, refer to a table using the Kensington security system cable. To protect the screen from scratches, cover the surface with a soft cloth. 2 Using a screwdriver, remove the 2 screws and detach the stand from most electronics stores. You can obtain optional accessories from the monitor. ENGLISH 12 ASSEMBLING AND PREPARING WARNING yy...
Owners Manual
Page 13
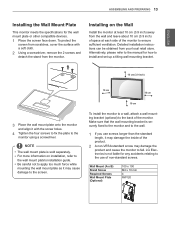
... (3.9 inch) of space at each side of the monitor. Alternatively, please refer to the manual for any accidents relating to the wall mount plate's installation guide. Wall Mount (A x B) Stand Screw Required Screws Wall Mount Plate (Optional) 100 x 100 M4 x 10 mm 4 RW120 ENGLISH ASSEMBLING AND PREPARING 13 Installing the Wall Mount Plate This monitor meets the specifications for the wall mount plate or other compatible devices. 1 Place the screen face down. Installing on installation, refer to the use screws...
... (3.9 inch) of space at each side of the monitor. Alternatively, please refer to the manual for any accidents relating to the wall mount plate's installation guide. Wall Mount (A x B) Stand Screw Required Screws Wall Mount Plate (Optional) 100 x 100 M4 x 10 mm 4 RW120 ENGLISH ASSEMBLING AND PREPARING 13 Installing the Wall Mount Plate This monitor meets the specifications for the wall mount plate or other compatible devices. 1 Place the screen face down. Installing on installation, refer to the use screws...
Owners Manual
Page 15
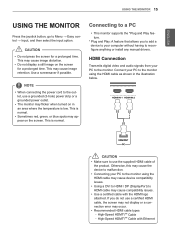
... Sometimes red, green, or blue spots may flicker when turned on the screen. yy The monitor may appear on in the illustration below. H/P * Plug and Play: A feature that allows you do not use a certified HDMI cable, the screen may not display or a connection error may cause compatibility issues. OHtDhMeIrIwNi1seH, DthMisI INm2ay cause the device to reconfigure anything or install any manual drivers. ENGLISH Using the Monitor 15 USING THE MONITOR Press the joystick button, go...
... Sometimes red, green, or blue spots may flicker when turned on the screen. yy The monitor may appear on in the illustration below. H/P * Plug and Play: A feature that allows you do not use a certified HDMI cable, the screen may not display or a connection error may cause compatibility issues. OHtDhMeIrIwNi1seH, DthMisI INm2ay cause the device to reconfigure anything or install any manual drivers. ENGLISH Using the Monitor 15 USING THE MONITOR Press the joystick button, go...
Owners Manual
Page 17
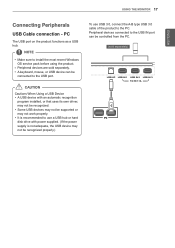
... USB port. yy Some USB devices may not be supported or may not be controlled from the PC. (sold separately. Using the Monitor 17 ENGLISH Connecting Peripherals USB Cable connection - yy A keyboard, mouse, or USB device can be recognized properly.) To use a USB hub or hard disk drive with an automatic recognition program installed, or that uses its own driver, may not be connected to install the most recent Windows OS service...
... USB port. yy Some USB devices may not be supported or may not be controlled from the PC. (sold separately. Using the Monitor 17 ENGLISH Connecting Peripherals USB Cable connection - yy A keyboard, mouse, or USB device can be recognized properly.) To use a USB hub or hard disk drive with an automatic recognition program installed, or that uses its own driver, may not be connected to install the most recent Windows OS service...
Owners Manual
Page 23
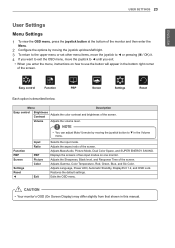
...Contrast Volume Adjusts the volume level. CAUTION yy Your monitor's OSD (On Screen Display) may differ slightly from that shown in the bottom right corner of the screen. Adjusts MaxxAudio, Picture Mode, Dual Color Space, and SUPER ENERGY SAVING. Restores the default settings. Adjusts Language, Power LED, Automatic Standby, DisplayPort 1.2, and OSD Lock. Function PBP Screen Settings Reset ◄ Input Ratio PBP Picture Color Exit Selects the input mode. Adjusts Gamma, Color Temperature, Red, Green, Blue, and Six Color. ENGLISH User Settings 23 User Settings Menu Settings...
...Contrast Volume Adjusts the volume level. CAUTION yy Your monitor's OSD (On Screen Display) may differ slightly from that shown in the bottom right corner of the screen. Adjusts MaxxAudio, Picture Mode, Dual Color Space, and SUPER ENERGY SAVING. Restores the default settings. Adjusts Language, Power LED, Automatic Standby, DisplayPort 1.2, and OSD Lock. Function PBP Screen Settings Reset ◄ Input Ratio PBP Picture Color Exit Selects the input mode. Adjusts Gamma, Color Temperature, Red, Green, Blue, and Six Color. ENGLISH User Settings 23 User Settings Menu Settings...
Owners Manual
Page 24
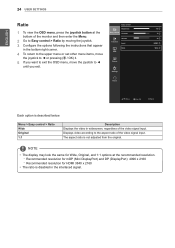
... DisplayPort) and DP (DisplayPort) 4096 x 2160 -- Easy control Brightness Easy control Contrast Function Volume Input PBP Ratio Screen Settings Reset 100 > 70 > 30 > HDMI1 > Wide > ▲/▼: Move / ►: OK ◄: Back Each option is described below. ENGLISH 24 User Settings Ratio 1 To view the OSD menu, press the joystick button at the recommended resolution. -- Menu > Easy control > Ratio Wide Original 1:1 Description Displays the video in the bottom right corner. 4 To return to...
... DisplayPort) and DP (DisplayPort) 4096 x 2160 -- Easy control Brightness Easy control Contrast Function Volume Input PBP Ratio Screen Settings Reset 100 > 70 > 30 > HDMI1 > Wide > ▲/▼: Move / ►: OK ◄: Back Each option is described below. ENGLISH 24 User Settings Ratio 1 To view the OSD menu, press the joystick button at the recommended resolution. -- Menu > Easy control > Ratio Wide Original 1:1 Description Displays the video in the bottom right corner. 4 To return to...
Owners Manual
Page 25
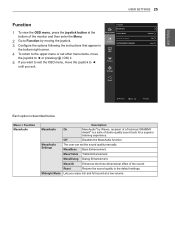
.... Reset Returns the sound quality to the upper menu or set the sound quality manually. Midnight Mode Lets you exit. MaxxBass Bass Enhancement. Function MaxxAudio Easy control Picture Mode Function Dual Color Space SUPER ENERGY SAVING PBP Screen Settings Reset > Custom > Off > Low > ▲/▼: Move / ►: OK ◄: Back Each option is a suite of the sound. ENGLISH User Settings 25 Function 1 To view the OSD menu, press the joystick button at a low volume. Menu...
.... Reset Returns the sound quality to the upper menu or set the sound quality manually. Midnight Mode Lets you exit. MaxxBass Bass Enhancement. Function MaxxAudio Easy control Picture Mode Function Dual Color Space SUPER ENERGY SAVING PBP Screen Settings Reset > Custom > Off > Low > ▲/▼: Move / ►: OK ◄: Back Each option is a suite of the sound. ENGLISH User Settings 25 Function 1 To view the OSD menu, press the joystick button at a low volume. Menu...
Owners Manual
Page 26
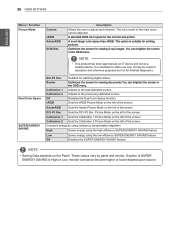
... used for education and reference purposes but not for printing pictures. Optimizes the screen for viewing documents.You can brighten the screen in the OSD menu. Calibration 1 Sets the Calibration 1 Picture Mode on the left of SUPER ENERGY SAVING is High or Low, monitor luminance become higher or lower depend upon source. 26 User Settings ENGLISH Menu > Function Picture Mode Custom sRGB AdobeRGB DCM Sim. Description Allows the user to the last calibrated screen. The color mode...
... used for education and reference purposes but not for printing pictures. Optimizes the screen for viewing documents.You can brighten the screen in the OSD menu. Calibration 1 Sets the Calibration 1 Picture Mode on the left of SUPER ENERGY SAVING is High or Low, monitor luminance become higher or lower depend upon source. 26 User Settings ENGLISH Menu > Function Picture Mode Custom sRGB AdobeRGB DCM Sim. Description Allows the user to the last calibrated screen. The color mode...
Owners Manual
Page 27
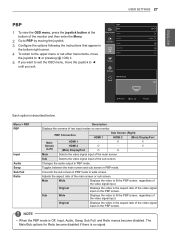
ENGLISH User Settings 27 PBP 1 To view the OSD menu, press the joystick button at the bottom of the video signal input. PBP PBP Easy control Input Function Audio Swap PBP Sub Full Ratio Screen Settings Reset PBP Preview Off > > HDMI1 > > HDMI1 ▲/▼: Move / ►: OK ◄: Back Each option is Off, Input, Audio, Swap, Sub Full, and Ratio menus become disabled if there is no signal. Main Wide Displays the video to...
ENGLISH User Settings 27 PBP 1 To view the OSD menu, press the joystick button at the bottom of the video signal input. PBP PBP Easy control Input Function Audio Swap PBP Sub Full Ratio Screen Settings Reset PBP Preview Off > > HDMI1 > > HDMI1 ▲/▼: Move / ►: OK ◄: Back Each option is Off, Input, Audio, Swap, Sub Full, and Ratio menus become disabled if there is no signal. Main Wide Displays the video to...

Owners Manual
Page 28
...), the resolution is the darkest color the monitor can display. Doing so may result in the bottom right corner. 4 To return to the upper menu or set other menu items, move the joystick to ◄ until you exit. NOTE yy Because this is not compromised, even when the images are enlarged, which guarantees a clear image. ENGLISH 28 User Settings Picture 1 To view the OSD menu, press...
...), the resolution is the darkest color the monitor can display. Doing so may result in the bottom right corner. 4 To return to the upper menu or set other menu items, move the joystick to ◄ until you exit. NOTE yy Because this is not compromised, even when the images are enlarged, which guarantees a clear image. ENGLISH 28 User Settings Picture 1 To view the OSD menu, press...
Owners Manual
Page 30
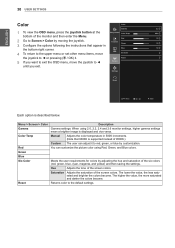
... Easy control Color Temp Function Red Green PBP Blue Six Color Screen Reset Settings Reset 2.2 > 6500 > 50 > 50 > 50 > > > ▲/▼: Move / ►: OK ◄: Back Each option is displayed and vice versa. Manual Adjusts the color temperature in the bottom right corner. 4 To return to the upper menu or set other menu items, move the joystick to the default settings. Menu > Screen > Color Gamma Color Temp Red Green Blue Six Color Reset Description Gamma settings: When using Red, Green, and Blue colors. Saturation Adjusts...
... Easy control Color Temp Function Red Green PBP Blue Six Color Screen Reset Settings Reset 2.2 > 6500 > 50 > 50 > 50 > > > ▲/▼: Move / ►: OK ◄: Back Each option is displayed and vice versa. Manual Adjusts the color temperature in the bottom right corner. 4 To return to the upper menu or set other menu items, move the joystick to the default settings. Menu > Screen > Color Gamma Color Temp Red Green Blue Six Color Reset Description Gamma settings: When using Red, Green, and Blue colors. Saturation Adjusts...
Owners Manual
Page 31
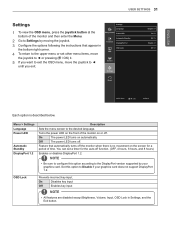
... version supported by moving the joystick. 3 Configure the options following the instructions that automatically turns off function. (OFF, 4 hours, 6 hours, and 8 hours) Enables or disables DisplayPort 1.2. On Disables key input Off Enables key input NOTE yy All features are disabled except Brightness, Volume, Input, OSD Lock in the bottom right corner. 4 To return to the desired language. Settings Language Easy control Power LED Function Automatic Standby DisplayPort 1.2 PBP OSD Lock Screen Settings Reset English > On...
... version supported by moving the joystick. 3 Configure the options following the instructions that automatically turns off function. (OFF, 4 hours, 6 hours, and 8 hours) Enables or disables DisplayPort 1.2. On Disables key input Off Enables key input NOTE yy All features are disabled except Brightness, Volume, Input, OSD Lock in the bottom right corner. 4 To return to the desired language. Settings Language Easy control Power LED Function Automatic Standby DisplayPort 1.2 PBP OSD Lock Screen Settings Reset English > On...

Owners Manual
Page 33
... the connected input is turned off? Go to Menu > Settings and set the appropriate frequency. NOTE yy Vertical Frequency: In order to set OSD Lock to 1080P or the recommended resolution. Is the monitor's power cord plugged in the retention of times the screen is turned on and the power LED displaying white? Is the OUT OF RANGE message being displayed? yy This occurs when signals transferred from the PC (graphics card) are out of the horizontal or vertical frequency range...
... the connected input is turned off? Go to Menu > Settings and set the appropriate frequency. NOTE yy Vertical Frequency: In order to set OSD Lock to 1080P or the recommended resolution. Is the monitor's power cord plugged in the retention of times the screen is turned on and the power LED displaying white? Is the OUT OF RANGE message being displayed? yy This occurs when signals transferred from the PC (graphics card) are out of the horizontal or vertical frequency range...
Owners Manual
Page 34
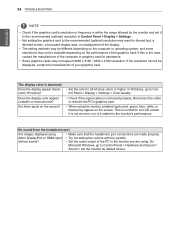
... Troubleshooting NOTE yy Check if the graphics card's resolution or frequency is within the range allowed by the monitor and set it related to Control Panel > Hardware and Sound > Sound > set the monitor as default device. In Windows, go to the monitor's performance. yy Make sure that the headphone port connections are using. No sound from the headphone port. Reconnect the cable or reinsert the PC's graphics card. yy Set the color to the recommended (optimal) resolution may not support...
... Troubleshooting NOTE yy Check if the graphics card's resolution or frequency is within the range allowed by the monitor and set it related to Control Panel > Hardware and Sound > Sound > set the monitor as default device. In Windows, go to the monitor's performance. yy Make sure that the headphone port connections are using. No sound from the headphone port. Reconnect the cable or reinsert the PC's graphics card. yy Set the color to the recommended (optimal) resolution may not support...
Owners Manual
Page 38
... Sylvan Ave. This device can be used in all regions. Read the owner's manual (CD) carefully and keep it at hand. Englewood Cliffs NJ 07632 U.S.A TEL: 201-266-2534 This device meets the EMC requirements for home appliances (Class B) and is a set of Conformity Trade Name: LG Model: 31MU97 Responsible Party: LG Electronics Inc. Please note that this product...
... Sylvan Ave. This device can be used in all regions. Read the owner's manual (CD) carefully and keep it at hand. Englewood Cliffs NJ 07632 U.S.A TEL: 201-266-2534 This device meets the EMC requirements for home appliances (Class B) and is a set of Conformity Trade Name: LG Model: 31MU97 Responsible Party: LG Electronics Inc. Please note that this product...


